


More on Productivity

Maria Stepanova
3 years ago
How Elon Musk Picks Things Up Quicker Than Anyone Else
Adopt Elon Musk's learning strategy to succeed.
Medium writers rank first and second when you Google “Elon Musk's learning approach”.
My article idea seems unoriginal. Lol
Musk is brilliant.
No doubt here.
His name connotes success and intelligence.
He knows rocket science, engineering, AI, and solar power.
Musk is a Unicorn, but his skills aren't special.
How does he manage it?
Elon Musk has two learning rules that anyone may use.
You can apply these rules and become anyone you want.
You can become a rocket scientist or a surgeon. If you want, of course.
The learning process is key.
Make sure you are creating a Tree of Knowledge according to Rule #1.
Musk told Reddit how he learns:
“It is important to view knowledge as sort of a semantic tree — make sure you understand the fundamental principles, i.e. the trunk and big branches, before you get into the leaves/details or there is nothing for them to hang onto.”
Musk understands the essential ideas and mental models of each of his business sectors.
He starts with the tree's trunk, making sure he learns the basics before going on to branches and leaves.
We often act otherwise. We memorize small details without understanding how they relate to the whole. Our minds are stuffed with useless data.
Cramming isn't learning.
Start with the basics to learn faster. Before diving into minutiae, grasp the big picture.

Rule #2: You can't connect what you can't remember.
Elon Musk transformed industries this way. As his expertise grew, he connected branches and leaves from different trees.
Musk read two books a day as a child. He didn't specialize like most people. He gained from his multidisciplinary education. It helped him stand out and develop billion-dollar firms.
He gained skills in several domains and began connecting them. World-class performances resulted.
Most of us never learn the basics and only collect knowledge. We never really comprehend information, thus it's hard to apply it.
Learn the basics initially to maximize your chances of success. Then start learning.
Learn across fields and connect them.
This method enabled Elon Musk to enter and revolutionize a century-old industry.

wordsmithwriter
3 years ago
2023 Will Be the Year of Evernote and Craft Notetaking Apps.
Note-taking is a vital skill. But it's mostly learned.
Recently, innovative note-taking apps have flooded the market.
In the next few years, Evernote and Craft will be important digital note-taking companies.
Evernote is a 2008 note-taking program. It can capture ideas, track tasks, and organize information on numerous platforms.
It's one of the only note-taking app that lets users input text, audio, photos, and videos. It's great for collecting research notes, brainstorming, and remaining organized.
Craft is a popular note-taking app.
Craft is a more concentrated note-taking application than Evernote. It organizes notes into subjects, tags, and relationships, making it ideal for technical or research notes.
Craft's search engine makes it easy to find what you need.
Both Evernote and Craft are likely to be the major players in digital note-taking in the years to come.
Their concentration on gathering and organizing information lets users generate notes quickly and simply. Multimedia elements and a strong search engine make them the note-taking apps of the future.
Evernote and Craft are great note-taking tools for staying organized and tracking ideas and projects.
With their focus on acquiring and organizing information, they'll dominate digital note-taking in 2023.
Pros
Concentrate on gathering and compiling information
special features including a strong search engine and multimedia components
Possibility of subject, tag, and relationship structuring
enables users to incorporate multimedia elements
Excellent tool for maintaining organization, arranging research notes, and brainstorming
Cons
Software may be difficult for folks who are not tech-savvy to utilize.
Limited assistance for hardware running an outdated operating system
Subscriptions could be pricey.
Data loss risk because of security issues
Evernote and Craft both have downsides.
The risk of data loss as a result of security flaws and software defects comes first.
Additionally, their subscription fees could be high, and they might restrict support for hardware that isn't running the newest operating systems.
Finally, folks who need to be tech-savvy may find the software difficult.
Evernote versus. Productivity Titans Evernote will make Notion more useful. medium.com

Deon Ashleigh
3 years ago
You can dominate your daily productivity with these 9 little-known Google Calendar tips.
Calendars are great unpaid employees.
After using Notion to organize my next three months' goals, my days were a mess.
I grew very chaotic afterward. I was overwhelmed, unsure of what to do, and wasting time attempting to plan the day after it had started.
Imagine if our skeletons were on the outside. Doesn’t work.
The goals were too big; I needed to break them into smaller chunks. But how?
Enters Google Calendar
RescueTime’s recommendations took me seven hours to make a daily planner. This epic narrative begins with a sheet of paper and concludes with a daily calendar that helps me focus and achieve more goals. Ain’t nobody got time for “what’s next?” all day.
Onward!
Return to the Paleolithic Era
Plan in writing.
Not on the list, but it helped me plan my day. Physical writing boosts creativity and recall.
Find My Heart
i.e. prioritize
RescueTime suggested I prioritize before planning. Personal and business goals were proposed.
My top priorities are to exercise, eat healthily, spend time in nature, and avoid stress.
Priorities include writing and publishing Medium articles, conducting more freelance editing and Medium outreach, and writing/editing sci-fi books.
These eight things will help me feel accomplished every day.
Make a baby calendar.
Create daily calendar templates.
Make family, pleasure, etc. calendars.
Google Calendar instructions:
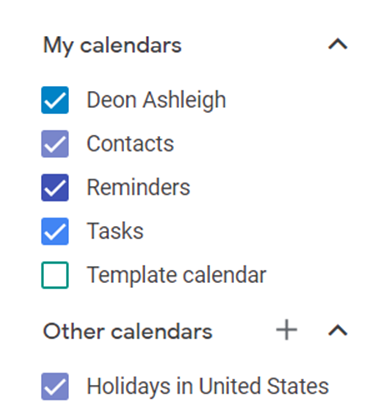
Other calendars
Press the “+” button
Create a new calendar
Create recurring events for each day
My calendar, without the template:
Empty, so I can fill it with vital tasks.
With the template:
My daily skeleton corresponds with my priorities. I've been overwhelmed for years because I lack daily, weekly, monthly, and yearly structure.
Google Calendars helps me reach my goals and focus my energy.
Get your colored pencils ready
Time-block color-coding.
Color labeling lets me quickly see what's happening. Maybe you are too.
Google Calendar instructions:
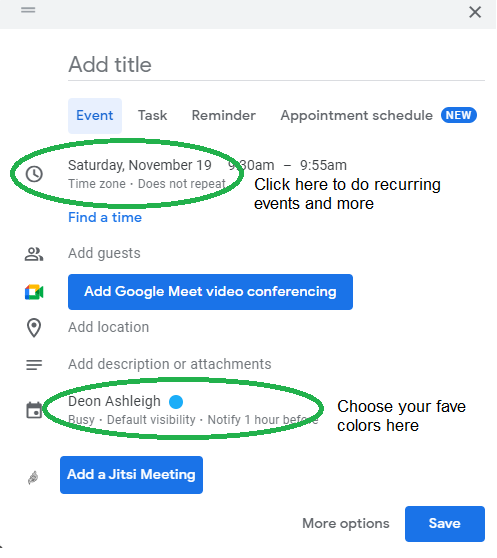
Determine which colors correspond to each time block.
When establishing new events, select a color.
Save
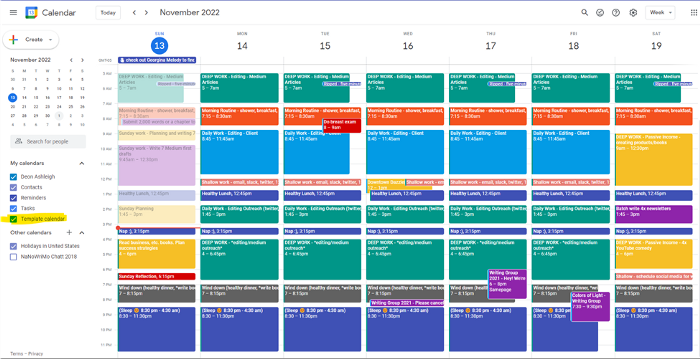
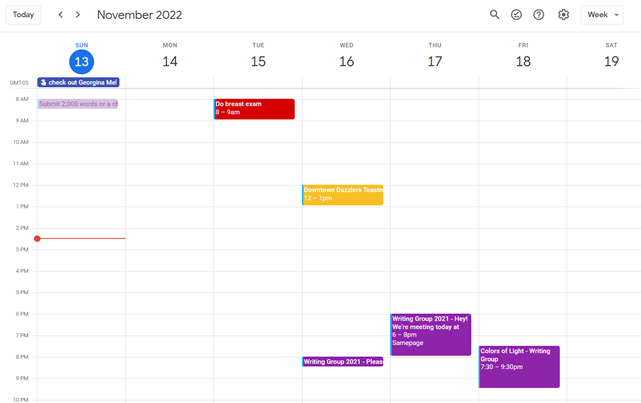
My calendar is color-coded as follows:
Yellow — passive income or other future-related activities
Red — important activities, like my monthly breast exam
Flamingo — shallow work, like emails, Twitter, etc.
Blue — all my favorite activities, like walking, watching comedy, napping, and sleeping. Oh, and eating.
Green — money-related events required for this adulting thing
Purple — writing-related stuff
Associating a time block with a color helps me stay focused. Less distractions mean faster work.
Open My Email
aka receive a daily email from Google Calendar.
Google Calendar sends a daily email feed of your calendars. I sent myself the template calendar in this email.
Google Calendar instructions:
Access settings
Select the calendar that you want to send (left side)
Go down the page to see more alerts
Under the daily agenda area, click Email.

Get in Touch With Your Red Bull Wings — Naturally
aka audit your energy levels.
My daily planner has arrows. These indicate how much energy each activity requires or how much I have.
Rightward arrow denotes medium energy.
I do my Medium and professional editing in the morning because it's energy-intensive.
Niharikaa Sodhi recommends morning Medium editing.
I’m a morning person. As long as I go to bed at a reasonable time, 5 a.m. is super wild GO-TIME. It’s like the world was just born, and I marvel at its wonderfulness.
Freelance editing lets me do what I want. An afternoon snooze will help me finish on time.
Ditch Schedule View
aka focus on the weekly view.
RescueTime advocated utilizing the weekly view of Google Calendar, so I switched.
When you launch the phone app or desktop calendar, a red line shows where you are in the day.
I'll follow the red line's instructions. My digital supervisor is easy to follow.
In the image above, it's almost 3 p.m., therefore the red line implies it's time to snooze.
I won't forget this block ;).
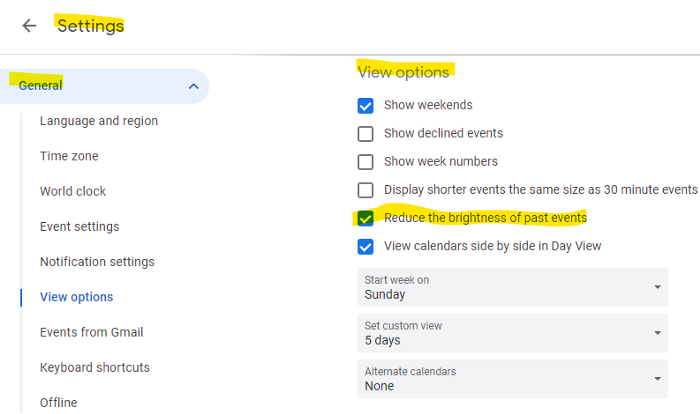
Reduce the Lighting
aka dim previous days.
This is another Google Calendar feature I didn't know about. Once the allotted time passes, the time block dims. This keeps me present.
Google Calendar instructions:
Access settings
remaining general
To view choices, click.
Check Diminish the glare of the past.
Bonus
Two additional RescueTimes hacks:
Maintain a space between tasks
I left 15 minutes between each time block to transition smoothly. This relates to my goal of less stress. If I set strict start and end times, I'll be stressed.
With a buffer, I can breathe, stroll around, and start the following time block fresh.
Find a time is related to the buffer.
This option allows you conclude small meetings five minutes early and longer ones ten. Before the next meeting, relax or go wild.
Decide on a backup day.
This productivity technique is amazing.
Spend this excess day catching up on work. It helps reduce tension and clutter.
That's all I can say about Google Calendar's functionality.
You might also like

Tom Smykowski
3 years ago
CSS Scroll-linked Animations Will Transform The Web's User Experience
We may never tap again in ten years.
I discussed styling websites and web apps on smartwatches in my earlier article on W3C standardization.
The Parallax Chronicles
Section containing examples and flying objects
Another intriguing Working Draft I found applies to all devices, including smartphones.
These pages may have something intriguing. Take your time. Return after scrolling:
What connects these three pages?
JustinWick at English Wikipedia • CC-BY-SA-3.0
Scroll-linked animation, commonly called parallax, is the effect.
WordPress theme developers' quick setup and low-code tools made the effect popular around 2014.
Parallax: Why Designers Love It
The chapter that your designer shouldn't read
Online video playback required searching, scrolling, and clicking ten years ago. Scroll and click four years ago.
Some video sites let you swipe to autoplay the next video from an endless list.
UI designers create scrollable pages and apps to accommodate the behavioral change.
Web interactivity used to be mouse-based. Clicking a button opened a help drawer, and hovering animated it.
However, a large page with more material requires fewer buttons and less interactiveness.
Designers choose scroll-based effects. Design and frontend developers must fight the trend but prepare for the worst.
How to Create Parallax
The component that you might want to show the designer
JavaScript-based effects track page scrolling and apply animations.
Javascript libraries like lax.js simplify it.
Using it needs a lot of human mathematical and physical computations.
Your asset library must also be prepared to display your website on a laptop, television, smartphone, tablet, foldable smartphone, and possibly even a microwave.
Overall, scroll-based animations can be solved better.
CSS Scroll-linked Animations
CSS makes sense since it's presentational. A Working Draft has been laying the groundwork for the next generation of interactiveness.
The new CSS property scroll-timeline powers the feature, which MDN describes well.
Before testing it, you should realize it is poorly supported:
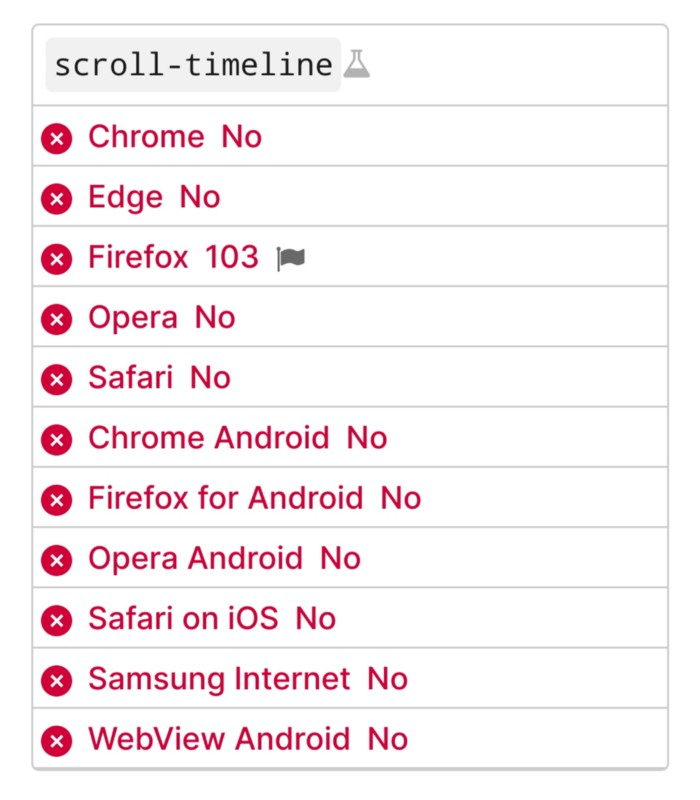
Firefox 103 currently supports it.
There is also a polyfill, with some demo examples to explore.
Summary
Web design was a protracted process. Started with pages with static backdrop images and scrollable text. Artists and designers may use the scroll-based animation CSS API to completely revamp our web experience.
It's a promising frontier. This post may attract a future scrollable web designer.
Ps. I have created flashcards for HTML, Javascript etc. Check them out!

Yogita Khatri
3 years ago
Moonbirds NFT sells for $1 million in first week
On Saturday, Moonbird #2642, one of the collection's rarest NFTs, sold for a record 350 ETH (over $1 million) on OpenSea.
The Sandbox, a blockchain-based gaming company based in Hong Kong, bought the piece. The seller, "oscuranft" on OpenSea, made around $600,000 after buying the NFT for 100 ETH a week ago.
Owl avatars
Moonbirds is a 10,000 owl NFT collection. It is one of the quickest collections to achieve bluechip status. Proof, a media startup founded by renowned VC Kevin Rose, launched Moonbirds on April 16.
Rose is currently a partner at True Ventures, a technology-focused VC firm. He was a Google Ventures general partner and has 1.5 million Twitter followers.
Rose has an NFT podcast on Proof. It follows Proof Collective, a group of 1,000 NFT collectors and artists, including Beeple, who hold a Proof Collective NFT and receive special benefits.
These include early access to the Proof podcast and in-person events.
According to the Moonbirds website, they are "the official Proof PFP" (picture for proof).
Moonbirds NFTs sold nearly $360 million in just over a week, according to The Block Research and Dune Analytics. Its top ten sales range from $397,000 to $1 million.
In the current market, Moonbirds are worth 33.3 ETH. Each NFT is 2.5 ETH. Holders have gained over 12 times in just over a week.
Why was it so popular?
The Block Research's NFT analyst, Thomas Bialek, attributes Moonbirds' rapid rise to Rose's backing, the success of his previous Proof Collective project, and collectors' preference for proven NFT projects.
Proof Collective NFT holders have made huge gains. These NFTs were sold in a Dutch auction last December for 5 ETH each. According to OpenSea, the current floor price is 109 ETH.
According to The Block Research, citing Dune Analytics, Proof Collective NFTs have sold over $39 million to date.
Rose has bigger plans for Moonbirds. Moonbirds is introducing "nesting," a non-custodial way for holders to stake NFTs and earn rewards.
Holders of NFTs can earn different levels of status based on how long they keep their NFTs locked up.
"As you achieve different nest status levels, we can offer you different benefits," he said. "We'll have in-person meetups and events, as well as some crazy airdrops planned."
Rose went on to say that Proof is just the start of "a multi-decade journey to build a new media company."

Architectural Digest
3 years ago
Take a look at The One, a Los Angeles estate with a whopping 105,000 square feet of living area.
The interiors of the 105,000-square-foot property, which sits on a five-acre parcel in the wealthy Los Angeles suburb of Bel Air and is suitably titled The One, have been a well guarded secret. We got an intimate look inside this world-record-breaking property, as well as the creative and aesthetic geniuses behind it.
The estate appears to float above the city, surrounded on three sides by a moat and a 400-foot-long running track. Completed over eight years—and requiring 600 workers to build—the home was designed by architect Paul McClean and interior designer Kathryn Rotondi, who were enlisted by owner and developer Nile Niami to help it live up to its standard.
"This endeavor seemed both exhilarating and daunting," McClean says. However, the home's remarkable location and McClean's long-standing relationship with Niami persuaded him to "build something unique and extraordinary" rather than just take on the job.
And McClean has more than delivered.
The home's main entrance leads to a variety of meeting places with magnificent 360-degree views of the Pacific Ocean, downtown Los Angeles, and the San Gabriel Mountains, thanks to its 26-foot-high ceilings. There is water at the entrance area, as well as a sculpture and a bridge. "We often employ water in our design approach because it provides a sensory change that helps you acclimatize to your environment," McClean explains.
Niami wanted a neutral palette that would enable the environment and vistas to shine, so she used black, white, and gray throughout the house.
McClean has combined the home's inside with outside "to create that quintessential L.A. lifestyle but on a larger scale," he says, drawing influence from the local environment and history of Los Angeles modernism. "We separated the entertaining spaces from the living portions to make the house feel more livable. The former are on the lowest level, which serves as a plinth for the rest of the house and minimizes its apparent mass."
The home's statistics, in addition to its eye-catching style, are equally impressive. There are 42 bathrooms, 21 bedrooms, a 5,500-square-foot master suite, a 30-car garage gallery with two car-display turntables, a four-lane bowling alley, a spa level, a 30-seat movie theater, a "philanthropy wing (with a capacity of 200) for charity galas, a 10,000-square-foot sky deck, and five swimming pools.
Rotondi, the creator of KFR Design, collaborated with Niami on the interior design to create different spaces that flow into one another despite the house's grandeur. "I was especially driven to 'wow factor' components in the hospitality business," Rotondi says, citing top luxury hotel brands such as Aman, Bulgari, and Baccarat as sources of inspiration. Meanwhile, the home's color scheme, soft textures, and lighting are a nod to Niami and McClean's favorite Tom Ford boutique on Rodeo Drive.
The house boasts an extraordinary collection of art, including a butterfly work by Stephen Wilson on the lower level and a Niclas Castello bespoke panel in black and silver in the office, thanks to a cooperation between Creative Art Partners and Art Angels. There is also a sizable collection of bespoke furniture pieces from byShowroom.
A house of this size will never be erected again in Los Angeles, thanks to recently enacted city rules, so The One will truly be one of a kind. "For all of us, this project has been such a long and instructive trip," McClean says. "It was exciting to develop and approached with excitement, but I don't think any of us knew how much effort and time it would take to finish the project."