


More on Web3 & Crypto

CNET
4 years ago
How a $300K Bored Ape Yacht Club NFT was accidentally sold for $3K
The Bored Ape Yacht Club is one of the most prestigious NFT collections in the world. A collection of 10,000 NFTs, each depicting an ape with different traits and visual attributes, Jimmy Fallon, Steph Curry and Post Malone are among their star-studded owners. Right now the price of entry is 52 ether, or $210,000.
Which is why it's so painful to see that someone accidentally sold their Bored Ape NFT for $3,066.
Unusual trades are often a sign of funny business, as in the case of the person who spent $530 million to buy an NFT from themselves. In Saturday's case, the cause was a simple, devastating "fat-finger error." That's when people make a trade online for the wrong thing, or for the wrong amount. Here the owner, real name Max or username maxnaut, meant to list his Bored Ape for 75 ether, or around $300,000. Instead he accidentally listed it for 0.75. One hundredth the intended price.
It was bought instantaneously. The buyer paid an extra $34,000 to speed up the transaction, ensuring no one could snap it up before them. The Bored Ape was then promptly listed for $248,000. The transaction appears to have been done by a bot, which can be coded to immediately buy NFTs listed below a certain price on behalf of their owners in order to take advantage of these exact situations.
"How'd it happen? A lapse of concentration I guess," Max told me. "I list a lot of items every day and just wasn't paying attention properly. I instantly saw the error as my finger clicked the mouse but a bot sent a transaction with over 8 eth [$34,000] of gas fees so it was instantly sniped before I could click cancel, and just like that, $250k was gone."
"And here within the beauty of the Blockchain you can see that it is both honest and unforgiving," he added.
Fat finger trades happen sporadically in traditional finance -- like the Japanese trader who almost bought 57% of Toyota's stock in 2014 -- but most financial institutions will stop those transactions if alerted quickly enough. Since cryptocurrency and NFTs are designed to be decentralized, you essentially have to rely on the goodwill of the buyer to reverse the transaction.
Fat finger errors in cryptocurrency trades have made many a headline over the past few years. Back in 2019, the company behind Tether, a cryptocurrency pegged to the US dollar, nearly doubled its own coin supply when it accidentally created $5 billion-worth of new coins. In March, BlockFi meant to send 700 Gemini Dollars to a set of customers, worth roughly $1 each, but mistakenly sent out millions of dollars worth of bitcoin instead. Last month a company erroneously paid a $24 million fee on a $100,000 transaction.
Similar incidents are increasingly being seen in NFTs, now that many collections have accumulated in market value over the past year. Last month someone tried selling a CryptoPunk NFT for $19 million, but accidentally listed it for $19,000 instead. Back in August, someone fat finger listed their Bored Ape for $26,000, an error that someone else immediately capitalized on. The original owner offered $50,000 to the buyer to return the Bored Ape -- but instead the opportunistic buyer sold it for the then-market price of $150,000.
"The industry is so new, bad things are going to happen whether it's your fault or the tech," Max said. "Once you no longer have control of the outcome, forget and move on."
The Bored Ape Yacht Club launched back in April 2021, with 10,000 NFTs being sold for 0.08 ether each -- about $190 at the time. While NFTs are often associated with individual digital art pieces, collections like the Bored Ape Yacht Club, which allow owners to flaunt their NFTs by using them as profile pictures on social media, are becoming increasingly prevalent. The Bored Ape Yacht Club has since become the second biggest NFT collection in the world, second only to CryptoPunks, which launched in 2017 and is considered the "original" NFT collection.

Marco Manoppo
3 years ago
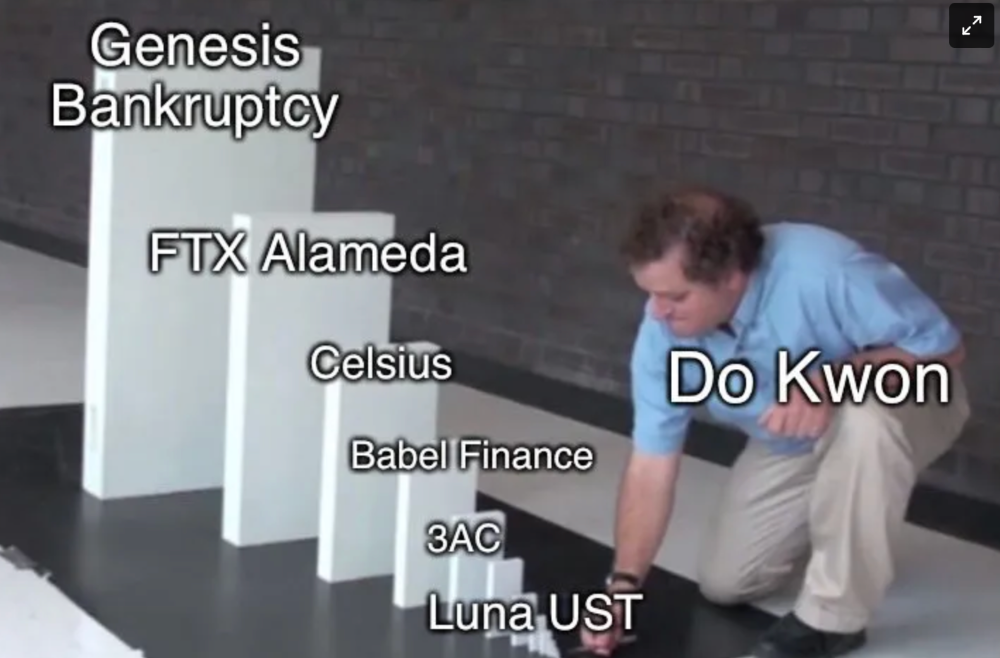
Failures of DCG and Genesis
Don't sleep with your own sister.
70% of lottery winners go broke within five years. You've heard the last one. People who got rich quickly without setbacks and hard work often lose it all. My father said, "Easy money is easily lost," and a wealthy friend who owns a family office said, "The first generation makes it, the second generation spends it, and the third generation blows it."
This is evident. Corrupt politicians in developing countries live lavishly, buying their third wives' fifth Hermès bag and celebrating New Year's at The Brando Resort. A successful businessperson from humble beginnings is more conservative with money. More so if they're atom-based, not bit-based. They value money.
Crypto can "feel" easy. I have nothing against capital market investing. The global financial system is shady, but that's another topic. The problem started when those who took advantage of easy money started affecting other businesses. VCs did minimal due diligence on FTX because they needed deal flow and returns for their LPs. Lenders did minimum diligence and underwrote ludicrous loans to 3AC because they needed revenue.
Alameda (hence FTX) and 3AC made "easy money" Genesis and DCG aren't. Their businesses are more conventional, but they underestimated how "easy money" can hurt them.
Genesis has been the victim of easy money hubris and insolvency, losing $1 billion+ to 3AC and $200M to FTX. We discuss the implications for the broader crypto market.
Here are the quick takeaways:
Genesis is one of the largest and most notable crypto lenders and prime brokerage firms.
DCG and Genesis have done related party transactions, which can be done right but is a bad practice.
Genesis owes DCG $1.5 billion+.
If DCG unwinds Grayscale's GBTC, $9-10 billion in BTC will hit the market.
DCG will survive Genesis.
What happened?
Let's recap the FTX shenanigan from two weeks ago. Shenanigans! Delphi's tweet sums up the craziness. Genesis has $175M in FTX.
Cred's timeline: I hate bad crisis management. Yes, admitting their balance sheet hole right away might've sparked more panic, and there's no easy way to convey your trouble, but no one ever learns.
By November 23, rumors circulated online that the problem could affect Genesis' parent company, DCG. To address this, Barry Silbert, Founder, and CEO of DCG released a statement to shareholders.
A few things are confirmed thanks to this statement.
DCG owes $1.5 billion+ to Genesis.
$500M is due in 6 months, and the rest is due in 2032 (yes, that’s not a typo).
Unless Barry raises new cash, his last-ditch efforts to repay the money will likely push the crypto market lower.
Half a year of GBTC fees is approximately $100M.
They can pay $500M with GBTC.
With profits, sell another port.
Genesis has hired a restructuring adviser, indicating it is in trouble.
Rehypothecation
Every crypto problem in the past year seems to be rehypothecation between related parties, excessive leverage, hubris, and the removal of the money printer. The Bankless guys provided a chart showing 2021 crypto yield.
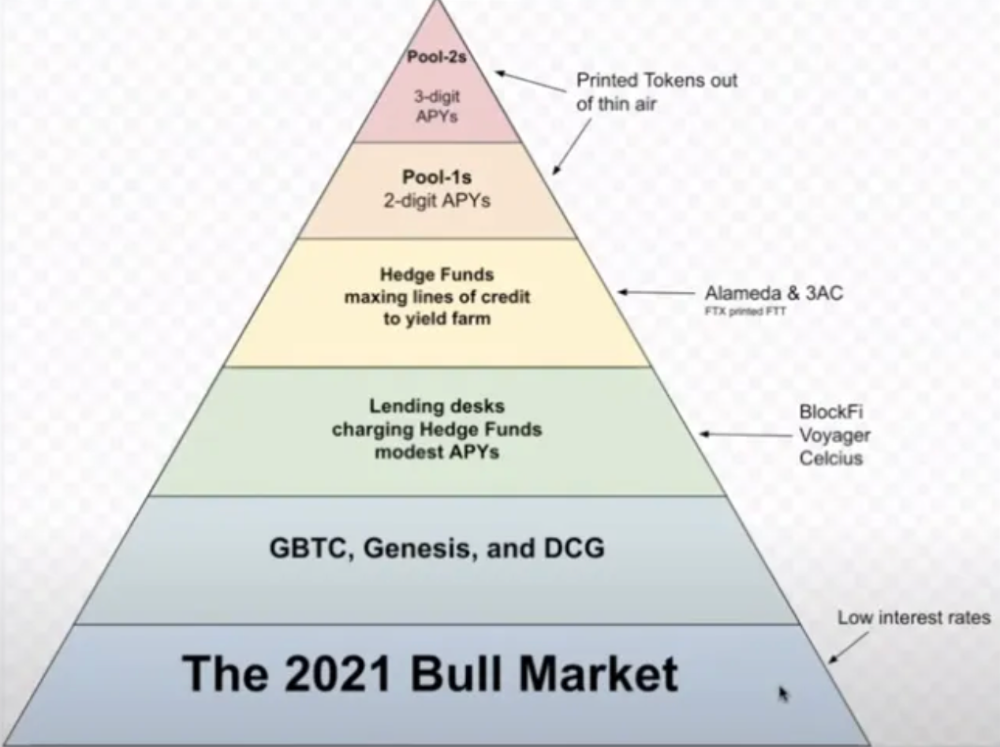
In June 2022, @DataFinnovation published a great investigation about 3AC and DCG. Here's a summary.
3AC borrowed BTC from Genesis and pledged it to create Grayscale's GBTC shares.
3AC uses GBTC to borrow more money from Genesis.
This lets 3AC leverage their capital.
3AC's strategy made sense because GBTC had a premium, creating "free money."
GBTC's discount and LUNA's implosion caused problems.
3AC lost its loan money in LUNA.
Margin called on 3ACs' GBTC collateral.
DCG bought GBTC to avoid a systemic collapse and a larger discount.
Genesis lost too much money because 3AC can't pay back its loan. DCG "saved" Genesis, but the FTX collapse hurt Genesis further, forcing DCG and Genesis to seek external funding.
bruh…
Learning Experience
Co-borrowing. Unnecessary rehypothecation. Extra space. Governance disaster. Greed, hubris. Crypto has repeatedly shown it can recreate traditional financial system disasters quickly. Working in crypto is one of the best ways to learn crazy financial tricks people will do for a quick buck much faster than if you dabble in traditional finance.
Moving Forward
I think the crypto industry needs to consider its future. This is especially true for professionals. I'm not trying to scare you. In 2018 and 2020, I had doubts. No doubts now. Detailing the crypto industry's potential outcomes helped me gain certainty and confidence in its future. This includes VCs' benefits and talking points during the bull market, as well as what would happen if government regulations became hostile, etc. Even if that happens, I'm certain. This is permanent. I may write a post about that soon.
Sincerely,
M.

Franz Schrepf
3 years ago
What I Wish I'd Known About Web3 Before Building
Cryptoland rollercoaster

I've lost money in crypto.
Unimportant.
The real issue: I didn’t understand how.
I'm surrounded with winners. To learn more, I created my own NFTs, currency, and DAO.
Web3 is a hilltop castle. Everything is valuable, decentralized, and on-chain.
The castle is Disneyland: beautiful in images, but chaotic with lengthy lines and kids spending too much money on dressed-up animals.
When the throng and businesses are gone, Disneyland still has enchantment.

The Real Story of Web3
NFTs
Scarcity. Scarce NFTs. That's their worth.
Skull. Rare-looking!
Nonsense.
Bored Ape Yacht Club vs. my NFTs?
Marketing.
BAYC is amazing, but not for the reasons people believe. Apecoin and Otherside's art, celebrity following, and innovation? Stunning.
No other endeavor captured the zeitgeist better. Yet how long did you think it took to actually mint the NFTs?
1 hour? Maybe a week for the website?
Minting NFTs is incredibly easy. Kid-friendly. Developers are rare. Think about that next time somebody posts “DevS dO SMt!?”
NFTs will remain popular. These projects are like our Van Goghs and Monets. Still, be wary. It still uses exclusivity and wash selling like the OG art market.
Not all NFTs are art-related.
Soulbound and anonymous NFTs could offer up new use cases. Property rights, privacy-focused ID, open-source project verification. Everything.
NFTs build online trust through ownership.
We just need to evolve from the apes first.
NFTs' superpower is marketing until then.
Crypto currency
What the hell is a token?
99% of people are clueless.
So I invested in both coins and tokens. Same same. Only that they are not.
Coins have their own blockchain and developer/validator community. It's hard.
Creating a token on top of a blockchain? Five minutes.
Most consumers don’t understand the difference, creating an arbitrage opportunity: pretend you’re a serious project without having developers on your payroll.
Few market sites help. Take a look. See any tokens?
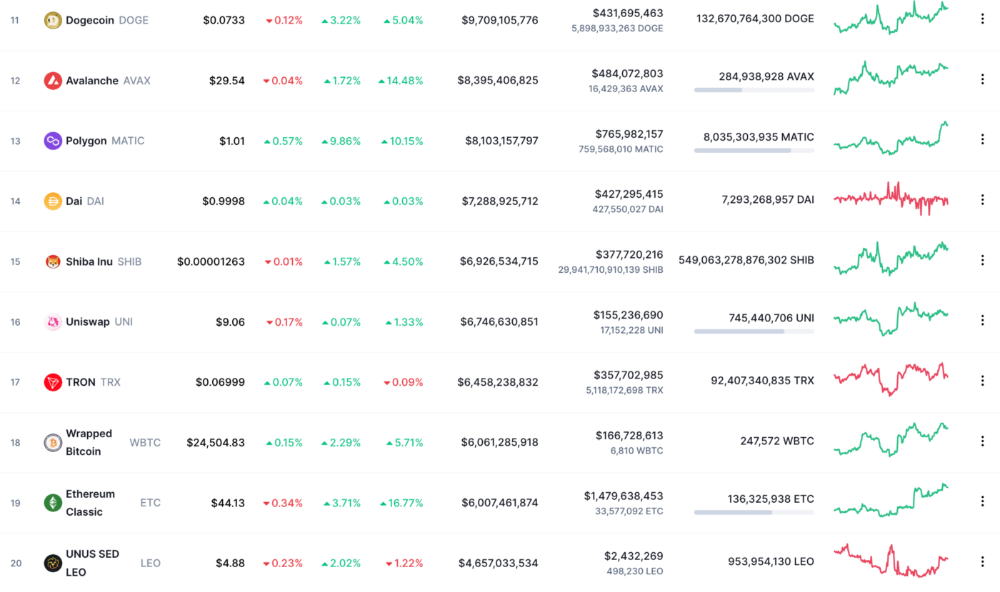
There's a hint one click deeper.

Some tokens are legitimate. Some coins are bad investments.
Tokens are utilized for DAO governance and DApp payments. Still, know who's behind a token. They might be 12 years old.
Coins take time and money. The recent LUNA meltdown indicates that currency investing requires research.
DAOs
Decentralized Autonomous Organizations (DAOs) don't work as you assume.
Yes, members can vote.
A productive organization requires more.
I've observed two types of DAOs.
Total decentralization total dysfunction
Centralized just partially. Community-driven.
A core team executes the DAO's strategy and roadmap in successful DAOs. The community owns part of the organization, votes on decisions, and holds the team accountable.
DAOs are public companies.
Amazing.
A shareholder meeting's logistics are staggering. DAOs may hold anonymous, secure voting quickly. No need for intermediaries like banks to chase up every shareholder.
Successful DAOs aren't totally decentralized. Large-scale voting and collaboration have never been easier.
And that’s all that matters.
Scale, speed.
My Web3 learnings
Disneyland is enchanting. Web3 too.
In a few cycles, NFTs may be used to build trust, not clout. Not speculating with coins. DAOs run organizations, not themselves.
Finally, some final thoughts:
NFTs will be a very helpful tool for building trust online. NFTs are successful now because of excellent marketing.
Tokens are not the same as coins. Look into any project before making a purchase. Make sure it isn't run by three 9-year-olds piled on top of one another in a trench coat, at the very least.
Not entirely decentralized, DAOs. We shall see a future where community ownership becomes the rule rather than the exception once we acknowledge this fact.
Crypto Disneyland is a rollercoaster with loops that make you sick.
Always buckle up.
Have fun!
You might also like

Jared Heyman
3 years ago
The survival and demise of Y Combinator startups
I've written a lot about Y Combinator's success, but as any startup founder or investor knows, many startups fail.
Rebel Fund invests in the top 5-10% of new Y Combinator startups each year, so we focus on identifying and supporting the most promising technology startups in our ecosystem. Given the power law dynamic and asymmetric risk/return profile of venture capital, we worry more about our successes than our failures. Since the latter still counts, this essay will focus on the proportion of YC startups that fail.
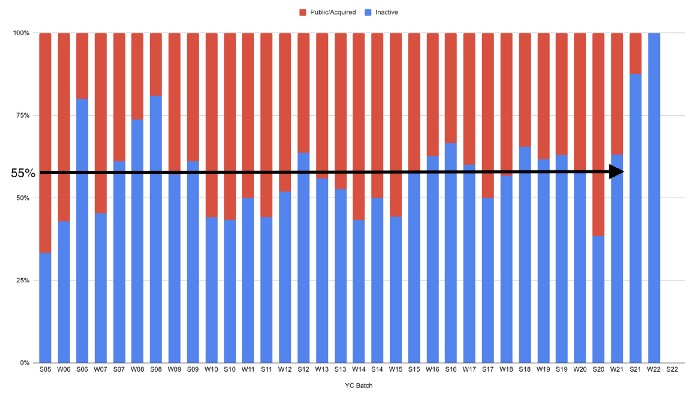
Since YC's launch in 2005, the figure below shows the percentage of active, inactive, and public/acquired YC startups by batch.

As more startups finish, the blue bars (active) decrease significantly. By 12 years, 88% of startups have closed or exited. Only 7% of startups reach resolution each year.
YC startups by status after 12 years:
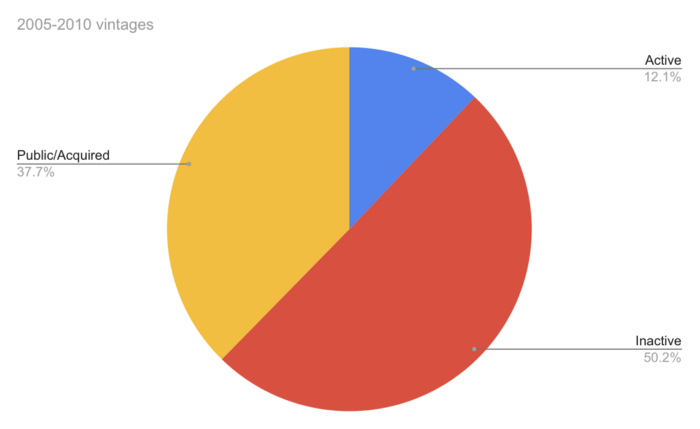
Half the startups have failed, over one-third have exited, and the rest are still operating.
In venture investing, it's said that failed investments show up before successful ones. This is true for YC startups, but only in their early years.
Below, we only present resolved companies from the first chart. Some companies fail soon after establishment, but after a few years, the inactive vs. public/acquired ratio stabilizes around 55:45. After a few years, a YC firm is roughly as likely to quit as fail, which is better than I imagined.
I prepared this post because Rebel investors regularly question me about YC startup failure rates and how long it takes for them to exit or shut down.
Early-stage venture investors can overlook it because 100x investments matter more than 0x investments.
YC founders can ignore it because it shouldn't matter if many of their peers succeed or fail ;)

Web3Lunch
3 years ago
An employee of OpenSea might get a 40-year prison sentence for insider trading using NFTs.

The space had better days. Those greenish spikes...oh wow, haven't felt that in ages. Cryptocurrencies and NFTs have lost popularity. Google agrees. Both are declining.
As seen below, crypto interest spiked in May because of the Luna fall. NFT interest is similar to early October last year.
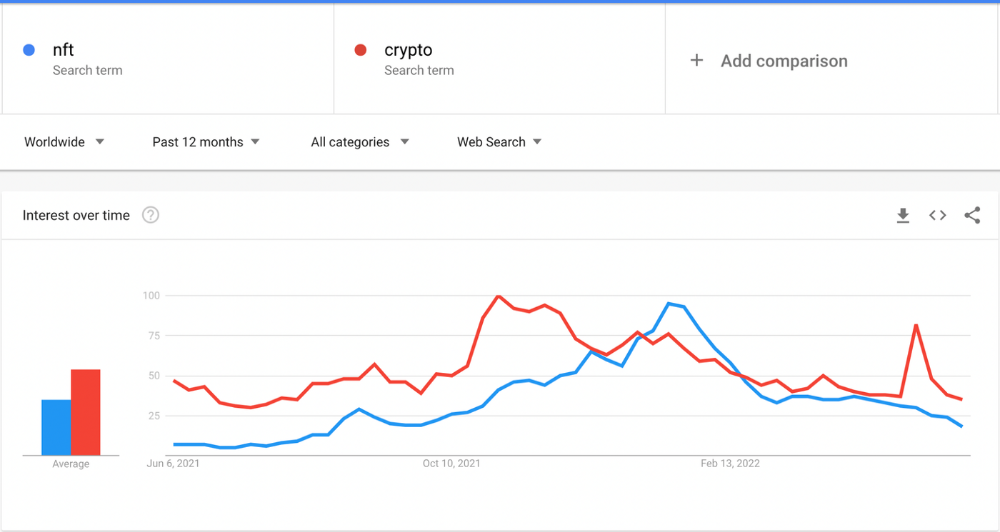
This makes me think NFTs are mostly hype and FOMO. No art or community. I've seen enough initiatives to know that communities stick around if they're profitable. Once it starts falling, they move on to the next project. The space has no long-term investments. Flip everything.
OpenSea trading volume has stayed steady for months. May's volume is 1.8 million ETH ($3.3 billion).

Despite this, I think NFTs and crypto will stick around. In bad markets, builders gain most.
Only 4k developers are active on Ethereum blockchain. It's low. A great chance for the space enthusiasts.
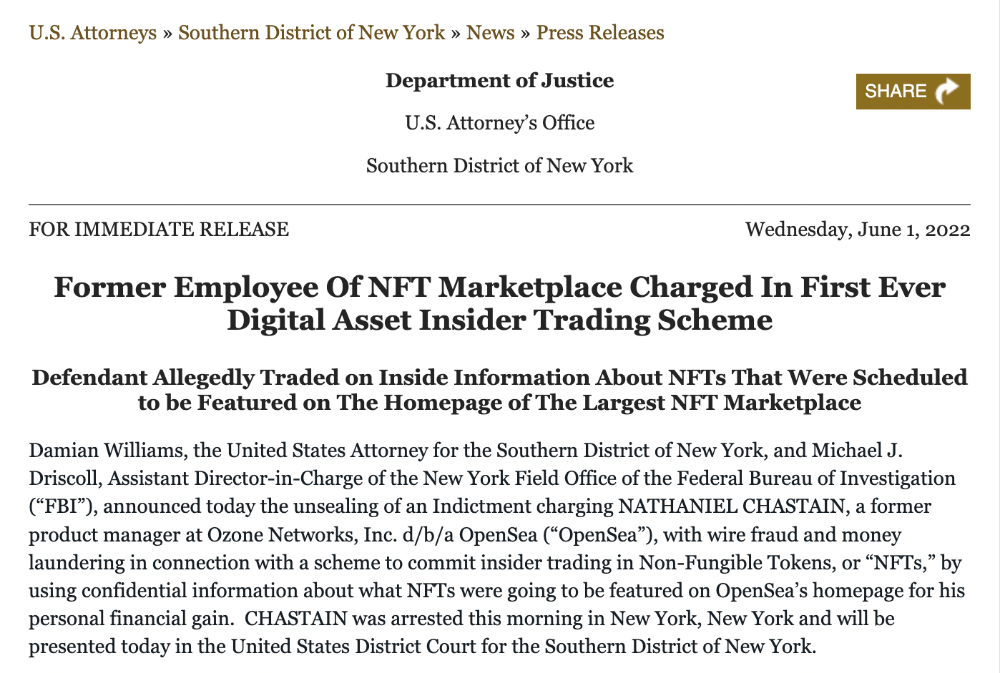
An employee of OpenSea might get a 40-year prison sentence for insider trading using NFTs.
Nathaniel Chastian, an OpenSea employee, traded on insider knowledge. He'll serve 40 years for that.
Here's what happened if you're unfamiliar.
OpenSea is a secondary NFT marketplace. Their homepage featured remarkable drops. Whatever gets featured there, NFT prices will rise 5x.
Chastian was at OpenSea. He chose forthcoming NFTs for OpenSeas' webpage.
Using anonymous digital currency wallets and OpenSea accounts, he would buy NFTs before promoting them on the homepage, showcase them, and then sell them for at least 25 times the price he paid.
From June through September 2021, this happened. Later caught, fired. He's charged with wire fraud and money laundering, each carrying a 20-year maximum penalty.
Although web3 space is all about decentralization, a step like this is welcomed since it restores faith in the area. We hope to see more similar examples soon.
Here's the press release.
Understanding smart contracts
@cantino.eth has a Twitter thread on smart contracts. Must-read. Also, he appears educated about the space, so follow him.


Cory Doctorow
3 years ago
The downfall of the Big Four accounting companies is just one (more) controversy away.
Economic mutual destruction.
Multibillion-dollar corporations never bothered with an independent audit, and they all lied about their balance sheets.
It's easy to forget that the Big Four accounting firms are lousy fraud enablers. Just because they sign off on your books doesn't mean you're not a hoax waiting to erupt.
This is *crazy* Capitalism depends on independent auditors. Rich folks need to know their financial advisers aren't lying. Rich folks usually succeed.
No accounting. EY, KPMG, PWC, and Deloitte make more money consulting firms than signing off on their accounts.
The Big Four sign off on phony books because failing to make friends with unscrupulous corporations may cost them consulting contracts.
The Big Four are the only firms big enough to oversee bankruptcy when they sign off on fraudulent books, as they did for Carillion in 2018. All four profited from Carillion's bankruptcy.
The Big Four are corrupt without any consequences for misconduct. Who can forget when KPMG's top management was fined millions for helping auditors cheat on ethics exams?
Consulting and auditing conflict. Consultants help a firm cover its evil activities, such as tax fraud or wage theft, whereas auditors add clarity to a company's finances. The Big Four make more money from cooking books than from uncooking them, thus they are constantly embroiled in scandals.
If a major scandal breaks, it may bring down the entire sector and substantial parts of the economy. Jim Peterson explains system risk for The Dig.
The Big Four are voluntary private partnerships where accountants invest their time, reputations, and money. If a controversy threatens the business, partners who depart may avoid scandal and financial disaster.
When disaster looms, each partner should bolt for the door, even if a disciplined stay-and-hold posture could weather the storm. This happened to Arthur Andersen during Enron's collapse, and a 2006 EU report recognized the risk to other corporations.
Each partner at a huge firm knows how much dirty laundry they've buried in the company's garden, and they have well-founded suspicions about what other partners have buried, too. When someone digs, everyone runs.
If a firm confronts substantial litigation damages or enforcement penalties, it could trigger the collapse of one of the Big Four. That would be bad news for the firm's clients, who would have trouble finding another big auditor.
Most of the world's auditing capacity is concentrated in four enormous, brittle, opaque, compromised organizations. If one of them goes bankrupt, the other three won't be able to take on its clients.
Peterson: Another collapse would strand many of the world's large public businesses, leaving them unable to obtain audit views for their securities listings and regulatory compliance.
Count Down: The Past, Present, and Uncertain Future of the Big Four Accounting Firms is in its second edition.
https://www.emerald.com/insight/publication/doi/10.1108/9781787147003