


More on Technology

Nikhil Vemu
3 years ago
7 Mac Apps That Are Exorbitantly Priced But Totally Worth It

Wish you more bang for your buck
By ‘Cost a Bomb’ I didn’t mean to exaggerate. It’s an idiom that means ‘To be very expensive’. In fact, no app on the planet costs a bomb lol.
So, to the point.
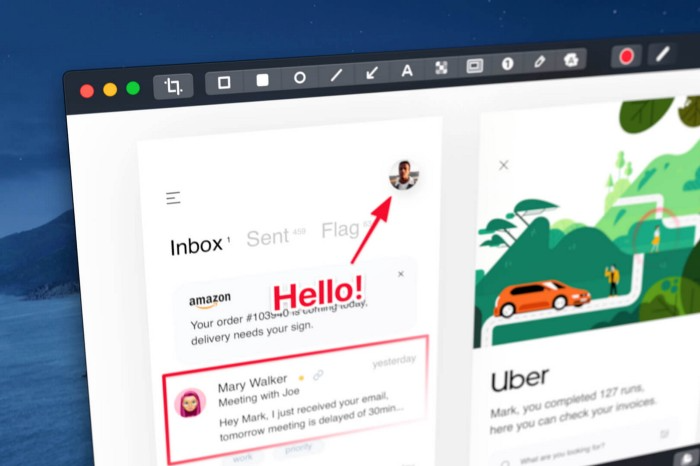
Chronicle
(Freemium. For Pro, $24.99 | Available on Setapp)
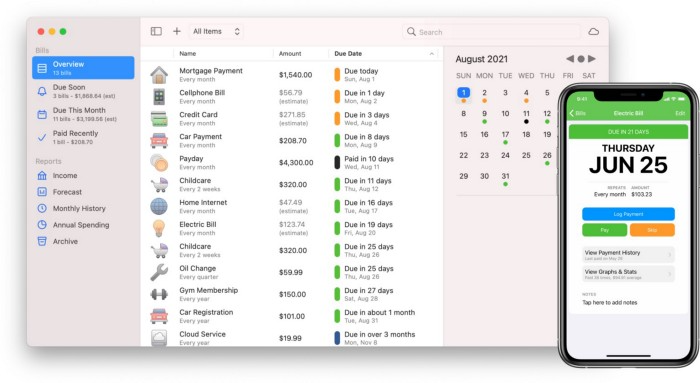
You probably have trouble keeping track of dozens of bills and subscriptions each month.
Try Chronicle.
Easy-to-use app
Add payment due dates and receive reminders,
Save payment documentation,
Analyze your spending by season, year, and month.
Observe expenditure trends and create new budgets.
Best of all, Chronicle features an integrated browser for fast payment and logging.
iOS and macOS sync.
SoundSource
($39 for lifetime)
Background Music, a free macOS program, was featured in #6 of this post last month.
It controls per-app volume, stereo balance, and audio over its max level.
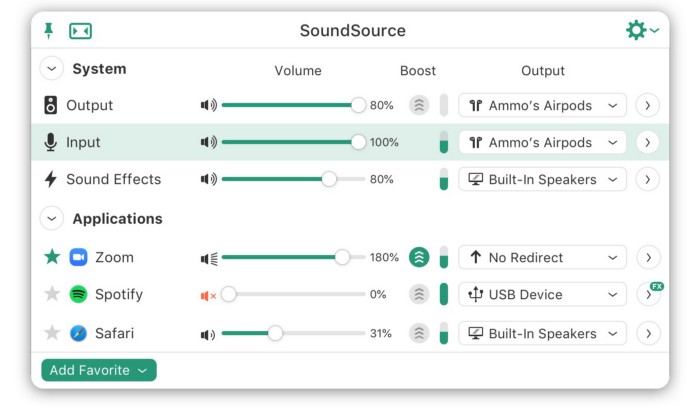
Background Music is fully supported. Additionally,
Connect various speakers to various apps (Wow! ),
change the audio sample rate for each app,
To facilitate access, add a floating SoundSource window.
Use its blocks in Shortcuts app,
On the menu bar, include meters for output/input devices and running programs.
PixelSnap
($39 for lifetime | Available on Setapp)
This software is heaven for UI designers.
It aids you.
quickly calculate screen distances (in pixels) ,
Drag an area around an object to determine its borders,
Measure the distances between the additional guides,
screenshots should be pixel-perfect.
What’s more.
You can
Adapt your tolerance for items with poor contrast and shadows.
Use your Touch Bar to perform important tasks, if you have one.
Mate Translation
($3.99 a month / $29.99 a year | Available on Setapp)
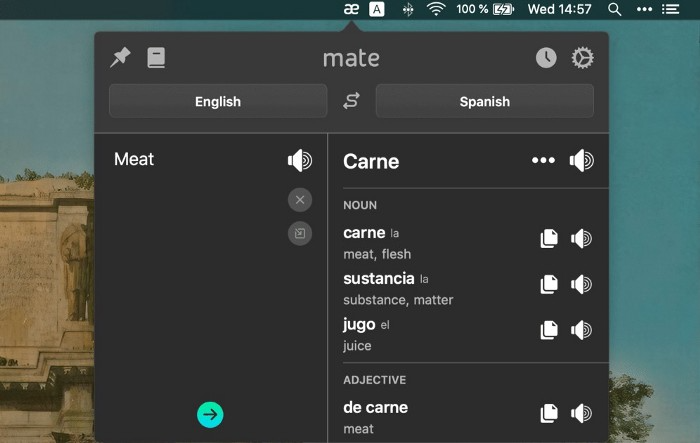
Mate Translate resembles a roided-up version of BarTranslate, which I wrote about in #1 of this piece last month.
If you translate often, utilize Mate Translate on macOS and Safari.
I'm really vocal about it.
It stays on the menu bar, and is accessible with a click or ⌥+shift+T hotkey.
It lets you
Translate in 103 different languages,
To translate text, double-click or right-click on it.
Totally translate websites. Additionally, Netflix subtitles,
Listen to their pronunciation to see how close it is to human.
iPhone and Mac sync Mate-ing history.
Swish
($16 for lifetime | Available on Setapp)
Swish is awesome!
Swipe, squeeze, tap, and hold movements organize chaotic desktop windows. Swish operates with mouse and trackpad.
Some gestures:
• Pinch Once: Close an app
• Pinch Twice: Quit an app
• Swipe down once: Minimise an app
• Pinch Out: Enter fullscreen mode
• Tap, Hold, & Swipe: Arrange apps in grids
 and many more...

After getting acquainted to the movements, your multitasking will improve.
Unite
($24.99 for lifetime | Available on Setapp)
It turns webapps into macOS apps. The end.
Unite's functionality is a million times better.
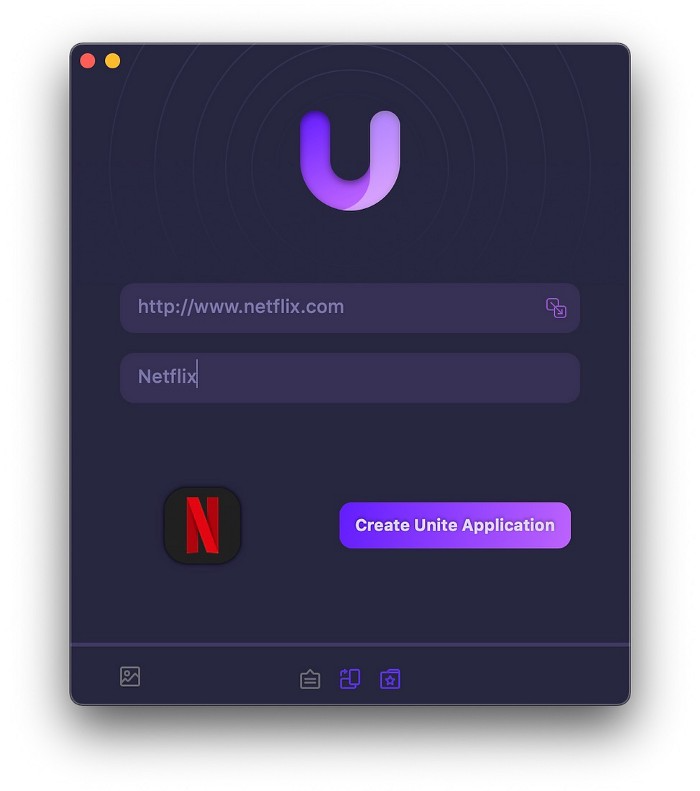
Provide extensive customization (incl. its icon, light and dark modes)
make menu bar applications,
Get badges for web notifications and automatically refresh websites,
Replace any dock icon in the window with it (Wow!) by selecting that portion of the window.

Use PiP (Picture-in-Picture) on video sites that support it.
Delete advertising,
Throughout macOS, use floating windows
and many more…
I feel $24.99 one-off for this tool is a great deal, considering all these features. What do you think?
CleanShot X
(Basic: $29 one-off. Pro: $8/month | Available on Setapp)
CleanShot X can achieve things the macOS screenshot tool cannot. Complete screenshot toolkit.
CleanShot X, like Pixel Snap 2 (#3), is fantastic.
Allows
Scroll to capture a long page,
screen recording,
With webcam on,
• With mic and system audio,
• Highlighting mouse clicks and hotkeys.
Maintain floating screenshots for reference
While capturing, conceal desktop icons and notifications.
Recognize text in screenshots (OCR),
You may upload and share screenshots using the built-in cloud.
These are just 6 in 50+ features, and you’re already saying Wow!

Jussi Luukkonen, MBA
3 years ago
Is Apple Secretly Building A Disruptive Tsunami?
A TECHNICAL THOUGHT
The IT giant is seeding the digital Great Renaissance.

Recently, technology has been dull.
We're still fascinated by processing speeds. Wearables are no longer an engineer's dream.
Apple has been quiet and avoided huge announcements. Slowness speaks something. Everything in the spaceship HQ seems to be turning slowly, unlike competitors around buzzwords.
Is this a sign of the impending storm?
Metas stock has fallen while Google milks dumb people. Microsoft steals money from corporations and annexes platforms like Linkedin.
Just surface bubbles?
Is Apple, one of the technology continents, pushing against all others to create a paradigm shift?
The fundamental human right to privacy
Apple's unusual remarks emphasize privacy. They incorporate it into their business models and judgments.
Apple believes privacy is a human right. There are no compromises.
This makes it hard for other participants to gain Apple's ecosystem's efficiencies.
Other players without hardware platforms lose.
Apple delivers new kidneys without rejection, unlike other software vendors. Nothing compromises your privacy.
Corporate citizenship will become more popular.
Apples have full coffers. They've started using that flow to better communities, which is great.
Apple's $2.5B home investment is one example. Google and Facebook are building or proposing to build workforce housing.
Apple's funding helps marginalized populations in more than 25 California counties, not just Apple employees.
Is this a trend, and does Apple keep giving back? Hope so.
I'm not cynical enough to suspect these investments have malicious motives.
The last frontier is the environment.
Climate change is a battle-to-win.
Long-term winners will be companies that protect the environment, turning climate change dystopia into sustainable growth.
Apple has been quietly changing its supply chain to be carbon-neutral by 2030.
“Apple is dedicated to protecting the planet we all share with solutions that are supporting the communities where we work.” Lisa Jackson, Apple’s vice president of environment.
Apple's $4.7 billion Green Bond investment will produce 1.2 gigawatts of green energy for the corporation and US communities. Apple invests $2.2 billion in Europe's green energy. In the Philippines, Thailand, Nigeria, Vietnam, Colombia, Israel, and South Africa, solar installations are helping communities obtain sustainable energy.
Apple is already carbon neutral today for its global corporate operations, and this new commitment means that by 2030, every Apple device sold will have net zero climate impact. -Apple.
Apple invests in green energy and forests to reduce its paper footprint in China and the US. Apple and the Conservation Fund are safeguarding 36,000 acres of US working forest, according to GreenBiz.
Apple's packaging paper is recycled or from sustainably managed forests.
What matters is the scale.
$1 billion is a rounding error for Apple.
These small investments originate from a tree with deep, spreading roots.
Apple's genes are anchored in building the finest products possible to improve consumers' lives.
I felt it when I switched to my iPhone while waiting for a train and had to pack my Macbook. iOS 16 dictation makes writing more enjoyable. Small change boosts productivity. Smooth transition from laptop to small screen and dictation.
Apples' tiny, well-planned steps have great growth potential for all consumers in everything they do.
There is clearly disruption, but it doesn't have to be violent
Digital channels, methods, and technologies have globalized human consciousness. One person's responsibility affects many.
Apple gives us tools to be privately connected. These technologies foster creativity, innovation, fulfillment, and safety.
Apple has invented a mountain of technologies, services, and channels to assist us adapt to the good future or combat evil forces who cynically aim to control us and ruin the environment and communities. Apple has quietly disrupted sectors for decades.
Google, Microsoft, and Meta, among others, should ride this wave. It's a tsunami, but it doesn't have to be devastating if we care, share, and cooperate with political decision-makers and community leaders worldwide.
A fresh Renaissance
Renaissance geniuses Michelangelo and Da Vinci. Different but seeing something no one else could yet see. Both were talented in many areas and could discover art in science and science in art.
These geniuses exemplified a period that changed humanity for the better. They created, used, and applied new, valuable things. It lives on.
Apple is a digital genius orchard. Wozniak and Jobs offered us fertile ground for the digital renaissance. We'll build on their legacy.
We may put our seeds there and see them bloom despite corporate greed and political ignorance.
I think the coming tsunami will illuminate our planet like the Renaissance.

M.G. Siegler
3 years ago
G3nerative
Generative AI hype: some thoughts

The sudden surge in "generative AI" startups and projects feels like the inverse of the recent "web3" boom. Both came from hyped-up pots. But while web3 hyped idealistic tech and an easy way to make money, generative AI hypes unsettling tech and questions whether it can be used to make money.
Web3 is technology looking for problems to solve, while generative AI is technology creating almost too many solutions. Web3 has been evangelists trying to solve old problems with new technology. As Generative AI evolves, users are resolving old problems in stunning new ways.
It's a jab at web3, but it's true. Web3's hype, including crypto, was unhealthy. Always expected a tech crash and shakeout. Tech that won't look like "web3" but will enhance "web2"
But that doesn't mean AI hype is healthy. There'll be plenty of bullshit here, too. As moths to a flame, hype attracts charlatans. Again, the difference is the different starting point. People want to use it. Try it.
With the beta launch of Dall-E 2 earlier this year, a new class of consumer product took off. Midjourney followed suit (despite having to jump through the Discord server hoops). Twelve more generative art projects. Lensa, Prisma Labs' generative AI self-portrait project, may have topped the hype (a startup which has actually been going after this general space for quite a while). This week, ChatGPT went off-topic.
This has a "fake-it-till-you-make-it" vibe. We give these projects too much credit because they create easy illusions. This also unlocks new forms of creativity. And faith in new possibilities.
As a user, it's thrilling. We're just getting started. These projects are not only fun to play with, but each week brings a new breakthrough. As an investor, it's all happening so fast, with so much hype (and ethical and societal questions), that no one knows how it will turn out. Web3's demand won't be the issue. Too much demand may cause servers to melt down, sending costs soaring. Companies will try to mix rapidly evolving tech to meet user demand and create businesses. Frustratingly difficult.
Anyway, I wanted an excuse to post some Lensa selfies.

These are really weird. I recognize them as me or a version of me, but I have no memory of them being taken. It's surreal, out-of-body. Uncanny Valley.
You might also like

KonstantinDr
3 years ago
Early Adopters And the Fifth Reason WHY
Product management wizardry.

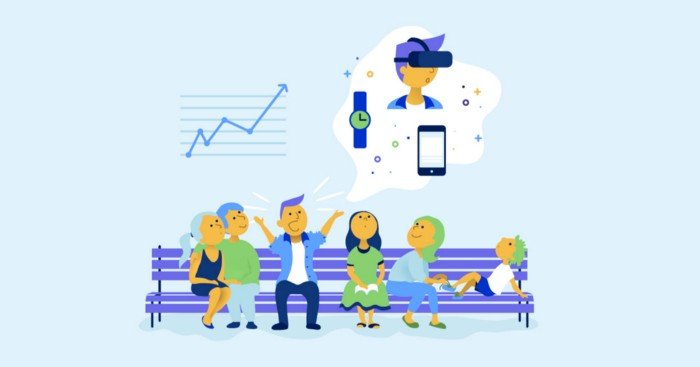
Early adopters buy a product even if it hasn't hit the market or has flaws.
Who are the early adopters?
Early adopters try a new technology or product first. Early adopters are interested in trying or buying new technologies and products before others. They're risk-tolerant and can provide initial cash flow and product reviews. They help a company's new product or technology gain social proof.
Early adopters are most common in the technology industry, but they're in every industry. They don't follow the crowd. They seek innovation and report product flaws before mass production. If the product works well, the first users become loyal customers, and colleagues value their opinion.
What to do with early adopters?
They can be used to collect feedback and initial product promotion, first sales, and product value validation.
How to find early followers?
Start with your immediate environment and target audience. Communicate with them to see if they're interested in your value proposition.
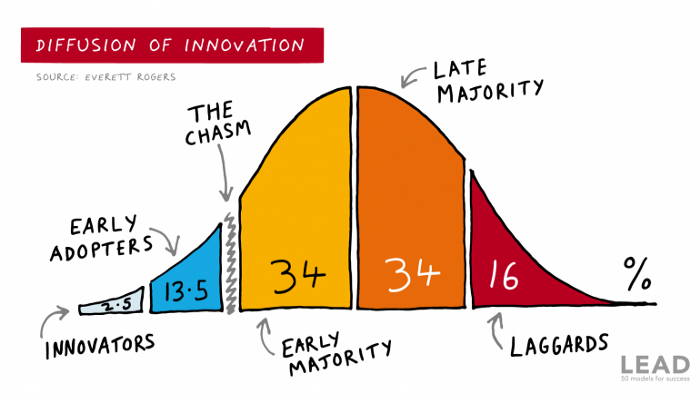
1) Innovators (2.5% of the population) are risk-takers seeking novelty. These people are the first to buy new and trendy items and drive social innovation. However, these people are usually elite;
Early adopters (13.5%) are inclined to accept innovations but are more cautious than innovators; they start using novelties when innovators or famous people do;
3) The early majority (34%) is conservative; they start using new products when many people have mastered them. When the early majority accepted the innovation, it became ingrained in people's minds.
4) Attracting 34% of the population later means the novelty has become a mass-market product. Innovators are using newer products;
5) Laggards (16%) are the most conservative, usually elderly people who use the same products.
Stages of new information acceptance
1. The information is strange and rejected by most. Accepted only by innovators;
2. When early adopters join, more people believe it's not so bad; when a critical mass is reached, the novelty becomes fashionable and most people use it.
3. Fascination with a novelty peaks, then declines; the majority and laggards start using it later; novelty becomes obsolete; innovators master something new.
Problems with early implementation
Early adopter sales have disadvantages.
Higher risk of defects
Selling to first-time users increases the risk of defects. Early adopters are often influential, so this can affect the brand's and its products' long-term perception.
Not what was expected
First-time buyers may be disappointed by the product. Marketing messages can mislead consumers, and if the first users believe the company misrepresented the product, this will affect future sales.
Compatibility issues
Some technological advances cause compatibility issues. Consumers may be disappointed if new technology is incompatible with their electronics.
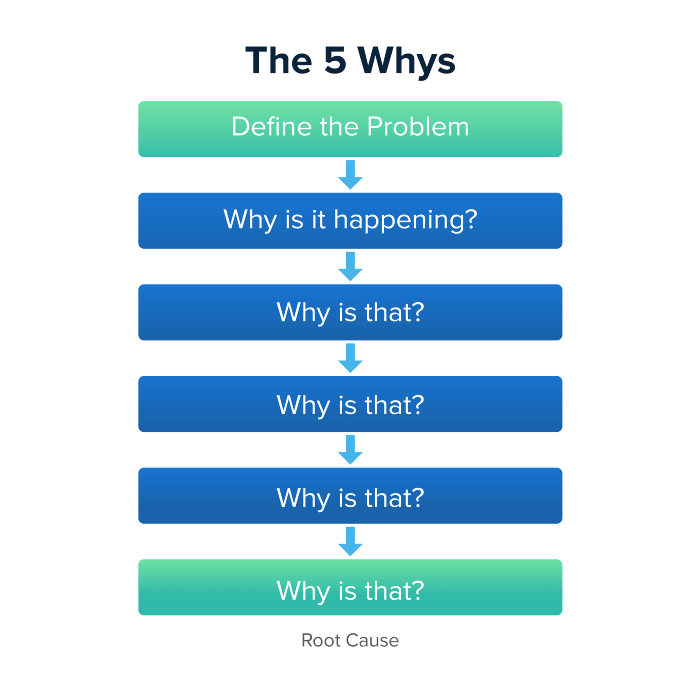
Method 5 WHY
Let's talk about 5 why, a good tool for finding project problems' root causes. This method is also known as the five why rule, method, or questions.
The 5 why technique came from Toyota's lean manufacturing and helps quickly determine a problem's root cause.
On one, two, and three, you simply do this:
We identify and frame the issue for which a solution is sought.
We frequently ponder this question. The first 2-3 responses are frequently very dull, making you want to give up on this pointless exercise. However, after that, things get interesting. And occasionally it's so fascinating that you question whether you really needed to know.
We consider the final response, ponder it, and choose a course of action.
Always do the 5 whys with the customer or team to have a reasonable discussion and better understand what's happening.
And the “five whys” is a wonderful and simplest tool for introspection. With the accumulated practice, it is used almost automatically in any situation like “I can’t force myself to work, the mood is bad in the morning” or “why did I decide that I have no life without this food processor for 20,000 rubles, which will take half of my rather big kitchen.”
An illustration of the five whys
A simple, but real example from my work practice that I think is very indicative, given the participants' low IT skills. Anonymized, of course.
Users spend too long looking for tender documents.
Why? Because they must search through many company tender documents.
Why? Because the system can't filter department-specific bids.
Why? Because our contract management system requirements didn't include a department-tender link. That's it, right? We'll add a filter and be happy. but still…
why? Because we based the system's requirements on regulations for working with paper tender documents (when they still had envelopes and autopsies), not electronic ones, and there was no search mechanism.
Why? We didn't consider how our work would change when switching from paper to electronic tenders when drafting the requirements.
Now I know what to do in the future. We add a filter, enter department data, and teach users to use it. This is tactical, but strategically we review the same forgotten requirements to make all the necessary changes in a package, plus we include it in the checklist for the acceptance of final requirements for the future.
Errors when using 5 why
Five whys seems simple, but it can be misused.
Popular ones:
The accusation of everyone and everything is then introduced. After all, the 5 why method focuses on identifying the underlying causes rather than criticizing others. As a result, at the third step, it is not a good idea to conclude that the system is ineffective because users are stupid and that we can therefore do nothing about it.
to fight with all my might so that the outcome would be exactly 5 reasons, neither more nor less. 5 questions is a typical number (it sounds nice, yes), but there could be 3 or 7 in actuality.
Do not capture in-between responses. It is difficult to overestimate the power of the written or printed word, so the result is so-so when the focus is lost. That's it, I suppose. Simple, quick, and brilliant, like other project management tools.
Conclusion
Today we analyzed important study elements:
Early adopters and 5 WHY We've analyzed cases and live examples of how these methods help with product research and growth point identification. Next, consider the HADI cycle.


Justin Kuepper
4 years ago
Day Trading Introduction
Historically, only large financial institutions, brokerages, and trading houses could actively trade in the stock market. With instant global news dissemination and low commissions, developments such as discount brokerages and online trading have leveled the playing—or should we say trading—field. It's never been easier for retail investors to trade like pros thanks to trading platforms like Robinhood and zero commissions.
Day trading is a lucrative career (as long as you do it properly). But it can be difficult for newbies, especially if they aren't fully prepared with a strategy. Even the most experienced day traders can lose money.
So, how does day trading work?
Day Trading Basics
Day trading is the practice of buying and selling a security on the same trading day. It occurs in all markets, but is most common in forex and stock markets. Day traders are typically well educated and well funded. For small price movements in highly liquid stocks or currencies, they use leverage and short-term trading strategies.
Day traders are tuned into short-term market events. News trading is a popular strategy. Scheduled announcements like economic data, corporate earnings, or interest rates are influenced by market psychology. Markets react when expectations are not met or exceeded, usually with large moves, which can help day traders.
Intraday trading strategies abound. Among these are:
- Scalping: This strategy seeks to profit from minor price changes throughout the day.
- Range trading: To determine buy and sell levels, range traders use support and resistance levels.
- News-based trading exploits the increased volatility around news events.
- High-frequency trading (HFT): The use of sophisticated algorithms to exploit small or short-term market inefficiencies.
A Disputed Practice
Day trading's profit potential is often debated on Wall Street. Scammers have enticed novices by promising huge returns in a short time. Sadly, the notion that trading is a get-rich-quick scheme persists. Some daytrade without knowledge. But some day traders succeed despite—or perhaps because of—the risks.
Day trading is frowned upon by many professional money managers. They claim that the reward rarely outweighs the risk. Those who day trade, however, claim there are profits to be made. Profitable day trading is possible, but it is risky and requires considerable skill. Moreover, economists and financial professionals agree that active trading strategies tend to underperform passive index strategies over time, especially when fees and taxes are factored in.
Day trading is not for everyone and is risky. It also requires a thorough understanding of how markets work and various short-term profit strategies. Though day traders' success stories often get a lot of media attention, keep in mind that most day traders are not wealthy: Many will fail, while others will barely survive. Also, while skill is important, bad luck can sink even the most experienced day trader.
Characteristics of a Day Trader
Experts in the field are typically well-established professional day traders.
They usually have extensive market knowledge. Here are some prerequisites for successful day trading.
Market knowledge and experience
Those who try to day-trade without understanding market fundamentals frequently lose. Day traders should be able to perform technical analysis and read charts. Charts can be misleading if not fully understood. Do your homework and know the ins and outs of the products you trade.
Enough capital
Day traders only use risk capital they can lose. This not only saves them money but also helps them trade without emotion. To profit from intraday price movements, a lot of capital is often required. Most day traders use high levels of leverage in margin accounts, and volatile market swings can trigger large margin calls on short notice.
Strategy
A trader needs a competitive advantage. Swing trading, arbitrage, and trading news are all common day trading strategies. They tweak these strategies until they consistently profit and limit losses.
Strategy Breakdown:
Type | Risk | Reward
Swing Trading | High | High
Arbitrage | Low | Medium
Trading News | Medium | Medium
Mergers/Acquisitions | Medium | High
Discipline
A profitable strategy is useless without discipline. Many day traders lose money because they don't meet their own criteria. “Plan the trade and trade the plan,” they say. Success requires discipline.
Day traders profit from market volatility. For a day trader, a stock's daily movement is appealing. This could be due to an earnings report, investor sentiment, or even general economic or company news.
Day traders also prefer highly liquid stocks because they can change positions without affecting the stock's price. Traders may buy a stock if the price rises. If the price falls, a trader may decide to sell short to profit.
A day trader wants to trade a stock that moves (a lot).
Day Trading for a Living
Professional day traders can be self-employed or employed by a larger institution.
Most day traders work for large firms like hedge funds and banks' proprietary trading desks. These traders benefit from direct counterparty lines, a trading desk, large capital and leverage, and expensive analytical software (among other advantages). By taking advantage of arbitrage and news events, these traders can profit from less risky day trades before individual traders react.
Individual traders often manage other people’s money or simply trade with their own. They rarely have access to a trading desk, but they frequently have strong ties to a brokerage (due to high commissions) and other resources. However, their limited scope prevents them from directly competing with institutional day traders. Not to mention more risks. Individuals typically day trade highly liquid stocks using technical analysis and swing trades, with some leverage.
Day trading necessitates access to some of the most complex financial products and services. Day traders usually need:
Access to a trading desk
Traders who work for large institutions or manage large sums of money usually use this. The trading or dealing desk provides these traders with immediate order execution, which is critical during volatile market conditions. For example, when an acquisition is announced, day traders interested in merger arbitrage can place orders before the rest of the market.
News sources
The majority of day trading opportunities come from news, so being the first to know when something significant happens is critical. It has access to multiple leading newswires, constant news coverage, and software that continuously analyzes news sources for important stories.
Analytical tools
Most day traders rely on expensive trading software. Technical traders and swing traders rely on software more than news. This software's features include:
-
Automatic pattern recognition: It can identify technical indicators like flags and channels, or more complex indicators like Elliott Wave patterns.
-
Genetic and neural applications: These programs use neural networks and genetic algorithms to improve trading systems and make more accurate price predictions.
-
Broker integration: Some of these apps even connect directly to the brokerage, allowing for instant and even automatic trade execution. This reduces trading emotion and improves execution times.
-
Backtesting: This allows traders to look at past performance of a strategy to predict future performance. Remember that past results do not always predict future results.
Together, these tools give traders a competitive advantage. It's easy to see why inexperienced traders lose money without them. A day trader's earnings potential is also affected by the market in which they trade, their capital, and their time commitment.
Day Trading Risks
Day trading can be intimidating for the average investor due to the numerous risks involved. The SEC highlights the following risks of day trading:
Because day traders typically lose money in their first months of trading and many never make profits, they should only risk money they can afford to lose.
Trading is a full-time job that is stressful and costly: Observing dozens of ticker quotes and price fluctuations to spot market trends requires intense concentration. Day traders also spend a lot on commissions, training, and computers.
Day traders heavily rely on borrowing: Day-trading strategies rely on borrowed funds to make profits, which is why many day traders lose everything and end up in debt.
Avoid easy profit promises: Avoid “hot tips” and “expert advice” from day trading newsletters and websites, and be wary of day trading educational seminars and classes.
Should You Day Trade?
As stated previously, day trading as a career can be difficult and demanding.
- First, you must be familiar with the trading world and know your risk tolerance, capital, and goals.
- Day trading also takes a lot of time. You'll need to put in a lot of time if you want to perfect your strategies and make money. Part-time or whenever isn't going to cut it. You must be fully committed.
- If you decide trading is for you, remember to start small. Concentrate on a few stocks rather than jumping into the market blindly. Enlarging your trading strategy can result in big losses.
- Finally, keep your cool and avoid trading emotionally. The more you can do that, the better. Keeping a level head allows you to stay focused and on track.
If you follow these simple rules, you may be on your way to a successful day trading career.
Is Day Trading Illegal?
Day trading is not illegal or unethical, but it is risky. Because most day-trading strategies use margin accounts, day traders risk losing more than they invest and becoming heavily in debt.
How Can Arbitrage Be Used in Day Trading?
Arbitrage is the simultaneous purchase and sale of a security in multiple markets to profit from small price differences. Because arbitrage ensures that any deviation in an asset's price from its fair value is quickly corrected, arbitrage opportunities are rare.
Why Don’t Day Traders Hold Positions Overnight?
Day traders rarely hold overnight positions for several reasons: Overnight trades require more capital because most brokers require higher margin; stocks can gap up or down on overnight news, causing big trading losses; and holding a losing position overnight in the hope of recovering some or all of the losses may be against the trader's core day-trading philosophy.
What Are Day Trader Margin Requirements?
Regulation D requires that a pattern day trader client of a broker-dealer maintain at all times $25,000 in equity in their account.
How Much Buying Power Does Day Trading Have?
Buying power is the total amount of funds an investor has available to trade securities. FINRA rules allow a pattern day trader to trade up to four times their maintenance margin excess as of the previous day's close.
The Verdict
Although controversial, day trading can be a profitable strategy. Day traders, both institutional and retail, keep the markets efficient and liquid. Though day trading is still popular among novice traders, it should be left to those with the necessary skills and resources.

Suzie Glassman
3 years ago
How I Stay Fit Despite Eating Fast Food and Drinking Alcohol
Here's me. Perfectionism is unnecessary.

This post isn't for people who gag at the prospect of eating french fries. I've been ridiculed for stating you can lose weight eating carbs and six-pack abs aren't good.
My family eats frozen processed meals and quick food most weeks (sometimes more). Clean eaters may think I'm unqualified to give fitness advice. I get it.
Hear me out, though. I’m a 44-year-old raising two busy kids with a weekly-traveling husband. Tutoring, dance, and guitar classes fill weeknights. I'm also juggling my job and freelancing.
I'm as worried and tired as my clients. I wish I ate only kale smoothies and salads. I can’t. Despite my mistakes, I'm fit. I won't promise you something just because it worked for me. But here’s a look at how I manage.
What I largely get right about eating
I have a flexible diet and track my daily intake. I count protein, fat, and carbs. Only on vacation or exceptional occasions do I not track.
My protein goal is 1 g per lb. I consume a lot of chicken breasts, eggs, turkey, and lean ground beef. I also occasionally drink protein shakes.
I eat 220–240 grams of carbs daily. My carb count depends on training volume and goals. I'm trying to lose weight slowly. If I want to lose weight faster, I cut carbs to 150-180.
My carbs include white rice, Daves Killer Bread, fruit, pasta, and veggies. I don't eat enough vegetables, so I take Athletic Greens. Also, V8.
Fat grams over 50 help me control my hormones. Recently, I've reached 70-80 grams. Cooking with olive oil. I eat daily dark chocolate. Eggs, butter, milk, and cheese contribute to the rest.
Those frozen meals? What can I say? Stouffer’s lasagna is sometimes needed. I order the healthiest fast food I can find (although I can never bring myself to order the salad). That's a chicken sandwich or a kid's hamburger. I rarely order fries. I eat slowly and savor each bite to feel full.
Potato chips and sugary cereals are in the pantry, but I'm not tempted. My kids eat them because I'd rather teach them moderation than total avoidance. If I eat them, I only eat one portion.
If you're not hungry and eating enough protein and fat, you won't want to eat everything in sight.
I drink once or twice a week. As a result, I rarely overdo it.
Food tracking is tedious and frustrating for many. Taking breaks and using estimates when eating out help. Not perfect, but realistic.
I practice a prolonged fast to enhance metabolic adaptability
Metabolic flexibility is the ability to switch between fuel sources (fat and carbs) based on activity intensity and time since eating. At rest or during low to moderate exertion, your body burns fat. Your body burns carbs after eating and during intense exercise.
Our metabolic flexibility can be hampered by lack of exercise, overeating, and stress. Our bodies become lousy fat burners, making weight loss difficult.
Once a week, I skip dinner (usually around 24 hours). Long-term fasting teaches my body to burn fat. It provides me one low-calorie day a week (I break the fast with a normal-sized dinner).
Fasting day helps me maintain my weight on weekends, when I typically overeat and drink.
Try an extended fast slowly. Delay breakfast by two hours. Next week, add two hours, etc. It takes practice to go that long without biting off your arm. I also suggest consulting your doctor.
I stay active.
I've always been active. As a child, I danced many nights a week, was on the high school dance team, and ran marathons in my 20s.
Often, I feel driven by an internal engine. Working from home makes it easy to exercise. If that’s not you, I get it. Everyone can benefit from raising their baseline.
After taking the kids to school, I walk two miles around the neighborhood. When I need to think, I switch off podcasts. First thing in the morning, I go for a walk.
I lift weights Monday, Wednesday, and Friday. 45 minutes is typical. I run 45-90 minutes on Tuesday and Thursday. I'm slow but reliable. On Saturdays and Sundays, I walk and add a short spin class if I'm not too tired.
I almost never forgo sleep.
I rarely stay up past 10 p.m., much to my night-owl husband's dismay. My 7-8-hour nights help me recover from workouts and handle stress. Without it, I'm grumpy.
I suppose sleep duration matters more than bedtime. Some people just can't fall asleep early. Internal clock and genetics determine sleep and wake hours.
Prioritize sleep.
Last thoughts
Fitness and diet advice is often useless. Some of the advice is inaccurate, dangerous, or difficult to follow if you have a life. I want to throw a shoe at my screen when I see headlines promising to speed up my metabolism or help me lose fat.
I studied exercise physiology for years. No shortcuts exist. No medications or cleanses reset metabolism. I play the hand I'm dealt. I realize that just because something works for me, it won't for you.
If I wanted 15% body fat and ripped abs, I'd have to be stricter. I occasionally think I’d like to get there. But then I remember I’m happy with my life. I like fast food and beer. Pizza and margaritas are favorites (not every day).
You can get it mostly right and live a healthy life.