


More on Entrepreneurship/Creators

Carter Kilmann
3 years ago
I finally achieved a $100K freelance income. Here's what I wish I knew.

We love round numbers, don't we? $100,000 is a frequent freelancing milestone. You feel like six figures means you're doing something properly.
You've most likely already conquered initial freelancing challenges like finding clients, setting fair pricing, coping with criticism, getting through dry spells, managing funds, etc.
You think I must be doing well. Last month, my freelance income topped $100,000.
That may not sound impressive considering I've been freelancing for 2.75 years, but I made 30% of that in the previous four months, which is crazy.
Here are the things I wish I'd known during the early days of self-employment that would have helped me hit $100,000 faster.
1. The Volatility of Freelancing Will Stabilize.
Freelancing is risky. No surprise.
Here's an example.
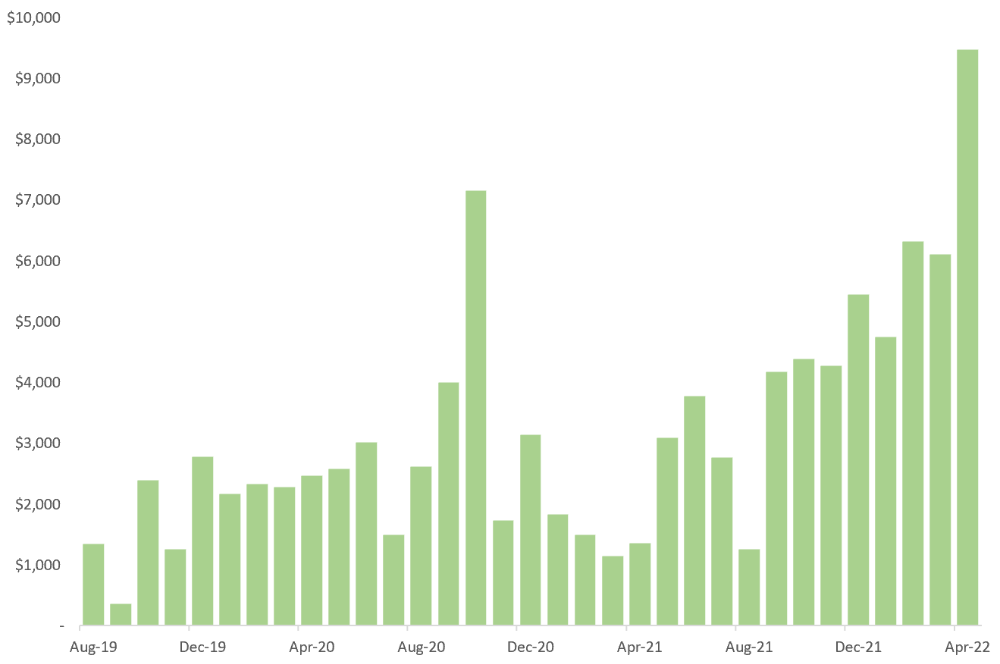
October 2020 was my best month, earning $7,150. Between $4,004 in September and $1,730 in November. Unsteady.
Freelancing is regrettably like that. Moving clients. Content requirements change. Allocating so much time to personal pursuits wasn't smart, but yet.
Stabilizing income takes time. Consider my rolling three-month average income since I started freelancing. My three-month average monthly income. In February, this metric topped $5,000. Now, it's in the mid-$7,000s, but it took a while to get there.
Finding freelance gigs that provide high pay, high volume, and recurring revenue is difficult. But it's not impossible.
TLDR: Don't expect a steady income increase at first. Be patient.
2. You Have More Value Than You Realize.
Writing is difficult. Assembling words, communicating a message, and provoking action are a puzzle.
People are willing to pay you for it because they can't do what you do or don't have enough time.
Keeping that in mind can have huge commercial repercussions.
When talking to clients, don't tiptoe. You can ignore ridiculous deadlines. You don't have to take unmanageable work.
You solve an issue, so make sure you get rightly paid.
TLDR: Frame services as problem-solutions. This will let you charge more and set boundaries.
3. Increase Your Prices.
I studied hard before freelancing. I read articles and watched videos about writing businesses.
I didn't want to work for pennies. Despite this clarity, I had no real strategy to raise my rates.
I then luckily stumbled into higher-paying work. We discussed fees and hours with a friend who launched a consulting business. It's subjective and speculative because value isn't standardized. One company may laugh at your charges. If your solution helps them create a solid ROI, another client may pay $200 per hour.
When he told me he charged his first client $125 per hour, I thought, Why not?
A new-ish client wanted to discuss a huge forthcoming project, so I raised my rates. They knew my worth, so they didn't blink when I handed them my new number.
TLDR: Increase rates periodically (e.g., every 6 or 12 months). Writing skill develops with practice. You'll gain value over time.
4. Remember Your Limits.
If you can squeeze additional time into a day, let me know. I can't manipulate time yet.
We all have time and economic limits. You could theoretically keep boosting rates, but your prospect pool diminishes. Outsourcing and establishing extra revenue sources might boost monthly revenues.
I've devoted a lot of time to side projects (hopefully extra cash sources), but I've only just started outsourcing. I wish I'd tried this earlier.
If you can discover good freelancers, you can grow your firm without sacrificing time.
TLDR: Expand your writing network immediately. You'll meet freelancers who understand your daily grind and locate reference sources.
5. Every Action You Take Involves an Investment. Be Certain to Select Correctly.
Investing in stocks or crypto requires paying money, right?
In business, time is your currency (and maybe money too). Your daily habits define your future. If you spend time collecting software customers and compiling content in the space, you'll end up with both. So be sure.
I only spend around 50% of my time on client work, therefore it's taken me nearly three years to earn $100,000. I spend the remainder of my time on personal projects including a freelance book, an investment newsletter, and this blog.
Why? I don't want to rely on client work forever. So, I'm working on projects that could pay off later and help me live a more fulfilling life.
TLDR: Consider the long-term impact of your time commitments, and don't overextend. You can only make so many "investments" in a given time.
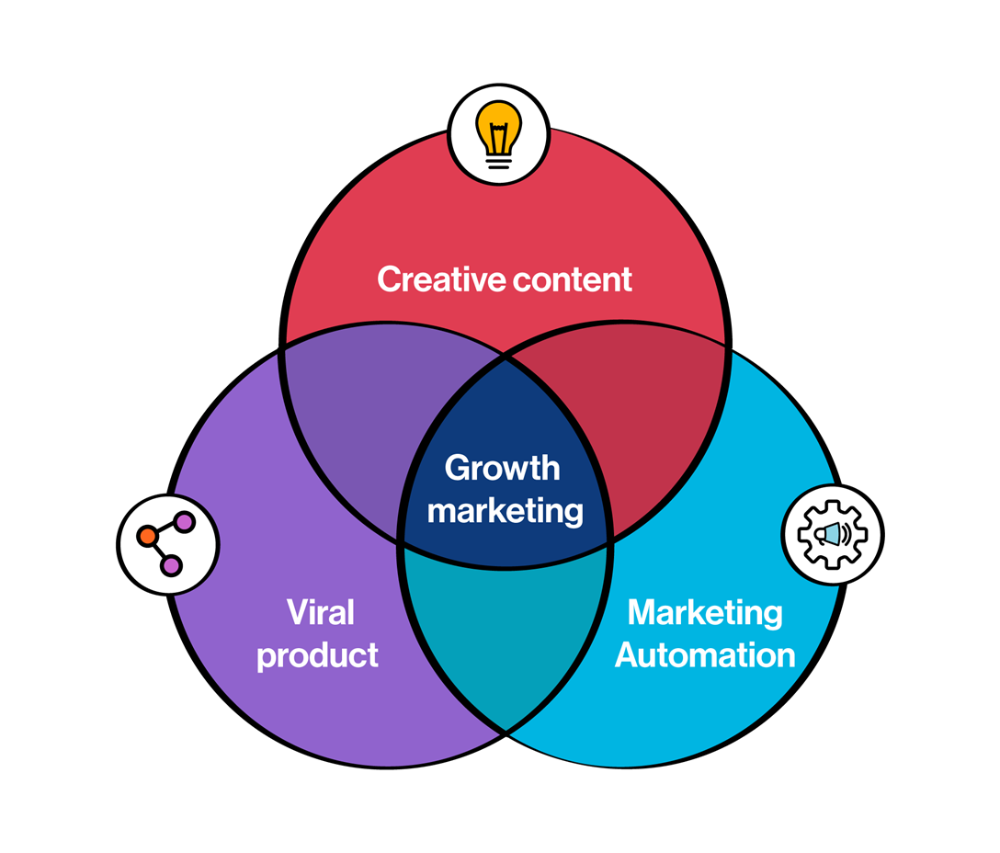
6. LinkedIn Is an Endless Mine of Gold. Use It.
Why didn't I use LinkedIn earlier?
I designed a LinkedIn inbound lead strategy that generates 12 leads a month and a few high-quality offers. As a result, I've turned down good gigs. Wish I'd begun earlier.
If you want to create a freelance business, prioritize LinkedIn. Too many freelancers ignore this site, missing out on high-paying clients. Build your profile, post often, and interact.
TLDR: Study LinkedIn's top creators. Once you understand their audiences, start posting and participating daily.
For 99% of People, Freelancing is Not a Get-Rich-Quick Scheme.
Here's a list of things I wish I'd known when I started freelancing.
Although it is erratic, freelancing eventually becomes stable.
You deserve respect and discretion over how you conduct business because you have solved an issue.
Increase your charges rather than undervaluing yourself. If necessary, add a reminder to your calendar. Your worth grows with time.
In order to grow your firm, outsource jobs. After that, you can work on the things that are most important to you.
Take into account how your present time commitments may affect the future. It will assist in putting things into perspective and determining whether what you are doing is indeed worthwhile.
Participate on LinkedIn. You'll get better jobs as a result.
If I could give my old self (and other freelancers) one bit of advice, it's this:
Despite appearances, you're making progress.
Each job. Tweets. Newsletters. Progress. It's simpler to see retroactively than in the moment.
Consistent, intentional work pays off. No good comes from doing nothing. You must set goals, divide them into time-based targets, and then optimize your calendar.
Then you'll understand you're doing well.
Want to learn more? I’ll teach you.
Vanessa Karel
3 years ago
10 hard lessons from founding a startup.
Here is the ugly stuff, read this if you have a founder in your life or are trying to become one. Your call.

#1 You'll try to talk yourself to sleep, but it won't always work.
As founders, we're all driven. Good and bad, you're restless. Success requires resistance and discipline. Your startup will be on your mind 24/7, and not everyone will have the patience to listen to your worries, ideas, and coffee runs. You become more self-sufficient than ever before.
#2 No one will understand what you're going through unless they've been a founder.
Some of my closest friends don't understand the work that goes into starting a business, and we can't blame them.
#3 You'll feel alienated.
Your problems aren't common; calling your bestie won't help. You must search hard for the right resources. It alienates you from conversations you no longer relate to. (No 4th of July, no long weekends!)
#4 Since you're your "own boss," people assume you have lots of free time.
Do you agree? I was on a webinar with lots of new entrepreneurs, and one woman said, "I started my own business so I could have more time for myself." This may be true for some lucky people, and you can be flexible with your schedule. If you want your business to succeed, you'll probably be its slave for a while.
#5 No time for illness or family emergencies.
Both last month. Oh, no! Physically and emotionally withdrawing at the worst times will give you perspective. I learned this the hard way because I was too stubborn to postpone an important interview. I thought if I rested all day and only took one call, I'd be fine. Nope. I had a fever and my mind wasn't as sharp, so my performance and audience interaction suffered. Nope. Better to delay than miss out.
Oh, and setting a "OoO" makes you cringe.
#6 Good luck with your mental health, perfectionists.
When building a startup, it's difficult to accept that there won't be enough time to do everything. You can't make them all, not perfectly. You must learn to accept things that are done but not perfect.
#7 As a founder, you'll make mistakes, but you'll want to make them quickly so you can learn.
Hard lessons are learned quicker. You'll need to pivot and try new things often; some won't work, and it's best to discover them sooner rather than later.
#8 Pyramid schemes abound.
I didn't realize how bad it was until I started a company. You must spy and constantly research. As a founder, you'll receive many emails from people claiming to "support" you. Be wary and keep your eyes open. When it's too good to be true. Some "companies" will try to get you to pay for "competitions" to "pitch at events." Don't do it.
#9 Keep your competitor research to a minimum.
Actually, competition is good. It means there's a market for those solutions. However, this can be mentally exhausting too. Learn about their geography and updates, but that's it.
#10 You'll feel guilty taking vacation.
I don't know what to say, but I no longer enjoy watching TV, and that's okay. Pay attention to things that enrich you, bring you joy, and have fun. It boosts creativity.
Being a startup founder may be one of the hardest professional challenges you face, but it's also a great learning experience. Your passion will take you places you never imagined and open doors to opportunities you wouldn't have otherwise. You'll meet amazing people. No regrets, no complaints. It's a roller coaster, but the good days are great.
Miss anything? Comment below

Alex Mathers
3 years ago
400 articles later, nobody bothered to read them.
Writing for readers:
14 years of daily writing.
I post practically everything on social media. I authored hundreds of articles, thousands of tweets, and numerous volumes to almost no one.
Tens of thousands of readers regularly praise me.
I despised writing. I'm stuck now.
I've learned what readers like and what doesn't.
Here are some essential guidelines for writing with impact:
Readers won't understand your work if you can't.
Though obvious, this slipped me up. Share your truths.
Stories engage human brains.
Showing the journey of a person from worm to butterfly inspires the human spirit.
Overthinking hinders powerful writing.
The best ideas come from inner understanding in between thoughts.
Avoid writing to find it. Write.
Writing a masterpiece isn't motivating.
Write for five minutes to simplify. Step-by-step, entertaining, easy steps.
Good writing requires a willingness to make mistakes.
So write loads of garbage that you can edit into a good piece.
Courageous writing.
A courageous story will move readers. Personal experience is best.
Go where few dare.
Templates, outlines, and boundaries help.
Limitations enhance writing.
Excellent writing is straightforward and readable, removing all the unnecessary fat.
Use five words instead of nine.
Use ordinary words instead of uncommon ones.
Readers desire relatability.
Too much perfection will turn it off.
Write to solve an issue if you can't think of anything to write.
Instead, read to inspire. Best authors read.
Every tweet, thread, and novel must have a central idea.
What's its point?
This can make writing confusing.
️ Don't direct your reader.
Readers quit reading. Demonstrate, describe, and relate.
Even if no one responds, have fun. If you hate writing it, the reader will too.
You might also like
Muhammad Rahmatullah
3 years ago
The Pyramid of Coding Principles
A completely operating application requires many processes and technical challenges. Implementing coding standards can make apps right, work, and faster.
With years of experience working in software houses. Many client apps are scarcely maintained.
Why are these programs "barely maintainable"? If we're used to coding concepts, we can probably tell if an app is awful or good from its codebase.
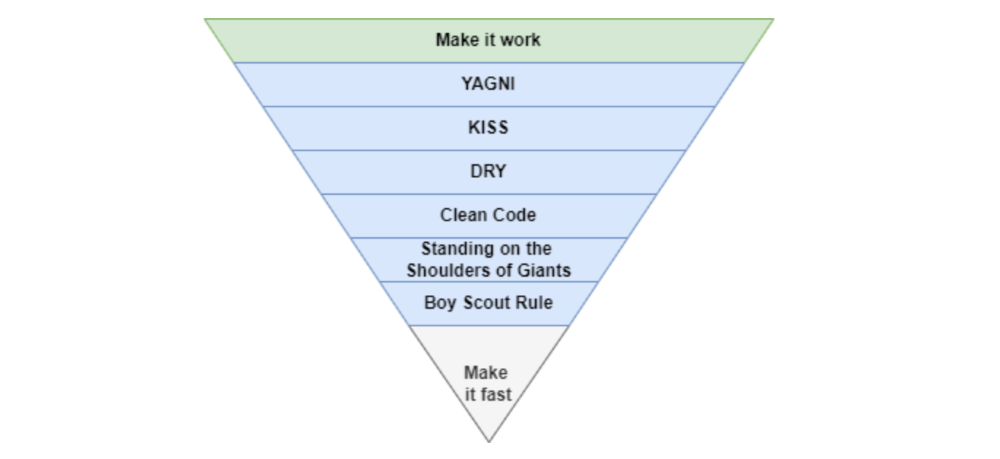
This is how I coded much of my app.
Make It Work
Before adopting any concept, make sure the apps are completely functional. Why have a fully maintained codebase if the app can't be used?
The user doesn't care if the app is created on a super server or uses the greatest coding practices. The user just cares if the program helps them.
After the application is working, we may implement coding principles.
You Aren’t Gonna Need It
As a junior software engineer, I kept unneeded code, components, comments, etc., thinking I'd need them later.
In reality, I never use that code for weeks or months.
First, we must remove useless code from our primary codebase. If you insist on keeping it because "you'll need it later," employ version control.
If we remove code from our codebase, we can quickly roll back or copy-paste the previous code without preserving it permanently.
The larger the codebase, the more maintenance required.
Keep It Simple Stupid

Indeed. Keep things simple.
Why complicate something if we can make it simpler?
Our code improvements should lessen the server load and be manageable by others.
If our code didn't pass those benchmarks, it's too convoluted and needs restructuring. Using an open-source code critic or code smell library, we can quickly rewrite the code.
Simpler codebases and processes utilize fewer server resources.
Don't Repeat Yourself
Have you ever needed an action or process before every action, such as ensuring the user is logged in before accessing user pages?
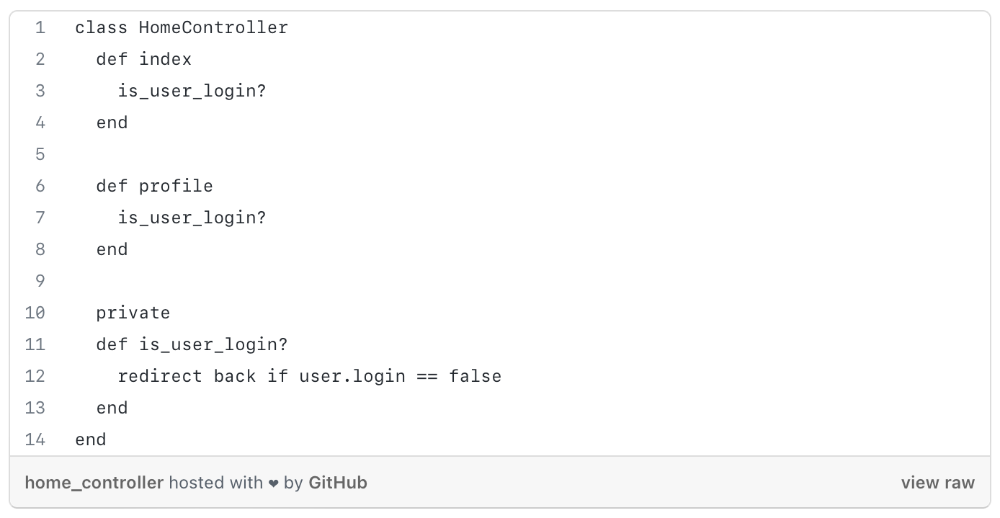
As you can see from the above code, I try to call is user login? in every controller action, and it should be optimized, because if we need to rename the method or change the logic, etc. We can improve this method's efficiency.
We can write a constructor/middleware/before action that calls is_user_login?
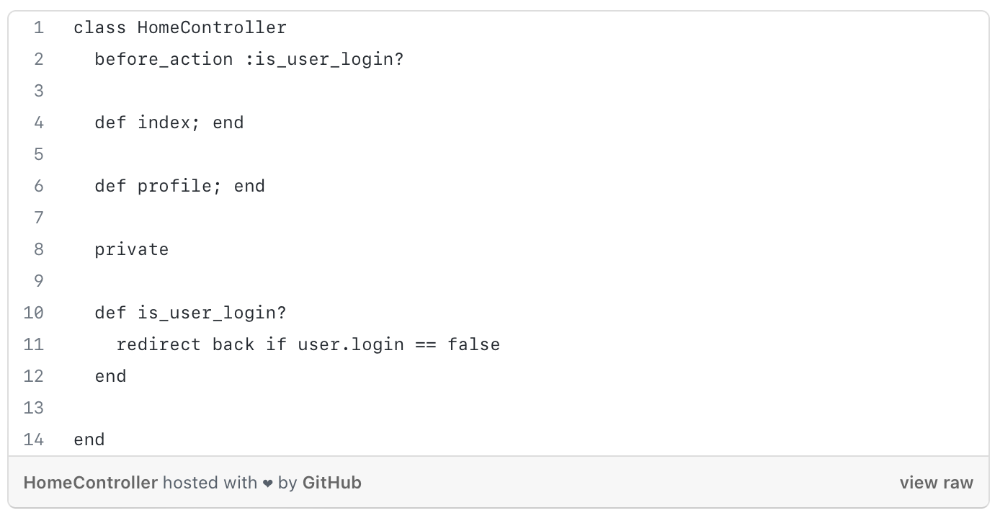
The code is more maintainable and readable after refactoring.
Each programming language or framework handles this issue differently, so be adaptable.
Clean Code
Clean code is a broad notion that you've probably heard of before.
When creating a function, method, module, or variable name, the first rule of clean code is to be precise and simple.
The name should express its value or logic as a whole, and follow code rules because every programming language is distinct.
If you want to learn more about this topic, I recommend reading https://www.amazon.com/Clean-Code-Handbook-Software-Craftsmanship/dp/0132350882.
Standing On The Shoulder of Giants
Use industry standards and mature technologies, not your own(s).
There are several resources that explain how to build boilerplate code with tools, how to code with best practices, etc.
I propose following current conventions, best practices, and standardization since we shouldn't innovate on top of them until it gives us a competitive edge.
Boy Scout Rule
What reduces programmers' productivity?
When we have to maintain or build a project with messy code, our productivity decreases.
Having to cope with sloppy code will slow us down (shame of us).
How to cope? Uncle Bob's book says, "Always leave the campground cleaner than you found it."
When developing new features or maintaining current ones, we must improve our codebase. We can fix minor issues too. Renaming variables, deleting whitespace, standardizing indentation, etc.
Make It Fast
After making our code more maintainable, efficient, and understandable, we can speed up our app.
Whether it's database indexing, architecture, caching, etc.
A smart craftsman understands that refactoring takes time and it's preferable to balance all the principles simultaneously. Don't YAGNI phase 1.
Using these ideas in each iteration/milestone, while giving the bottom items less time/care.
You can check one of my articles for further information. https://medium.com/life-at-mekari/why-does-my-website-run-very-slowly-and-how-do-i-optimize-it-for-free-b21f8a2f0162

Koji Mochizuki
4 years ago
How to Launch an NFT Project by Yourself
Creating 10,000 auto-generated artworks, deploying a smart contract to the Ethereum / Polygon blockchain, setting up some tools, etc.
There is so much to do from launching to running an NFT project. Creating parts for artworks, generating 10,000 unique artworks and metadata, creating a smart contract and deploying it to a blockchain network, creating a website, creating a Twitter account, setting up a Discord server, setting up an OpenSea collection. In addition, you need to have MetaMask installed in your browser and have some ETH / MATIC. Did you get tired of doing all this? Don’t worry, once you know what you need to do, all you have to do is do it one by one.
To be honest, it’s best to run an NFT project in a team of three or more, including artists, developers, and marketers. However, depending on your motivation, you can do it by yourself. Some people might come later to offer help with your project. The most important thing is to take a step as soon as possible.
Creating Parts for Artworks
There are lots of free/paid software for drawing, but after all, I think Adobe Illustrator or Photoshop is the best. The images of Skulls In Love are a composite of 48x48 pixel parts created using Photoshop.
The most important thing in creating parts for generative art is to repeatedly test what your artworks will look like after each layer has been combined. The generated artworks should not be too unnatural.
How Many Parts Should You Create?
Are you wondering how many parts you should create to avoid duplication as much as possible when generating your artworks? My friend Stephane, a developer, has created a great tool to help with that.
Generating 10,000 Unique Artworks and Metadata
I highly recommend using the HashLips Art Engine to generate your artworks and metadata. Perhaps there is no better artworks generation tool at the moment.
GitHub: https://github.com/HashLips/hashlips_art_engine
YouTube:
Storing Artworks and Metadata
Ideally, the generated artworks and metadata should be stored on-chain, but if you want to store them off-chain, you should use IPFS. Do not store in centralized storage. This is because data will be lost if the server goes down or if the company goes down. On the other hand, IPFS is a more secure way to find data because it utilizes a distributed, decentralized system.
Storing to IPFS is easy with Pinata, NFT.Storage, and so on. The Skulls In Love uses Pinata. It’s very easy to use, just upload the folder containing your artworks.
Creating and Deploying a Smart Contract
You don’t have to create a smart contract from scratch. There are many great NFT projects, many of which publish their contract source code on Etherscan / PolygonScan. You can choose the contract you like and reuse it. Of course, that requires some knowledge of Solidity, but it depends on your efforts. If you don’t know which contract to choose, use the HashLips smart contract. It’s very simple, but it has almost all the functions you need.
GitHub: https://github.com/HashLips/hashlips_nft_contract
Note: Later on, you may want to change the cost value. You can change it on Remix or Etherscan / PolygonScan. But in this case, enter the Wei value instead of the Ether value. For example, if you want to sell for 1 MATIC, you have to enter “1000000000000000000”. If you set this value to “1”, you will have a nightmare. I recommend using Simple Unit Converter as a tool to calculate the Wei value.
Creating a Website
The website here is not just a static site to showcase your project, it’s a so-called dApp that allows you to access your smart contract and mint NFTs. In fact, this level of dApp is not too difficult for anyone who has ever created a website. Because the ethers.js / web3.js libraries make it easy to interact with your smart contract. There’s also no problem connecting wallets, as MetaMask has great documentation.
The Skulls In Love uses a simple, fast, and modern dApp that I built from scratch using Next.js. It is published on GitHub, so feel free to use it.
Why do people mint NFTs on a website?
Ethereum’s gas fees are high, so if you mint all your NFTs, there will be a huge initial cost. So it makes sense to get the buyers to help with the gas fees for minting.
What about Polygon? Polygon’s gas fees are super cheap, so even if you mint 10,000 NFTs, it’s not a big deal. But we don’t do that. Since NFT projects are a kind of game, it involves the fun of not knowing what will come out after minting.
Creating a Twitter Account
I highly recommend creating a Twitter account. Twitter is an indispensable tool for announcing giveaways and reaching more people. It’s better to announce your project and your artworks little by little, 1–2 weeks before launching your project.
Creating and Setting Up a Discord Server
I highly recommend creating a Discord server as well as a Twitter account. The Discord server is a community and its home. Fans of your NFT project will want to join your community and interact with many other members. So, carefully create each channel on your Discord server to make it a cozy place for your community members.
If you are unfamiliar with Discord, you may be particularly confused by the following:
What bots should I use?
How should I set roles and permissions?
But don’t worry. There are lots of great YouTube videos and blog posts about these.
It’s also a good idea to join the Discord servers of some NFT projects and see how they’re made. Our Discord server is so simple that even beginners will find it easy to understand. Please join us and see it!
Note: First, create a test account and a test server to make sure your bots and permissions work properly. It is better to verify the behavior on the test server before setting up your production server.
UPDATED: As your Discord server grows, you cannot manage it on your own. In this case, you will be hiring several moderators, but choose carefully before hiring. And don’t give them important role permissions right after hiring. Initially, the same permissions as other members are sufficient. After a while, you can add permissions as needed, such as kicking/banning, using the “@every” tag, and adding roles. Again, don’t immediately give significant permissions to your Mod role. Your server can be messed up by fake moderators.
Setting Up Your OpenSea Collection
Before you start selling your NFTs, you need to reserve some for airdrops, giveaways, staff, and more. It’s up to you whether it’s 100, 500, or how many.
After minting some of your NFTs, your account and collection should have been created in OpenSea. Go to OpenSea, connect to your wallet, and set up your collection. Just set your logo, banner image, description, links, royalties, and more. It’s not that difficult.
Promoting Your Project
After all, promotion is the most important thing. In fact, almost every successful NFT project spends a lot of time and effort on it.
In addition to Twitter and Discord, it’s even better to use Instagram, Reddit, and Medium. Also, register your project in NFTCalendar and DISBOARD
DISBOARD is the public Discord server listing community.
About Promoters
You’ll probably get lots of contacts from promoters on your Discord, Twitter, Instagram, and more. But most of them are scams, so don’t pay right away. If you have a promoter that looks attractive to you, be sure to check the promoter’s social media accounts or website to see who he/she is. They basically charge in dollars. The amount they charge isn’t cheap, but promoters with lots of followers may have some temporary effect on your project. Some promoters accept 50% prepaid and 50% postpaid. If you can afford it, it might be worth a try. I never ask them, though.
When Should the Promotion Activities Start?
You may be worried that if you promote your project before it starts, someone will copy your project (artworks). It is true that some projects have actually suffered such damage. I don’t have a clear answer to this question right now, but:
- Do not publish all the information about your project too early
- The information should be released little by little
- Creating artworks that no one can easily copy
I think these are important.
If anyone has a good idea, please share it!
About Giveaways
When hosting giveaways, you’ll probably use multiple social media platforms. You may want to grow your Discord server faster. But if joining the Discord server is included in the giveaway requirements, some people hate it. I recommend holding giveaways for each platform. On Twitter and Reddit, you should just add the words “Discord members-only giveaway is being held now! Please join us if you like!”.
If you want to easily pick a giveaway winner in your browser, I recommend Twitter Picker.
Precautions for Distributing Free NFTs
If you want to increase your Twitter followers and Discord members, you can actually get a lot of people by holding events such as giveaways and invite contests. However, distributing many free NFTs at once can be dangerous. Some people who want free NFTs, as soon as they get a free one, sell it at a very low price on marketplaces such as OpenSea. They don’t care about your project and are only thinking about replacing their own “free” NFTs with Ethereum. The lower the floor price of your NFTs, the lower the value of your NFTs (project). Try to think of ways to get people to “buy” your NFTs as much as possible.
Ethereum vs. Polygon
Even though Ethereum has high gas fees, NFT projects on the Ethereum network are still mainstream and popular. On the other hand, Polygon has very low gas fees and fast transaction processing, but NFT projects on the Polygon network are not very popular.
Why? There are several reasons, but the biggest one is that it’s a lot of work to get MATIC (on Polygon blockchain, use MATIC instead of ETH) ready to use. Simply put, you need to bridge your tokens to the Polygon chain. So people need to do this first before minting your NFTs on your website. It may not be a big deal for those who are familiar with crypto and blockchain, but it may be complicated for those who are not. I hope that the tedious work will be simplified in the near future.
If you are confident that your NFTs will be purchased even if they are expensive, or if the total supply of your NFTs is low, you may choose Ethereum. If you just want to save money, you should choose Polygon. Keep in mind that gas fees are incurred not only when minting, but also when performing some of your smart contract functions and when transferring your NFTs.
If I were to launch a new NFT project, I would probably choose Ethereum or Solana.
Conclusion
Some people may want to start an NFT project to make money, but don’t forget to enjoy your own project. Several months ago, I was playing with creating generative art by imitating the CryptoPunks. I found out that auto-generated artworks would be more interesting than I had imagined, and since then I’ve been completely absorbed in generative art.
This is one of the Skulls In Love artworks:
This character wears a cowboy hat, black slim sunglasses, and a kimono. If anyone looks like this, I can’t help laughing!
The Skulls In Love NFTs can be minted for a small amount of MATIC on the official website. Please give it a try to see what kind of unique characters will appear 💀💖
Thank you for reading to the end. I hope this article will be helpful to those who want to launch an NFT project in the future ✨

Ann
3 years ago
These new DeFi protocols are just amazing.
I've never seen this before.
Focus on native crypto development, not price activity or turmoil.
CT is boring now. Either folks are still angry about FTX or they're distracted by AI. Plus, it's year-end, and people rest for the holidays. 2022 was rough.
So DeFi fans can get inspired by something fresh. Who's building? As I read the Defillama daily roundup, many updates are still on FTX and its contagion.
I've used the same method on their Raises page. Not much happened :(. Maybe my high standards are to fault, but the business may be resting. OK.
The handful I locate might last us till the end of the year. (If another big blowup occurs.)
Hashflow
An on-chain monitor account I follow reported a huge transfer of $HFT from Binance to Jump Tradings.
I was intrigued. Stacking? So I checked and discovered out the project was launched through Binance Launchpad, which has introduced many 100x tokens (although momentarily) in the past, such as GALA and STEPN.
Hashflow appears to be pumpable. Binance launchpad, VC backers, CEX listing immediately. What's the protocol?
Hasflow is intriguing and timely, I discovered. After the FTX collapse, people looked more at DEXs.
Hashflow is a decentralized exchange that connects traders with professional market makers, according to its Binance launchpad description. Post-FTX, market makers lost their MM-ing chance with the collapse of the world's third-largest exchange. Jump and Wintermute back them?
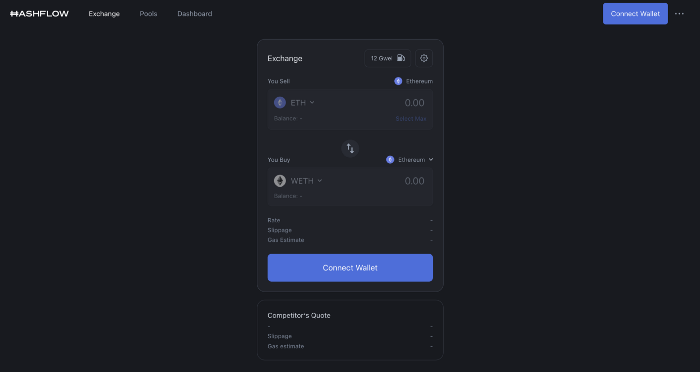
Why is that the case? Hashflow doesn't use bonding curves like standard AMM. On AMMs, you pay more for the following trade because the prior trade reduces liquidity (supply and demand). With market maker quotations, you get a CEX-like experience (fewer coins in the pool, higher price). Stable prices, no MEV frontrunning.
Hashflow is innovative because...
DEXs gained from the FTX crash, but let's be honest: DEXs aren't as good as CEXs. Hashflow will change this.
Hashflow offers MEV protection, which major dealers seek in DEXs. You can trade large amounts without front running and sandwich assaults.
Hasflow offers a user-friendly swapping platform besides MEV. Any chain can be traded smoothly. This is a benefit because DEXs lag CEXs in UX.
Status, timeline:
Wintermute wrote in August that prominent market makers will work on Hashflow. Binance launched a month-long farming session in December. Jump probably participated in this initial sell, therefore we witnessed a significant transfer after the introduction.
Binance began trading HFT token on November 11 (the day FTX imploded). coincidence?)
Tokens are used for community rewards. Perhaps they'd copy dYdX. (Airdrop?). Read their documents about their future plans. Tokenomics doesn't impress me. Governance, rewards, and NFT.
Their stat page details their activity. First came Ethereum, then Arbitrum. For a new protocol in a bear market, they handled a lot of unique users daily.
It’s interesting to see their future. Will they be thriving? Not only against DEXs, but also among the CEXs too.
STFX
I forget how I found STFX. Possibly a Twitter thread concerning Arbitrum applications. STFX was the only new protocol I found interesting.
STFX is a new concept and trader problem-solver. I've never seen this protocol.
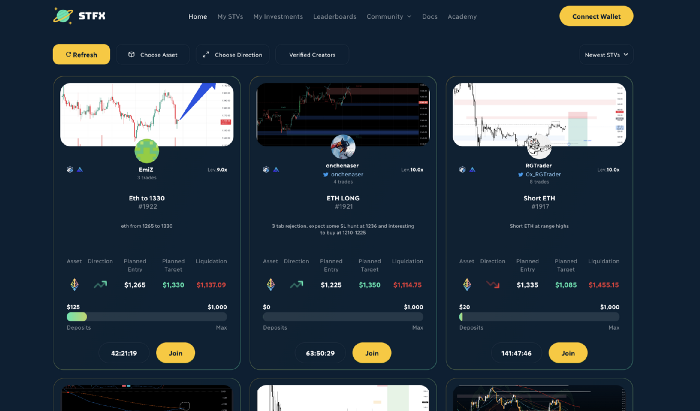
STFX allows you copy trades. You give someone your money to trade for you.
It's a marketplace. Traders are everywhere. You put your entry, exit, liquidation point, and trading theory. Twitter has a verification system for socials. Leaderboards display your trading skill.
This service could be popular. Staying disciplined is the hardest part of trading. Sometimes you take-profit too early or too late, or sell at a loss when an asset dumps, then it soon recovers (often happens in crypto.) It's hard to stick to entry-exit and liquidation plans.
What if you could hire someone to run your trade for a little commission? Set-and-forget.
Trading money isn't easy. Trust how? How do you know they won't steal your money?
Smart contracts.
STFX's trader is a vault maker/manager. One trade=one vault. User sets long/short, entrance, exit, and liquidation point. Anyone who agrees can exchange instantly. The smart contract will keep the fund during the trade and limit the manager's actions.
Here's STFX's transaction flow.
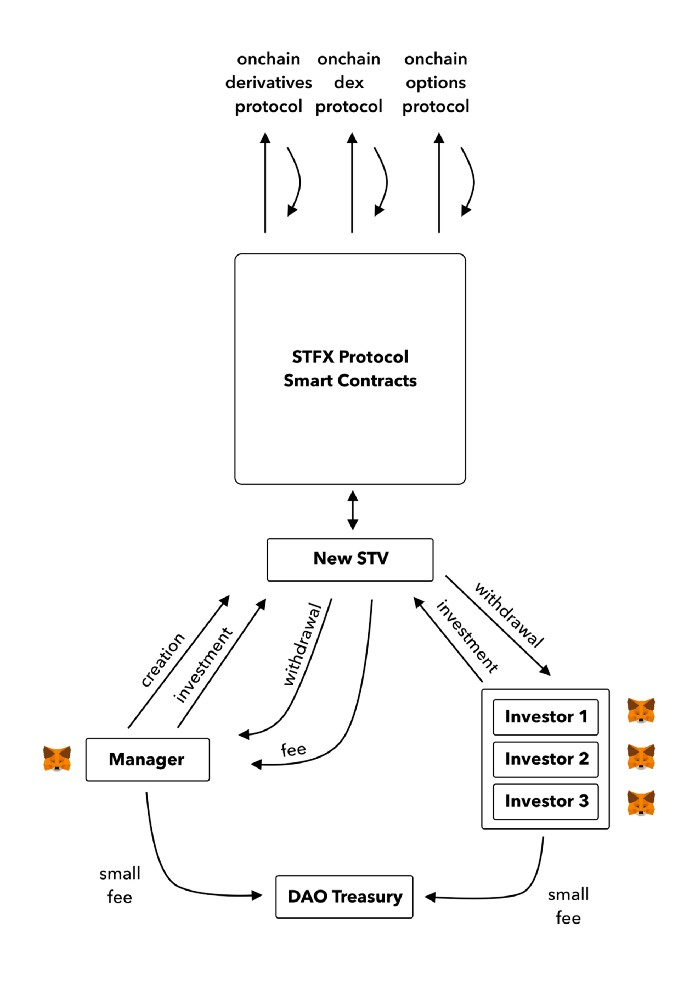
Managers and the treasury receive fees. It's a sustainable business strategy that benefits everyone.
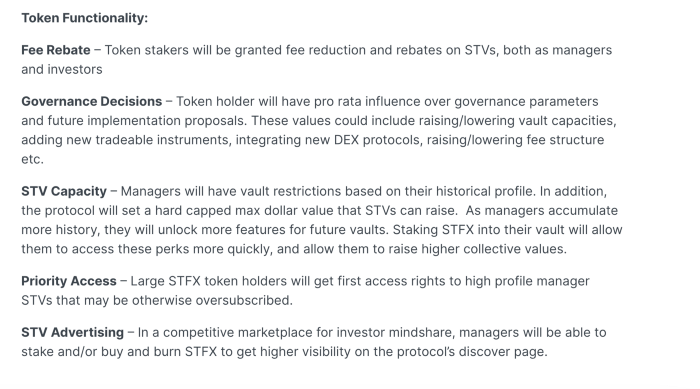
I'm impressed by $STFX's planned use. Brilliant priority access. A crypto dealer opens a vault here. Many would join. STFX tokens offer VIP access over those without tokens.
STFX provides short-term trading, which is mind-blowing to me. I agree with their platform's purpose. Crypto market pricing actions foster short-termism. When you trade, the turnover could be larger than long-term holding or trading. 2017 BTC buyers waited 5 years to complete their holdings.
STFX teams simply adapted. Volatility aids trading.
All things about STFX scream Degen. The protocol fully embraces the degen nature of some, if not most, crypto natives.

An enjoyable dApp. Leaderboards are fun for reputation-building. FLEXING COMPETITIONS. You can join for as low as $10. STFX uses Arbitrum, therefore gas costs are low. Alpha procedure completes the degen feeling.
Despite looking like they don't take themselves seriously, I sense a strong business plan below. There is a real demand for the solution STFX offers.