

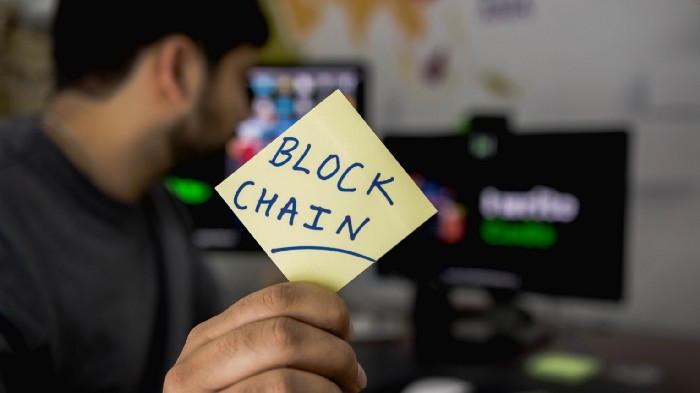
A Warm Welcome to Web3 and the Future of the Internet
Let's take a look back at the internet's history and see where we're going — and why.
Tim Berners Lee had a problem. He was at CERN, the world's largest particle physics factory, at the time. The institute's stated goal was to study the simplest particles with the most sophisticated scientific instruments. The institute completed the LEP Tunnel in 1988, a 27 kilometer ring. This was Europe's largest civil engineering project (to study smaller particles — electrons).
The problem Tim Berners Lee found was information loss, not particle physics. CERN employed a thousand people in 1989. Due to team size and complexity, people often struggled to recall past project information. While these obstacles could be overcome, high turnover was nearly impossible. Berners Lee addressed the issue in a proposal titled ‘Information Management'.
When a typical stay is two years, data is constantly lost. The introduction of new people takes a lot of time from them and others before they understand what is going on. An emergency situation may require a detective investigation to recover technical details of past projects. Often, the data is recorded but cannot be found. — Information Management: A Proposal
He had an idea. Create an information management system that allowed users to access data in a decentralized manner using a new technology called ‘hypertext'.
To quote Berners Lee, his proposal was “vague but exciting...”. The paper eventually evolved into the internet we know today. Here are three popular W3C standards used by billions of people today:
(credit: CERN)
HTML (Hypertext Markup)
A web formatting language.
URI (Unique Resource Identifier)
Each web resource has its own “address”. Known as ‘a URL'.
HTTP (Hypertext Transfer Protocol)
Retrieves linked resources from across the web.
These technologies underpin all computer work. They were the seeds of our quest to reorganize information, a task as fruitful as particle physics.
Tim Berners-Lee would probably think the three decades from 1989 to 2018 were eventful. He'd be amazed by the billions, the inspiring, the novel. Unlocking innovation at CERN through ‘Information Management'.
The fictional character would probably need a drink, walk, and a few deep breaths to fully grasp the internet's impact. He'd be surprised to see a few big names in the mix.
Then he'd say, "Something's wrong here."
We should review the web's history before going there. Was it a success after Berners Lee made it public? Web1 and Web2: What is it about what we are doing now that so many believe we need a new one, web3?
Per Outlier Ventures' Jamie Burke:
Web 1.0 was read-only.
Web 2.0 was the writable
Web 3.0 is a direct-write web.
Let's explore.
Web1: The Read-Only Web
Web1 was the digital age. We put our books, research, and lives ‘online'. The web made information retrieval easier than any filing cabinet ever. Massive amounts of data were stored online. Encyclopedias, medical records, and entire libraries were put away into floppy disks and hard drives.
In 2015, the web had around 305,500,000,000 pages of content (280 million copies of Atlas Shrugged).
Initially, one didn't expect to contribute much to this database. Web1 was an online version of the real world, but not yet a new way of using the invention.
One gets the impression that the web has been underutilized by historians if all we can say about it is that it has become a giant global fax machine. — Daniel Cohen, The Web's Second Decade (2004)
That doesn't mean developers weren't building. The web was being advanced by great minds. Web2 was born as technology advanced.
Web2: Read-Write Web
Remember when you clicked something on a website and the whole page refreshed? Is it too early to call the mid-2000s ‘the good old days'?
Browsers improved gradually, then suddenly. AJAX calls augmented CGI scripts, and applications began sending data back and forth without disrupting the entire web page. One button to ‘digg' a post (see below). Web experiences blossomed.
In 2006, Digg was the most active ‘Web 2.0' site. (Photo: Ethereum Foundation Taylor Gerring)
Interaction was the focus of new applications. Posting, upvoting, hearting, pinning, tweeting, liking, commenting, and clapping became a lexicon of their own. It exploded in 2004. Easy ways to ‘write' on the internet grew, and continue to grow.
Facebook became a Web2 icon, where users created trillions of rows of data. Google and Amazon moved from Web1 to Web2 by better understanding users and building products and services that met their needs.
Business models based on Software-as-a-Service and then managing consumer data within them for a fee have exploded.
Web2 Emerging Issues
Unbelievably, an intriguing dilemma arose. When creating this read-write web, a non-trivial question skirted underneath the covers. Who owns it all?
You have no control over [Web 2] online SaaS. People didn't realize this because SaaS was so new. People have realized this is the real issue in recent years.
Even if these organizations have good intentions, their incentive is not on the users' side.
“You are not their customer, therefore you are their product,” they say. With Laura Shin, Vitalik Buterin, Unchained
A good plot line emerges. Many amazing, world-changing software products quietly lost users' data control.
For example: Facebook owns much of your social graph data. Even if you hate Facebook, you can't leave without giving up that data. There is no ‘export' or ‘exit'. The platform owns ownership.
While many companies can pull data on you, you cannot do so.
On the surface, this isn't an issue. These companies use my data better than I do! A complex group of stakeholders, each with their own goals. One is maximizing shareholder value for public companies. Tim Berners-Lee (and others) dislike the incentives created.
“Show me the incentive and I will show you the outcome.” — Berkshire Hathaway's CEO
It's easy to see what the read-write web has allowed in retrospect. We've been given the keys to create content instead of just consume it. On Facebook and Twitter, anyone with a laptop and internet can participate. But the engagement isn't ours. Platforms own themselves.
Web3: The ‘Unmediated’ Read-Write Web
Tim Berners Lee proposed a decade ago that ‘linked data' could solve the internet's data problem.
However, until recently, the same principles that allowed the Web of documents to thrive were not applied to data...
The Web of Data also allows for new domain-specific applications. Unlike Web 2.0 mashups, Linked Data applications work with an unbound global data space. As new data sources appear on the Web, they can provide more complete answers.
At around the same time as linked data research began, Satoshi Nakamoto created Bitcoin. After ten years, it appears that Berners Lee's ideas ‘link' spiritually with cryptocurrencies.
What should Web 3 do?
Here are some quick predictions for the web's future.
Users' data:
Users own information and provide it to corporations, businesses, or services that will benefit them.
Defying censorship:
No government, company, or institution should control your access to information (1, 2, 3)
Connect users and platforms:
Create symbiotic rather than competitive relationships between users and platform creators.
Open networks:
“First, the cryptonetwork-participant contract is enforced in open source code. Their voices and exits are used to keep them in check.” Dixon, Chris (4)
Global interactivity:
Transacting value, information, or assets with anyone with internet access, anywhere, at low cost
Self-determination:
Giving you the ability to own, see, and understand your entire digital identity.
Not pull, push:
‘Push' your data to trusted sources instead of ‘pulling' it from others.
Where Does This Leave Us?
Change incentives, change the world. Nick Babalola
People believe web3 can help build a better, fairer system. This is not the same as equal pay or outcomes, but more equal opportunity.
It should be noted that some of these advantages have been discussed previously. Will the changes work? Will they make a difference? These unanswered questions are technical, economic, political, and philosophical. Unintended consequences are likely.
We hope Web3 is a more democratic web. And we think incentives help the user. If there’s one thing that’s on our side, it’s that open has always beaten closed, given a long enough timescale.
We are at the start.
More on Web3 & Crypto

Farhan Ali Khan
2 years ago
Introduction to Zero-Knowledge Proofs: The Art of Proving Without Revealing
Zero-Knowledge Proofs for Beginners
Published here originally.
Introduction
I Spy—did you play as a kid? One person chose a room object, and the other had to guess it by answering yes or no questions. I Spy was entertaining, but did you know it could teach you cryptography?
Zero Knowledge Proofs let you show your pal you know what they picked without exposing how. Math replaces electronics in this secret spy mission. Zero-knowledge proofs (ZKPs) are sophisticated cryptographic tools that allow one party to prove they have particular knowledge without revealing it. This proves identification and ownership, secures financial transactions, and more. This article explains zero-knowledge proofs and provides examples to help you comprehend this powerful technology.
What is a Proof of Zero Knowledge?
Zero-knowledge proofs prove a proposition is true without revealing any other information. This lets the prover show the verifier that they know a fact without revealing it. So, a zero-knowledge proof is like a magician's trick: the prover proves they know something without revealing how or what. Complex mathematical procedures create a proof the verifier can verify.
Want to find an easy way to test it out? Try out with tis awesome example! ZK Crush
Describe it as if I'm 5
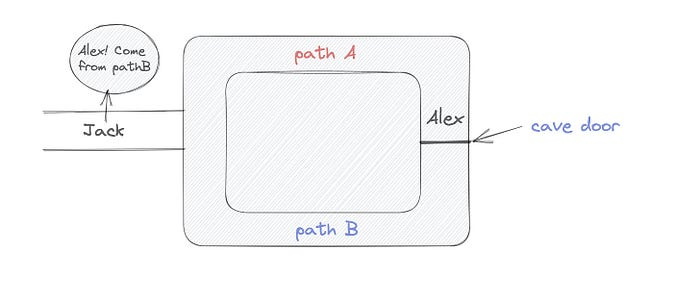
Alex and Jack found a cave with a center entrance that only opens when someone knows the secret. Alex knows how to open the cave door and wants to show Jack without telling him.
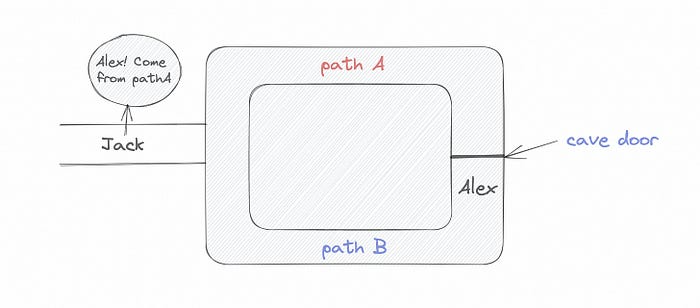
Alex and Jack name both pathways (let’s call them paths A and B).
In the first phase, Alex is already inside the cave and is free to select either path, in this case A or B.
As Alex made his decision, Jack entered the cave and asked him to exit from the B path.
Jack can confirm that Alex really does know the key to open the door because he came out for the B path and used it.
To conclude, Alex and Jack repeat:
Alex walks into the cave.
Alex follows a random route.
Jack walks into the cave.
Alex is asked to follow a random route by Jack.
Alex follows Jack's advice and heads back that way.
What is a Zero Knowledge Proof?
At a high level, the aim is to construct a secure and confidential conversation between the prover and the verifier, where the prover convinces the verifier that they have the requisite information without disclosing it. The prover and verifier exchange messages and calculate in each round of the dialogue.
The prover uses their knowledge to prove they have the information the verifier wants during these rounds. The verifier can verify the prover's truthfulness without learning more by checking the proof's mathematical statement or computation.
Zero knowledge proofs use advanced mathematical procedures and cryptography methods to secure communication. These methods ensure the evidence is authentic while preventing the prover from creating a phony proof or the verifier from extracting unnecessary information.
ZK proofs require examples to grasp. Before the examples, there are some preconditions.
Criteria for Proofs of Zero Knowledge
Completeness: If the proposition being proved is true, then an honest prover will persuade an honest verifier that it is true.
Soundness: If the proposition being proved is untrue, no dishonest prover can persuade a sincere verifier that it is true.
Zero-knowledge: The verifier only realizes that the proposition being proved is true. In other words, the proof only establishes the veracity of the proposition being supported and nothing more.
The zero-knowledge condition is crucial. Zero-knowledge proofs show only the secret's veracity. The verifier shouldn't know the secret's value or other details.
Example after example after example
To illustrate, take a zero-knowledge proof with several examples:
Initial Password Verification Example
You want to confirm you know a password or secret phrase without revealing it.
Use a zero-knowledge proof:
You and the verifier settle on a mathematical conundrum or issue, such as figuring out a big number's components.
The puzzle or problem is then solved using the hidden knowledge that you have learned. You may, for instance, utilize your understanding of the password to determine the components of a particular number.
You provide your answer to the verifier, who can assess its accuracy without knowing anything about your private data.
You go through this process several times with various riddles or issues to persuade the verifier that you actually are aware of the secret knowledge.
You solved the mathematical puzzles or problems, proving to the verifier that you know the hidden information. The proof is zero-knowledge since the verifier only sees puzzle solutions, not the secret information.
In this scenario, the mathematical challenge or problem represents the secret, and solving it proves you know it. The evidence does not expose the secret, and the verifier just learns that you know it.
My simple example meets the zero-knowledge proof conditions:
Completeness: If you actually know the hidden information, you will be able to solve the mathematical puzzles or problems, hence the proof is conclusive.
Soundness: The proof is sound because the verifier can use a publicly known algorithm to confirm that your answer to the mathematical conundrum or difficulty is accurate.
Zero-knowledge: The proof is zero-knowledge because all the verifier learns is that you are aware of the confidential information. Beyond the fact that you are aware of it, the verifier does not learn anything about the secret information itself, such as the password or the factors of the number. As a result, the proof does not provide any new insights into the secret.
Explanation #2: Toss a coin.
One coin is biased to come up heads more often than tails, while the other is fair (i.e., comes up heads and tails with equal probability). You know which coin is which, but you want to show a friend you can tell them apart without telling them.
Use a zero-knowledge proof:
One of the two coins is chosen at random, and you secretly flip it more than once.
You show your pal the following series of coin flips without revealing which coin you actually flipped.
Next, as one of the two coins is flipped in front of you, your friend asks you to tell which one it is.
Then, without revealing which coin is which, you can use your understanding of the secret order of coin flips to determine which coin your friend flipped.
To persuade your friend that you can actually differentiate between the coins, you repeat this process multiple times using various secret coin-flipping sequences.
In this example, the series of coin flips represents the knowledge of biased and fair coins. You can prove you know which coin is which without revealing which is biased or fair by employing a different secret sequence of coin flips for each round.
The evidence is zero-knowledge since your friend does not learn anything about which coin is biased and which is fair other than that you can tell them differently. The proof does not indicate which coin you flipped or how many times you flipped it.
The coin-flipping example meets zero-knowledge proof requirements:
Completeness: If you actually know which coin is biased and which is fair, you should be able to distinguish between them based on the order of coin flips, and your friend should be persuaded that you can.
Soundness: Your friend may confirm that you are correctly recognizing the coins by flipping one of them in front of you and validating your answer, thus the proof is sound in that regard. Because of this, your acquaintance can be sure that you are not just speculating or picking a coin at random.
Zero-knowledge: The argument is that your friend has no idea which coin is biased and which is fair beyond your ability to distinguish between them. Your friend is not made aware of the coin you used to make your decision or the order in which you flipped the coins. Consequently, except from letting you know which coin is biased and which is fair, the proof does not give any additional information about the coins themselves.
Figure out the prime number in Example #3.
You want to prove to a friend that you know their product n=pq without revealing p and q. Zero-knowledge proof?
Use a variant of the RSA algorithm. Method:
You determine a new number s = r2 mod n by computing a random number r.
You email your friend s and a declaration that you are aware of the values of p and q necessary for n to equal pq.
A random number (either 0 or 1) is selected by your friend and sent to you.
You send your friend r as evidence that you are aware of the values of p and q if e=0. You calculate and communicate your friend's s/r if e=1.
Without knowing the values of p and q, your friend can confirm that you know p and q (in the case where e=0) or that s/r is a legitimate square root of s mod n (in the situation where e=1).
This is a zero-knowledge proof since your friend learns nothing about p and q other than their product is n and your ability to verify it without exposing any other information. You can prove that you know p and q by sending r or by computing s/r and sending that instead (if e=1), and your friend can verify that you know p and q or that s/r is a valid square root of s mod n without learning anything else about their values. This meets the conditions of completeness, soundness, and zero-knowledge.
Zero-knowledge proofs satisfy the following:
Completeness: The prover can demonstrate this to the verifier by computing q = n/p and sending both p and q to the verifier. The prover also knows a prime number p and a factorization of n as p*q.
Soundness: Since it is impossible to identify any pair of numbers that correctly factorize n without being aware of its prime factors, the prover is unable to demonstrate knowledge of any p and q that do not do so.
Zero knowledge: The prover only admits that they are aware of a prime number p and its associated factor q, which is already known to the verifier. This is the extent of their knowledge of the prime factors of n. As a result, the prover does not provide any new details regarding n's prime factors.
Types of Proofs of Zero Knowledge
Each zero-knowledge proof has pros and cons. Most zero-knowledge proofs are:
Interactive Zero Knowledge Proofs: The prover and the verifier work together to establish the proof in this sort of zero-knowledge proof. The verifier disputes the prover's assertions after receiving a sequence of messages from the prover. When the evidence has been established, the prover will employ these new problems to generate additional responses.
Non-Interactive Zero Knowledge Proofs: For this kind of zero-knowledge proof, the prover and verifier just need to exchange a single message. Without further interaction between the two parties, the proof is established.
A statistical zero-knowledge proof is one in which the conclusion is reached with a high degree of probability but not with certainty. This indicates that there is a remote possibility that the proof is false, but that this possibility is so remote as to be unimportant.
Succinct Non-Interactive Argument of Knowledge (SNARKs): SNARKs are an extremely effective and scalable form of zero-knowledge proof. They are utilized in many different applications, such as machine learning, blockchain technology, and more. Similar to other zero-knowledge proof techniques, SNARKs enable one party—the prover—to demonstrate to another—the verifier—that they are aware of a specific piece of information without disclosing any more information about that information.
The main characteristic of SNARKs is their succinctness, which refers to the fact that the size of the proof is substantially smaller than the amount of the original data being proved. Because to its high efficiency and scalability, SNARKs can be used in a wide range of applications, such as machine learning, blockchain technology, and more.
Uses for Zero Knowledge Proofs
ZKP applications include:
Verifying Identity ZKPs can be used to verify your identity without disclosing any personal information. This has uses in access control, digital signatures, and online authentication.
Proof of Ownership ZKPs can be used to demonstrate ownership of a certain asset without divulging any details about the asset itself. This has uses for protecting intellectual property, managing supply chains, and owning digital assets.
Financial Exchanges Without disclosing any details about the transaction itself, ZKPs can be used to validate financial transactions. Cryptocurrency, internet payments, and other digital financial transactions can all use this.
By enabling parties to make calculations on the data without disclosing the data itself, Data Privacy ZKPs can be used to preserve the privacy of sensitive data. Applications for this can be found in the financial, healthcare, and other sectors that handle sensitive data.
By enabling voters to confirm that their vote was counted without disclosing how they voted, elections ZKPs can be used to ensure the integrity of elections. This is applicable to electronic voting, including internet voting.
Cryptography Modern cryptography's ZKPs are a potent instrument that enable secure communication and authentication. This can be used for encrypted messaging and other purposes in the business sector as well as for military and intelligence operations.
Proofs of Zero Knowledge and Compliance
Kubernetes and regulatory compliance use ZKPs in many ways. Examples:
Security for Kubernetes ZKPs offer a mechanism to authenticate nodes without disclosing any sensitive information, enhancing the security of Kubernetes clusters. ZKPs, for instance, can be used to verify, without disclosing the specifics of the program, that the nodes in a Kubernetes cluster are running permitted software.
Compliance Inspection Without disclosing any sensitive information, ZKPs can be used to demonstrate compliance with rules like the GDPR, HIPAA, and PCI DSS. ZKPs, for instance, can be used to demonstrate that data has been encrypted and stored securely without divulging the specifics of the mechanism employed for either encryption or storage.
Access Management Without disclosing any private data, ZKPs can be used to offer safe access control to Kubernetes resources. ZKPs can be used, for instance, to demonstrate that a user has the necessary permissions to access a particular Kubernetes resource without disclosing the details of those permissions.
Safe Data Exchange Without disclosing any sensitive information, ZKPs can be used to securely transmit data between Kubernetes clusters or between several businesses. ZKPs, for instance, can be used to demonstrate the sharing of a specific piece of data between two parties without disclosing the details of the data itself.
Kubernetes deployments audited Without disclosing the specifics of the deployment or the data being processed, ZKPs can be used to demonstrate that Kubernetes deployments are working as planned. This can be helpful for auditing purposes and for ensuring that Kubernetes deployments are operating as planned.
ZKPs preserve data and maintain regulatory compliance by letting parties prove things without revealing sensitive information. ZKPs will be used more in Kubernetes as it grows.

Amelie Carver
3 years ago
Web3 Needs More Writers to Educate Us About It
WRITE FOR THE WEB3
Why web3’s messaging is lost and how crypto winter is growing growth seeds
People interested in crypto, blockchain, and web3 typically read Bitcoin and Ethereum's white papers. It's a good idea. Documents produced for developers and academia aren't always the ideal resource for beginners.
Given the surge of extremely technical material and the number of fly-by-nights, rug pulls, and other scams, it's little wonder mainstream audiences regard the blockchain sector as an expensive sideshow act.
What's the solution?
Web3 needs more than just builders.
After joining TikTok, I followed Amy Suto of SutoScience. Amy switched from TV scriptwriting to IT copywriting years ago. She concentrates on web3 now. Decentralized autonomous organizations (DAOs) are seeking skilled copywriters for web3.
Amy has found that web3's basics are easy to grasp; you don't need technical knowledge. There's a paradigm shift in knowing the basics; be persistent and patient.
Apple is positioning itself as a data privacy advocate, leveraging web3's zero-trust ethos on data ownership.
Finn Lobsien, who writes about web3 copywriting for the Mirror and Twitter, agrees: acronyms and abstractions won't do.
Web3 preached to the choir. Curious newcomers have only found whitepapers and scams when trying to learn why the community loves it. No wonder people resist education and buy-in.
Due to the gender gap in crypto (Crypto Bro is not just a stereotype), it attracts people singing to the choir or trying to cash in on the next big thing.
Last year, the industry was booming, so writing wasn't necessary. Now that the bear market has returned (for everyone, but especially web3), holding readers' attention is a valuable skill.
White papers and the Web3
Why does web3 rely so much on non-growth content?
Businesses must polish and improve their messaging moving into the 2022 recession. The 2021 tech boom provided such a sense of affluence and (unsustainable) growth that no one needed great marketing material. The market found them.
This was especially true for web3 and the first-time crypto believers. Obviously. If they knew which was good.
White papers help. White papers are highly technical texts that walk a reader through a product's details. How Does a White Paper Help Your Business and That White Paper Guy discuss them.
They're meant for knowledgeable readers. Investors and the technical (academic/developer) community read web3 white papers. White papers are used when a product is extremely technical or difficult to assist an informed reader to a conclusion. Web3 uses them most often for ICOs (initial coin offerings).
White papers for web3 education help newcomers learn about the web3 industry's components. It's like sending a first-grader to the Annotated Oxford English Dictionary to learn to read. It's a reference, not a learning tool, for words.
Newcomers can use platforms that teach the basics. These included Coinbase's Crypto Basics tutorials or Cryptochicks Academy, founded by the mother of Ethereum's inventor to get more women utilizing and working in crypto.
Discord and Web3 communities
Discord communities are web3's opposite. Discord communities involve personal communications and group involvement.
Online audience growth begins with community building. User personas prefer 1000 dedicated admirers over 1 million lukewarm followers, and the language is much more easygoing. Discord groups are renowned for phishing scams, compromised wallets, and incorrect information, especially since the crypto crisis.
White papers and Discord increase industry insularity. White papers are complicated, and Discord has a high risk threshold.
Web3 and writing ads
Copywriting is emotional, but white papers are logical. It uses the brain's quick-decision centers. It's meant to make the reader invest immediately.
Not bad. People think sales are sleazy, but they can spot the poor things.
Ethical copywriting helps you reach the correct audience. People who gain a following on Medium are likely to have copywriting training and a readership (or three) in mind when they publish. Tim Denning and Sinem Günel know how to identify a target audience and make them want to learn more.
In a fast-moving market, copywriting is less about long-form content like sales pages or blogs, but many organizations do. Instead, the copy is concise, individualized, and high-value. Tweets, email marketing, and IM apps (Discord, Telegram, Slack to a lesser extent) keep engagement high.
What does web3's messaging lack? As DAOs add stricter copyrighting, narrative and connecting tales seem to be missing.
Web3 is passionate about constructing the next internet. Now, they can connect their passion to a specific audience so newcomers understand why.

Vitalik
4 years ago
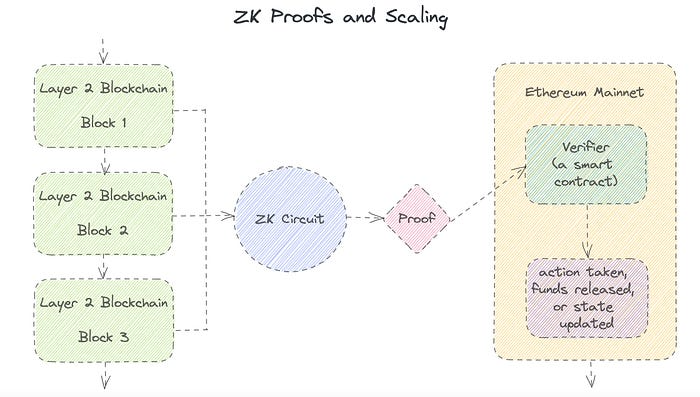
An approximate introduction to how zk-SNARKs are possible (part 2)
If tasked with the problem of coming up with a zk-SNARK protocol, many people would make their way to this point and then get stuck and give up. How can a verifier possibly check every single piece of the computation, without looking at each piece of the computation individually? But it turns out that there is a clever solution.
Polynomials
Polynomials are a special class of algebraic expressions of the form:
- x+5
- x^4
- x^3+3x^2+3x+1
- 628x^{271}+318x^{270}+530x^{269}+…+69x+381
i.e. they are a sum of any (finite!) number of terms of the form cx^k
There are many things that are fascinating about polynomials. But here we are going to zoom in on a particular one: polynomials are a single mathematical object that can contain an unbounded amount of information (think of them as a list of integers and this is obvious). The fourth example above contained 816 digits of tau, and one can easily imagine a polynomial that contains far more.
Furthermore, a single equation between polynomials can represent an unbounded number of equations between numbers. For example, consider the equation A(x)+ B(x) = C(x). If this equation is true, then it's also true that:
- A(0)+B(0)=C(0)
- A(1)+B(1)=C(1)
- A(2)+B(2)=C(2)
- A(3)+B(3)=C(3)
And so on for every possible coordinate. You can even construct polynomials to deliberately represent sets of numbers so you can check many equations all at once. For example, suppose that you wanted to check:
- 12+1=13
- 10+8=18
- 15+8=23
- 15+13=28
You can use a procedure called Lagrange interpolation to construct polynomials A(x) that give (12,10,15,15) as outputs at some specific set of coordinates (eg. (0,1,2,3)), B(x) the outputs (1,8,8,13) on thos same coordinates, and so forth. In fact, here are the polynomials:
- A(x)=-2x^3+\frac{19}{2}x^2-\frac{19}{2}x+12
- B(x)=2x^3-\frac{19}{2}x^2+\frac{29}{2}x+1
- C(x)=5x+13
Checking the equation A(x)+B(x)=C(x) with these polynomials checks all four above equations at the same time.
Comparing a polynomial to itself
You can even check relationships between a large number of adjacent evaluations of the same polynomial using a simple polynomial equation. This is slightly more advanced. Suppose that you want to check that, for a given polynomial F, F(x+2)=F(x)+F(x+1) with the integer range {0,1…89} (so if you also check F(0)=F(1)=1, then F(100) would be the 100th Fibonacci number)
As polynomials, F(x+2)-F(x+1)-F(x) would not be exactly zero, as it could give arbitrary answers outside the range x={0,1…98}. But we can do something clever. In general, there is a rule that if a polynomial P is zero across some set S=\{x_1,x_2…x_n\} then it can be expressed as P(x)=Z(x)*H(x), where Z(x)=(x-x_1)*(x-x_2)*…*(x-x_n) and H(x) is also a polynomial. In other words, any polynomial that equals zero across some set is a (polynomial) multiple of the simplest (lowest-degree) polynomial that equals zero across that same set.
Why is this the case? It is a nice corollary of polynomial long division: the factor theorem. We know that, when dividing P(x) by Z(x), we will get a quotient Q(x) and a remainder R(x) is strictly less than that of Z(x). Since we know that P is zero on all of S, it means that R has to be zero on all of S as well. So we can simply compute R(x) via polynomial interpolation, since it's a polynomial of degree at most n-1 and we know n values (the zeros at S). Interpolating a polynomial with all zeroes gives the zero polynomial, thus R(x)=0 and H(x)=Q(x).
Going back to our example, if we have a polynomial F that encodes Fibonacci numbers (so F(x+2)=F(x)+F(x+1) across x=\{0,1…98\}), then I can convince you that F actually satisfies this condition by proving that the polynomial P(x)=F(x+2)-F(x+1)-F(x) is zero over that range, by giving you the quotient:
H(x)=\frac{F(x+2)-F(x+1)-F(x)}{Z(x)}
Where Z(x) = (x-0)*(x-1)*…*(x-98).
You can calculate Z(x) yourself (ideally you would have it precomputed), check the equation, and if the check passes then F(x) satisfies the condition!
Now, step back and notice what we did here. We converted a 100-step-long computation into a single equation with polynomials. Of course, proving the N'th Fibonacci number is not an especially useful task, especially since Fibonacci numbers have a closed form. But you can use exactly the same basic technique, just with some extra polynomials and some more complicated equations, to encode arbitrary computations with an arbitrarily large number of steps.
see part 3
You might also like

Aaron Dinin, PhD
2 years ago
The Advantages and Disadvantages of Having Investors Sign Your NDA
Startup entrepreneurs assume what risks when pitching?
Last week I signed four NDAs.
Four!
NDA stands for non-disclosure agreement. A legal document given to someone receiving confidential information. By signing, the person pledges not to share the information for a certain time. If they do, they may be in breach of contract and face legal action.
Companies use NDAs to protect trade secrets and confidential internal information from employees and contractors. Appropriate. If you manage a huge, successful firm, you don't want your employees selling their information to your competitors. To be true, business NDAs don't always prevent corporate espionage, but they usually make employees and contractors think twice before sharing.
I understand employee and contractor NDAs, but I wasn't asked to sign one. I counsel entrepreneurs, thus the NDAs I signed last week were from startups that wanted my feedback on their concepts.
I’m not a startup investor. I give startup guidance online. Despite that, four entrepreneurs thought their company ideas were so important they wanted me to sign a generically written legal form they probably acquired from a shady, spam-filled legal templates website before we could chat.
False. One company tried to get me to sign their NDA a few days after our conversation. I gently rejected, but their tenacity encouraged me. I considered sending retroactive NDAs to everyone I've ever talked to about one of my startups in case they establish a successful company based on something I said.
Two of the other three NDAs were from nearly identical companies. Good thing I didn't sign an NDA for the first one, else they may have sued me for talking to the second one as though I control the firms people pitch me.
I wasn't talking to the fourth NDA company. Instead, I received an unsolicited email from someone who wanted comments on their fundraising pitch deck but required me to sign an NDA before sending it.
That's right, before I could read a random Internet stranger's unsolicited pitch deck, I had to sign his NDA, potentially limiting my ability to discuss what was in it.
You should understand. Advisors, mentors, investors, etc. talk to hundreds of businesses each year. They cannot manage all the companies they deal with, thus they cannot risk legal trouble by talking to someone. Well, if I signed NDAs for all the startups I spoke with, half of the 300+ articles I've written on Medium over the past several years could get me sued into the next century because I've undoubtedly addressed topics in my articles that I discussed with them.
The four NDAs I received last week are part of a recent trend of entrepreneurs sending out NDAs before meetings, despite the practical and legal issues. They act like asking someone to sign away their right to talk about all they see and hear in a day is as straightforward as asking for a glass of water.
Given this inflow of NDAs, I wanted to briefly remind entrepreneurs reading this blog about the merits and cons of requesting investors (or others in the startup ecosystem) to sign your NDA.
Benefits of having investors sign your NDA include:
None. Zero. Nothing.
Disadvantages of requesting investor NDAs:
You'll come off as an amateur who has no idea what it takes to launch a successful firm.
Investors won't trust you with their money since you appear to be a complete amateur.
Printing NDAs will be a waste of paper because no genuine entrepreneur will ever sign one.
I apologize for missing any cons. Please leave your remarks.
Aaron Dinin, PhD
2 years ago
Are You Unintentionally Creating the Second Difficult Startup Type?
Most don't understand the issue until it's too late.
My first startup was what entrepreneurs call the hardest. A two-sided marketplace.
Two-sided marketplaces are the hardest startups because founders must solve the chicken or the egg conundrum.
A two-sided marketplace needs suppliers and buyers. Without suppliers, buyers won't come. Without buyers, suppliers won't come. An empty marketplace and a founder striving to gain momentum result.
My first venture made me a struggling founder seeking to achieve traction for a two-sided marketplace. The company failed, and I vowed never to start another like it.
I didn’t. Unfortunately, my second venture was almost as hard. It failed like the second-hardest startup.
What kind of startup is the second-hardest?
The second-hardest startup, which is almost as hard to develop, is rarely discussed in the startup community. Because of this, I predict more founders fail each year trying to develop the second-toughest startup than the hardest.
Fairly, I have no proof. I see many startups, so I have enough of firsthand experience. From what I've seen, for every entrepreneur developing a two-sided marketplace, I'll meet at least 10 building this other challenging startup.
I'll describe a startup I just met with its two co-founders to explain the second hardest sort of startup and why it's so hard. They created a financial literacy software for parents of high schoolers.
The issue appears plausible. Children struggle with money. Parents must teach financial responsibility. Problems?
It's possible.
Buyers and users are different.
Buyer-user mismatch.
The financial literacy app I described above targets parents. The parent doesn't utilize the app. Child is end-user. That may not seem like much, but it makes customer and user acquisition and onboarding difficult for founders.
The difficulty of a buyer-user imbalance
The company developing a product faces a substantial operational burden when the buyer and end customer are different. Consider classic firms where the buyer is the end user to appreciate that responsibility.
Entrepreneurs selling directly to end users must educate them about the product's benefits and use. Each demands a lot of time, effort, and resources.
Imagine selling a financial literacy app where the buyer and user are different. To make the first sale, the entrepreneur must establish all the items I mentioned above. After selling, the entrepreneur must supply a fresh set of resources to teach, educate, or train end-users.
Thus, a startup with a buyer-user mismatch must market, sell, and train two organizations at once, requiring twice the work with the same resources.
The second hardest startup is hard for reasons other than the chicken-or-the-egg conundrum. It takes a lot of creativity and luck to solve the chicken-or-egg conundrum.
The buyer-user mismatch problem cannot be overcome by innovation or luck. Buyer-user mismatches must be solved by force. Simply said, when a product buyer is different from an end-user, founders have a lot more work. If they can't work extra, their companies fail.

Ethan Siegel
2 years ago
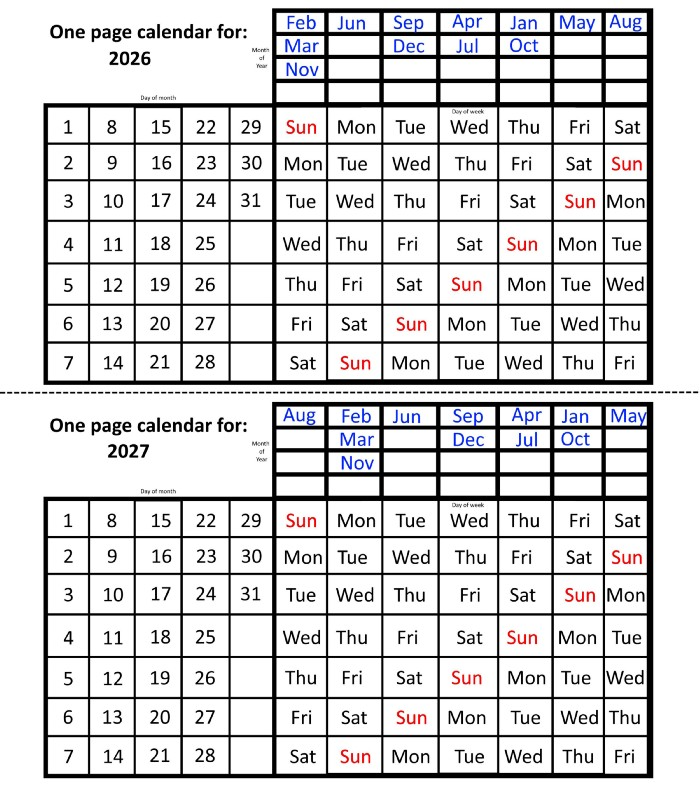
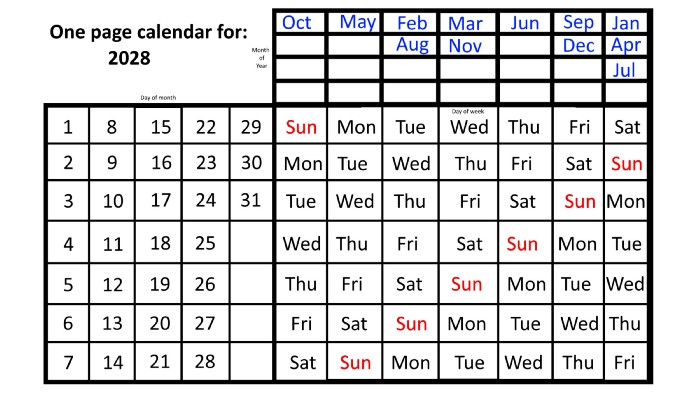
How you view the year will change after using this one-page calendar.
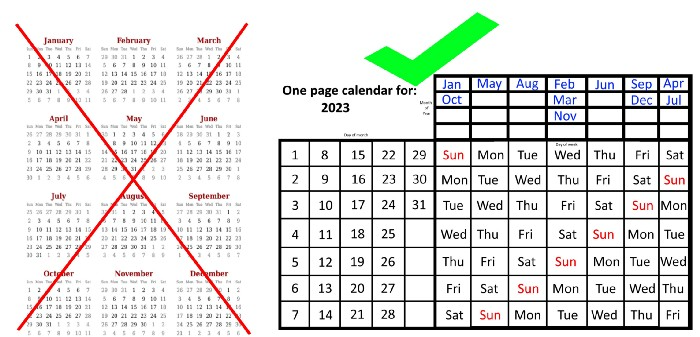
No other calendar is simpler, smaller, and reusable year after year. It works and is used here.
Most of us discard and replace our calendars annually. Each month, we move our calendar ahead another page, thus if we need to know which day of the week corresponds to a given day/month combination, we have to calculate it or flip forward/backward to the corresponding month. Questions like:
What day does this year's American Thanksgiving fall on?
Which months contain a Friday the thirteenth?
When is July 4th? What day of the week?
Alternatively, what day of the week is Christmas?
They're hard to figure out until you switch to the right month or look up all the months.
However, mathematically, the answers to these questions or any question that requires matching the day of the week with the day/month combination in a year are predictable, basic, and easy to work out. If you use this one-page calendar instead of a 12-month calendar, it lasts the whole year and is easy to alter for future years. Let me explain.
The 2023 one-page calendar is above. The days of the month are on the lower left, which works for all months if you know that:
There are 31 days in January, March, May, July, August, October, and December.
All of the months of April, June, September, and November have 30 days.
And depending on the year, February has either 28 days (in non-leap years) or 29 days (in leap years).
If you know this, this calendar makes it easy to match the day/month of the year to the weekday.
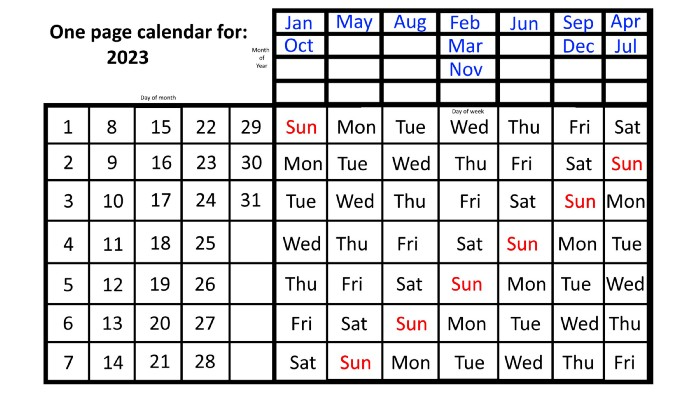
Here are some instances. American Thanksgiving is always on the fourth Thursday of November. You'll always know the month and day of the week, but the date—the day in November—changes each year.
On any other calendar, you'd have to flip to November to see when the fourth Thursday is. This one-page calendar only requires:
pick the month of November in the top-right corner to begin.
drag your finger down until Thursday appears,
then turn left and follow the monthly calendar until you reach the fourth Thursday.
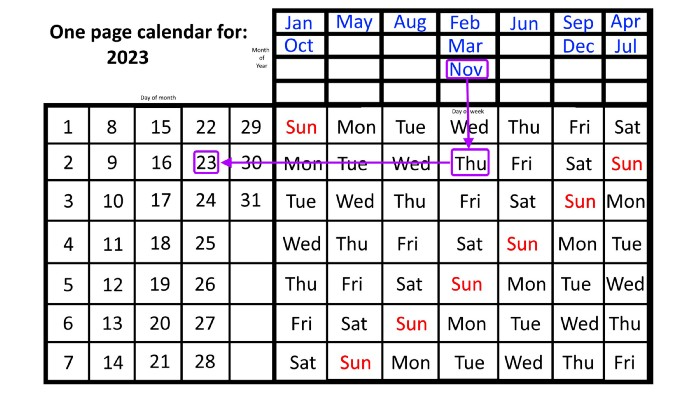
It's obvious: 2023 is the 23rd American Thanksgiving. For every month and day-of-the-week combination, start at the month, drag your finger down to the desired day, and then move to the left to see which dates match.
What if you knew the day of the week and the date of the month, but not the month(s)?
A different method using the same one-page calendar gives the answer. Which months have Friday the 13th this year? Just:
begin on the 13th of the month, the day you know you desire,
then swipe right with your finger till Friday appears.
and then work your way up until you can determine which months the specific Friday the 13th falls under.
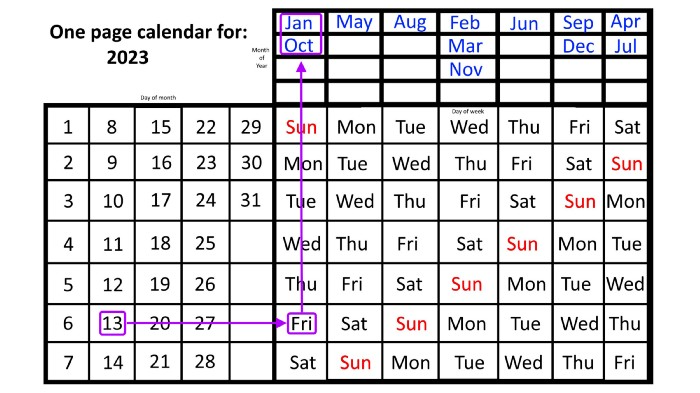
One Friday the 13th occurred in January 2023, and another will occur in October.
The most typical reason to consult a calendar is when you know the month/day combination but not the day of the week.
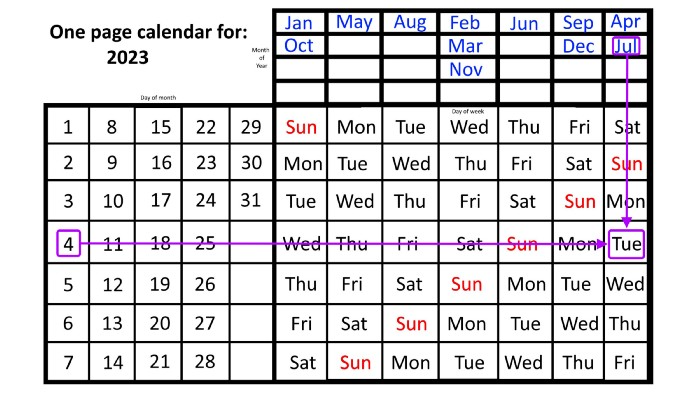
Compared to single-month calendars, the one-page calendar excels here. Take July 4th, for instance. Find the weekday here:
beginning on the left on the fourth of the month, as you are aware,
also begin with July, the month of the year you are most familiar with, at the upper right,
you should move your two fingers in the opposite directions till they meet: on a Tuesday in 2023.
That's how you find your selected day/month combination's weekday.
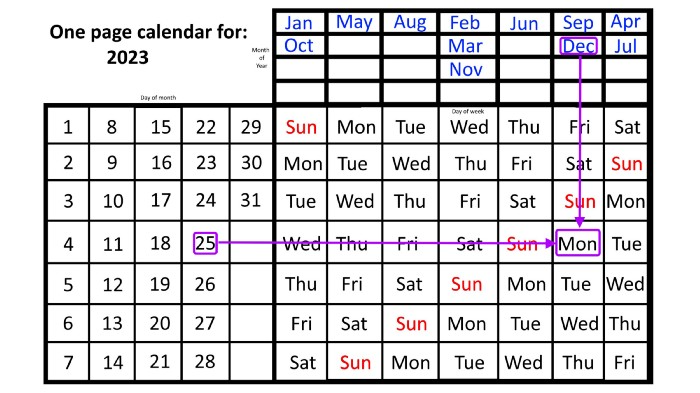
Another example: Christmas. Christmas Day is always December 25th, however unless your conventional calendar is open to December of your particular year, a question like "what day of the week is Christmas?" difficult to answer.
Unlike the one-page calendar!
Remember the left-hand day of the month. Top-right, you see the month. Put two fingers, one from each hand, on the date (25th) and the month (December). Slide the day hand to the right and the month hand downwards until they touch.
They meet on Monday—December 25, 2023.
For 2023, that's fine, but what happens in 2024? Even worse, what if we want to know the day-of-the-week/day/month combo many years from now?
I think the one-page calendar shines here.
Except for the blue months in the upper-right corner of the one-page calendar, everything is the same year after year. The months also change in a consistent fashion.
Each non-leap year has 365 days—one more than a full 52 weeks (which is 364). Since January 1, 2023 began on a Sunday and 2023 has 365 days, we immediately know that December 31, 2023 will conclude on a Sunday (which you can confirm using the one-page calendar) and that January 1, 2024 will begin on a Monday. Then, reorder the months for 2024, taking in mind that February will have 29 days in a leap year.
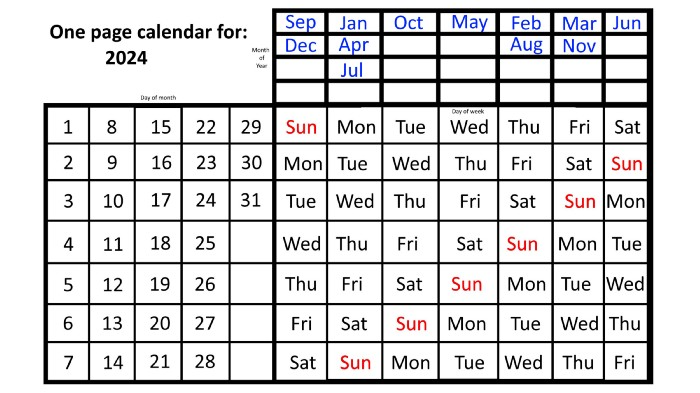
Please note the differences between 2023 and 2024 month placement. In 2023:
October and January began on the same day of the week.
On the following Monday of the week, May began.
August started on the next day,
then the next weekday marked the start of February, March, and November, respectively.
Unlike June, which starts the following weekday,
While September and December start on the following day of the week,
Lastly, April and July start one extra day later.
Since 2024 is a leap year, February has 29 days, disrupting the rhythm. Month placements change to:
The first day of the week in January, April, and July is the same.
October will begin the following day.
Possibly starting the next weekday,
February and August start on the next weekday,
beginning on the following day of the week between March and November,
beginning the following weekday in June,
and commencing one more day of the week after that, September and December.
Due to the 366-day leap year, 2025 will start two days later than 2024 on January 1st.

Now, looking at the 2025 calendar, you can see that the 2023 pattern of which months start on which days is repeated! The sole variation is a shift of three days-of-the-week ahead because 2023 had one more day (365) than 52 full weeks (364), and 2024 had two more days (366). Again,
On Wednesday this time, January and October begin on the same day of the week.
Although May begins on Thursday,
August begins this Friday.
March, November, and February all begin on a Saturday.
Beginning on a Sunday in June
Beginning on Monday are September and December,
and on Tuesday, April and July begin.
In 2026 and 2027, the year will commence on a Thursday and a Friday, respectively.
We must return to our leap year monthly arrangement in 2028. Yes, January 1, 2028 begins on a Saturday, but February, which begins on a Tuesday three days before January, will have 29 days. Thus:
Start dates for January, April, and July are all Saturdays.
Given that October began on Sunday,
Although May starts on a Monday,
beginning on a Tuesday in February and August,
Beginning on a Wednesday in March and November,
Beginning on Thursday, June
and Friday marks the start of September and December.
This is great because there are only 14 calendar configurations: one for each of the seven non-leap years where January 1st begins on each of the seven days of the week, and one for each of the seven leap years where it begins on each day of the week.
The 2023 calendar will function in 2034, 2045, 2051, 2062, 2073, 2079, 2090, 2102, 2113, and 2119. Except when passing over a non-leap year that ends in 00, like 2100, the repeat time always extends to 12 years or shortens to an extra 6 years.
The pattern is repeated in 2025's calendar in 2031, 2042, 2053, 2059, 2070, 2081, 2087, 2098, 2110, and 2121.
The extra 6-year repeat at the end of the century on the calendar for 2026 will occur in the years 2037, 2043, 2054, 2065, 2071, 2082, 2093, 2099, 2105, and 2122.
The 2027s calendar repeats in 2038, 2049, 2055, 2066, 2077, 2083, 2094, 2100, 2106, and 2117, almost exactly matching the 2026s pattern.
For leap years, the recurrence pattern is every 28 years when not passing a non-leap year ending in 00, or 12 or 40 years when we do. 2024's calendar repeats in 2052, 2080, 2120, 2148, 2176, and 2216; 2028's in 2056, 2084, 2124, 2152, 2180, and 2220.
Knowing January 1st and whether it's a leap year lets you construct a one-page calendar for any year. Try it—you might find it easier than any other alternative!