


More on Web3 & Crypto

Onchain Wizard
3 months ago
Three Arrows Capital & Celsius Updates
I read 1k+ page 3AC liquidation documentation so you don't have to. Also sharing revised Celsius recovery plans.
3AC's liquidation documents:
Someone disclosed 3AC liquidation records in the BVI courts recently. I'll discuss the leak's timeline and other highlights.
Three Arrows Capital began trading traditional currencies in emerging markets in 2012. They switched to equities and crypto, then purely crypto in 2018.
By 2020, the firm had $703mm in net assets and $1.8bn in loans (these guys really like debt).
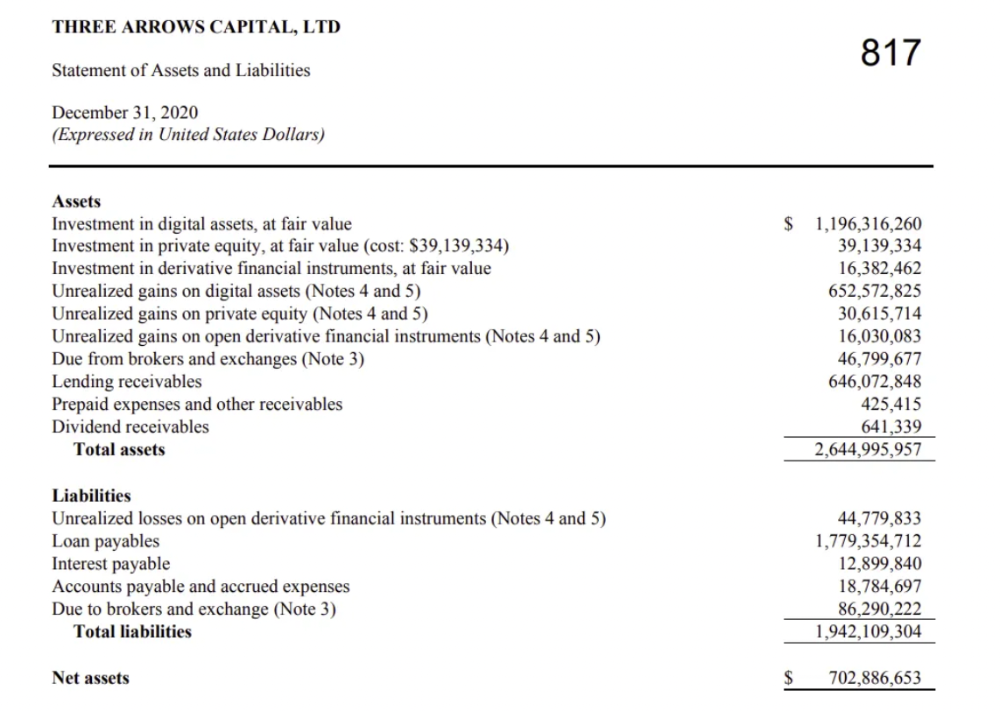
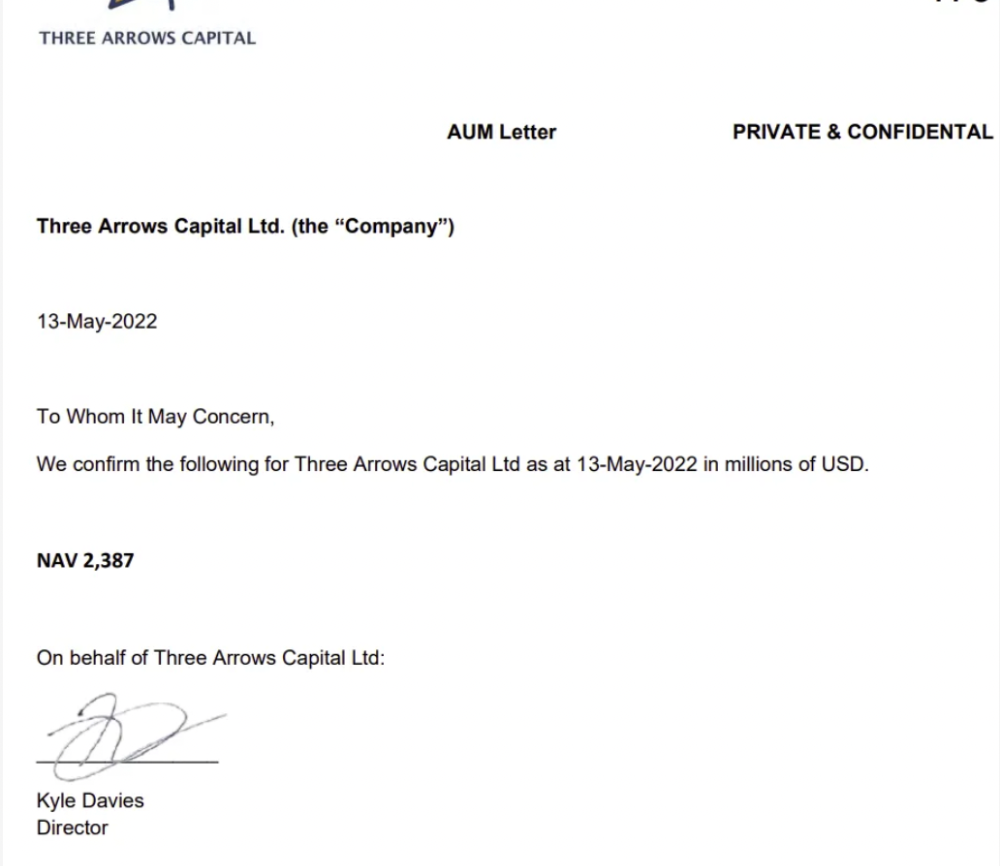
The firm's net assets under control reached $3bn in April 2022, according to the filings. 3AC had $600mm of LUNA/UST exposure before May 9th 2022, which put them over.
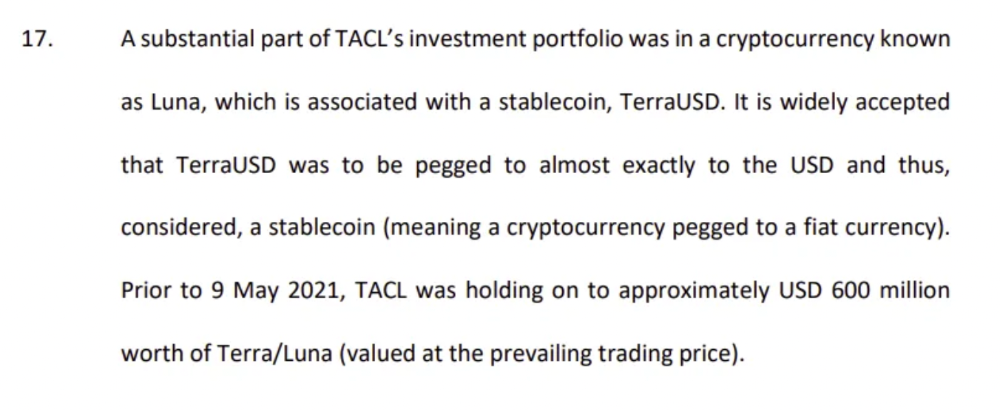
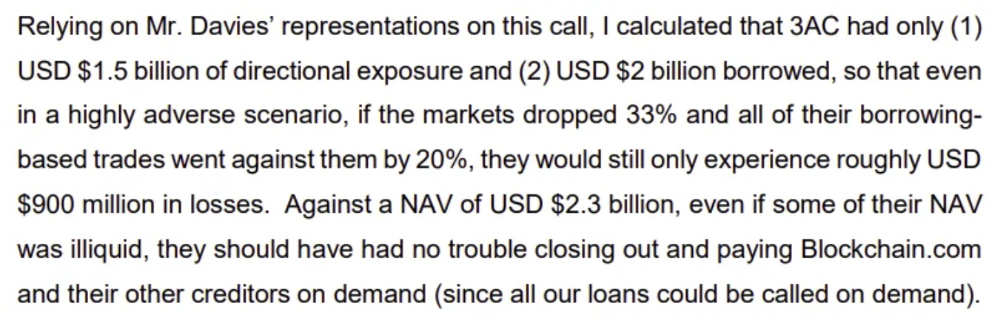
LUNA and UST go to zero quickly (I wrote about the mechanics of the blowup here). Kyle Davies, 3AC co-founder, told Blockchain.com on May 13 that they have $2.4bn in assets and $2.3bn NAV vs. $2bn in borrowings. As BTC and ETH plunged 33% and 50%, the company became insolvent by mid-2022.
3AC sent $32mm to Tai Ping Shen, a Cayman Islands business owned by Su Zhu and Davies' partner, Kelly Kaili Chen (who knows what is going on here).
3AC had borrowed over $3.5bn in notional principle, with Genesis ($2.4bn) and Voyager ($650mm) having the most exposure.
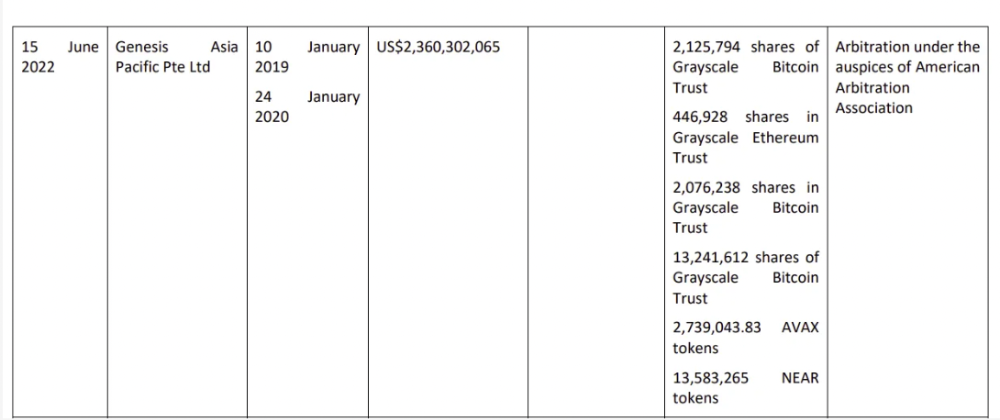
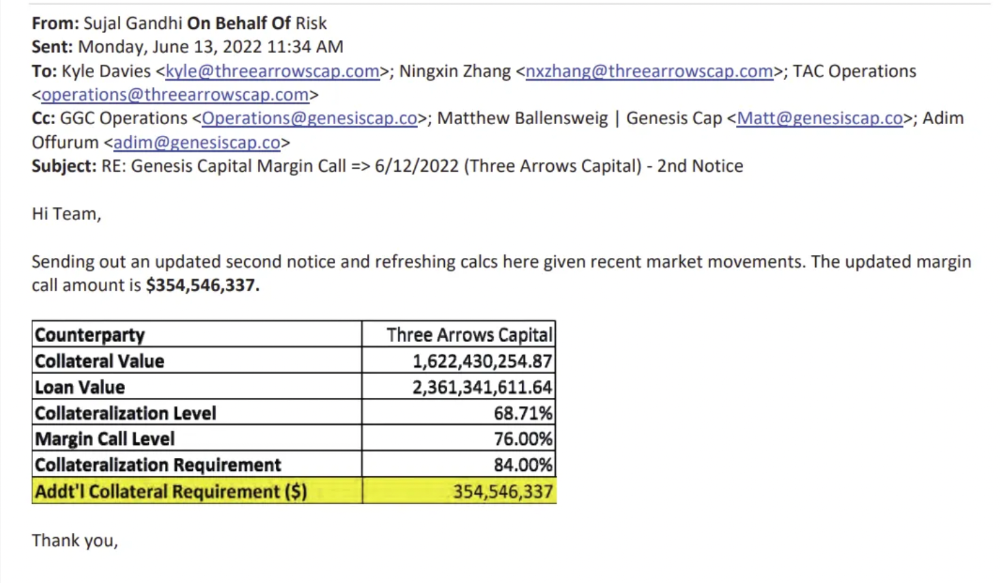
Genesis demanded $355mm in further collateral in June.
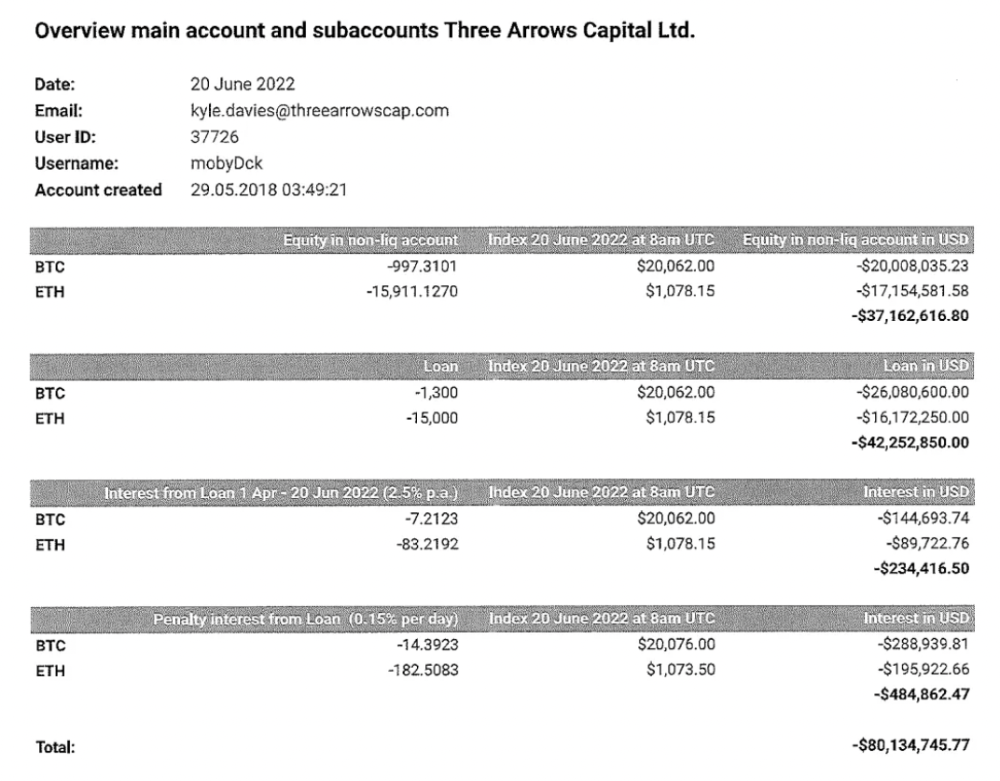
Deribit (another 3AC investment) called for $80 million in mid-June.
Even in mid-June, the corporation was trying to borrow more money to stay afloat. They approached Genesis for another $125mm loan (to pay another lender) and HODLnauts for BTC & ETH loans.
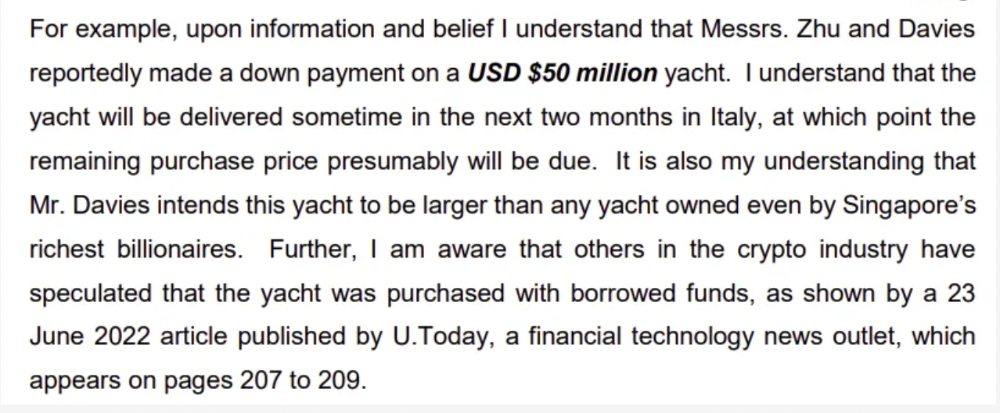
Pretty crazy. 3AC founders used borrowed money to buy a $50 million boat, according to the leak.
Su requesting for $5m + Chen Kaili Kelly asserting they loaned $65m unsecured to 3AC are identified as creditors.


Celsius:
This bankruptcy presentation shows the Celsius breakdown from March to July 14, 2022. From $22bn to $4bn, crypto assets plummeted from $14.6bn to $1.8bn (ouch). $16.5bn in user liabilities dropped to $4.72bn.
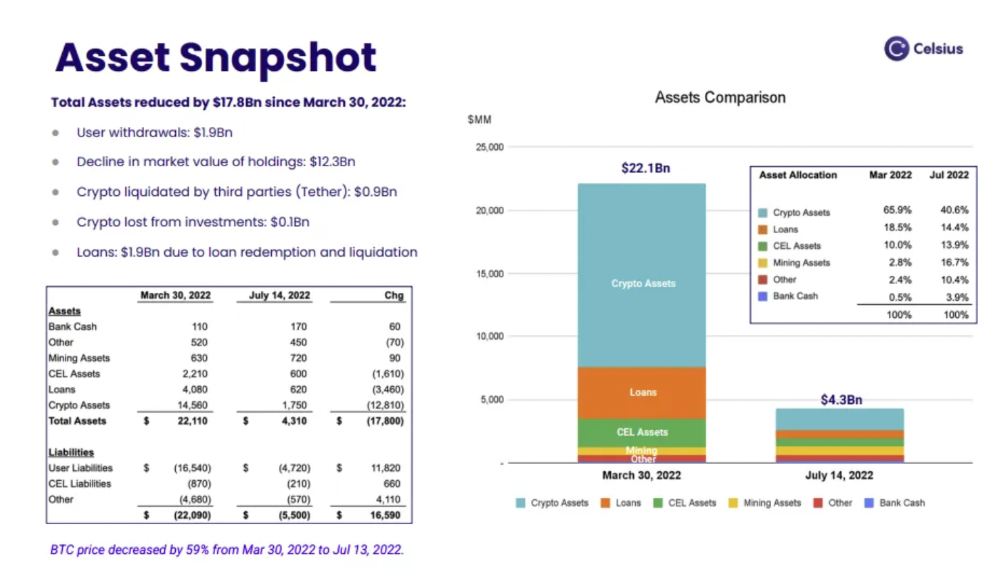
In my recent post, I examined if "forced selling" is over, with Celsius' crypto assets being a major overhang. In this presentation, it looks that Chapter 11 will provide clients the opportunity to accept cash at a discount or remain long crypto. Provided that a fresh source of money is unlikely to enter the Celsius situation, cash at a discount or crypto given to customers will likely remain a near-term market risk - cash at a discount will likely come from selling crypto assets, while customers who receive crypto could sell at any time. I'll share any Celsius updates I find.
Conclusion
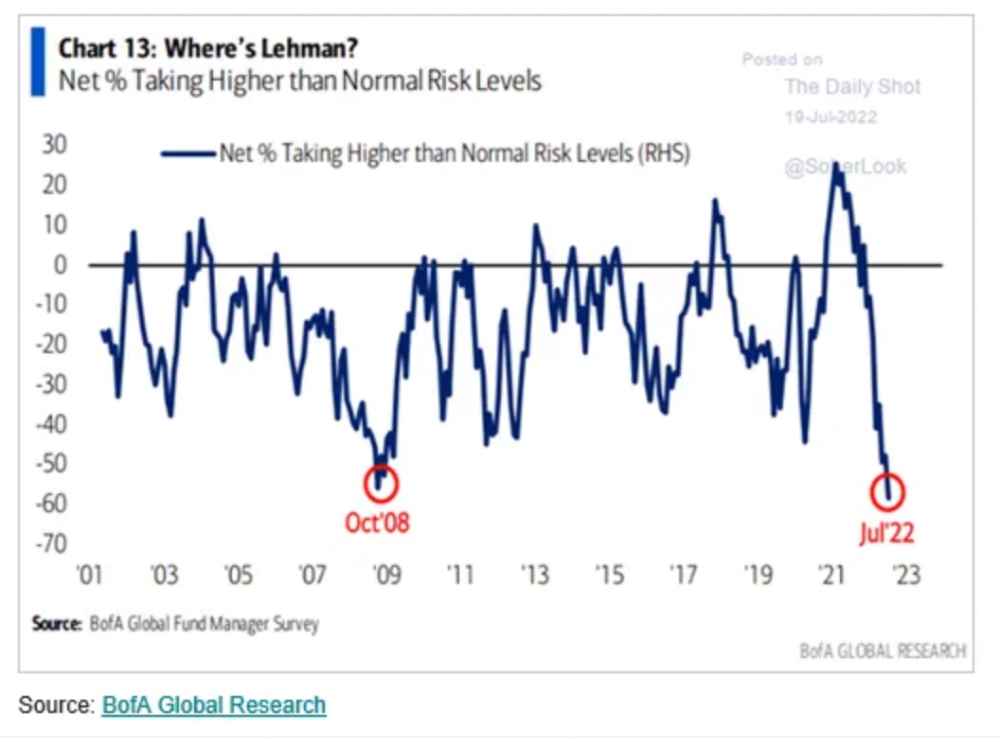
Only Celsius and the Mt Gox BTC unlock remain as forced selling catalysts. While everything went through a "relief" pump, with ETH up 75% from the bottom and numerous alts multiples higher, there are still macro dangers to equities + risk assets. There's a lot of wealth waiting to be deployed in crypto ($153bn in stables), but fund managers are risk apprehensive (lower than 2008 levels).
We're hopefully over crypto's "bottom," with peak anxiety and forced selling behind us, but we may chop around.
To see the full article, click here.
:max_bytes(150000):strip_icc():gifv():format(webp)/reiff_headshot-5bfc2a60c9e77c00519a70bd.jpg)
Nathan Reiff
6 months ago
Howey Test and Cryptocurrencies: 'Every ICO Is a Security'
What Is the Howey Test?
To determine whether a transaction qualifies as a "investment contract" and thus qualifies as a security, the Howey Test refers to the U.S. Supreme Court cass: the Securities Act of 1933 and the Securities Exchange Act of 1934. According to the Howey Test, an investment contract exists when "money is invested in a common enterprise with a reasonable expectation of profits from others' efforts."
The test applies to any contract, scheme, or transaction. The Howey Test helps investors and project backers understand blockchain and digital currency projects. ICOs and certain cryptocurrencies may be found to be "investment contracts" under the test.
Understanding the Howey Test
The Howey Test comes from the 1946 Supreme Court case SEC v. W.J. Howey Co. The Howey Company sold citrus groves to Florida buyers who leased them back to Howey. The company would maintain the groves and sell the fruit for the owners. Both parties benefited. Most buyers had no farming experience and were not required to farm the land.
The SEC intervened because Howey failed to register the transactions. The court ruled that the leaseback agreements were investment contracts.
This established four criteria for determining an investment contract. Investing contract:
- An investment of money
- n a common enterprise
- With the expectation of profit
- To be derived from the efforts of others
In the case of Howey, the buyers saw the transactions as valuable because others provided the labor and expertise. An income stream was obtained by only investing capital. As a result of the Howey Test, the transaction had to be registered with the SEC.
Howey Test and Cryptocurrencies
Bitcoin is notoriously difficult to categorize. Decentralized, they evade regulation in many ways. Regardless, the SEC is looking into digital assets and determining when their sale qualifies as an investment contract.
The SEC claims that selling digital assets meets the "investment of money" test because fiat money or other digital assets are being exchanged. Like the "common enterprise" test.
Whether a digital asset qualifies as an investment contract depends on whether there is a "expectation of profit from others' efforts."
For example, buyers of digital assets may be relying on others' efforts if they expect the project's backers to build and maintain the digital network, rather than a dispersed community of unaffiliated users. Also, if the project's backers create scarcity by burning tokens, the test is met. Another way the "efforts of others" test is met is if the project's backers continue to act in a managerial role.
These are just a few examples given by the SEC. If a project's success is dependent on ongoing support from backers, the buyer of the digital asset is likely relying on "others' efforts."
Special Considerations
If the SEC determines a cryptocurrency token is a security, many issues arise. It means the SEC can decide whether a token can be sold to US investors and forces the project to register.
In 2017, the SEC ruled that selling DAO tokens for Ether violated federal securities laws. Instead of enforcing securities laws, the SEC issued a warning to the cryptocurrency industry.
Due to the Howey Test, most ICOs today are likely inaccessible to US investors. After a year of ICOs, then-SEC Chair Jay Clayton declared them all securities.
SEC Chairman Gensler Agrees With Predecessor: 'Every ICO Is a Security'
Howey Test FAQs
How Do You Determine If Something Is a Security?
The Howey Test determines whether certain transactions are "investment contracts." Securities are transactions that qualify as "investment contracts" under the Securities Act of 1933 and the Securities Exchange Act of 1934.
The Howey Test looks for a "investment of money in a common enterprise with a reasonable expectation of profits from others' efforts." If so, the Securities Act of 1933 and the Securities Exchange Act of 1934 require disclosure and registration.
Why Is Bitcoin Not a Security?
Former SEC Chair Jay Clayton clarified in June 2018 that bitcoin is not a security: "Cryptocurrencies: Replace the dollar, euro, and yen with bitcoin. That type of currency is not a security," said Clayton.
Bitcoin, which has never sought public funding to develop its technology, fails the SEC's Howey Test. However, according to Clayton, ICO tokens are securities.
A Security Defined by the SEC
In the public and private markets, securities are fungible and tradeable financial instruments. The SEC regulates public securities sales.
The Supreme Court defined a security offering in SEC v. W.J. Howey Co. In its judgment, the court defines a security using four criteria:
- An investment contract's existence
- The formation of a common enterprise
- The issuer's profit promise
- Third-party promotion of the offering
Read original post.

Percy Bolmér
18 days ago
Ethereum No Longer Consumes A Medium-Sized Country's Electricity To Run
The Merge cut Ethereum's energy use by 99.5%.

The Crypto community celebrated on September 15, 2022. This day, Ethereum Merged. The entire blockchain successfully merged with the Beacon chain, and it was so smooth you barely noticed.
Many have waited, dreaded, and longed for this day.
Some investors feared the network would break down, while others envisioned a seamless merging.
Speculators predict a successful Merge will lead investors to Ethereum. This could boost Ethereum's popularity.
What Has Changed Since The Merge
The merging transitions Ethereum mainnet from PoW to PoS.
PoW sends a mathematical riddle to computers worldwide (miners). First miner to solve puzzle updates blockchain and is rewarded.
The puzzles sent are power-intensive to solve, so mining requires a lot of electricity. It's sent to every miner competing to solve it, requiring duplicate computation.
PoS allows investors to stake their coins to validate a new transaction. Instead of validating a whole block, you validate a transaction and get the fees.
You can validate instead of mine. A validator stakes 32 Ethereum. After staking, the validator can validate future blocks.
Once a validator validates a block, it's sent to a randomly selected group of other validators. This group verifies that a validator is not malicious and doesn't validate fake blocks.
This way, only one computer needs to solve or validate the transaction, instead of all miners. The validated block must be approved by a small group of validators, causing duplicate computation.
PoS is more secure because validating fake blocks results in slashing. You lose your bet tokens. If a validator signs a bad block or double-signs conflicting blocks, their ETH is burned.
Theoretically, Ethereum has one block every 12 seconds, so a validator forging a block risks burning 1 Ethereum for 12 seconds of transactions. This makes mistakes expensive and risky.
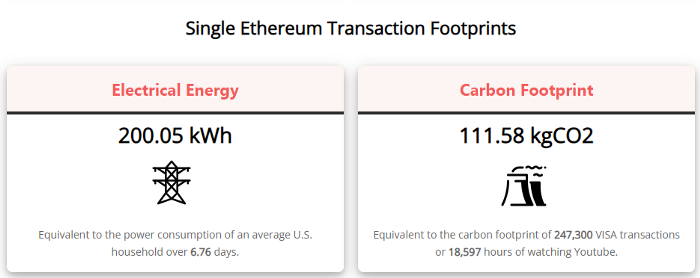
What Impact Does This Have On Energy Use?
Cryptocurrency is a natural calamity, sucking electricity and eating away at the earth one transaction at a time.
Many don't know the environmental impact of cryptocurrencies, yet it's tremendous.
A single Ethereum transaction used to use 200 kWh and leave a large carbon imprint. This update reduces global energy use by 0.2%.
Ethereum will submit a challenge to one validator, and that validator will forward it to randomly selected other validators who accept it.
This reduces the needed computing power.
They expect a 99.5% reduction, therefore a single transaction should cost 1 kWh.
Carbon footprint is 0.58 kgCO2, or 1,235 VISA transactions.
This is a big Ethereum blockchain update.
I love cryptocurrency and Mother Earth.
You might also like

Jay Peters
5 months ago
Apple AR/VR heaset
Apple is said to have opted for a standalone AR/VR headset over a more powerful tethered model.
It has had a tumultuous history.
Apple's alleged mixed reality headset appears to be the worst-kept secret in tech, and a fresh story from The Information is jam-packed with details regarding the device's rocky development.
Apple's decision to use a separate headgear is one of the most notable aspects of the story. Apple had yet to determine whether to pursue a more powerful VR headset that would be linked with a base station or a standalone headset. According to The Information, Apple officials chose the standalone product over the version with the base station, which had a processor that later arrived as the M1 Ultra. In 2020, Bloomberg published similar information.
That decision appears to have had a long-term impact on the headset's development. "The device's many processors had already been in development for several years by the time the choice was taken, making it impossible to go back to the drawing board and construct, say, a single chip to handle all the headset's responsibilities," The Information stated. "Other difficulties, such as putting 14 cameras on the headset, have given hardware and algorithm engineers stress."
Jony Ive remained to consult on the project's design even after his official departure from Apple, according to the story. Ive "prefers" a wearable battery, such as that offered by Magic Leap. Other prototypes, according to The Information, placed the battery in the headset's headband, and it's unknown which will be used in the final design.
The headset was purportedly shown to Apple's board of directors last week, indicating that a public unveiling is imminent. However, it is possible that it will not be introduced until later this year, and it may not hit shop shelves until 2023, so we may have to wait a bit to try it.
For further down the line, Apple is working on a pair of AR spectacles that appear like Ray-Ban wayfarer sunglasses, but according to The Information, they're "still several years away from release." (I'm interested to see how they compare to Meta and Ray-Bans' true wayfarer-style glasses.)

INTΞGRITY team
2 months ago
Terms of Service
Effective: August 31, 2022
These Terms of Service ("Terms") govern your access to and use of INTΞGRITY’s (or "we") websites, mobile applications, and other online products and services (collectively, the "Services"). By clicking your assent (e.g. "Continue," "Sign-in," or "Sign-up") or by utilizing our Services, you consent to these Terms, including the mandatory arbitration provision and class action waiver in the Resolving Disputes; Binding Arbitration Section.
Our Privacy Policy describes how we gather and utilize your information, while our Rules detail your duties when utilizing our Services. You agree to be bound by these Terms and our Rules by utilizing our Services. Please refer to our Privacy Statement for details on how we collect, utilize, disclose, and otherwise manage your information.
Please contact us at hello@int3grity.com if you have any queries regarding these Terms or our Services.
Account Details and Responsibilities
You are responsible for your use of the Services and any content you contribute, including compliance with all relevant laws. The Services may host content that is protected by the intellectual property rights of third parties. Please do not copy, post, download, or distribute content without permission.
You must adhere to our Rules when using the Services.
To use any or all of our services, you may need to register for an account. Contribute to the protection of your account. Protect your account's password, and maintain accurate account details. We advise you not to share your password with anyone else.
If you are accepting these Terms and using the Services on behalf of someone else (such as another person or entity), you confirm that you are allowed to do so, and the words "you" or "your" in these Terms refer to that other person or entity.
You must be at least 13 years old to access our services.
If you use the Services to access, collect, or otherwise utilize the personal information of other INTΞGRITY users ("Personal Information"), you agree to comply with all applicable laws. You also undertake not to sell any Personal Information, where "sell" has the meaning ascribed to it by relevant legislation.
For Personal Information you provide to us (as a Newsletter Editor, for example), you represent and warrant that you have lawfully collected the Personal Information and that you or a third party have provided all required notices and obtained all required consents prior to collecting the Personal Information. You further represent and warrant that INTΞGRITY’s use of such Personal Information in accordance with the purposes for which you provided the Personal Information will not violate, misappropriate, or infringe any rights of a third party (including intellectual property rights or privacy rights) or cause us to violate any applicable laws.
The Services' User Content
INTΞGRITY may monitor your conduct and material for compliance with these Terms and our Rules, and reserves the right to remove any content that violates these guidelines.
INTΞGRITY maintains the right to remove or disable content that is accused to violate the intellectual property rights of others, as well as to cancel the accounts of repeat infringers. We respond to notifications of alleged copyright violations if they comply with the law; please report such notices using our Copyright Policy.
Ownership and Rights
You maintain ownership of all content that you submit, upload, or display on or through the Services.
By submitting, posting, or displaying content on or through the Services, unless otherwise agreed in writing, you grant INTΞGRITY a nonexclusive, royalty-free, worldwide, fully paid, and sublicensable license to use, reproduce, modify, adapt, publish, translate, create derivative works from, distribute, publicly perform and display your content and any name, username or likeness provided in connection with your content in all media formats and distribution methods now known or later developed.
INTΞGRITY requires this license because you are the owner of your material, and INTΞGRITY cannot show it across its multiple platforms (mobile, online) without your consent.
This type of license is also required for content distribution throughout our Services. For example, you may publish a piece on INTΞGRITY. It is duplicated as versions on both our website and app, and distributed to many locations on INTΞGRITY, including the homepage and reading lists. A tweak could be that we display a fragment of your work as a preview (rather than the entire post), with attribution. An example of a derivative work might be a list of top authors or quotations on INTΞGRITY that includes chunks of your article, again with full attribution. This license solely applies to our Services and does not grant us permissions outside of our Services.
So long as you comply with these Terms, INTΞGRITY grants you a limited, non-exclusive, personal, and non-transferable license to access and utilize our Services.
Copyright, trademark, and other United States and international laws protect the Services. These Terms do not grant you any right, title, or interest in the Services, the material posted by other users on the Services, or INTΞGRITY’s trademarks, logos, or other brand characteristics.
In addition to the content you submit, post, or display on our Services, we appreciate your feedback, which may include your thoughts, ideas, and suggestions regarding our Services. This input may be used for any reason at our sole discretion and without obligation to you. We may treat your comments as non-confidential.
We reserve the right, at our sole discretion, to discontinue the Services or any of its features. In addition, we reserve the right to impose limits on use and storage, and to remove or restrict the distribution of content on the Services.
Termination
You are allowed to terminate your use of our services at any time. We have the right to stop or cancel your use of the Services with or without notice.
Moving and Processing Information
To enable us to deliver our Services, you accept that we may handle, transfer, and retain information about you in the United States and other countries, where you may not enjoy the same rights and protections as you do under local law.
Indemnification
To the maximum extent permitted by applicable law, you will indemnify, defend, and hold harmless INTΞGRITY, and our officers, directors, agents, partners, and employees (collectively, the "INTΞGRITY Parties"), from and against any losses, liabilities, claims, demands, damages, expenses or costs ("Claims") arising out of or relating to your violation, misappropriation, or infringement of any rights of another (including intellectual property rights or privacy rights). You undertake to promptly notify INTΞGRITY Parties of any third-party Claims, to assist INTΞGRITY Parties in fighting such Claims, and to pay any fees, charges, and expenses connected with defending such Claims (including attorneys' fees). You further agree that, at INTΞGRITY’s sole discretion, the INTΞGRITY Parties will govern the defense or settlement of any third-party Claims.
Disclaimers — Services Provided "As Is"
INTΞGRITY strives to provide you with excellent Services, but there are certain things we cannot guarantee. Utilization of our services is at your own risk. You acknowledge that our Services and any content uploaded or shared by users on the Services are given "as is" and "as available" without explicit or implied warranties of any kind, including warranties of merchantability, fitness for a particular purpose, title, and non-infringement. In addition, INTΞGRITY does not represent or promise that our Services are accurate, comprehensive, dependable, up-to-date, or error-free. No advice or information gained from INTΞGRITY or via the Services shall create any warranty or representation unless expressly set forth in this section. INTΞGRITY may provide information on third-party products, services, activities, or events, or we may permit third parties to make their material and information accessible via our Services (collectively, "Third-Party Content"). We neither control nor endorse any Third-Party Content, nor do we make any claims or warranties about it. Accessing and utilizing Third-Party Content is at your own risk. The disclaimers in this section may not apply to you if they are prohibited in your location.
Limitation of Liability
We do not exclude or limit our obligation to you where it would be unlawful to do so; this includes any liability for the gross negligence, fraud, or willful misconduct of INTΞGRITY or the other INTΞGRITY Parties in providing the Services. In jurisdictions where the foregoing exclusions are not permitted, our liability to you is limited to losses and damages that are reasonably foreseeable as a result of our failure to exercise reasonable care and skill or breach of contract with you. This paragraph does not impact consumer rights that cannot be waived or limited by contract.
In jurisdictions that permit liability exclusions or limits, INTΞGRITY and INTΞGRITY Parties will not be liable for:
(a) Any indirect, consequential, exemplary, incidental, punitive, or extraordinary damages, or any loss of use, data, or profits, based on any legal theory, even if INTΞGRITY or the other INTΞGRITY Parties were advised of the potential of such damages.
(b) Except for the types of liability we cannot limit by law (as described in this section), we limit the total liability of INTΞGRITY and the other INTΞGRITY Parties for any claim arising out of or related to these Terms or our Services, regardless of the form of action, to $100.00 USD.
Arbitration; Resolution of Disputes
We intend to address your concerns without filing a formal lawsuit. Before making a claim against INTΞGRITY, you agree to contact us and attempt to resolve the dispute informally by emailing hello@int3grity.com or by sending certified mail to INTΞGRITY, P.O. JOY, 479 Jessie St, San Francisco, CA 94103. The notice must (a) contain your name, address, email address, and telephone number; (b) identify the nature and grounds of the claim; and (c) detail the relief requested. Our notice to you will be sent to the email address linked with your online account and will contain the information specified in the preceding section. Any party may commence a formal procedure if we are unable to reach a resolution within thirty (30) days of the date of any notice.
Please read the following section carefully because it compels you to arbitrate certain claims and disputes with INTΞGRITY and limits the method in which you can seek redress from us, unless you opt out of arbitration by following the steps provided below. This arbitration provision does not permit class or representative lawsuits or arbitrations. In addition, arbitration prohibits you from filing a lawsuit or having a jury trial.
(a) Absence of Representative Actions You and INTΞGRITY agree that any dispute arising out of or relating to these Terms or our Services is personal to you and INTΞGRITY and will be resolved entirely via individual action, and not by class arbitration, class action, or other representative procedure.
(b) Dispute Arbitration. Except for small claims disputes in which you or INTΞGRITY seeks to bring an individual action in small claims court located in the county where you reside and disputes in which you or INTΞGRITY seeks injunctive or other equitable relief for the alleged infringement or misappropriation of intellectual property, you and INTΞGRITY waive your rights to a jury trial and to have any other dispute arising out of or relating to these Terms or our Services, including claims related to privity of contract, decided by a jury. All Disputes submitted to JAMS shall be decided by confidential, binding arbitration before a single arbitrator. If you are a consumer, you may choose to have the arbitration in your county of residence. A "consumer" is a person who uses the Services for personal, family, or household purposes for the purposes of this provision. You and INTΞGRITY agree that Disputes shall be resolved using the JAMS Streamlined Arbitration Rules and Procedures ("JAMS Rules"). The latest version of the JAMS Rules is accessible on the JAMS website and is incorporated herein by reference. Either you accept and agree that you have read and comprehended the JAMS Rules or you forfeit your right to read the JAMS Rules and any claim that the JAMS Rules are unreasonable or should not apply for any reason.
(c) You and INTΞGRITY agree that these Terms affect interstate commerce and that the enforceability of this provision is subject to the Federal Arbitration Act, 9 U.S.C. 1 et seq. (the "FAA"), to the maximum extent permissible by applicable law. As limited by the FAA, these Terms, and the JAMS Rules, the arbitrator will have sole authority to make all procedural and substantive judgments regarding any Dispute, and to grant any remedy that would otherwise be available in court, including the authority to determine arbitrability. The arbitrator may only conduct an individual arbitration and may not consolidate the claims of more than one party, preside over any sort of class or representative procedure, or preside over any proceeding involving more than one party.
d) The arbitration will permit the discovery or exchange of nonconfidential information pertinent to the Dispute. The arbitrator, INTΞGRITY, and you will maintain the confidentiality of all arbitration proceedings, judgments, and awards, as well as any information gathered, prepared, or presented for the purposes of the arbitration or relating to the Dispute(s) therein. Unless the law specifies otherwise, the arbitrator will have the right to make decisions that protect confidentiality. The duty of confidentiality does not apply where disclosure is required to prepare for or conduct the arbitration hearing on the merits, in connection with a court application for a preliminary remedy, in connection with a judicial challenge to an arbitration award or its enforcement, or where disclosure is otherwise required by law or judicial decision.
e) You and INTΞGRITY agree that for any arbitration you begin, you will pay the filing fee (up to $250 if you are a consumer) and INTΞGRITY will pay the remaining JAMS fees and costs. INTΞGRITY will pay all JAMS fees and costs for any and all arbitrations it initiates. You and INTΞGRITY agree that the state and federal courts of California and the United States located in San Francisco have exclusive jurisdiction over any appeals and the implementation of an arbitration award.
(f) Any Dispute must be filed within one year after the relevant claim arose; otherwise, the Dispute is permanently barred, meaning that neither you nor INTΞGRITY will be able to assert the claim.
(g) You have the right to opt-out of binding arbitration within 30 days of the date you initially accepted the terms of this section by sending an email to hello@int3grity.com. For the opt-out notification to be effective, it must include your full name and address and clearly explain your intent to opt out of binding arbitration. By declining binding arbitration, you consent to the resolution of Disputes in accordance with "Governing Law and Venue" below.
(h) If any portion of this section is found to be unenforceable or unlawful for any reason: (1) the unenforceable or unlawful provision shall be severed from these Terms; (2) the severance of the unenforceable or unlawful provision shall have no effect whatsoever on the remainder of this section or the parties' ability to compel arbitration of any remaining claims on an individual basis pursuant to this section; and (3) to the extent that any claims must therefore proceed on an individual basis, the parties agree to arbitrate those claims on an individual basis. In addition, if it is determined that any portion of this section prohibits an individual claim seeking public injunctive relief, that provision will be null and void to the extent that such relief may be sought outside of arbitration, and the balance of this section will be enforceable.
Statute and Location
These Terms and any dispute that may arise between you and INTΞGRITY are governed by California law, excluding its conflict of law provisions. Any issue between the parties that is not arbitrable or cannot be heard in small claims court will be determined by the state or federal courts of California and the United States, sitting in San Francisco, California.
Some nations have regulations that require agreements to be controlled by the consumer's country's laws. These statutes are not overridden by this paragraph.
Amendments
Periodically, we may make modifications to these Terms. If we make modifications, we will notify you by sending an email to the address connected with your account, providing an in-product message, or amending the date at the top of these Terms. Unless we specify otherwise in our notification, the modified Terms will take effect immediately, and your continued use of our Services after we issue such notice indicates your acceptance of the changes. If you do not accept the updated Terms, you must cease using our services.
Severability
If any section or portion of a provision of these Terms is determined to be unlawful, void, or unenforceable, that provision or part of the provision shall be deemed severable from these Terms and shall not affect the validity and enforceability of the other terms.
Miscellaneous INTΞGRITY’s omission to assert or enforce any right or term of these Terms is not a waiver of such right or provision. These Terms and the terms and policies specified in the Other Terms and Policies that May Apply to You Section constitute the complete agreement between the parties pertaining to the subject matter hereof and supersede all prior agreements, statements, and understandings between the parties. The section headings in these Terms are for convenience only and have no legal or contractual significance. The use of the word "including" shall be taken to mean "including without limitation." Unless otherwise specified, these Terms are intended solely for the benefit of the parties and are not intended to confer third-party beneficiary rights on any other person or entity. You consent to the use of electronic means for our communications and transactions.

Darshak Rana
6 months ago
17 Google Secrets 99 Percent of People Don't Know
What can't Google do?
Seriously, nothing! Google rocks.
Google is a major player in online tools and services. We use it for everything, from research to entertainment.
Did I say entertain yourself?
Yes, with so many features and options, it can be difficult to fully utilize Google.
#1. Drive Google Mad
You can make Google's homepage dance if you want to be silly.
Just type “Google Gravity” into Google.com. Then select I'm lucky.
See the page unstick before your eyes!
#2 Play With Google Image
Google isn't just for work.
Then have fun with it!
You can play games right in your search results. When you need a break, google “Solitaire” or “Tic Tac Toe”.
#3. Do a Barrel Roll
Need a little more excitement in your life? Want to see Google dance?
Type “Do a barrel roll” into the Google search bar.
Then relax and watch your screen do a 360.
#4 No Internet? No issue!
This is a fun trick to use when you have no internet.
If your browser shows a “No Internet” page, simply press Space.
Boom!
We have dinosaurs! Now use arrow keys to save your pixelated T-Rex from extinction.
#5 Google Can Help
Play this Google coin flip game to see if you're lucky.
Enter “Flip a coin” into the search engine.
You'll see a coin flipping animation. If you get heads or tails, click it.
#6. Think with Google
My favorite Google find so far is the “Think with Google” website.
Think with Google is a website that offers marketing insights, research, and case studies.
I highly recommend it to entrepreneurs, small business owners, and anyone interested in online marketing.
#7. Google Can Read Images!
This is a cool Google trick that few know about.
You can search for images by keyword or upload your own by clicking the camera icon on Google Images.
Google will then show you all of its similar images.
Caution: You should be fine with your uploaded images being public.
#8. Modify the Google Logo!
Clicking on the “I'm Feeling Lucky” button on Google.com takes you to a random Google Doodle.
Each year, Google creates a Doodle to commemorate holidays, anniversaries, and other occasions.
#9. What is my IP?
Simply type “What is my IP” into Google to find out.
Your IP address will appear on the results page.
#10. Send a Self-Destructing Email With Gmail,
Create a new message in Gmail. Find an icon that resembles a lock and a clock near the SEND button. That's where the Confidential Mode is.
By clicking it, you can set an expiration date for your email. Expiring emails are automatically deleted from both your and the recipient's inbox.
#11. Blink, Google Blink!
This is a unique Google trick.
Type “blink HTML” into Google. The words “blink HTML” will appear and then disappear.
The text is displayed for a split second before being deleted.
To make this work, Google reads the HTML code and executes the “blink” command.
#12. The Answer To Everything
This is for all Douglas Adams fans.
The answer to life, the universe, and everything is 42, according to Google.
An allusion to Douglas Adams' Hitchhiker's Guide to the Galaxy, in which Ford Prefect seeks to understand life, the universe, and everything.
#13. Google in 1998
It's a blast!
Type “Google in 1998” into Google. "I'm feeling lucky"
You'll be taken to an old-school Google homepage.
It's a nostalgic trip for long-time Google users.
#14. Scholarships and Internships
Google can help you find college funding!
Type “scholarships” or “internships” into Google.
The number of results will surprise you.
#15. OK, Google. Dice!
To roll a die, simply type “Roll a die” into Google.
On the results page is a virtual dice that you can click to roll.
#16. Google has secret codes!
Hit the nine squares on the right side of your Google homepage to go to My Account. Then Personal Info.
You can add your favorite language to the “General preferences for the web” tab.
#17. Google Terminal
You can feel like a true hacker.
Just type “Google Terminal” into Google.com. "I'm feeling lucky"
Voila~!
You'll be taken to an old-school computer terminal-style page.
You can then type commands to see what happens.
Have you tried any of these activities? Tell me in the comments.
Read full article here