


More on Entrepreneurship/Creators

Woo
3 years ago
How To Launch A Business Without Any Risk
> Say Hello To The Lean-Hedge Model
People think starting a business requires significant debt and investment. Like Shark Tank, you need a world-changing idea. I'm not saying to avoid investors or brilliant ideas.
Investing is essential to build a genuinely profitable company. Think Apple or Starbucks.
Entrepreneurship is risky because many people go bankrupt from debt. As starters, we shouldn't do it. Instead, use lean-hedge.
Simply defined, you construct a cash-flow business to hedge against long-term investment-heavy business expenses.
What the “fx!$rench-toast” is the lean-hedge model?
When you start a business, your money should move down, down, down, then up when it becomes profitable.
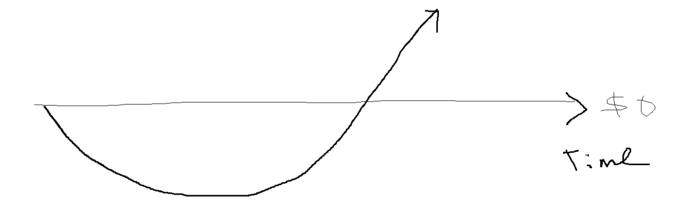
Many people don't survive the business's initial losses and debt. What if, we created a cash-flow business BEFORE we started our Starbucks to hedge against its initial expenses?

Lean-hedge has two sections. Start a cash-flow business. A cash-flow business takes minimal investment and usually involves sweat and time.
Let’s take a look at some examples:
A Translation company
Personal portfolio website (you make a site then you do cold e-mail marketing)
FREELANCE (UpWork, Fiverr).
Educational business.
Infomarketing. (You design a knowledge-based product. You sell the info).
Online fitness/diet/health coaching ($50-$300/month, calls, training plan)
Amazon e-book publishing. (Medium writers do this)
YouTube, cash-flow channel
A web development agency (I'm a dev, but if you're not, a graphic design agency, etc.) (Sell your time.)
Digital Marketing
Online paralegal (A million lawyers work in the U.S).
Some dropshipping (Organic Tik Tok dropshipping, where you create content to drive traffic to your shopify store instead of spend money on ads).
(Disclaimer: My first two cash-flow enterprises, which were language teaching, failed terribly. My translation firm is now booming because B2B e-mail marketing is easy.)
Crossover occurs. Your long-term business starts earning more money than your cash flow business.
My cash-flow business (freelancing, translation) makes $7k+/month.
I’ve decided to start a slightly more investment-heavy digital marketing agency
Here are the anticipated business's time- and money-intensive investments:
($$$) Top Front-End designer's Figma/UI-UX design (in negotiation)
(Time): A little copywriting (I will do this myself)
($$) Creating an animated webpage with HTML (in negotiation)
Backend Development (Duration) (I'll carry out this myself using Laravel.)
Logo Design ($$)
Logo Intro Video for $
Video Intro (I’ll edit this myself with Premiere Pro)
etc.
Then evaluate product, place, price, and promotion. Consider promotion and pricing.
The lean-hedge model's point is:
Don't gamble. Avoid debt. First create a cash-flow project, then grow it steadily.
Check read my previous posts on “Nightmare Mode” (which teaches you how to make work as interesting as video games) and Why most people can't escape a 9-5 to learn how to develop a cash-flow business.

Carter Kilmann
3 years ago
I finally achieved a $100K freelance income. Here's what I wish I knew.

We love round numbers, don't we? $100,000 is a frequent freelancing milestone. You feel like six figures means you're doing something properly.
You've most likely already conquered initial freelancing challenges like finding clients, setting fair pricing, coping with criticism, getting through dry spells, managing funds, etc.
You think I must be doing well. Last month, my freelance income topped $100,000.
That may not sound impressive considering I've been freelancing for 2.75 years, but I made 30% of that in the previous four months, which is crazy.
Here are the things I wish I'd known during the early days of self-employment that would have helped me hit $100,000 faster.
1. The Volatility of Freelancing Will Stabilize.
Freelancing is risky. No surprise.
Here's an example.
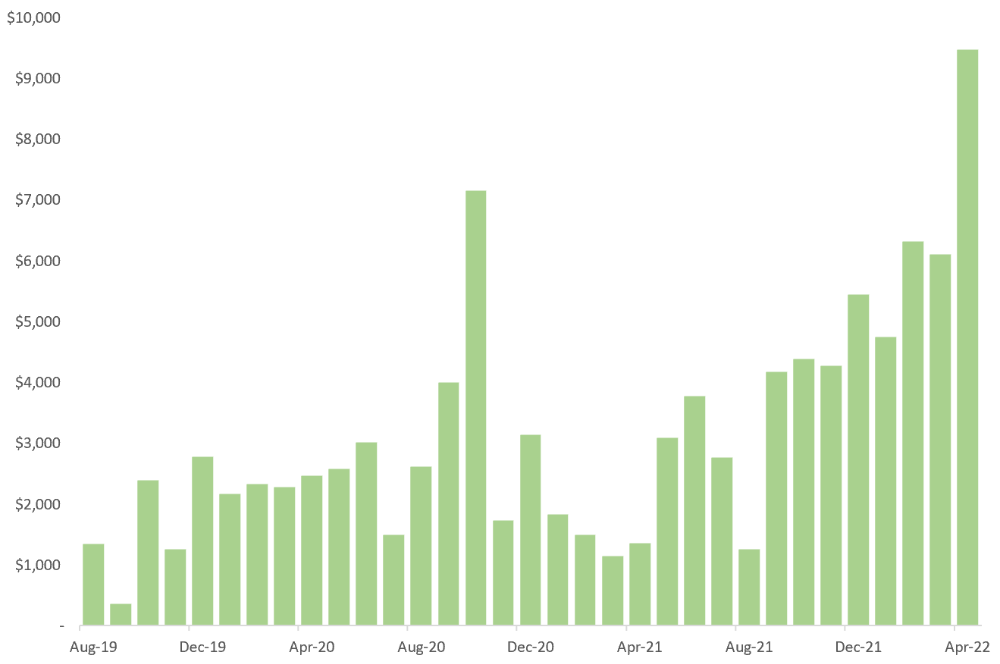
October 2020 was my best month, earning $7,150. Between $4,004 in September and $1,730 in November. Unsteady.
Freelancing is regrettably like that. Moving clients. Content requirements change. Allocating so much time to personal pursuits wasn't smart, but yet.
Stabilizing income takes time. Consider my rolling three-month average income since I started freelancing. My three-month average monthly income. In February, this metric topped $5,000. Now, it's in the mid-$7,000s, but it took a while to get there.
Finding freelance gigs that provide high pay, high volume, and recurring revenue is difficult. But it's not impossible.
TLDR: Don't expect a steady income increase at first. Be patient.
2. You Have More Value Than You Realize.
Writing is difficult. Assembling words, communicating a message, and provoking action are a puzzle.
People are willing to pay you for it because they can't do what you do or don't have enough time.
Keeping that in mind can have huge commercial repercussions.
When talking to clients, don't tiptoe. You can ignore ridiculous deadlines. You don't have to take unmanageable work.
You solve an issue, so make sure you get rightly paid.
TLDR: Frame services as problem-solutions. This will let you charge more and set boundaries.
3. Increase Your Prices.
I studied hard before freelancing. I read articles and watched videos about writing businesses.
I didn't want to work for pennies. Despite this clarity, I had no real strategy to raise my rates.
I then luckily stumbled into higher-paying work. We discussed fees and hours with a friend who launched a consulting business. It's subjective and speculative because value isn't standardized. One company may laugh at your charges. If your solution helps them create a solid ROI, another client may pay $200 per hour.
When he told me he charged his first client $125 per hour, I thought, Why not?
A new-ish client wanted to discuss a huge forthcoming project, so I raised my rates. They knew my worth, so they didn't blink when I handed them my new number.
TLDR: Increase rates periodically (e.g., every 6 or 12 months). Writing skill develops with practice. You'll gain value over time.
4. Remember Your Limits.
If you can squeeze additional time into a day, let me know. I can't manipulate time yet.
We all have time and economic limits. You could theoretically keep boosting rates, but your prospect pool diminishes. Outsourcing and establishing extra revenue sources might boost monthly revenues.
I've devoted a lot of time to side projects (hopefully extra cash sources), but I've only just started outsourcing. I wish I'd tried this earlier.
If you can discover good freelancers, you can grow your firm without sacrificing time.
TLDR: Expand your writing network immediately. You'll meet freelancers who understand your daily grind and locate reference sources.
5. Every Action You Take Involves an Investment. Be Certain to Select Correctly.
Investing in stocks or crypto requires paying money, right?
In business, time is your currency (and maybe money too). Your daily habits define your future. If you spend time collecting software customers and compiling content in the space, you'll end up with both. So be sure.
I only spend around 50% of my time on client work, therefore it's taken me nearly three years to earn $100,000. I spend the remainder of my time on personal projects including a freelance book, an investment newsletter, and this blog.
Why? I don't want to rely on client work forever. So, I'm working on projects that could pay off later and help me live a more fulfilling life.
TLDR: Consider the long-term impact of your time commitments, and don't overextend. You can only make so many "investments" in a given time.
6. LinkedIn Is an Endless Mine of Gold. Use It.
Why didn't I use LinkedIn earlier?
I designed a LinkedIn inbound lead strategy that generates 12 leads a month and a few high-quality offers. As a result, I've turned down good gigs. Wish I'd begun earlier.
If you want to create a freelance business, prioritize LinkedIn. Too many freelancers ignore this site, missing out on high-paying clients. Build your profile, post often, and interact.
TLDR: Study LinkedIn's top creators. Once you understand their audiences, start posting and participating daily.
For 99% of People, Freelancing is Not a Get-Rich-Quick Scheme.
Here's a list of things I wish I'd known when I started freelancing.
Although it is erratic, freelancing eventually becomes stable.
You deserve respect and discretion over how you conduct business because you have solved an issue.
Increase your charges rather than undervaluing yourself. If necessary, add a reminder to your calendar. Your worth grows with time.
In order to grow your firm, outsource jobs. After that, you can work on the things that are most important to you.
Take into account how your present time commitments may affect the future. It will assist in putting things into perspective and determining whether what you are doing is indeed worthwhile.
Participate on LinkedIn. You'll get better jobs as a result.
If I could give my old self (and other freelancers) one bit of advice, it's this:
Despite appearances, you're making progress.
Each job. Tweets. Newsletters. Progress. It's simpler to see retroactively than in the moment.
Consistent, intentional work pays off. No good comes from doing nothing. You must set goals, divide them into time-based targets, and then optimize your calendar.
Then you'll understand you're doing well.
Want to learn more? I’ll teach you.

Khoi Ho
3 years ago
After working at seven startups, here are the early-stage characteristics that contributed to profitability, unicorn status or successful acquisition.

I've worked in a People role at seven early-stage firms for over 15 years (I enjoy chasing a dream!). Few of the seven achieved profitability, including unicorn status or acquisition.
Did early-stage startups share anything? Was there a difference between winners and losers? YES.
I support founders and entrepreneurs building financially sustainable enterprises with a compelling cause. This isn't something everyone would do. A company's success demands more than guts. Founders drive startup success.
Six Qualities of Successful Startups
Successful startup founders either innately grasped the correlation between strong team engagement and a well-executed business model, or they knew how to ask and listen to others (executive coaches, other company leaders, the team itself) to learn about it.
Successful startups:
1. Co-founders agreed and got along personally.
Multi-founder startups are common. When co-founders agree on strategic decisions and are buddies, there's less friction and politics at work.
As a co-founder, ask your team if you're aligned. They'll explain.
I've seen C-level leaders harbor personal resentments over disagreements. A co-departure founder's caused volatile leadership and work disruptions that the team struggled to manage during and after.
2. Team stayed.
Successful startups have low turnover. Nobody is leaving. There may be a termination for performance, but other team members will have observed the issues and agreed with the decision.
You don't want organizational turnover of 30%+, with leaders citing performance issues but the team not believing them. This breeds suspicion.
Something is wrong if many employees leave voluntarily or involuntarily. You may hear about lack of empowerment, support, or toxic leadership in exit interviews and from the existing team. Intellectual capital loss and resource instability harm success.
3. Team momentum.
A successful startup's team is excited about its progress. Consistently achieving goals and having trackable performance metrics. Some describe this period of productivity as magical, with great talents joining the team and the right people in the right places. Increasing momentum.
I've also seen short-sighted decisions where only some departments, like sales and engineering, had goals. Lack of a unified goals system created silos and miscommunication. Some employees felt apathetic because they didn't know how they contributed to team goals.
4. Employees advanced in their careers.
Even if you haven't created career pathing or professional development programs, early-stage employees will grow and move into next-level roles. If you hire more experienced talent and leaders, expect them to mentor existing team members. Growing companies need good performers.
New talent shouldn't replace and discard existing talent. This creates animosity and makes existing employees feel unappreciated for their early contributions to the company.
5. The company lived its values.
Culture and identity are built on lived values. A company's values affect hiring, performance management, rewards, and other processes. Identify, practice, and believe in company values. Starting with team values instead of management or consultants helps achieve this. When a company's words and actions match, it builds trust.
When company values are beautifully displayed on a wall but few employees understand them, the opposite is true. If an employee can't name the company values, they're useless.
6. Communication was clear.
When necessary information is shared with the team, they feel included, trusted, and like owners. Transparency means employees have the needed information to do their jobs. Disclosure builds trust. The founders answer employees' questions honestly.
Information accessibility decreases office politics. Without transparency, even basic information is guarded and many decisions are made in secret. I've seen founders who don't share financial, board meeting, or compensation and equity information. The founders' lack of trust in the team wasn't surprising, so it was reciprocated.
The Choices
Finally. All six of the above traits (leadership alignment, minimal turnover, momentum, professional advancement, values, and transparency) were high in the profitable startups I've worked at, including unicorn status or acquisition.
I've seen these as the most common and constant signals of startup success or failure.
These characteristics are the product of founders' choices. These decisions lead to increased team engagement and business execution.
Here's something to consider for startup employees and want-to-bes. 90% of startups fail, despite the allure of building something new and gaining ownership. With the emotional and time investment in startup formation, look for startups with these traits to reduce your risk.
Both you and the startup will thrive in these workplaces.
You might also like

Amelia Winger-Bearskin
3 years ago
Hate NFTs? I must break some awful news to you...
If you think NFTs are awful, check out the art market.
The fervor around NFTs has subsided in recent months due to the crypto market crash and the media's short attention span. They were all anyone could talk about earlier this spring. Last semester, when passions were high and field luminaries were discussing "slurp juices," I asked my students and students from over 20 other universities what they thought of NFTs.
According to many, NFTs were either tasteless pyramid schemes or a new way for artists to make money. NFTs contributed to the climate crisis and harmed the environment, but so did air travel, fast fashion, and smartphones. Some students complained that NFTs were cheap, tasteless, algorithmically generated schlock, but others asked how this was different from other art.

I'm not sure what I expected, but the intensity of students' reactions surprised me. They had strong, emotional opinions about a technology I'd always considered administrative. NFTs address ownership and accounting, like most crypto/blockchain projects.
Art markets can be irrational, arbitrary, and subject to the same scams and schemes as any market. And maybe a few shenanigans that are unique to the art world.
The Fairness Question
Fairness, a deflating moral currency, was the general sentiment (the less of it in circulation, the more ardently we clamor for it.) These students, almost all of whom are artists, complained to the mismatch between the quality of the work in some notable NFT collections and the excessive amounts these items were fetching on the market. They can sketch a Bored Ape or Lazy Lion in their sleep. Why should they buy ramen with school loans while certain swindlers get rich?

I understand students. Art markets are unjust. They can be irrational, arbitrary, and governed by chance and circumstance, like any market. And art-world shenanigans.
Almost every mainstream critique leveled against NFTs applies just as easily to art markets
Over 50% of artworks in circulation are fake, say experts. Sincere art collectors and institutions are upset by the prevalence of fake goods on the market. Not everyone. Wealthy people and companies use art as investments. They can use cultural institutions like museums and galleries to increase the value of inherited art collections. People sometimes buy artworks and use family ties or connections to museums or other cultural taste-makers to hype the work in their collection, driving up the price and allowing them to sell for a profit. Money launderers can disguise capital flows by using market whims, hype, and fluctuating asset prices.
Almost every mainstream critique leveled against NFTs applies just as easily to art markets.
Art has always been this way. Edward Kienholz's 1989 print series satirized art markets. He stamped 395 identical pieces of paper from $1 to $395. Each piece was initially priced as indicated. Kienholz was joking about a strange feature of art markets: once the last print in a series sells for $395, all previous works are worth at least that much. The entire series is valued at its highest auction price. I don't know what a Kienholz print sells for today (inquire with the gallery), but it's more than $395.
I love Lee Lozano's 1969 "Real Money Piece." Lozano put cash in various denominations in a jar in her apartment and gave it to visitors. She wrote, "Offer guests coffee, diet pepsi, bourbon, half-and-half, ice water, grass, and money." "Offer real money as candy."
Lee Lozano kept track of who she gave money to, how much they took, if any, and how they reacted to the offer of free money without explanation. Diverse reactions. Some found it funny, others found it strange, and others didn't care. Lozano rarely says:
Apr 17 Keith Sonnier refused, later screws lid very tightly back on. Apr 27 Kaltenbach takes all the money out of the jar when I offer it, examines all the money & puts it all back in jar. Says he doesn’t need money now. Apr 28 David Parson refused, laughing. May 1 Warren C. Ingersoll refused. He got very upset about my “attitude towards money.” May 4 Keith Sonnier refused, but said he would take money if he needed it which he might in the near future. May 7 Dick Anderson barely glances at the money when I stick it under his nose and says “Oh no thanks, I intend to earn it on my own.” May 8 Billy Bryant Copley didn’t take any but then it was sort of spoiled because I had told him about this piece on the phone & he had time to think about it he said.
Smart Contracts (smart as in fair, not smart as in Blockchain)
Cornell University's Cheryl Finley has done a lot of research on secondary art markets. I first learned about her research when I met her at the University of Florida's Harn Museum, where she spoke about smart contracts (smart as in fair, not smart as in Blockchain) and new protocols that could help artists who are often left out of the economic benefits of their own work, including women and women of color.

Her talk included findings from her ArtNet op-ed with Lauren van Haaften-Schick, Christian Reeder, and Amy Whitaker.
NFTs allow us to think about and hack on formal contractual relationships outside a system of laws that is currently not set up to service our community.
The ArtNet article The Recent Sale of Amy Sherald's ‘Welfare Queen' Symbolizes the Urgent Need for Resale Royalties and Economic Equity for Artists discussed Sherald's 2012 portrait of a regal woman in a purple dress wearing a sparkling crown and elegant set of pearls against a vibrant red background.
Amy Sherald sold "Welfare Queen" to Princeton professor Imani Perry. Sherald agreed to a payment plan to accommodate Perry's budget.
Amy Sherald rose to fame for her 2016 portrait of Michelle Obama and her full-length portrait of Breonna Taylor, one of the most famous works of the past decade.
As is common, Sherald's rising star drove up the price of her earlier works. Perry's "Welfare Queen" sold for $3.9 million in 2021.
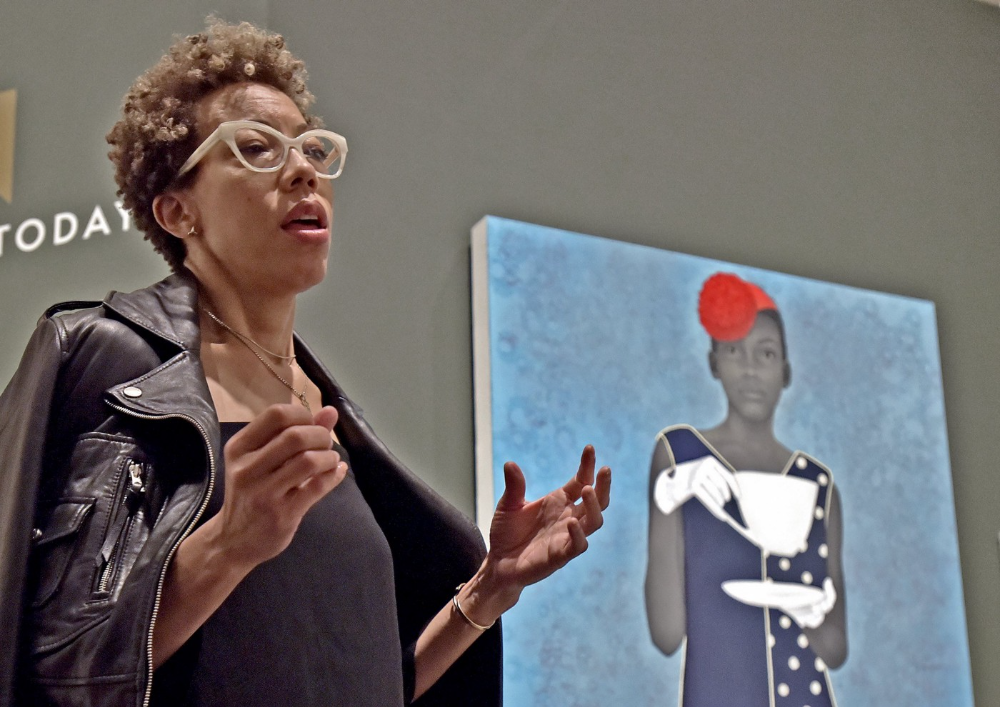
Imani Perry's early investment paid off big-time. Amy Sherald, whose work directly increased the painting's value and who was on an artist's shoestring budget when she agreed to sell "Welfare Queen" in 2012, did not see any of the 2021 auction money. Perry and the auction house got that money.
Sherald sold her Breonna Taylor portrait to the Smithsonian and Louisville's Speed Art Museum to fund a $1 million scholarship. This is a great example of what an artist can do for the community if they can amass wealth through their work.
NFTs haven't solved all of the art market's problems — fakes, money laundering, market manipulation — but they didn't create them. Blockchain and NFTs are credited with making these issues more transparent. More ideas emerge daily about what a smart contract should do for artists.
NFTs are a copyright solution. They allow us to hack formal contractual relationships outside a law system that doesn't serve our community.
Amy Sherald shows the good smart contracts can do (as in, well-considered, self-determined contracts, not necessarily blockchain contracts.) Giving back to our community, deciding where and how our work can be sold or displayed, and ensuring artists share in the equity of our work and the economy our labor creates.


Jari Roomer
3 years ago
Successful people have this one skill.
Without self-control, you'll waste time chasing dopamine fixes.
I found a powerful quote in Tony Robbins' Awaken The Giant Within:
“Most of the challenges that we have in our personal lives come from a short-term focus” — Tony Robbins
Most people are short-term oriented, but highly successful people are long-term oriented.
Successful people act in line with their long-term goals and values, while the rest are distracted by short-term pleasures and dopamine fixes.
Instant gratification wrecks lives
Instant pleasure is fleeting. Quickly fading effects leave you craving more stimulation.
Before you know it, you're in a cycle of quick fixes. This explains binging on food, social media, and Netflix.
These things cause a dopamine spike, which is entertaining. This dopamine spike crashes quickly, leaving you craving more stimulation.
It's fine to watch TV or play video games occasionally. Problems arise when brain impulses aren't controlled. You waste hours chasing dopamine fixes.
Instant gratification becomes problematic when it interferes with long-term goals, happiness, and life fulfillment.
Most rewarding things require delay
Life's greatest rewards require patience and delayed gratification. They must be earned through patience, consistency, and effort.
Ex:
A fit, healthy body
A deep connection with your spouse
A thriving career/business
A healthy financial situation
These are some of life's most rewarding things, but they take work and patience. They all require the ability to delay gratification.
To have a healthy bank account, you must save (and invest) a large portion of your monthly income. This means no new tech or clothes.
If you want a fit, healthy body, you must eat better and exercise three times a week. So no fast food and Netflix.
It's a battle between what you want now and what you want most.
Successful people choose what they want most over what they want now. It's a major difference.
Instant vs. delayed gratification
Most people subconsciously prefer instant rewards over future rewards, even if the future rewards are more significant.
We humans aren't logical. Emotions and instincts drive us. So we act against our goals and values.
Fortunately, instant gratification bias can be overridden. This is a modern superpower. Effective methods include:
#1: Train your brain to handle overstimulation
Training your brain to function without constant stimulation is a powerful change. Boredom can lead to long-term rewards.
Unlike impulsive shopping, saving money is boring. Having lots of cash is amazing.
Compared to video games, deep work is boring. A successful online business is rewarding.
Reading books is boring compared to scrolling through funny videos on social media. Knowledge is invaluable.
You can't do these things if your brain is overstimulated. Your impulses will control you. To reduce overstimulation addiction, try:
Daily meditation (10 minutes is enough)
Daily study/work for 90 minutes (no distractions allowed)
First hour of the day without phone, social media, and Netflix
Nature walks, journaling, reading, sports, etc.
#2: Make Important Activities Less Intimidating
Instant gratification helps us cope with stress. Starting a book or business can be intimidating. Video games and social media offer a quick escape in such situations.
Make intimidating tasks less so. Break them down into small tasks. Start a new business/side-hustle by:
Get domain name
Design website
Write out a business plan
Research competition/peers
Approach first potential client
Instead of one big mountain, divide it into smaller sub-tasks. This makes a task easier and less intimidating.
#3: Plan ahead for important activities
Distractions will invade unplanned time. Your time is dictated by your impulses, which are usually Netflix, social media, fast food, and video games. It wants quick rewards and dopamine fixes.
Plan your days and be proactive with your time. Studies show that scheduling activities makes you 3x more likely to do them.
To achieve big goals, you must plan. Don't gamble.
Want to get fit? Schedule next week's workouts. Want a side-job? Schedule your work time.

James White
3 years ago
I read three of Elon Musk's suggested books (And His Taste Is Incredible)
A reading list for successful people

Elon Musk reads and talks. So, one learns. Many brilliant individuals & amazing literature.
This article recommends 3 Elon Musk novels. All of them helped me succeed. Hope they'll help you.
Douglas Adams's The Hitchhiker's Guide to the Galaxy
Page Count: 193
Rating on Goodreads: 4.23
Arthur Dent is pulled off Earth by a buddy seconds before it's razed for a cosmic motorway. The trio hitchhikes through space and gets into problems.
I initially read Hitchhiker's as a child. To evade my mum, I'd read with a flashlight under the covers. She'd scold at me for not sleeping on school nights when she found out. Oops.
The Hitchhiker's Guide to the Galaxy is lighthearted science fiction.
My favorite book quotes are:
“Space is big. You won’t believe how vastly, hugely, mind-bogglingly big it is. I mean, you may think it’s a long way down the road to the chemist’s, but that’s just peanuts to space.”
“Far out in the uncharted backwaters of the unfashionable end of the western spiral arm of the Galaxy lies a small unregarded yellow sun. Orbiting this at a distance of roughly ninety-two million miles is an utterly insignificant little blue-green planet whose ape-descended life forms are so amazingly primitive that they still think digital watches are a pretty neat idea.”
“On planet Earth, man had always assumed that he was more intelligent than dolphins because he had achieved so much — the wheel, New York, wars, and so on — whilst all the dolphins had ever done was muck about in the water having a good time. But conversely, the dolphins had always believed that they were far more intelligent than man — for precisely the same reasons.”
the Sun Tzu book The Art Of War
Page Count: 273
Rating on Goodreads: 3.97
It's a classic. You may apply The Art of War's ideas to (nearly) every facet of life. Ex:
Pick your fights.
Keep in mind that timing is crucial.
Create a backup plan in case something goes wrong.
Obstacles provide us a chance to adapt and change.
This book was my first. Since then, I'm a more strategic entrepreneur. Excellent book. And read it ASAP!

My favorite book quotes are:
“Victorious warriors win first and then go to war, while defeated warriors go to war first and then seek to win.”
“Engage people with what they expect; it is what they are able to discern and confirms their projections. It settles them into predictable patterns of response, occupying their minds while you wait for the extraordinary moment — that which they cannot anticipate.”
“If you know the enemy and know yourself, you need not fear the result of a hundred battles. If you know yourself but not the enemy, for every victory gained, you will also suffer a defeat. If you know neither the enemy nor yourself, you will succumb in every battle.”
Peter Thiel's book Zero to One
Page Count: 195
Rating on Goodreads: 4.18
Peter argues the best money-making strategies are typically unproven. Entrepreneurship should never have a defined path to success. Whoever says differently is lying.
Zero to One explores technology and society. Peter is a philosophy major and law school graduate, which informs the work.
Peters' ideas, depth, and intellect stood out in Zero to One. It's a top business book.
My favorite book quotes are:
“The most valuable businesses of coming decades will be built by entrepreneurs who seek to empower people rather than try to make them obsolete.”
“The next Bill Gates will not build an operating system. The next Larry Page or Sergey Brin won’t make a search engine. And the next Mark Zuckerberg won’t create a social network. If you are copying these guys, you aren’t learning from them.”
“If your goal is to never make a mistake in your life, you shouldn’t look for secrets. The prospect of being lonely but right — dedicating your life to something that no one else believes in — is already hard. The prospect of being lonely and wrong can be unbearable.”