


More on Technology

Stephen Moore
3 years ago
A Meta-Reversal: Zuckerberg's $71 Billion Loss
The company's epidemic gains are gone.

Mark Zuckerberg was in line behind Jeff Bezos and Bill Gates less than two years ago. His wealth soared to $142 billion. Facebook's shares reached $382 in September 2021.
What comes next is either the start of something truly innovative or the beginning of an epic rise and fall story.
In order to start over (and avoid Facebook's PR issues), he renamed the firm Meta. Along with the new logo, he announced a turn into unexplored territory, the Metaverse, as the next chapter for the internet after mobile. Or, Zuckerberg believed Facebook's death was near, so he decided to build a bigger, better, cooler ship. Then we saw his vision (read: dystopian nightmare) in a polished demo that showed Zuckerberg in a luxury home and on a spaceship with aliens. Initially, it looked entertaining. A problem was obvious, though. He might claim this was the future and show us using the Metaverse for business, play, and more, but when I took off my headset, I'd realize none of it was genuine.
The stock price is almost as low as January 2019, when Facebook was dealing with the aftermath of the Cambridge Analytica crisis.
Irony surrounded the technology's aim. Zuckerberg says the Metaverse connects people. Despite some potential uses, this is another step away from physical touch with people. Metaverse worlds can cause melancholy, addiction, and mental illness. But forget all the cool stuff you can't afford. (It may be too expensive online, too.)
Metaverse activity slowed for a while. In early February 2022, we got an earnings call update. Not good. Reality Labs lost $10 billion on Oculus and Zuckerberg's Metaverse. Zuckerberg expects losses to rise. Meta's value dropped 20% in 11 minutes after markets closed.
It was a sign of things to come.
The corporation has failed to create interest in Metaverse, and there is evidence the public has lost interest. Meta still relies on Facebook's ad revenue machine, which is also struggling. In July, the company announced a decrease in revenue and missed practically all its forecasts, ending a decade of exceptional growth and relentless revenue. They blamed a dismal advertising demand climate, and Apple's monitoring changes smashed Meta's ad model. Throw in whistleblowers, leaked data revealing the firm knows Instagram negatively affects teens' mental health, the current Capital Hill probe, and the fact TikTok is eating its breakfast, lunch, and dinner, and 2022 might be the corporation's worst year ever.
After a rocky start, tech saw unprecedented growth during the pandemic. It was a tech bubble and then some.
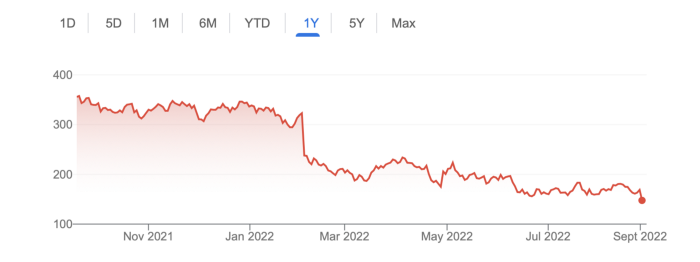
The gains reversed after the dust settled and stock markets adjusted. Meta's year-to-date decline is 60%. Apple Inc is down 14%, Amazon is down 26%, and Alphabet Inc is down 29%. At the time of writing, Facebook's stock price is almost as low as January 2019, when the Cambridge Analytica scandal broke. Zuckerberg owns 350 million Meta shares. This drop costs him $71 billion.
The company's problems are growing, and solutions won't be easy.
Facebook's period of unabated expansion and exorbitant ad revenue is ended, and the company's impact is dwindling as it continues to be the program that only your parents use. Because of the decreased ad spending and stagnant user growth, Zuckerberg will have less time to create his vision for the Metaverse because of the declining stock value and decreasing ad spending.
Instagram is progressively dying in its attempt to resemble TikTok, alienating its user base and further driving users away from Meta-products.
And now that the corporation has shifted its focus to the Metaverse, it is clear that, in its eagerness to improve its image, it fired the launch gun too early. You're fighting a lost battle when you announce an idea and then claim it won't happen for 10-15 years. When the idea is still years away from becoming a reality, the public is already starting to lose interest.
So, as I questioned earlier, is it the beginning of a technological revolution that will take this firm to stratospheric growth and success, or are we witnessing the end of Meta and Zuckerberg himself?

CyberPunkMetalHead
3 years ago
I made ChatGPT copy itself.

OpenAI's ChatGPT is an amazing AI-powered chatbot. It can write poetry, stories, and marketing campaigns, and it's also adept at coding. ChatGPT's coding is so amazing that it replicated itself. What happened:
Me: Hi
Hello! Can I help? I'll answer any inquiries you have.
Me: Build a python and flask AI chatbot that responds to user messages on the frontend.
CGPT:
from flask import Flask, request, jsonify

import openai
openai.api_key = "YOUR_API_KEY"

@app.route('/chatbot', methods=['POST'])
def chatbot():
    user_message = request.get_json()['message']
    response = chatbot_response(user_message)
    return jsonify({'response': response})


def chatbot_response(user_message):
    response = openai.Completion.create(
        engine="text-davinci-002",
        prompt=user_message,
        max_tokens=1024,
        n = 1,
        temperature=0.5
    )
    return response['choices'][0]['text']

if __name__ == '__main__':
    app.run()
To integrate a chatbot with a frontend, use Flask to serve an HTML page with a form for user messages and the chatbot's answer. AJAX can submit the form to the /chatbot route, and JavaScript can show the chatbot's response.
I imported code snippets at the top of the file.
Let's add a frontend interface, I said.
CGPT:
<!DOCTYPE html>
<html>
<head>
    <title>AI Chatbot</title>
</head>
<body>
    <h1>AI Chatbot</h1>
    <form id="chatbot-form">
        <label for="message">Message:</label><br>
        <input type="text" id="message" name="message"><br>
        <input type="submit" value="Submit">
    </form>
    <div id="chatbot-response"></div>

    <script src="https://ajax.googleapis.com/ajax/libs/jquery/3.5.1/jquery.min.js"></script>
    <script>
        $(document).ready(function() {
            $("#chatbot-form").submit(function(e) {
                e.preventDefault();
                var userMessage = $("#message").val();
                $.ajax({
                    type: "POST",
                    url: "/chatbot",
                    data: JSON.stringify({message: userMessage}),
                    contentType: "application/json; charset=utf-8",
                    dataType: "json",
                    success: function(response) {
                        $("#chatbot-response").text(response.response);
                    }
                });
            });
        });
    </script>
</body>
</html>
To serve this HTML page using Flask, build a new route that returns the page as a GET response.
So far, so good.

Looked quite basic so I got chatGPT to add some tailwind to the project.
Me: Tailwind the chatbot.html page, please. Give it a futuristic style with purple and neon
After a few more prompts, Talk GPT aligned the form to the center, changed some colors, and added padding.
CGPT:
<!DOCTYPE html>
<html>
<head>
    <title>AI Chatbot</title>
    <link href="https://unpkg.com/tailwindcss@^1.0/dist/tailwind.min.css" rel="stylesheet">
</head>
<body class="bg-black flex flex-col justify-center items-center">
    <h1 class="sm:text-center text-purple-500">AI Chatbot</h1>
    <form id="chatbot-form" class="border-purple-500 bg-purple-800 rounded">
        <label for="message">Message:</label><br>
        <input type="text" id="message" name="message" class="min-w-30 rounded"><br>
        <input type="submit" value="Submit" class="bg-purple-500 border-red-500 transform hover:scale-110 rounded">
    </form>
    <div class="flex justify-center">
        <div id="chatbot-response" class="text-white rounded"></div>
    </div>

    <script src="https://ajax.googleapis.com/ajax/libs/jquery/3.5.1/jquery.min.js"></script>
    <script>
        var colors = ['red', 'orange', 'yellow', 'green', 'blue', 'indigo', 'violet'];
        var colorIndex = 0;

        $(document).ready(function() {
            setInterval(function() {
                $("#chatbot-form").css('border-color', colors[colorIndex]);
                colorIndex = (colorIndex + 1) % colors.length;
            }, 1000);

            $("#chatbot-form").submit(function(e) {
                e.preventDefault();
                var userMessage = $("#message").val();
                $.ajax({
                    type: "POST",
                    url: "/chatbot",
                    data: JSON.stringify({message: userMessage}),
                    contentType: "application/json; charset=utf-8",
                    dataType: "json",
                    success: function(response) {
                        $("#chatbot-response").text(response.response);
                    }
                });
            });
        });
    </script>
</body>
</html>
Improved:

A few more prompts like “Add more vertical and horizontal padding to the submit button and vertical margin, and vertically align this file's body.”
The result:
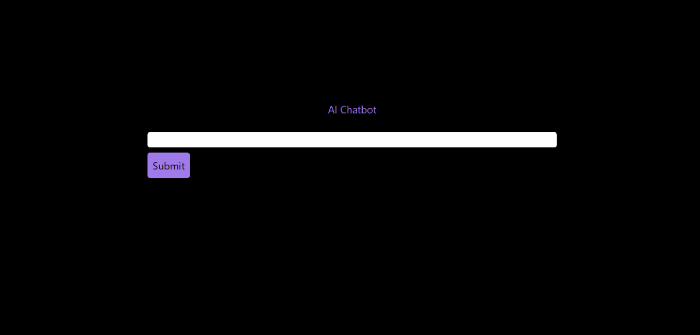
Is it effective? Now, I'll chat with ChatGPT's AI Chatbot. I intervened minimally throughout construction. Chat GPT created numerous files, connected and interacted with its own API, and presented the user request response on the front end by itself.
Me to AI Chatbot: Hey, can you give me 6 name suggestions for a black horse?
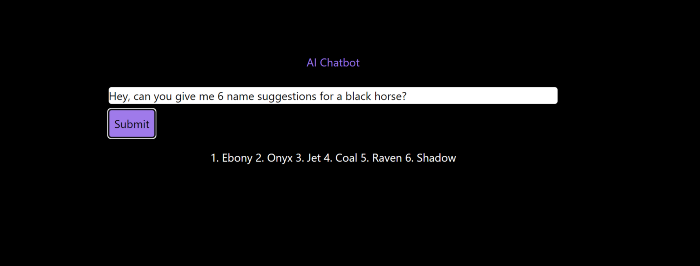
Me to AI Chatbot: Write a poem in the style of Jim Morrison. Make sure to mention cacti and black holes
ChatGPTs Chatbot:
In the desert night, I am confronted by cacti,
Their arms reaching out, As if to grab me and take me away.
The stars in the sky, Beckon me to come,
To a world of black holes, Where I can be free.
I am in a trance, My body and mind,
In a state of limbo, As I wander the night.
I hear a voice, Calling me to the unknown,
I cannot resist, The lure of the black hole.
The cacti watch, As I take my leave,
To a place of mystery, Where I can find peace.
Of course, the next question I gave it was to build a chatbot!
Me: Build a python and flask AI chatbot that responds to user messages on the frontend.
ChatbotGPTs:
import os from flask
import Flask, request, jsonify
from chatterbot
import ChatBot
from chatterbot.trainers
import ListTrainer

# Create a new chatbot
bot = ChatBot(
  "My Bot",
  storage_adapter="chatterbot.storage.SQLStorageAdapter",
  logic_adapters=[
    "chatterbot.logic.BestMatch",
    { "import_path": "chatterbot.logic.BestMatch",
      "statement_comparison_function": "chatterbot.comparisons.levenshtein_distance",
       "response_selection_method": "chatterbot.response_selection.get_first_response" }
    ],
    database_uri="sqlite:///database.sqlite3" )

# Train the chatbot with a few sample conversations
conversation = [ "Hello", "Hi there!", "How are you doing?", "I'm doing great.", "That is good to hear", "Thank you.", "You're welcome." ]
trainer = ListTrainer(bot) trainer.train(conversation)

# Create a Flask app
app = Flask(__name__)

# Define a route for the default URL
@app.route("/") def index(): return "<h1>Chatbot</h1>"

# Define a route for the /get_response URL
@app.route("/get_response", methods=["POST"])

def get_response():
# Get the user's message
user_message = request.form["user_message"]
# Get the bot's response
bot_response = bot.get_response(user_message)
# Return the bot's response
return str(bot_response)
# Run the Flask
app if __name__ == "__main__": app.run()
No matter how many times I tried, the second generation always used chatterbot instead of the ChatGPT API. Even when I told it to use the ChatGPT API, it didn't.
ChatGTP's ability to reproduce or construct other machine learning algorithms is interesting and possibly terrifying. Nothing prevents ChatGPT from replicating itself ad infinitum throughout the Internet other than a lack of desire. This may be the first time a machine repeats itself, so I've preserved the project as a reference. Adding a requirements.txt file and python env for easier deployment is the only change to the code.
I hope you enjoyed this.

Enrique Dans
3 years ago
You may not know about The Merge, yet it could change society
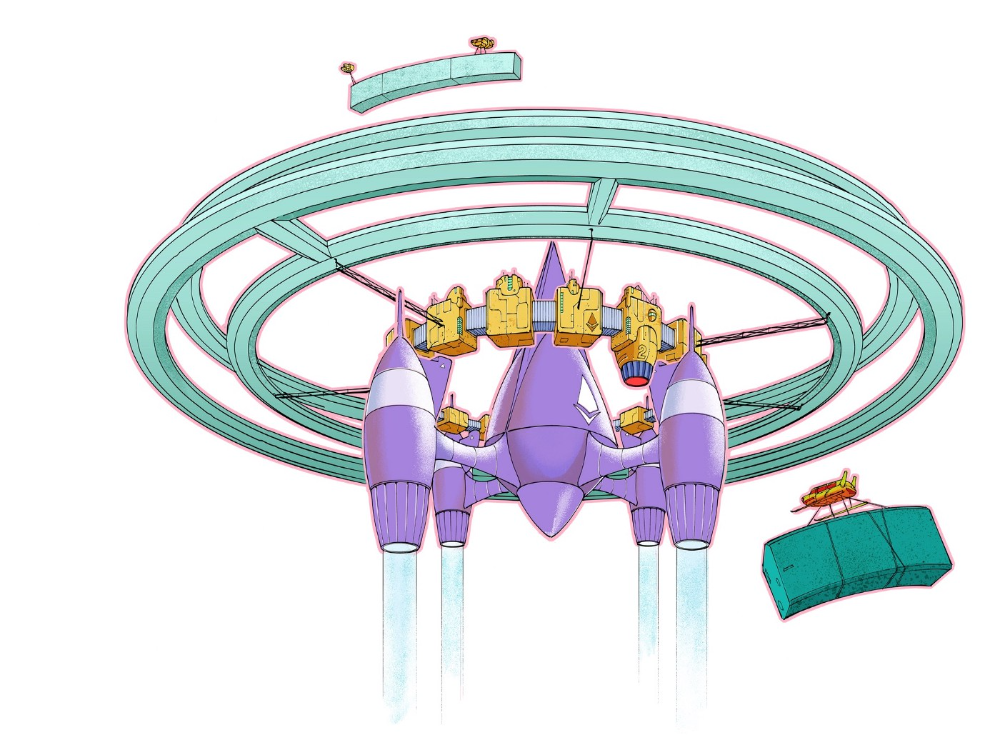
Ethereum is the second-largest cryptocurrency. The Merge, a mid-September event that will convert Ethereum's consensus process from proof-of-work to proof-of-stake if all goes according to plan, will be a game changer.
Why is Ethereum ditching proof-of-work? Because it can. We're talking about a fully functioning, open-source ecosystem with a capacity for evolution that other cryptocurrencies lack, a change that would allow it to scale up its performance from 15 transactions per second to 100,000 as its blockchain is used for more and more things. It would reduce its energy consumption by 99.95%. Vitalik Buterin, the system's founder, would play a less active role due to decentralization, and miners, who validated transactions through proof of work, would be far less important.
Why has this conversion taken so long and been so cautious? Because it involves modifying a core process while it's running to boost its performance. It requires running the new mechanism in test chains on an ever-increasing scale, assessing participant reactions, and checking for issues or restrictions. The last big test was in early June and was successful. All that's left is to converge the mechanism with the Ethereum blockchain to conclude the switch.
What's stopping Bitcoin, the leader in market capitalization and the cryptocurrency that began blockchain's appeal, from doing the same? Satoshi Nakamoto, whoever he or she is, departed from public life long ago, therefore there's no community leadership. Changing it takes a level of consensus that is impossible to achieve without strong leadership, which is why Bitcoin's evolution has been sluggish and conservative, with few modifications.
Secondly, The Merge will balance the consensus mechanism (proof-of-work or proof-of-stake) and the system decentralization or centralization. Proof-of-work prevents double-spending, thus validators must buy hardware. The system works, but it requires a lot of electricity and, as it scales up, tends to re-centralize as validators acquire more hardware and the entire network activity gets focused in a few nodes. Larger operations save more money, which increases profitability and market share. This evolution runs opposed to the concept of decentralization, and some anticipate that any system that uses proof of work as a consensus mechanism will evolve towards centralization, with fewer large firms able to invest in efficient network nodes.
Yet radical bitcoin enthusiasts share an opposite argument. In proof-of-stake, transaction validators put their funds at stake to attest that transactions are valid. The algorithm chooses who validates each transaction, giving more possibilities to nodes that put more coins at stake, which could open the door to centralization and government control.
In both cases, we're talking about long-term changes, but Bitcoin's proof-of-work has been evolving longer and seems to confirm those fears, while proof-of-stake is only employed in coins with a minuscule volume compared to Ethereum and has no predictive value.
As of mid-September, we will have two significant cryptocurrencies, each with a different consensus mechanisms and equally different characteristics: one is intrinsically conservative and used only for economic transactions, while the other has been evolving in open source mode, and can be used for other types of assets, smart contracts, or decentralized finance systems. Some even see it as the foundation of Web3.
Many things could change before September 15, but The Merge is likely to be a turning point. We'll have to follow this closely.
You might also like
Atown Research
2 years ago
Meet the One-Person Businesses Earning Millions in Sales from Solo Founders
I've spent over 50 hours researching one-person firms, which interest me. I've found countless one-person enterprises that made millions on the founder's determination and perseverance.
Throughout my investigation, I found three of the most outstanding one-person enterprises. These enterprises show that people who work hard and dedicate themselves to their ideas may succeed.
Eric Barone (@ConcernedApe) created Stardew Valley in 2011 to better his job prospects. Eric loved making the game, in which players inherit a farm, grow crops, raise livestock, make friends with the villagers, and form a family.
Eric handled complete game production, including 3D graphics, animations, and music, to maintain creative control. He stopped job hunting and worked 8-15 hours a day on the game.
Eric developed a Stardew Valley website and subreddit to engage with gamers and get feedback. Eric's devoted community helped him meet Steam's minimum vote requirement for single creators.
Stardew Valley sold 1 million copies in two months after Eric launched it for $15 in 2016. The game has sold 20 million copies and made $300 million.

The game's inexpensive price, outsourcing of PR, marketing, and publication, and loyal player base helped it succeed. Eric has turned down million-dollar proposals from Sony and Nintendo to sell the game and instead updates and improves it. Haunted Chocolatier is Eric's new game.
Is farming not profitable? Ask Stardew Valley creator Eric Barone.
Gary Brewer established BuiltWith to assist users find website technologies and services. BuiltWith boasts 3000 paying customers and $14 million in yearly revenue, making it a significant resource for businesses wishing to generate leads, do customer analytics, obtain business insight, compare websites, or search websites by keyword.
BuiltWith has one full-time employee, Gary, and one or two part-time contractors that help with the blog. Gary handles sales, customer service, and other company functions alone.
BuiltWith acquired popularity through blog promotions and a top Digg ranking. About Us, a domain directory, connected to BuiltWith on every domain page, boosting it. Gary introduced $295–$995 monthly subscriptions to search technology, keywords, and potential consumers in response to customer demand.
Gary uses numerous methods to manage a firm without staff. He spends one to two hours every day answering user queries, most of which are handled quickly by linking to BuiltWiths knowledge store. Gary creates step-by-step essays or videos for complex problems. Gary can focus on providing new features based on customer comments and requests since he makes it easy to unsubscribe.
BuiltWith is entirely automated and successful due to its unique approach and useful offerings. It works for Google, Meta, Amazon, and Twitter.
Digital Inspiration develops Google Documents, Sheets, and Slides plugins. Digital Inspiration, founded by Amit Agarwal, receives 5 million monthly visits and earns $10 million. 40 million individuals have downloaded Digital Inspirations plugins.
Amit started Digital Inspiration by advertising his blog at tech events and getting Indian filter blogs and other newspapers to promote his articles. Amit built plugins and promoted them on the blog once the blog acquired popularity, using ideas from comments, friends, and Reddit. Digital Inspiration has over 20 free and premium plugins.
Mail Merge, Notifications for Google Forms, YouTube Uploader, and Document Studio are some of Digital Inspiration's most popular plugins. Mail Merge allows users to send personalized emails in bulk and track email opens and clicks.
Since Amits manages Digital Inspiration alone, his success is astounding. Amit developed a successful company via hard work and creativity, despite platform dependence. His tale inspires entrepreneurs.

Muthinja
3 years ago
Why don't you relaunch my startup projects?
Open to ideas or acquisitions
Failure is an unavoidable aspect of life, yet many recoil at the word.

I've worked on unrelated startup projects. This is a list of products I developed (often as the tech lead or co-founder) and why they failed to launch.
Chess Bet (Betting)
As a chess player who plays 5 games a day and has an ELO rating of 2100, I tried to design a chess engine to rival stockfish and Houdini.
While constructing my chess engine, my cofounder asked me about building a p2p chess betting app. Chess Bet. There couldn't be a better time.
Two people in different locations could play a staked game. The winner got 90% of the bet and we got 10%. The business strategy was clear, but our mini-launch was unusual.
People started employing the same cheat engines I mentioned, causing user churn and defaming our product.
It was the first programming problem I couldn't solve after building a cheat detection system based on player move strengths and prior games. Chess.com, the most famous online chess software, still suffers from this.
We decided to pivot because we needed an expensive betting license.
We relaunched as Chess MVP after deciding to focus on chess learning. A platform for teachers to create chess puzzles and teach content. Several chess students used our product, but the target market was too tiny.
We chose to quit rather than persevere or pivot.
BodaCare (Insure Tech)
‘BodaBoda’ in Swahili means Motorcycle. My Dad approached me in 2019 (when I was working for a health tech business) about establishing an Insurtech/fintech solution for motorbike riders to pay for insurance using SNPL.
We teamed up with an underwriter to market motorcycle insurance. Once they had enough premiums, they'd get an insurance sticker in the mail. We made it better by splitting the cover in two, making it more reasonable for motorcyclists struggling with lump-sum premiums.
Lack of capital and changing customer behavior forced us to close, with 100 motorcyclists paying 0.5 USD every day. Our unit econ didn't make sense, and CAC and retention capital only dug us deeper.
Circle (Social Networking)
Having learned from both product failures, I began to understand what worked and what didn't. While reading through Instagram, an idea struck me.
Suppose social media weren't virtual.
Imagine meeting someone on your way home. Like-minded person
People were excited about social occasions after covid restrictions were eased. Anything to escape. I just built a university student-popular experiences startup. Again, there couldn't be a better time.
I started the Android app. I launched it on Google Beta and oh my! 200 people joined in two days.
It works by signaling if people are in a given place and allowing users to IM in hopes of meeting up in near real-time. Playstore couldn't deploy the app despite its success in beta for unknown reasons. I appealed unsuccessfully.
My infrastructure quickly lost users because I lacked funding.
In conclusion
This essay contains many failures, some of which might have been avoided and others not, but they were crucial learning points in my startup path.
If you liked any idea, I have the source code on Github.
Happy reading until then!

Nojus Tumenas
3 years ago
NASA: Strange Betelgeuse Explosion Just Took Place

Orion's red supergiant Betelgeuse erupted. This is astronomers' most magnificent occurrence.
Betelgeuse, a supergiant star in Orion, garnered attention in 2019 for its peculiar appearance. It continued to dim in 2020.
The star was previously thought to explode as a supernova. Studying the event has revealed what happened to Betelgeuse since it happened.
Astronomers saw that the star released a large amount of material, causing it to lose a section of its surface.
They have never seen anything like this and are unsure what caused the star to release so much material.
According to Harvard-Smithsonian Center for Astrophysics astrophysicist Andrea Dupre, astronomers' data reveals an unexplained mystery.
They say it's a new technique to examine star evolution. The James Webb telescope revealed the star's surface features.
Corona flares are stellar mass ejections. These eruptions change the Sun's outer atmosphere.
This could affect power grids and satellite communications if it hits Earth.
Betelgeuse's flare ejected four times more material than the Sun's corona flare.
Astronomers have monitored star rhythms for 50 years. They've seen its dimming and brightening cycle start, stop, and repeat.
Monitoring Betelgeuse's pulse revealed the eruption's power.
Dupre believes the star's convection cells are still amplifying the blast's effects, comparing it to an imbalanced washing machine tub.
The star's outer layer has returned to normal, Hubble data shows. The photosphere slowly rebuilds its springy surface.
Dupre noted the star's unusual behavior. For instance, it’s causing its interior to bounce.
This suggests that the mass ejections that caused the star's surface to lose mass were two separate processes.
Researchers hope to better understand star mass ejection with the James Webb Space Telescope.