


More on Marketing

Rita McGrath
3 years ago
Flywheels and Funnels
Traditional sales organizations used the concept of a sales “funnel” to describe the process through which potential customers move, ending up with sales at the end. Winners today have abandoned that way of thinking in favor of building flywheels — business models in which every element reinforces every other.
Ah, the marketing funnel…
Prospective clients go through a predictable set of experiences, students learn in business school marketing classes. It looks like this:

Understanding the funnel helps evaluate sales success indicators. Gail Goodwin, former CEO of small business direct mail provider Constant Contact, said managing the pipeline was key to escaping the sluggish SaaS ramp of death.
Like the funnel concept. To predict how well your business will do, measure how many potential clients are aware of it (awareness) and how many take the next step. If 1,000 people heard about your offering and 10% showed interest, you'd have 100 at that point. If 50% of these people made buyer-like noises, you'd know how many were, etc. It helped model buying trends.
TV, magazine, and radio advertising are pricey for B2C enterprises. Traditional B2B marketing involved armies of sales reps, which was expensive and a barrier to entry.
Cracks in the funnel model
Digital has exposed the funnel's limitations. Hubspot was born at a time when buyers and sellers had huge knowledge asymmetries, according to co-founder Brian Halligan. Those selling a product could use the buyer's lack of information to become a trusted partner.
As the world went digital, getting information and comparing offerings became faster, easier, and cheaper. Buyers didn't need a seller to move through a funnel. Interactions replaced transactions, and the relationship didn't end with a sale.
Instead, buyers and sellers interacted in a constant flow. In many modern models, the sale is midway through the process (particularly true with subscription and software-as-a-service models). Example:
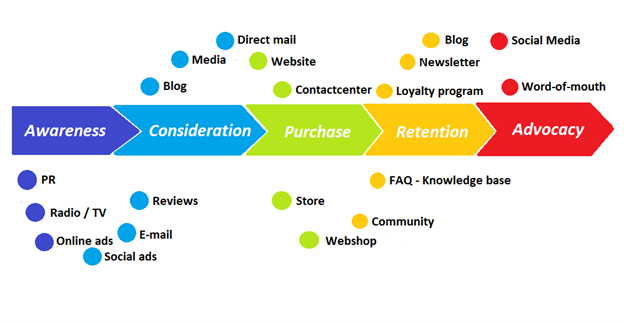
You're creating a winding journey with many touch points, not a funnel (and lots of opportunities for customers to get lost).
From winding journey to flywheel
Beyond this revised view of an interactive customer journey, a company can create what Jim Collins famously called a flywheel. Imagine rolling a heavy disc on its axis. The first few times you roll it, you put in a lot of effort for a small response. The same effort yields faster turns as it gains speed. Over time, the flywheel gains momentum and turns without your help.
Modern digital organizations have created flywheel business models, in which any additional force multiplies throughout the business. The flywheel becomes a force multiplier, according to Collins.
Amazon is a famous flywheel example. Collins explained the concept to Amazon CEO Jeff Bezos at a corporate retreat in 2001. In The Everything Store, Brad Stone describes in his book The Everything Store how he immediately understood Amazon's levers.
The result (drawn on a napkin):
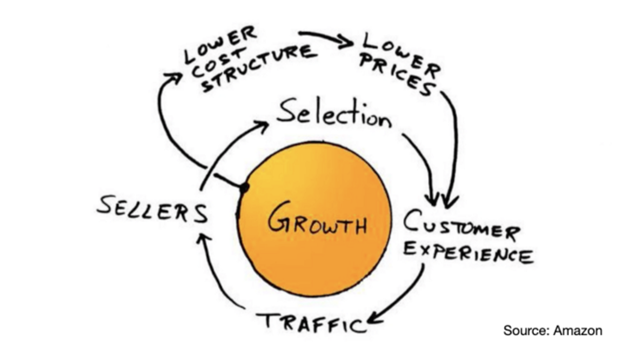
Low prices and a large selection of products attracted customers, while a focus on customer service kept them coming back, increasing traffic. Third-party sellers then increased selection. Low-cost structure supports low-price commitment. It's brilliant! Every wheel turn creates acceleration.
Where from here?
Flywheel over sales funnel! Consider these business terms.

Tim Denning
3 years ago
I Posted Six Times a Day for 210 Days on Twitter. Here's What Happened.
I'd spend hours composing articles only to find out they were useless. Twitter solved the problem.

Twitter is wrinkled, say critics.
Nope. Writing is different. It won't make sense until you write there.
Twitter is resurgent. People are reading again. 15-second TikToks overloaded our senses.
After nuking my 20,000-follower Twitter account and starting again, I wrote every day for 210 days.
I'll explain.
I came across the strange world of microblogging.
Traditional web writing is filler-heavy.
On Twitter, you must be brief. I played Wordle.
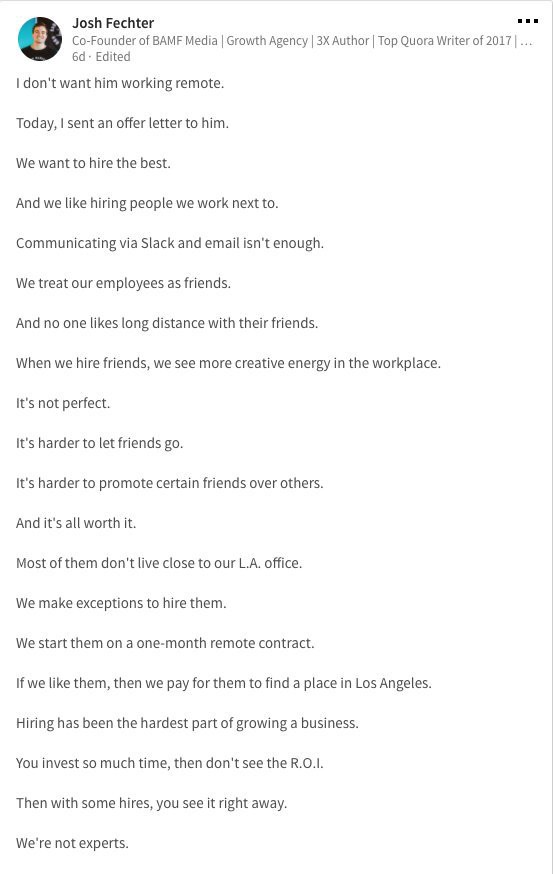
Twitter Threads are the most popular writing format. Like a blog post. It reminds me of the famous broetry posts on LinkedIn a few years ago.
Threads combine tweets into an article.
Sharp, concise sentences
No regard for grammar
As important as the information is how the text looks.
Twitter Threads are like Michael Angelo's David monument. He chipped away at an enormous piece of marble until a man with a big willy appeared.
That's Twitter Threads.
I tried to remove unnecessary layers from several of my Wordpress blog posts. Then I realized something.
Tweeting from scratch is easier and more entertaining. It's quicker and makes you think more concisely.
Superpower: saying much with little words. My long-form writing has improved. My article sentences resemble tweets.
You never know what will happen.
Twitter's subcultures are odd. Best-performing tweets are strange.
Unusual trend: working alone and without telling anyone. It's a rebellion against Instagram influencers who share their every moment.
Early on, random thoughts worked:
My friend’s wife is Ukrainian. Her family are trapped in the warzone. He is devastated. And here I was complaining about my broken garage door. War puts everything in perspective. Today is a day to be grateful for peace.
Documenting what's happening triggers writing. It's not about viral tweets. Helping others matters.
There are numerous anonymous users.
Twitter uses pseudonyms.
You don't matter. On sites like LinkedIn, you must use your real name. Welcome to the Cyberpunk metaverse of Twitter :)
One daily piece of writing is a powerful habit.
Habits build creator careers. Read that again.
Twitter is an easy habit to pick up. If you can't tweet in one sentence, something's wrong. Easy-peasy-japanese.
Not what I tweeted, but my constancy, made the difference.
Daily writing is challenging, especially if your supervisor is on your back. Twitter encourages writing.
Tweets evolved as the foundation of all other material.
During my experiment, I enjoyed Twitter's speed.
Tweets get immediate responses, comments, and feedback. My popular tweets become newspaper headlines. I've also written essays from tweet discussions.
Sometimes the tweet and article were clear. Twitter sometimes helped me overcome writer's block.
I used to spend hours composing big things that had little real-world use.
Twitter helped me. No guessing. Data guides my coverage and validates concepts.
Test ideas on Twitter.
It took some time for my email list to grow.
Subscribers are a writer's lifeblood.
Without them, you're broke and homeless when Mark Zuckerberg tweaks the algorithms for ad dollars. Twitter has three ways to obtain email subscribers:
1. Add a link to your bio.
Twitter allows bio links (LinkedIn now does too). My eBook's landing page is linked. I collect emails there.
2. Start an online newsletter.
Twitter bought newsletter app Revue. They promote what they own.
I just established up a Revue email newsletter. I imported them weekly into my ConvertKit email list.
3. Create Twitter threads and include a link to your email list in the final tweet.
Write Twitter Threads and link the last tweet to your email list (example below).
Initial email subscribers were modest.
Numbers are growing. Twitter provides 25% of my new email subscribers. Some days, 50 people join.
Without them, my writing career is over. I'd be back at a 9-5 job begging for time off to spend with my newborn daughter. Nope.
Collect email addresses or die trying.
As insurance against unsubscribes and Zucks, use a second email list or Discord community.
What I still need to do
Twitter's fun. I'm wiser. I need to enable auto-replies and auto-DMs (direct messages).
This adds another way to attract subscribers. I schedule tweets with Tweet Hunter.
It’s best to go slow. People assume you're an internet marketer if you spam them with click requests.
A human internet marketer is preferable to a robot. My opinion.
210 days on Twitter taught me that. I plan to use the platform until I'm a grandfather unless Elon ruins it.
Matthew Royse
3 years ago
5 Tips for Concise Writing
Here's how to be clear.
“I have only made this letter longer because I have not had the time to make it shorter.” — French mathematician, physicist, inventor, philosopher, and writer Blaise Pascal
Concise.
People want this. We tend to repeat ourselves and use unnecessary words.
Being vague frustrates readers. It focuses their limited attention span on figuring out what you're saying rather than your message.
Edit carefully.
“Examine every word you put on paper. You’ll find a surprising number that don’t serve any purpose.” — American writer, editor, literary critic, and teacher William Zinsser
How do you write succinctly?
Here are three ways to polish your writing.
1. Delete
Your readers will appreciate it if you delete unnecessary words. If a word or phrase is essential, keep it. Don't force it.
Many readers dislike bloated sentences. Ask yourself if cutting a word or phrase will change the meaning or dilute your message.
For example, you could say, “It’s absolutely essential that I attend this meeting today, so I know the final outcome.” It’s better to say, “It’s critical I attend the meeting today, so I know the results.”
Key takeaway
Delete actually, completely, just, full, kind of, really, and totally. Keep the necessary words, cut the rest.
2. Just Do It
Don't tell readers your plans. Your readers don't need to know your plans. Who are you?
Don't say, "I want to highlight our marketing's problems." Our marketing issues are A, B, and C. This cuts 5–7 words per sentence.
Keep your reader's attention on the essentials, not the fluff. What are you doing? You won't lose readers because you get to the point quickly and don't build up.
Key takeaway
Delete words that don't add to your message. Do something, don't tell readers you will.
3. Cut Overlap
You probably repeat yourself unintentionally. You may add redundant sentences when brainstorming. Read aloud to detect overlap.
Remove repetition from your writing. It's important to edit our writing and thinking to avoid repetition.
Key Takeaway
If you're repeating yourself, combine sentences to avoid overlap.
4. Simplify
Write as you would to family or friends. Communicate clearly. Don't use jargon. These words confuse readers.
Readers want specifics, not jargon. Write simply. Done.
Most adults read at 8th-grade level. Jargon and buzzwords make speech fluffy. This confuses readers who want simple language.
Key takeaway
Ensure all audiences can understand you. USA Today's 5th-grade reading level is intentional. They want everyone to understand.
5. Active voice
Subjects perform actions in active voice. When you write in passive voice, the subject receives the action.
For example, “the board of directors decided to vote on the topic” is an active voice, while “a decision to vote on the topic was made by the board of directors” is a passive voice.
Key takeaway
Active voice clarifies sentences. Active voice is simple and concise.
Bringing It All Together
Five tips help you write clearly. Delete, just do it, cut overlap, use simple language, and write in an active voice.
Clear writing is effective. It's okay to occasionally use unnecessary words or phrases. Realizing it is key. Check your writing.
Adding words costs.
Write more concisely. People will appreciate it and read your future articles, emails, and messages. Spending extra time will increase trust and influence.
“Not that the story need be long, but it will take a long while to make it short.” — Naturalist, essayist, poet, and philosopher Henry David Thoreau
You might also like

Cody Collins
3 years ago
The direction of the economy is as follows.
What quarterly bank earnings reveal

Big banks know the economy best. Unless we’re talking about a housing crisis in 2007…
Banks are crucial to the U.S. economy. The Fed, communities, and investments exchange money.
An economy depends on money flow. Banks' views on the economy can affect their decision-making.
Most large banks released quarterly earnings and forward guidance last week. Others were pessimistic about the future.
What Makes Banks Confident
Bank of America's profit decreased 30% year-over-year, but they're optimistic about the economy. Comparatively, they're bullish.
Who banks serve affects what they see. Bank of America supports customers.
They think consumers' future is bright. They believe this for many reasons.
The average customer has decent credit, unless the system is flawed. Bank of America's new credit card and mortgage borrowers averaged 771. New-car loan and home equity borrower averages were 791 and 797.
2008's housing crisis affected people with scores below 620.
Bank of America and the economy benefit from a robust consumer. Major problems can be avoided if individuals maintain spending.
Reasons Other Banks Are Less Confident
Spending requires income. Many companies, mostly in the computer industry, have announced they will slow or freeze hiring. Layoffs are frequently an indication of poor times ahead.
BOA is positive, but investment banks are bearish.
Jamie Dimon, CEO of JPMorgan, outlined various difficulties our economy could confront.
But geopolitical tension, high inflation, waning consumer confidence, the uncertainty about how high rates have to go and the never-before-seen quantitative tightening and their effects on global liquidity, combined with the war in Ukraine and its harmful effect on global energy and food prices are very likely to have negative consequences on the global economy sometime down the road.
That's more headwinds than tailwinds.
JPMorgan, which helps with mergers and IPOs, is less enthusiastic due to these concerns. Incoming headwinds signal drying liquidity, they say. Less business will be done.
Final Reflections
I don't think we're done. Yes, stocks are up 10% from a month ago. It's a long way from old highs.
I don't think the stock market is a strong economic indicator.
Many executives foresee a 2023 recession. According to the traditional definition, we may be in a recession when Q2 GDP statistics are released next week.
Regardless of criteria, I predict the economy will have a terrible year.
Weekly layoffs are announced. Inflation persists. Will prices return to 2020 levels if inflation cools? Perhaps. Still expensive energy. Ukraine's war has global repercussions.
I predict BOA's next quarter earnings won't be as bullish about the consumer's strength.

Sofien Kaabar, CFA
3 years ago
Innovative Trading Methods: The Catapult Indicator
Python Volatility-Based Catapult Indicator

As a catapult, this technical indicator uses three systems: Volatility (the fulcrum), Momentum (the propeller), and a Directional Filter (Acting as the support). The goal is to get a signal that predicts volatility acceleration and direction based on historical patterns. We want to know when the market will move. and where. This indicator outperforms standard indicators.
Knowledge must be accessible to everyone. This is why my new publications Contrarian Trading Strategies in Python and Trend Following Strategies in Python now include free PDF copies of my first three books (Therefore, purchasing one of the new books gets you 4 books in total). GitHub-hosted advanced indications and techniques are in the two new books above.
The Foundation: Volatility
The Catapult predicts significant changes with the 21-period Relative Volatility Index.
The Average True Range, Mean Absolute Deviation, and Standard Deviation all assess volatility. Standard Deviation will construct the Relative Volatility Index.
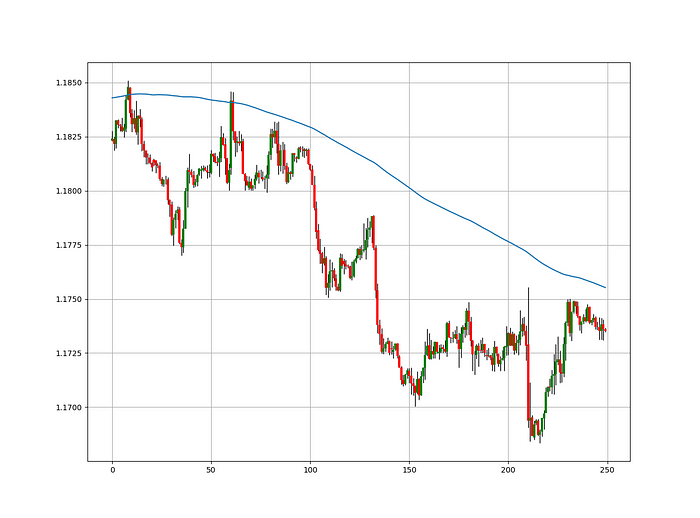
Standard Deviation is the most basic volatility. It underpins descriptive statistics and technical indicators like Bollinger Bands. Before calculating Standard Deviation, let's define Variance.
Variance is the squared deviations from the mean (a dispersion measure). We take the square deviations to compel the distance from the mean to be non-negative, then we take the square root to make the measure have the same units as the mean, comparing apples to apples (mean to standard deviation standard deviation). Variance formula:
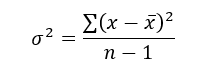
As stated, standard deviation is:
# The function to add a number of columns inside an array
def adder(Data, times):

    for i in range(1, times + 1):

        new_col = np.zeros((len(Data), 1), dtype = float)
        Data = np.append(Data, new_col, axis = 1)

    return Data

# The function to delete a number of columns starting from an index
def deleter(Data, index, times):

    for i in range(1, times + 1):

        Data = np.delete(Data, index, axis = 1)

    return Data

# The function to delete a number of rows from the beginning
def jump(Data, jump):

    Data = Data[jump:, ]

    return Data

# Example of adding 3 empty columns to an array
my_ohlc_array = adder(my_ohlc_array, 3)

# Example of deleting the 2 columns after the column indexed at 3
my_ohlc_array = deleter(my_ohlc_array, 3, 2)

# Example of deleting the first 20 rows
my_ohlc_array = jump(my_ohlc_array, 20)

# Remember, OHLC is an abbreviation of Open, High, Low, and Close and it refers to the standard historical data file

def volatility(Data, lookback, what, where):

  for i in range(len(Data)):

     try:

        Data[i, where] = (Data[i - lookback + 1:i + 1, what].std())
     except IndexError:
        pass

  return Data
The RSI is the most popular momentum indicator, and for good reason—it excels in range markets. Its 0–100 range simplifies interpretation. Fame boosts its potential.
The more traders and portfolio managers look at the RSI, the more people will react to its signals, pushing market prices. Technical Analysis is self-fulfilling, therefore this theory is obvious yet unproven.
RSI is determined simply. Start with one-period pricing discrepancies. We must remove each closing price from the previous one. We then divide the smoothed average of positive differences by the smoothed average of negative differences. The RSI algorithm converts the Relative Strength from the last calculation into a value between 0 and 100.
def ma(Data, lookback, close, where):

    Data = adder(Data, 1)

    for i in range(len(Data)):

            try:
                Data[i, where] = (Data[i - lookback + 1:i + 1, close].mean())

            except IndexError:
                pass

    # Cleaning
    Data = jump(Data, lookback)

    return Data
def ema(Data, alpha, lookback, what, where):

    alpha = alpha / (lookback + 1.0)
    beta  = 1 - alpha

    # First value is a simple SMA
    Data = ma(Data, lookback, what, where)

    # Calculating first EMA
    Data[lookback + 1, where] = (Data[lookback + 1, what] * alpha) + (Data[lookback, where] * beta)

    # Calculating the rest of EMA
    for i in range(lookback + 2, len(Data)):
            try:
                Data[i, where] = (Data[i, what] * alpha) + (Data[i - 1, where] * beta)

            except IndexError:
                pass

    return Datadef rsi(Data, lookback, close, where, width = 1, genre = 'Smoothed'):

    # Adding a few columns
    Data = adder(Data, 7)

    # Calculating Differences
    for i in range(len(Data)):

        Data[i, where] = Data[i, close] - Data[i - width, close]

    # Calculating the Up and Down absolute values
    for i in range(len(Data)):

        if Data[i, where] > 0:

            Data[i, where + 1] = Data[i, where]

        elif Data[i, where] < 0:

            Data[i, where + 2] = abs(Data[i, where])

    # Calculating the Smoothed Moving Average on Up and Down
    absolute values

    lookback = (lookback * 2) - 1 # From exponential to smoothed
    Data = ema(Data, 2, lookback, where + 1, where + 3)
    Data = ema(Data, 2, lookback, where + 2, where + 4)

    # Calculating the Relative Strength
    Data[:, where + 5] = Data[:, where + 3] / Data[:, where + 4]

    # Calculate the Relative Strength Index
    Data[:, where + 6] = (100 - (100 / (1 + Data[:, where + 5])))

    # Cleaning
    Data = deleter(Data, where, 6)
    Data = jump(Data, lookback)

    return Data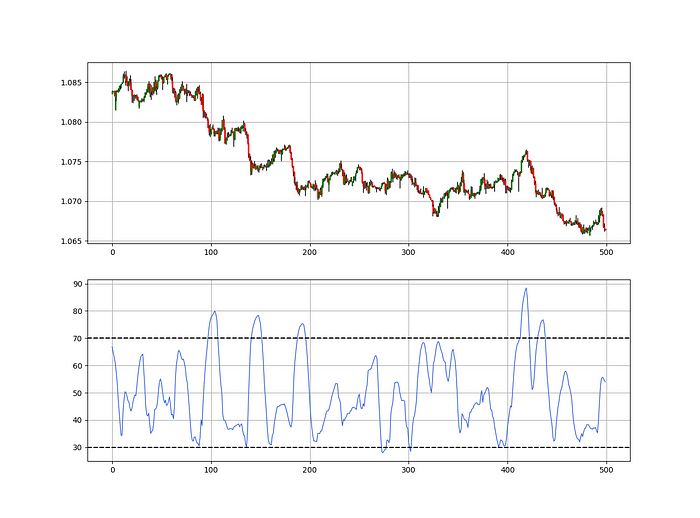
def relative_volatility_index(Data, lookback, close, where):

    # Calculating Volatility
    Data = volatility(Data, lookback, close, where)

    # Calculating the RSI on Volatility
    Data = rsi(Data, lookback, where, where + 1)

    # Cleaning
    Data = deleter(Data, where, 1)

    return Data
The Arm Section: Speed
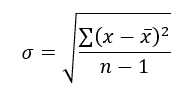
The Catapult predicts momentum direction using the 14-period Relative Strength Index.
As a reminder, the RSI ranges from 0 to 100. Two levels give contrarian signals:
A positive response is anticipated when the market is deemed to have gone too far down at the oversold level 30, which is 30.
When the market is deemed to have gone up too much, at overbought level 70, a bearish reaction is to be expected.
Comparing the RSI to 50 is another intriguing use. RSI above 50 indicates bullish momentum, while below 50 indicates negative momentum.
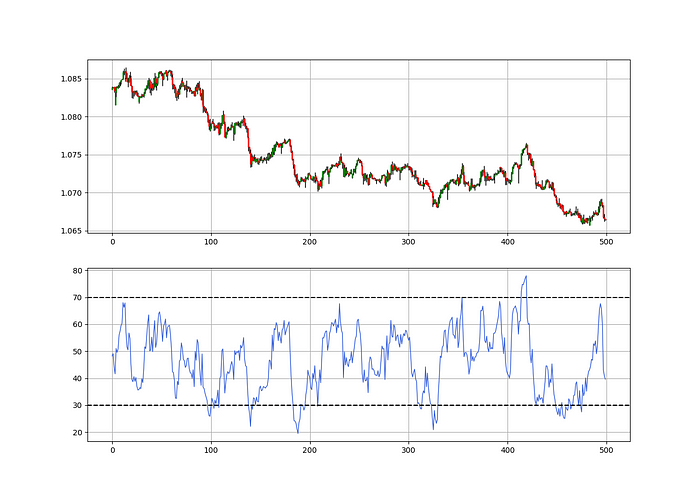
The direction-finding filter in the frame
The Catapult's directional filter uses the 200-period simple moving average to keep us trending. This keeps us sane and increases our odds.
Moving averages confirm and ride trends. Its simplicity and track record of delivering value to analysis make them the most popular technical indicator. They help us locate support and resistance, stops and targets, and the trend. Its versatility makes them essential trading tools.
This is the plain mean, employed in statistics and everywhere else in life. Simply divide the number of observations by their total values. Mathematically, it's:

We defined the moving average function above. Create the Catapult indication now.
Indicator of the Catapult
The indicator is a healthy mix of the three indicators:
The first trigger will be provided by the 21-period Relative Volatility Index, which indicates that there will now be above average volatility and, as a result, it is possible for a directional shift.
If the reading is above 50, the move is likely bullish, and if it is below 50, the move is likely bearish, according to the 14-period Relative Strength Index, which indicates the likelihood of the direction of the move.
The likelihood of the move's direction will be strengthened by the 200-period simple moving average. When the market is above the 200-period moving average, we can infer that bullish pressure is there and that the upward trend will likely continue. Similar to this, if the market falls below the 200-period moving average, we recognize that there is negative pressure and that the downside is quite likely to continue.
lookback_rvi = 21
lookback_rsi = 14
lookback_ma = 200
my_data = ma(my_data, lookback_ma, 3, 4)
my_data = rsi(my_data, lookback_rsi, 3, 5)
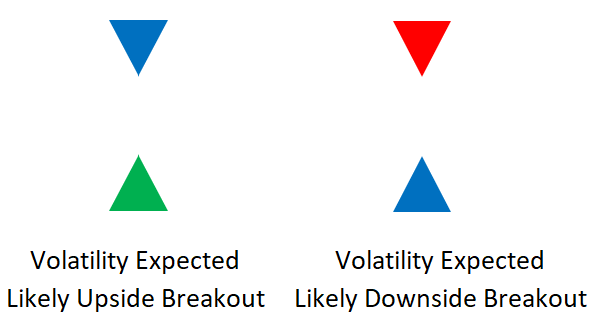
my_data = relative_volatility_index(my_data, lookback_rvi, 3, 6)Two-handled overlay indicator Catapult. The first exhibits blue and green arrows for a buy signal, and the second shows blue and red for a sell signal.
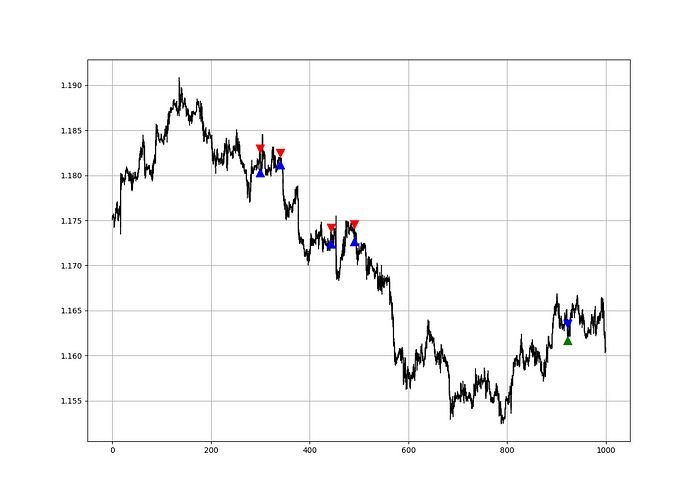
The chart below shows recent EURUSD hourly values.
def signal(Data, rvi_col, signal):

    Data = adder(Data, 10)

    for i in range(len(Data)):

        if Data[i,     rvi_col] < 30 and \
           Data[i - 1, rvi_col] > 30 and \
           Data[i - 2, rvi_col] > 30 and \
           Data[i - 3, rvi_col] > 30 and \
           Data[i - 4, rvi_col] > 30 and \
           Data[i - 5, rvi_col] > 30:

               Data[i, signal] = 1

    return Data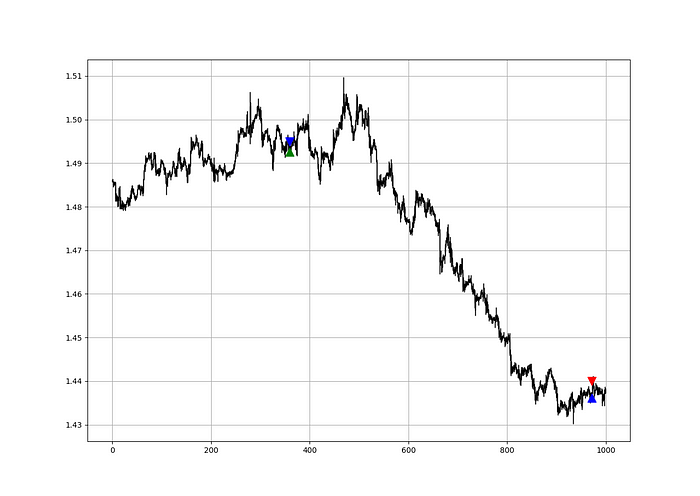
Signals are straightforward. The indicator can be utilized with other methods.
my_data = signal(my_data, 6, 7)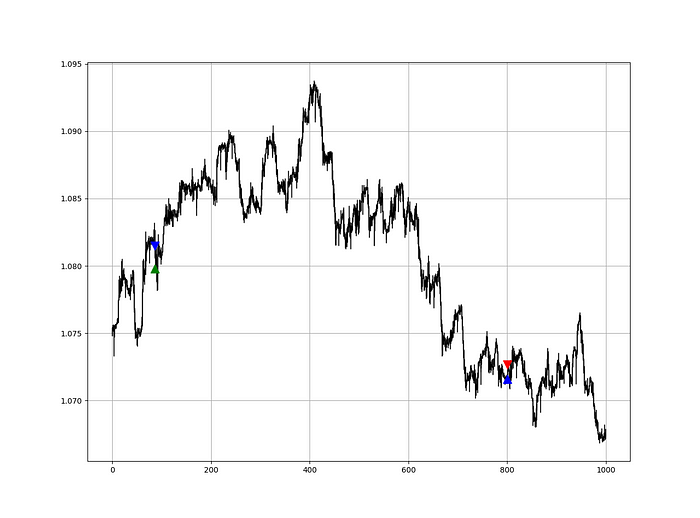
Lumiwealth shows how to develop all kinds of algorithms. I recommend their hands-on courses in algorithmic trading, blockchain, and machine learning.
Summary
To conclude, my goal is to contribute to objective technical analysis, which promotes more transparent methods and strategies that must be back-tested before implementation. Technical analysis will lose its reputation as subjective and unscientific.
After you find a trading method or approach, follow these steps:
Put emotions aside and adopt an analytical perspective.
Test it in the past in conditions and simulations taken from real life.
Try improving it and performing a forward test if you notice any possibility.
Transaction charges and any slippage simulation should always be included in your tests.
Risk management and position sizing should always be included in your tests.
After checking the aforementioned, monitor the plan because market dynamics may change and render it unprofitable.

Scott Hickmann
4 years ago
Welcome
Welcome to Integrity's Web3 community!