


More on Technology

Nitin Sharma
3 years ago
The result of my side-hustle blog post with ChatGPT is remarkable.
It's free now.

Most content writers—including me—write about side hustles because they do well.
I wrote several articles on a profitable programming side hustle.
Later, I learnt about AI content-generating platforms like Jasper.ai and Copy.ai, which I thought were terrible because they required subscriptions and had bad content. Even I dislike automatic online posting.
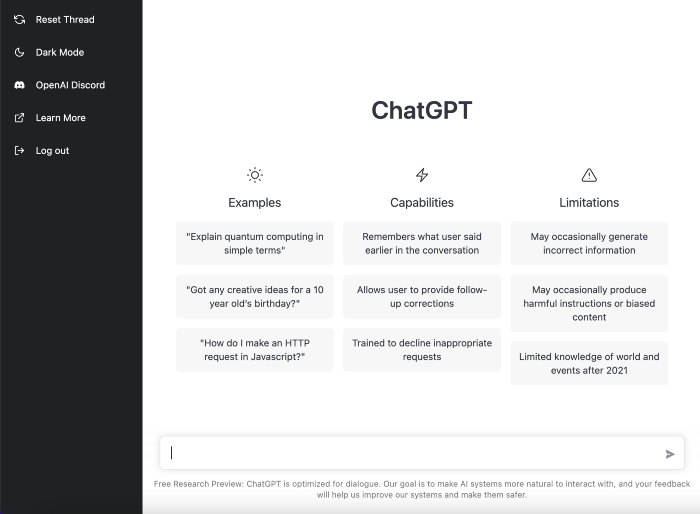
Since ChatGPT is becoming more popular, I tried it. It's free now.
Note: I wasn’t compensated to write this piece by this tool. In other words, I don’t receive any payment from their founders. There is no affiliate link, and right now it is free to use. Also, ChatGPT can do a lot more than what I ever did.
Begin.
OpenAI account registration requires visiting the website (if you don’t have one). Just write anything into the chatbot and get a response.
First, I wrote about the top 10 2023 side businesses.
This came in seconds.
2023 is shaping up to be a year of growth and opportunity for entrepreneurs and side hustlers. With the rise of remote work and the growing gig economy, there are many income streams to consider launching in the coming year. Here are the top 10 income streams to launch in 2023:
Virtual Assistant — The demand for virtual assistants is on the rise as more businesses move online. As a virtual assistant, you can offer administrative, technical, or creative services to clients remotely.
Online Tutoring — If you have expertise in a particular subject, consider becoming an online tutor. There are many platforms that connect tutors with students looking for help with their studies.
Freelance Writing — If you have a knack for writing, consider becoming a freelance writer. You can offer your services to businesses, bloggers, and individuals looking for content for their websites or social media platforms.
Graphic Design — If you have a talent for design, consider starting a graphic design side hustle. You can create logos, banners, and other visual content for businesses and individuals.
Social Media Management — Many businesses are looking for help with managing their social media accounts. As a social media manager, you can help businesses create and execute social media strategies to reach their target audience.
Dropshipping — Dropshipping is a business model where you sell products without actually holding any inventory. You can partner with suppliers and ship the products directly to the customer on behalf of the business.
Pet Sitting — If you love animals, consider starting a pet-sitting side hustle. You can offer your services to pet owners who need someone to take care of their pets while they are away.
Home Cleaning — With busy schedules, many people are looking for help with cleaning their homes. As a home cleaning service provider, you can offer your services to help keep homes tidy and organized.
Event Planning — If you have a talent for organization and planning, consider starting an event planning side hustle. You can offer your services to help plan and execute events for businesses and individuals.
Online Teaching — With the rise of online education, there is a growing demand for online teachers. If you have expertise in a particular subject, consider becoming an online teacher and offer your services to students looking for personalized instruction.
In conclusion, 2023 is shaping up to be a great year for launching new income streams. Whether you are looking to start a virtual assistant business, become an online tutor, or offer home cleaning services, there are many opportunities to turn your skills and expertise into a profitable side hustle.
Better than most online side hustle posts, right?
Write about the top 10 programming side hustles to start in 2023.
I got this.
If you are a programmer looking to start a side hustle, 2023 is the perfect time to launch your own business. With the growing demand for software and app development, there are many opportunities for programmers to turn their skills into a profitable side hustle. Here are the top 10 programming side hustles to start in 2023:
App Development — With the rise of smartphones and tablets, there is a growing demand for app development. You can offer your services to businesses and individuals looking to create custom apps for their needs.
Website Development — Many businesses and individuals are looking for help with creating and maintaining their websites. As a website developer, you can offer your services to help design, build, and manage websites for your clients.
Software Development — If you have expertise in a particular programming language, consider starting a software development side hustle. You can offer your services to businesses and individuals looking to create custom software solutions for their needs.
Game Development — The gaming industry is thriving, and there is a growing demand for game development. If you have experience in game development, you can offer your services to businesses and individuals looking to create custom games.
Data Analysis — With the rise of big data, there is a growing demand for data analysts. As a data analyst, you can offer your services to businesses and individuals looking to make sense of their data and gain insights from it.
Machine Learning — Machine learning is a rapidly growing field, and there is a growing demand for machine learning experts. If you have experience in machine learning, you can offer your services to businesses and individuals looking to develop custom machine learning solutions.
Cloud Computing — With the rise of cloud computing, there is a growing demand for cloud experts. If you have experience in cloud computing, you can offer your services to businesses and individuals looking to migrate their applications and data to the cloud.
Blockchain Development — Blockchain technology is gaining popularity, and there is a growing demand for blockchain developers. If you have experience in blockchain development, you can offer your services to businesses and individuals looking to develop custom blockchain solutions.
Artificial Intelligence — Artificial intelligence is a rapidly growing field, and there is a growing demand for AI experts. If you have experience in artificial intelligence, you can offer your services to businesses and individuals looking to develop custom AI solutions.
Virtual Reality — Virtual reality is an exciting and emerging technology, and there is a growing demand for VR developers. If you have experience in VR development, you can offer your services to businesses and individuals looking to create custom VR experiences.
In conclusion, 2023 is a great time to start a programming side hustle. Whether you are interested in app development, website development, or machine learning, there are many opportunities for programmers to turn their skills into a profitable business.
These two blogs show that AI can simplify blog authoring.
I asked some tough programming questions, and most were suitable.
The content may occasionally not be what we want, but it will almost always be very helpful to you.
Enjoy.
James Brockbank
3 years ago
Canonical URLs for Beginners
Canonicalization and canonical URLs are essential for SEO, and improper implementation can negatively impact your site's performance.
Canonical tags were introduced in 2009 to help webmasters with duplicate or similar content on multiple URLs.
To use canonical tags properly, you must understand their purpose, operation, and implementation.
Canonical URLs and Tags
Canonical tags tell search engines that a certain URL is a page's master copy. They specify a page's canonical URL. Webmasters can avoid duplicate content by linking to the "canonical" or "preferred" version of a page.
How are canonical tags and URLs different? Can these be specified differently?
Tags
Canonical tags are found in an HTML page's head></head> section.
<link rel="canonical" href="https://www.website.com/page/" />These can be self-referencing or reference another page's URL to consolidate signals.
Canonical tags and URLs are often used interchangeably, which is incorrect.
The rel="canonical" tag is the most common way to set canonical URLs, but it's not the only way.
Canonical URLs
What's a canonical link? Canonical link is the'master' URL for duplicate pages.
In Google's own words:
A canonical URL is the page Google thinks is most representative of duplicate pages on your site.
— Google Search Console Help
You can indicate your preferred canonical URL. For various reasons, Google may choose a different page than you.
When set correctly, the canonical URL is usually your specified URL.
Canonical URLs determine which page will be shown in search results (unless a duplicate is explicitly better for a user, like a mobile version).
Canonical URLs can be on different domains.
Other ways to specify canonical URLs
Canonical tags are the most common way to specify a canonical URL.
You can also set canonicals by:
Setting the HTTP header rel=canonical.
All pages listed in a sitemap are suggested as canonicals, but Google decides which pages are duplicates.
Redirects 301.
Google recommends these methods, but they aren't all appropriate for every situation, as we'll see below. Each has its own recommended uses.
Setting canonical URLs isn't required; if you don't, Google will use other signals to determine the best page version.
To control how your site appears in search engines and to avoid duplicate content issues, you should use canonicalization effectively.
Why Duplicate Content Exists
Before we discuss why you should use canonical URLs and how to specify them in popular CMSs, we must first explain why duplicate content exists. Nobody intentionally duplicates website content.
Content management systems create multiple URLs when you launch a page, have indexable versions of your site, or use dynamic URLs.
Assume the following URLs display the same content to a user:
A search engine sees eight duplicate pages, not one.
URLs #1 and #2: the CMS saves product URLs with and without the category name.
#3, #4, and #5 result from the site being accessible via HTTP, HTTPS, www, and non-www.
#6 is a subdomain mobile-friendly URL.
URL #7 lacks URL #2's trailing slash.
URL #8 uses a capital "A" instead of a lowercase one.
Duplicate content may also exist in URLs like:
https://www.website.com
https://www.website.com/index.php
Duplicate content is easy to create.
Canonical URLs help search engines identify different page variations as a single URL on many sites.
SEO Canonical URLs
Canonical URLs help you manage duplicate content that could affect site performance.
Canonical URLs are a technical SEO focus area for many reasons.
Specify URL for search results
When you set a canonical URL, you tell Google which page version to display.
Which would you click?
https://www.domain.com/page-1/
https://www.domain.com/index.php?id=2
First, probably.
Canonicals tell search engines which URL to rank.
Consolidate link signals on similar pages
When you have duplicate or nearly identical pages on your site, the URLs may get external links.
Canonical URLs consolidate multiple pages' link signals into a single URL.
This helps your site rank because signals from multiple URLs are consolidated into one.
Syndication management
Content is often syndicated to reach new audiences.
Canonical URLs consolidate ranking signals to prevent duplicate pages from ranking and ensure the original content ranks.
Avoid Googlebot duplicate page crawling
Canonical URLs ensure that Googlebot crawls your new pages rather than duplicated versions of the same one across mobile and desktop versions, for example.
Crawl budgets aren't an issue for most sites unless they have 100,000+ pages.
How to Correctly Implement the rel=canonical Tag
Using the header tag rel="canonical" is the most common way to specify canonical URLs.
Adding tags and HTML code may seem daunting if you're not a developer, but most CMS platforms allow canonicals out-of-the-box.
These URLs each have one product.
How to Correctly Implement a rel="canonical" HTTP Header
A rel="canonical" HTTP header can replace canonical tags.
This is how to implement a canonical URL for PDFs or non-HTML documents.
You can specify a canonical URL in your site's.htaccess file using the code below.
<Files "file-to-canonicalize.pdf"> Header add Link "< http://www.website.com/canonical-page/>; rel=\"canonical\"" </Files>301 redirects for canonical URLs
Google says 301 redirects can specify canonical URLs.
Only the canonical URL will exist if you use 301 redirects. This will redirect duplicates.
This is the best way to fix duplicate content across:
HTTPS and HTTP
Non-WWW and WWW
Trailing-Slash and Non-Trailing Slash URLs
On a single page, you should use canonical tags unless you can confidently delete and redirect the page.
Sitemaps' canonical URLs
Google assumes sitemap URLs are canonical, so don't include non-canonical URLs.
This does not guarantee canonical URLs, but is a best practice for sitemaps.
Best-practice Canonical Tag
Once you understand a few simple best practices for canonical tags, spotting and cleaning up duplicate content becomes much easier.
Always include:
One canonical URL per page
If you specify multiple canonical URLs per page, they will likely be ignored.
Correct Domain Protocol
If your site uses HTTPS, use this as the canonical URL. It's easy to reference the wrong protocol, so check for it to catch it early.
Trailing slash or non-trailing slash URLs
Be sure to include trailing slashes in your canonical URL if your site uses them.
Specify URLs other than WWW
Search engines see non-WWW and WWW URLs as duplicate pages, so use the correct one.
Absolute URLs
To ensure proper interpretation, canonical tags should use absolute URLs.
So use:
<link rel="canonical" href="https://www.website.com/page-a/" />And not:
<link rel="canonical" href="/page-a/" />If not canonicalizing, use self-referential canonical URLs.
When a page isn't canonicalizing to another URL, use self-referencing canonical URLs.
Canonical tags refer to themselves here.
Common Canonical Tags Mistakes
Here are some common canonical tag mistakes.
301 Canonicalization
Set the canonical URL as the redirect target, not a redirected URL.
Incorrect Domain Canonicalization
If your site uses HTTPS, don't set canonical URLs to HTTP.
Irrelevant Canonicalization
Canonicalize URLs to duplicate or near-identical content only.
SEOs sometimes try to pass link signals via canonical tags from unrelated content to increase rank. This isn't how canonicalization should be used and should be avoided.
Multiple Canonical URLs
Only use one canonical tag or URL per page; otherwise, they may all be ignored.
When overriding defaults in some CMSs, you may accidentally include two canonical tags in your page's <head>.
Pagination vs. Canonicalization
Incorrect pagination can cause duplicate content. Canonicalizing URLs to the first page isn't always the best solution.
Canonicalize to a 'view all' page.
How to Audit Canonical Tags (and Fix Issues)
Audit your site's canonical tags to find canonicalization issues.
SEMrush Site Audit can help. You'll find canonical tag checks in your website's site audit report.
Let's examine these issues and their solutions.
No Canonical Tag on AMP
Site Audit will flag AMP pages without canonical tags.
Canonicalization between AMP and non-AMP pages is important.
Add a rel="canonical" tag to each AMP page's head>.
No HTTPS redirect or canonical from HTTP homepage
Duplicate content issues will be flagged in the Site Audit if your site is accessible via HTTPS and HTTP.
You can fix this by 301 redirecting or adding a canonical tag to HTTP pages that references HTTPS.
Broken canonical links
Broken canonical links won't be considered canonical URLs.
This error could mean your canonical links point to non-existent pages, complicating crawling and indexing.
Update broken canonical links to the correct URLs.
Multiple canonical URLs
This error occurs when a page has multiple canonical URLs.
Remove duplicate tags and leave one.
Canonicalization is a key SEO concept, and using it incorrectly can hurt your site's performance.
Once you understand how it works, what it does, and how to find and fix issues, you can use it effectively to remove duplicate content from your site.
Canonicalization SEO Myths

Christianlauer
3 years ago
Looker Studio Pro is now generally available, according to Google.
Great News about the new Google Business Intelligence Solution

Google has renamed Data Studio to Looker Studio and Looker Studio Pro.
Now, Google releases Looker Studio Pro. Similar to the move from Data Studio to Looker Studio, Looker Studio Pro is basically what Looker was previously, but both solutions will merge. Google says the Pro edition will acquire new enterprise management features, team collaboration capabilities, and SLAs.
![Dashboard Example in Looker Studio Pro — Image Source: Google[2]](https://storage.googleapis.com/int3grity/posts/m9yb4IqJCm7D/images/ZuJudlWT6GUeTKKNVduA5)
In addition to Google's announcements and sales methods, additional features include:
Looker Studio assets can now have organizational ownership. Customers can link Looker Studio to a Google Cloud project and migrate existing assets once. This provides:
Your users' created Looker Studio assets are all kept in a Google Cloud project.
When the users who own assets leave your organization, the assets won't be removed.
Using IAM, you may provide each Looker Studio asset in your company project-level permissions.
Other Cloud services can access Looker Studio assets that are owned by a Google Cloud project.
Looker Studio Pro clients may now manage report and data source access at scale using team workspaces.
Google announcing these features for the pro version is fascinating. Both products will likely converge, but Google may only release many features in the premium version in the future. Microsoft with Power BI and its free and premium variants already achieves this.
Sources and Further Readings
Google, Release Notes (2022)
Google, Looker (2022)
You might also like

Elnaz Sarraf
3 years ago
Why Bitcoin's Crash Could Be Good for Investors

The crypto market crashed in June 2022. Bitcoin and other cryptocurrencies hit their lowest prices in over a year, causing market panic. Some believe this crash will benefit future investors.
Before I discuss how this crash might help investors, let's examine why it happened. Inflation in the U.S. reached a 30-year high in 2022 after Russia invaded Ukraine. In response, the U.S. Federal Reserve raised interest rates by 0.5%, the most in almost 20 years. This hurts cryptocurrencies like Bitcoin. Higher interest rates make people less likely to invest in volatile assets like crypto, so many investors sold quickly.

The crypto market collapsed. Bitcoin, Ethereum, and Binance dropped 40%. Other cryptos crashed so hard they were delisted from almost every exchange. Bitcoin peaked in April 2022 at $41,000, but after the May interest rate hike, it crashed to $28,000. Bitcoin investors were worried. Even in bad times, this crash is unprecedented.
Bitcoin wasn't "doomed." Before the crash, LUNA was one of the top 5 cryptos by market cap. LUNA was trading around $80 at the start of May 2022, but after the rate hike?
Less than 1 cent. LUNA lost 99.99% of its value in days and was removed from every crypto exchange. Bitcoin's "crash" isn't as devastating when compared to LUNA.
Many people said Bitcoin is "due" for a LUNA-like crash and that the only reason it hasn't crashed is because it's bigger. Still false. If so, Bitcoin should be worth zero by now. We didn't. Instead, Bitcoin reached 28,000, then 29k, 30k, and 31k before falling to 18k. That's not the world's greatest recovery, but it shows Bitcoin's safety.
Bitcoin isn't falling constantly. It fell because of the initial shock of interest rates, but not further. Now, Bitcoin's value is more likely to rise than fall. Bitcoin's low price also attracts investors. They know what prices Bitcoin can reach with enough hype, and they want to capitalize on low prices before it's too late.

Bitcoin's crash was bad, but in a way it wasn't. To understand, consider 2021. In March 2021, Bitcoin surpassed $60k for the first time. Elon Musk's announcement in May that he would no longer support Bitcoin caused a massive crash in the crypto market. In May 2017, Bitcoin's price hit $29,000. Elon Musk's statement isn't worth more than the Fed raising rates. Many expected this big announcement to kill Bitcoin.

Not so. Bitcoin crashed from $58k to $31k in 2021. Bitcoin fell from $41k to $28k in 2022. This crash is smaller. Bitcoin's price held up despite tensions and stress, proving investors still believe in it. What happened after the initial crash in the past?
Bitcoin fell until mid-July. This is also something we’re not seeing today. After a week, Bitcoin began to improve daily. Bitcoin's price rose after mid-July. Bitcoin's price fluctuated throughout the rest of 2021, but it topped $67k in November. Despite no major changes, the peak occurred after the crash. Elon Musk seemed uninterested in crypto and wasn't likely to change his mind soon. What triggered this peak? Nothing, really. What really happened is that people got over the initial statement. They forgot.
Internet users have goldfish-like attention spans. People quickly forgot the crash's cause and were back investing in crypto months later. Despite the market's setbacks, more crypto investors emerged by the end of 2017. Who gained from these peaks? Bitcoin investors who bought low. Bitcoin not only recovered but also doubled its ROI. It was like a movie, and it shows us what to expect from Bitcoin in the coming months.
The current Bitcoin crash isn't as bad as the last one. LUNA is causing market panic. LUNA and Bitcoin are different cryptocurrencies. LUNA crashed because Terra wasn’t able to keep its peg with the USD. Bitcoin is unanchored. It's one of the most decentralized investments available. LUNA's distrust affected crypto prices, including Bitcoin, but it won't last forever.
This is why Bitcoin will likely rebound in the coming months. In 2022, people will get over the rise in interest rates and the crash of LUNA, just as they did with Elon Musk's crypto stance in 2021. When the world moves on to the next big controversy, Bitcoin's price will soar.
Bitcoin may recover for another reason. Like controversy, interest rates fluctuate. The Russian invasion caused this inflation. World markets will stabilize, prices will fall, and interest rates will drop.
Next, lower interest rates could boost Bitcoin's price. Eventually, it will happen. The U.S. economy can't sustain such high interest rates. Investors will put every last dollar into Bitcoin if interest rates fall again.
Bitcoin has proven to be a stable investment. This boosts its investment reputation. Even if Ethereum dethrones Bitcoin as crypto king one day (or any other crypto, for that matter). Bitcoin may stay on top of the crypto ladder for a while. We'll have to wait a few months to see if any of this is true.
This post is a summary. Read the full article here.
:max_bytes(150000):strip_icc():gifv():format(webp)/reiff_headshot-5bfc2a60c9e77c00519a70bd.jpg)
Nathan Reiff
3 years ago
Howey Test and Cryptocurrencies: 'Every ICO Is a Security'
What Is the Howey Test?
To determine whether a transaction qualifies as a "investment contract" and thus qualifies as a security, the Howey Test refers to the U.S. Supreme Court cass: the Securities Act of 1933 and the Securities Exchange Act of 1934. According to the Howey Test, an investment contract exists when "money is invested in a common enterprise with a reasonable expectation of profits from others' efforts."
The test applies to any contract, scheme, or transaction. The Howey Test helps investors and project backers understand blockchain and digital currency projects. ICOs and certain cryptocurrencies may be found to be "investment contracts" under the test.
Understanding the Howey Test
The Howey Test comes from the 1946 Supreme Court case SEC v. W.J. Howey Co. The Howey Company sold citrus groves to Florida buyers who leased them back to Howey. The company would maintain the groves and sell the fruit for the owners. Both parties benefited. Most buyers had no farming experience and were not required to farm the land.
The SEC intervened because Howey failed to register the transactions. The court ruled that the leaseback agreements were investment contracts.
This established four criteria for determining an investment contract. Investing contract:
- An investment of money
- n a common enterprise
- With the expectation of profit
- To be derived from the efforts of others
In the case of Howey, the buyers saw the transactions as valuable because others provided the labor and expertise. An income stream was obtained by only investing capital. As a result of the Howey Test, the transaction had to be registered with the SEC.
Howey Test and Cryptocurrencies
Bitcoin is notoriously difficult to categorize. Decentralized, they evade regulation in many ways. Regardless, the SEC is looking into digital assets and determining when their sale qualifies as an investment contract.
The SEC claims that selling digital assets meets the "investment of money" test because fiat money or other digital assets are being exchanged. Like the "common enterprise" test.
Whether a digital asset qualifies as an investment contract depends on whether there is a "expectation of profit from others' efforts."
For example, buyers of digital assets may be relying on others' efforts if they expect the project's backers to build and maintain the digital network, rather than a dispersed community of unaffiliated users. Also, if the project's backers create scarcity by burning tokens, the test is met. Another way the "efforts of others" test is met is if the project's backers continue to act in a managerial role.
These are just a few examples given by the SEC. If a project's success is dependent on ongoing support from backers, the buyer of the digital asset is likely relying on "others' efforts."
Special Considerations
If the SEC determines a cryptocurrency token is a security, many issues arise. It means the SEC can decide whether a token can be sold to US investors and forces the project to register.
In 2017, the SEC ruled that selling DAO tokens for Ether violated federal securities laws. Instead of enforcing securities laws, the SEC issued a warning to the cryptocurrency industry.
Due to the Howey Test, most ICOs today are likely inaccessible to US investors. After a year of ICOs, then-SEC Chair Jay Clayton declared them all securities.
SEC Chairman Gensler Agrees With Predecessor: 'Every ICO Is a Security'
Howey Test FAQs
How Do You Determine If Something Is a Security?
The Howey Test determines whether certain transactions are "investment contracts." Securities are transactions that qualify as "investment contracts" under the Securities Act of 1933 and the Securities Exchange Act of 1934.
The Howey Test looks for a "investment of money in a common enterprise with a reasonable expectation of profits from others' efforts." If so, the Securities Act of 1933 and the Securities Exchange Act of 1934 require disclosure and registration.
Why Is Bitcoin Not a Security?
Former SEC Chair Jay Clayton clarified in June 2018 that bitcoin is not a security: "Cryptocurrencies: Replace the dollar, euro, and yen with bitcoin. That type of currency is not a security," said Clayton.
Bitcoin, which has never sought public funding to develop its technology, fails the SEC's Howey Test. However, according to Clayton, ICO tokens are securities.
A Security Defined by the SEC
In the public and private markets, securities are fungible and tradeable financial instruments. The SEC regulates public securities sales.
The Supreme Court defined a security offering in SEC v. W.J. Howey Co. In its judgment, the court defines a security using four criteria:
- An investment contract's existence
- The formation of a common enterprise
- The issuer's profit promise
- Third-party promotion of the offering
Read original post.

Sam Warain
3 years ago
Sam Altman, CEO of Open AI, foresees the next trillion-dollar AI company
“I think if I had time to do something else, I would be so excited to go after this company right now.”
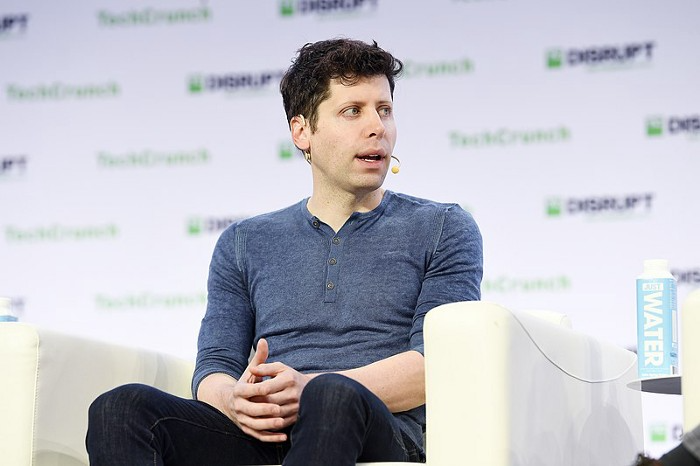
Sam Altman, CEO of Open AI, recently discussed AI's present and future.
Open AI is important. They're creating the cyberpunk and sci-fi worlds.
They use the most advanced algorithms and data sets.
GPT-3...sound familiar? Open AI built most copyrighting software. Peppertype, Jasper AI, Rytr. If you've used any, you'll be shocked by the quality.
Open AI isn't only GPT-3. They created DallE-2 and Whisper (a speech recognition software released last week).
What will they do next? What's the next great chance?
Sam Altman, CEO of Open AI, recently gave a lecture about the next trillion-dollar AI opportunity.
Who is the organization behind Open AI?
Open AI first. If you know, skip it.
Open AI is one of the earliest private AI startups. Elon Musk, Greg Brockman, and Rebekah Mercer established OpenAI in December 2015.
OpenAI has helped its citizens and AI since its birth.
They have scary-good algorithms.
Their GPT-3 natural language processing program is excellent.
The algorithm's exponential growth is astounding. GPT-2 came out in November 2019. May 2020 brought GPT-3.
Massive computation and datasets improved the technique in just a year. New York Times said GPT-3 could write like a human.
Same for Dall-E. Dall-E 2 was announced in April 2022. Dall-E 2 won a Colorado art contest.
Open AI's algorithms challenge jobs we thought required human innovation.
So what does Sam Altman think?
The Present Situation and AI's Limitations
During the interview, Sam states that we are still at the tip of the iceberg.
So I think so far, we’ve been in the realm where you can do an incredible copywriting business or you can do an education service or whatever. But I don’t think we’ve yet seen the people go after the trillion dollar take on Google.
He's right that AI can't generate net new human knowledge. It can train and synthesize vast amounts of knowledge, but it simply reproduces human work.
“It’s not going to cure cancer. It’s not going to add to the sum total of human scientific knowledge.”
But the key word is yet.
And that is what I think will turn out to be wrong that most surprises the current experts in the field.
Reinforcing his point that massive innovations are yet to come.
But where?
The Next $1 Trillion AI Company
Sam predicts a bio or genomic breakthrough.
There’s been some promising work in genomics, but stuff on a bench top hasn’t really impacted it. I think that’s going to change. And I think this is one of these areas where there will be these new $100 billion to $1 trillion companies started, and those areas are rare.
Avoid human trials since they take time. Bio-materials or simulators are suitable beginning points.
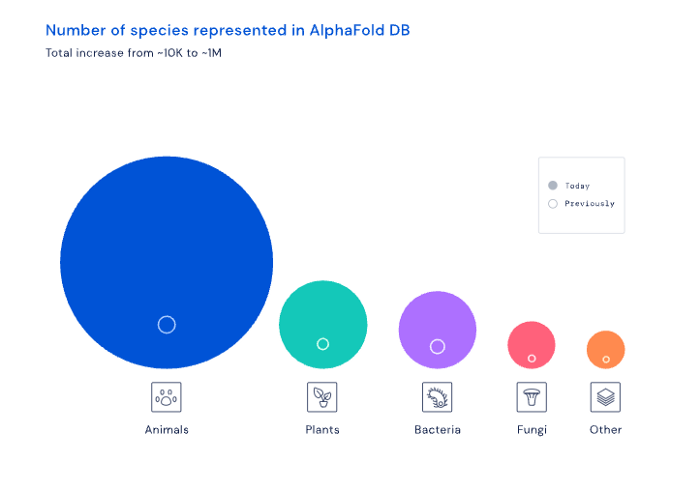
AI may have a breakthrough. DeepMind, an OpenAI competitor, has developed AlphaFold to predict protein 3D structures.
It could change how we see proteins and their function. AlphaFold could provide fresh understanding into how proteins work and diseases originate by revealing their structure. This could lead to Alzheimer's and cancer treatments. AlphaFold could speed up medication development by revealing how proteins interact with medicines.
Deep Mind offered 200 million protein structures for scientists to download (including sustainability, food insecurity, and neglected diseases).
Being in AI for 4+ years, I'm amazed at the progress. We're past the hype cycle, as evidenced by the collapse of AI startups like C3 AI, and have entered a productive phase.
We'll see innovative enterprises that could replace Google and other trillion-dollar companies.
What happens after AI adoption is scary and unpredictable. How will AGI (Artificial General Intelligence) affect us? Highly autonomous systems that exceed humans at valuable work (Open AI)
My guess is that the things that we’ll have to figure out are how we think about fairly distributing wealth, access to AGI systems, which will be the commodity of the realm, and governance, how we collectively decide what they can do, what they don’t do, things like that. And I think figuring out the answer to those questions is going to just be huge. — Sam Altman CEO