


More on Technology
Monroe Mayfield
2 years ago
CES 2023: A Third Look At Upcoming Trends
Las Vegas hosted CES 2023. This third and last look at CES 2023 previews upcoming consumer electronics trends that will be crucial for market share.
Definitely start with ICT. Qualcomm CEO Cristiano Amon spoke to CNBC from Las Vegas on China's crackdown and the company's automated driving systems for electric vehicles (EV). The business showed a concept car and its latest Snapdragon processor designs, which offer expanded digital interactions through SalesForce-partnered CRM platforms.
Electrification is reviving Michigan's automobile industry. Michigan Local News reports that $14 billion in EV and battery manufacturing investments will benefit the state. The report also revealed that the Strategic Outreach and Attraction Reserve (SOAR) fund had generated roughly $1 billion for the state's automotive sector.
Ars Technica is great for technology, society, and the future. After CES 2023, Jonathan M. Gitlin published How many electric car chargers are enough? Read about EV charging network issues and infrastructure spending. Politics aside, rapid technological advances enable EV charging network expansion in American cities and abroad.
Finally, the UNEP's The Future of Electric Vehicles and Material Resources: A Foresight Brief. Understanding how lithium-ion batteries will affect EV sales is crucial. Climate change affects EVs in various ways, but electrification and mining trends stand out because more EVs demand more energy-intensive metals and rare earths. Areas & Producers has been publishing my electrification and mining trends articles. Follow me if you wish to write for the publication.
The Weekend Brief (TWB) will routinely cover tech, industrials, and global commodities in global markets, including stock markets. Read more about the future of key areas and critical producers of the global economy in Areas & Producers.

Al Anany
3 years ago
Notion AI Might Destroy Grammarly and Jasper
The trick Notion could use is simply Facebook-ing the hell out of them.
*Time travel to fifteen years ago.* Future-Me: “Hey! What are you up to?” Old-Me: “I am proofreading an article. It’s taking a few hours, but I will be done soon.” Future-Me: “You know, in the future, you will be using a google chrome plugin called Grammarly that will help you easily proofread articles in half that time.” Old-Me: “What is… Google Chrome?” Future-Me: “Gosh…”
I love Grammarly. It’s one of those products that I personally feel the effects of. I mean, Space X is a great company. But I am not a rocket writing this article in space (or am I?)…
No, I’m not. So I don’t personally feel a connection to Space X. So, if a company collapse occurs in the morning, I might write about it. But I will have zero emotions regarding it.
Yet, if Grammarly fails tomorrow, I will feel 1% emotionally distressed. So looking at the title of this article, you’d realize that I am betting against them. This is how much I believe in the critical business model that’s taking over the world, the one of Notion.
Notion How frequently do you go through your notes?
Grammarly is everywhere, which helps its success. Grammarly is available when you update LinkedIn on Chrome. Grammarly prevents errors in Google Docs.
My internal concentration isn't apparent in the previous paragraph. Not Grammarly. I should have used Chrome to make a Google doc and LinkedIn update. Without this base, Grammarly will be useless.
So, welcome to this business essay.
Grammarly provides a solution.
Another issue is resolved by Jasper.
Your entire existence is supposed to be contained within Notion.
New Google Chrome is offline. It's an all-purpose notepad (in the near future.)
How should I start my blog? Enter it in Note.
an update on LinkedIn? If you mention it, it might be automatically uploaded there (with little help from another app.)
An advanced thesis? You can brainstorm it with your coworkers.
This ad sounds great! I won't cry if Notion dies tomorrow.
I'll reread the following passages to illustrate why I think Notion could kill Grammarly and Jasper.
Notion is a fantastic app that incubates your work.
Smartly, they began with note-taking.
Hopefully, your work will be on Notion. Grammarly and Jasper are still must-haves.
Grammarly will proofread your typing while Jasper helps with copywriting and AI picture development.
They're the best, therefore you'll need them. Correct? Nah.
Notion might bombard them with Facebook posts.
Notion: “Hi Grammarly, do you want to sell your product to us?” Grammarly: “Dude, we are more valuable than you are. We’ve even raised $400m, while you raised $342m. Our last valuation round put us at $13 billion, while yours put you at $10 billion. Go to hell.” Notion: “Okay, we’ll speak again in five years.”
Notion: “Jasper, wanna sell?” Jasper: “Nah, we’re deep into AI and the field. You can’t compete with our people.” Notion: “How about you either sell or you turn into a Snapchat case?” Jasper: “…”
Notion is your home. Grammarly is your neighbor. Your track is Jasper.
What if you grew enough vegetables in your backyard to avoid the supermarket? No more visits.
What if your home had a beautiful treadmill? You won't rush outside as much (I disagree with my own metaphor). (You get it.)
It's Facebooking. Instagram Stories reduced your Snapchat usage. Notion will reduce your need to use Grammarly.
The Final Piece of the AI Puzzle
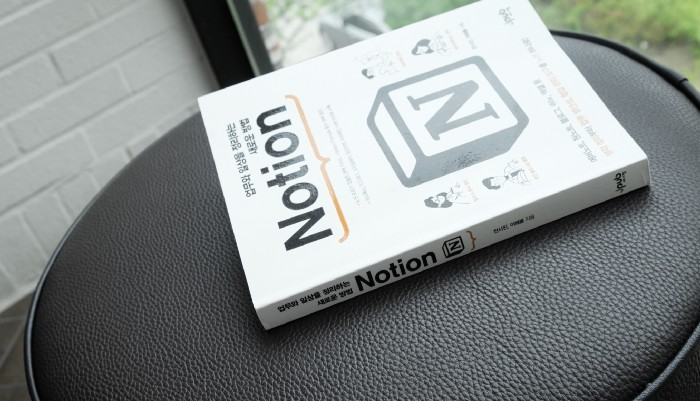
Let's talk about Notion first, since you've probably read about it everywhere.
They raised $343 million, as I previously reported, and bought four businesses
According to Forbes, Notion will have more than 20 million users by 2022. The number of users is up from 4 million in 2020.
If raising $1.8 billion was impressive, FTX wouldn't have fallen.
This article compares the basic product to two others. Notion is a day-long app.
Notion has released Notion AI to support writers. It's early, so it's not as good as Jasper. Then-Jasper isn't now-Jasper. In five years, Notion AI will be different.
With hard work, they may construct a Jasper-like writing assistant. They have resources and users.
At this point, it's all speculation. Jasper's copywriting is top-notch. Grammarly's proofreading is top-notch. Businesses are constrained by user activities.
If Notion's future business movements are strategic, they might become a blue ocean shark (or get acquired by an unbelievable amount.)
I love business mental teasers, so tell me:
How do you feel? Are you a frequent Notion user?
Do you dispute my position? I enjoy hearing opposing viewpoints.
Ironically, I proofread this with Grammarly.
James Brockbank
3 years ago
Canonical URLs for Beginners
Canonicalization and canonical URLs are essential for SEO, and improper implementation can negatively impact your site's performance.
Canonical tags were introduced in 2009 to help webmasters with duplicate or similar content on multiple URLs.
To use canonical tags properly, you must understand their purpose, operation, and implementation.
Canonical URLs and Tags
Canonical tags tell search engines that a certain URL is a page's master copy. They specify a page's canonical URL. Webmasters can avoid duplicate content by linking to the "canonical" or "preferred" version of a page.
How are canonical tags and URLs different? Can these be specified differently?
Tags
Canonical tags are found in an HTML page's head></head> section.
<link rel="canonical" href="https://www.website.com/page/" />These can be self-referencing or reference another page's URL to consolidate signals.
Canonical tags and URLs are often used interchangeably, which is incorrect.
The rel="canonical" tag is the most common way to set canonical URLs, but it's not the only way.
Canonical URLs
What's a canonical link? Canonical link is the'master' URL for duplicate pages.
In Google's own words:
A canonical URL is the page Google thinks is most representative of duplicate pages on your site.
— Google Search Console Help
You can indicate your preferred canonical URL. For various reasons, Google may choose a different page than you.
When set correctly, the canonical URL is usually your specified URL.
Canonical URLs determine which page will be shown in search results (unless a duplicate is explicitly better for a user, like a mobile version).
Canonical URLs can be on different domains.
Other ways to specify canonical URLs
Canonical tags are the most common way to specify a canonical URL.
You can also set canonicals by:
Setting the HTTP header rel=canonical.
All pages listed in a sitemap are suggested as canonicals, but Google decides which pages are duplicates.
Redirects 301.
Google recommends these methods, but they aren't all appropriate for every situation, as we'll see below. Each has its own recommended uses.
Setting canonical URLs isn't required; if you don't, Google will use other signals to determine the best page version.
To control how your site appears in search engines and to avoid duplicate content issues, you should use canonicalization effectively.
Why Duplicate Content Exists
Before we discuss why you should use canonical URLs and how to specify them in popular CMSs, we must first explain why duplicate content exists. Nobody intentionally duplicates website content.
Content management systems create multiple URLs when you launch a page, have indexable versions of your site, or use dynamic URLs.
Assume the following URLs display the same content to a user:
A search engine sees eight duplicate pages, not one.
URLs #1 and #2: the CMS saves product URLs with and without the category name.
#3, #4, and #5 result from the site being accessible via HTTP, HTTPS, www, and non-www.
#6 is a subdomain mobile-friendly URL.
URL #7 lacks URL #2's trailing slash.
URL #8 uses a capital "A" instead of a lowercase one.
Duplicate content may also exist in URLs like:
https://www.website.com
https://www.website.com/index.php
Duplicate content is easy to create.
Canonical URLs help search engines identify different page variations as a single URL on many sites.
SEO Canonical URLs
Canonical URLs help you manage duplicate content that could affect site performance.
Canonical URLs are a technical SEO focus area for many reasons.
Specify URL for search results
When you set a canonical URL, you tell Google which page version to display.
Which would you click?
https://www.domain.com/page-1/
https://www.domain.com/index.php?id=2
First, probably.
Canonicals tell search engines which URL to rank.
Consolidate link signals on similar pages
When you have duplicate or nearly identical pages on your site, the URLs may get external links.
Canonical URLs consolidate multiple pages' link signals into a single URL.
This helps your site rank because signals from multiple URLs are consolidated into one.
Syndication management
Content is often syndicated to reach new audiences.
Canonical URLs consolidate ranking signals to prevent duplicate pages from ranking and ensure the original content ranks.
Avoid Googlebot duplicate page crawling
Canonical URLs ensure that Googlebot crawls your new pages rather than duplicated versions of the same one across mobile and desktop versions, for example.
Crawl budgets aren't an issue for most sites unless they have 100,000+ pages.
How to Correctly Implement the rel=canonical Tag
Using the header tag rel="canonical" is the most common way to specify canonical URLs.
Adding tags and HTML code may seem daunting if you're not a developer, but most CMS platforms allow canonicals out-of-the-box.
These URLs each have one product.
How to Correctly Implement a rel="canonical" HTTP Header
A rel="canonical" HTTP header can replace canonical tags.
This is how to implement a canonical URL for PDFs or non-HTML documents.
You can specify a canonical URL in your site's.htaccess file using the code below.
<Files "file-to-canonicalize.pdf"> Header add Link "< http://www.website.com/canonical-page/>; rel=\"canonical\"" </Files>301 redirects for canonical URLs
Google says 301 redirects can specify canonical URLs.
Only the canonical URL will exist if you use 301 redirects. This will redirect duplicates.
This is the best way to fix duplicate content across:
HTTPS and HTTP
Non-WWW and WWW
Trailing-Slash and Non-Trailing Slash URLs
On a single page, you should use canonical tags unless you can confidently delete and redirect the page.
Sitemaps' canonical URLs
Google assumes sitemap URLs are canonical, so don't include non-canonical URLs.
This does not guarantee canonical URLs, but is a best practice for sitemaps.
Best-practice Canonical Tag
Once you understand a few simple best practices for canonical tags, spotting and cleaning up duplicate content becomes much easier.
Always include:
One canonical URL per page
If you specify multiple canonical URLs per page, they will likely be ignored.
Correct Domain Protocol
If your site uses HTTPS, use this as the canonical URL. It's easy to reference the wrong protocol, so check for it to catch it early.
Trailing slash or non-trailing slash URLs
Be sure to include trailing slashes in your canonical URL if your site uses them.
Specify URLs other than WWW
Search engines see non-WWW and WWW URLs as duplicate pages, so use the correct one.
Absolute URLs
To ensure proper interpretation, canonical tags should use absolute URLs.
So use:
<link rel="canonical" href="https://www.website.com/page-a/" />And not:
<link rel="canonical" href="/page-a/" />If not canonicalizing, use self-referential canonical URLs.
When a page isn't canonicalizing to another URL, use self-referencing canonical URLs.
Canonical tags refer to themselves here.
Common Canonical Tags Mistakes
Here are some common canonical tag mistakes.
301 Canonicalization
Set the canonical URL as the redirect target, not a redirected URL.
Incorrect Domain Canonicalization
If your site uses HTTPS, don't set canonical URLs to HTTP.
Irrelevant Canonicalization
Canonicalize URLs to duplicate or near-identical content only.
SEOs sometimes try to pass link signals via canonical tags from unrelated content to increase rank. This isn't how canonicalization should be used and should be avoided.
Multiple Canonical URLs
Only use one canonical tag or URL per page; otherwise, they may all be ignored.
When overriding defaults in some CMSs, you may accidentally include two canonical tags in your page's <head>.
Pagination vs. Canonicalization
Incorrect pagination can cause duplicate content. Canonicalizing URLs to the first page isn't always the best solution.
Canonicalize to a 'view all' page.
How to Audit Canonical Tags (and Fix Issues)
Audit your site's canonical tags to find canonicalization issues.
SEMrush Site Audit can help. You'll find canonical tag checks in your website's site audit report.
Let's examine these issues and their solutions.
No Canonical Tag on AMP
Site Audit will flag AMP pages without canonical tags.
Canonicalization between AMP and non-AMP pages is important.
Add a rel="canonical" tag to each AMP page's head>.
No HTTPS redirect or canonical from HTTP homepage
Duplicate content issues will be flagged in the Site Audit if your site is accessible via HTTPS and HTTP.
You can fix this by 301 redirecting or adding a canonical tag to HTTP pages that references HTTPS.
Broken canonical links
Broken canonical links won't be considered canonical URLs.
This error could mean your canonical links point to non-existent pages, complicating crawling and indexing.
Update broken canonical links to the correct URLs.
Multiple canonical URLs
This error occurs when a page has multiple canonical URLs.
Remove duplicate tags and leave one.
Canonicalization is a key SEO concept, and using it incorrectly can hurt your site's performance.
Once you understand how it works, what it does, and how to find and fix issues, you can use it effectively to remove duplicate content from your site.
Canonicalization SEO Myths
You might also like

1eth1da
3 years ago
6 Rules to build a successful NFT Community in 2022

Too much NFT, Discord, and shitposting.
How do you choose?
How do you recruit more members to join your NFT project?
In 2021, a successful NFT project required:
Monkey/ape artwork
Twitter and Discord bot-filled
Roadmap overpromise
Goal was quick cash.
2022 and the years after will change that.
These are 6 Rules for a Strong NFT Community in 2022:
THINK LONG TERM
This relates to roadmap planning. Hype and dumb luck may drive NFT projects (ahem, goblins) but rarely will your project soar.
Instead, consider sustainability.
Plan your roadmap based on your team's abilities.
Do what you're already doing, but with NFTs, make it bigger and better.
You shouldn't copy a project's roadmap just because it was profitable.
This will lead to over-promising, team burnout, and an RUG NFT project.
OFFER VALUE
Building a great community starts with giving.
Why are musicians popular?
Because they offer entertainment for everyone, a random person becomes a fan, and more fans become a cult.
That's how you should approach your community.
TEAM UP
A great team helps.
An NFT project could have 3 or 2 people.
Credibility trumps team size.
Make sure your team can answer community questions, resolve issues, and constantly attend to them.
Don't overwork and burn out.
Your community will be able to recognize that you are trying too hard and give up on the project.
BUILD A GREAT PRODUCT
Bored Ape Yacht Club altered the NFT space.
Cryptopunks transformed NFTs.
Many others did, including Okay Bears.
What made them that way?
Because they answered a key question.
What is my NFT supposed to be?
Before planning art, this question must be answered.
NFTs can't be just jpegs.
What does it represent?
Is it a Metaverse-ready project?
What blockchain are you going to be using and why?
Set some ground rules for yourself. This helps your project's direction.
These questions will help you and your team set a direction for blockchain, NFT, and Web3 technology.
EDUCATE ON WEB3
The more the team learns about Web3 technology, the more they can offer their community.
Think tokens, metaverse, cross-chain interoperability and more.
BUILD A GREAT COMMUNITY
Several projects mistreat their communities.
They treat their community like "customers" and try to sell them NFT.
Providing Whitelists and giveaways aren't your only community-building options.
Think bigger.
Consider them family and friends, not wallets.
Consider them fans.
These are some tips to start your NFT project.

ʟ ᴜ ᴄ ʏ
3 years ago
The Untapped Gold Mine of Inspiration and Startup Ideas
I joined the 1000 Digital Startups Movement (Gerakan 1000 Startup Digital) in 2017 and learned a lot about the startup sector. My previous essay outlined what a startup is and what must be prepared. Here I'll offer raw ideas for better products.

Intro
A good startup solves a problem. These can include environmental, economic, energy, transportation, logistics, maritime, forestry, livestock, education, tourism, legal, arts and culture, communication, and information challenges. Everything I wrote is simply a basic idea (as inspiration) and requires more mapping and validation. Learn how to construct a startup to maximize launch success.
Adrian Gunadi (Investree Co-Founder) taught me that a Founder or Co-Founder must be willing to be CEO (Chief Everything Officer). Everything is independent, including drafting a proposal, managing finances, and scheduling appointments. The best individuals will come to you if you're the best. It's easier than consulting Andy Zain (Kejora Capital Founder).
Description
To help better understanding from your idea, try to answer this following questions:
- Describe your idea/application
Maximum 1000 characters.
- Background
Explain the reasons that prompted you to realize the idea/application.
- Objective
Explain the expected goals of the creation of the idea/application.
- Solution
A solution that tells your idea can be the right solution for the problem at hand.
- Uniqueness
What makes your idea/app unique?
- Market share
Who are the people who need and are looking for your idea?
- Marketing Ways and Business Models
What is the best way to sell your idea and what is the business model?
Not everything here is a startup idea. It's meant to inspire creativity and new perspectives.
Ideas
#Application
1. Medical students can operate on patients or not. Applications that train prospective doctors to distinguish body organs and their placement are useful. In the advanced stage, the app can be built with numerous approaches so future doctors can practice operating on patients based on their ailments. If they made a mistake, they'd start over. Future doctors will be more assured and make fewer mistakes this way.
2. VR (virtual reality) technology lets people see 3D space from afar. Later, similar technology was utilized to digitally sell properties, so buyers could see the inside and room contents. Every gadget has flaws. It's like a gold mine for robbers. VR can let prospective students see a campus's facilities. This facility can also help hotels promote their products.
3. How can retail entrepreneurs maximize sales? Most popular goods' sales data. By using product and brand/type sales figures, entrepreneurs can avoid overstocking. Walmart computerized their procedures to track products from the manufacturer to the store. As Retail Link products sell out, suppliers can immediately step in.
4. Failing to marry is something to be avoided. But if it had to happen, the loss would be like the proverb “rub salt into the wound”. On the I do Now I dont website, Americans who don't marry can resell their jewelry to other brides-to-be. If some want to cancel the wedding and receive their down money and dress back, others want a wedding with particular criteria, such as a quick date and the expected building. Create a DP takeover marketplace for both sides.
#Games
1. Like in the movie, players must exit the maze they enter within 3 minutes or the shape will change, requiring them to change their strategy. The maze's transformation time will shorten after a few stages.
2. Treasure hunts involve following clues to uncover hidden goods. Here, numerous sponsors are combined in one boat, and participants can choose a game based on the prizes. Let's say X-mart is a sponsor and provides riddles or puzzles to uncover the prize in their store. After gathering enough points, the player can trade them for a gift utilizing GPS and AR (augmented reality). Players can collaborate to increase their chances of success.
3. Where's Wally? Where’s Wally displays a thick image with several things and various Wally-like characters. We must find the actual Wally, his companions, and the desired object. Make a game with a map where players must find objects for the next level. The player must find 5 artifacts randomly placed in an Egyptian-style mansion, for example. In the room, there are standard tickets, pass tickets, and gold tickets that can be removed for safekeeping, as well as a wall-mounted carpet that can be stored but not searched and turns out to be a flying rug that can be used to cross/jump to a different place. Regular tickets are spread out since they can buy life or stuff. At a higher level, a black ticket can lower your ordinary ticket. Objects can explode, scattering previously acquired stuff. If a player runs out of time, they can exchange a ticket for more.
#TVprogram
1. At the airport there are various visitors who come with different purposes. Asking tourists to live for 1 or 2 days in the city will be intriguing to witness.
2. Many professions exist. Carpenters, cooks, and lawyers must have known about job desks. Does HRD (Human Resource Development) only recruit new employees? Many don't know how to become a CEO, CMO, COO, CFO, or CTO. Showing young people what a Program Officer in an NGO does can help them choose a career.
#StampsCreations
Philatelists know that only the government can issue stamps. I hope stamps are creative so they have more worth.
1. Thermochromic pigments (leuco dyes) are well-known for their distinctive properties. By putting pigments to black and white batik stamps, for example, the black color will be translucent and display the basic color when touched (at a hot temperature).
2. In 2012, Liechtenstein Post published a laser-art Chinese zodiac stamp. Belgium (Bruges Market Square 2012), Taiwan (Swallow Tail Butterfly 2009), etc. Why not make a stencil of the president or king/queen?
3. Each country needs its unique identity, like Taiwan's silk and bamboo stamps. Create from your country's history. Using traditional paper like washi (Japan), hanji (Korea), and daluang/saeh (Indonesia) can introduce a country's culture.
4. Garbage has long been a problem. Bagasse, banana fronds, or corn husks can be used as stamp material.
5. Austria Post published a stamp containing meteor dust in 2006. 2004 meteorite found in Morocco produced the dust. Gibraltar's Rock of Gilbraltar appeared on stamps in 2002. What's so great about your country? East Java is muddy (Lapindo mud). Lapindo mud stamps will be popular. Red sand at Pink Beach, East Nusa Tenggara, could replace the mud.
#PostcardCreations
1. Map postcards are popular because they make searching easier. Combining laser-cut road map patterns with perforated 200-gram paper glued on 400-gram paper as a writing medium. Vision-impaired people can use laser-cut maps.
2. Regional art can be promoted by tucking traditional textiles into postcards.
3. A thin canvas or plain paper on the card's front allows the giver to be creative.
4. What is local crop residue? Cork lids, maize husks, and rice husks can be recycled into postcard materials.
5. Have you seen a dried-flower bookmark? Cover the postcard with mica and add dried flowers. If you're worried about losing the flowers, you can glue them or make a postcard envelope.
6. Wood may be ubiquitous; try a 0.2-mm copper plate engraved with an image and connected to a postcard as a writing medium.
7. Utilized paper pulp can be used to hold eggs, smartphones, and food. Form a smooth paper pulp on the plate with the desired image, the Golden Gate bridge, and paste it on your card.
8. Postcards can promote perfume. When customers rub their hands on the card with the perfume image, they'll smell the aroma.
#Tour #Travel
Tourism activities can be tailored to tourists' interests or needs. Each tourist benefits from tourism's distinct aim.
Let's define tourism's objective and purpose.
Holiday Tour is a tour that its participants plan and do in order to relax, have fun, and amuse themselves.
A familiarization tour is a journey designed to help travelers learn more about (survey) locales connected to their line of work.
An educational tour is one that aims to give visitors knowledge of the field of work they are visiting or an overview of it.
A scientific field is investigated and knowledge gained as the major goal of a scientific tour.
A pilgrimage tour is one designed to engage in acts of worship.
A special mission tour is one that has a specific goal, such a commerce mission or an artistic endeavor.
A hunting tour is a destination for tourists that plans organized animal hunting that is only allowed by local authorities for entertainment purposes.
Every part of life has tourism potential. Activities include:
1. Those who desire to volunteer can benefit from the humanitarian theme and collaboration with NGOs. This activity's profit isn't huge but consider the environmental impact.
2. Want to escape the city? Meditation travel can help. Beautiful spots around the globe can help people forget their concerns. A certified yoga/meditation teacher can help travelers release bad energy.
3. Any prison visitors? Some prisons, like those for minors under 17, are open to visitors. This type of tourism helps mental convicts reach a brighter future.
4. Who has taken a factory tour/study tour? Outside-of-school study tour (for ordinary people who have finished their studies). Not everyone in school could tour industries, workplaces, or embassies to learn and be inspired. Shoyeido (an incense maker) and Royce (a chocolate maker) offer factory tours in Japan.
5. Develop educational tourism like astronomy and archaeology. Until now, only a few astronomy enthusiasts have promoted astronomy tourism. In Indonesia, archaeology activities focus on site preservation, and to participate, office staff must undertake a series of training (not everyone can take a sabbatical from their routine). Archaeological tourist activities are limited, whether held by history and culture enthusiasts or in regional tours.
6. Have you ever longed to observe a film being made or your favorite musician rehearsing? Such tours can motivate young people to pursue entertainment careers.
7. Pamper your pets to reduce stress. Many pet owners don't have time for walks or treats. These premium services target the wealthy.
8. A quirky idea to provide tours for imaginary couples or things. Some people marry inanimate objects or animals and seek to make their lover happy; others cherish their ashes after death.
#MISCideas
1. Fashion is a lifestyle, thus people often seek fresh materials. Chicken claws, geckos, snake skin casings, mice, bats, and fish skins are also used. Needs some improvement, definitely.
2. As fuel supplies become scarcer, people hunt for other energy sources. Sound is an underutilized renewable energy. The Batechsant technology converts environmental noise into electrical energy, according to study (Battery Technology Of Sound Power Plant). South Korean researchers use Sound-Driven Piezoelectric Nanowire based on Nanogenerators to recharge cell phone batteries. The Batechsant system uses existing noise levels to provide electricity for street lamp lights, aviation, and ships. Using waterfall sound can also energize hard-to-reach locations.
3. A New York Times reporter said IQ doesn't ensure success. Our school system prioritizes IQ above EQ (Emotional Quotient). EQ is a sort of human intelligence that allows a person to perceive and analyze the dynamics of his emotions when interacting with others (and with himself). EQ is suspected of being a bigger source of success than IQ. EQ training can gain greater attention to help people succeed. Prioritize role models from school stakeholders, teachers, and parents to improve children' EQ.
4. Teaching focuses more on theory than practice, so students are less eager to explore and easily forget if they don't pay attention. Has an engineer ever made bricks from arid red soil? Morocco's non-college-educated builders can create weatherproof bricks from red soil without equipment. Can mechanical engineering grads create a water pump to solve water shortages in remote areas? Art graduates can innovate beyond only painting. Artists may create kinetic sculpture by experimenting so much. Young people should understand these sciences so they can be more creative with their potential. These might be extracurricular activities in high school and university.
5. People have been trying to recycle agricultural waste for a long time. Mycelium helps replace light, easily crushed tiles and bricks (a collection of hyphae like in the manufacture of tempe). Waste must contain lignocellulose. In this vein, anti-mainstream painting canvases can be made. The goal is to create the canvas uneven like an amoeba outline, not square or spherical. The resulting canvas is lightweight and needs no frame. Then what? Open source your idea like Precious Plastic to establish a community. By propagating this notion, many knowledgeable people will help improve your product's quality and impact.
6. As technology and humans adapt, fraud increases. Making phony doctor's letters to fool superiors, fake credentials to get hired, fraudulent land certificates to make money, and fake news (hoax). The existence of a Wikimedia can aid the community by comparing bogus and original information.
7. Do you often hit a problem-solving impasse? Since the Doraemon bag hasn't been made, construct an Idea Bank. Everyone can contribute to solving problems here. How do you recruit volunteers? Obviously, a reward is needed. Contributors can become moderators or gain complimentary tickets to TIA (Tech in Asia) conferences. Idea Bank-related concepts: the rise of startups without a solid foundation generates an age as old as corn that does not continue. Those with startup ideas should describe them here so they can be validated by other users. Other users can contribute input if a comparable notion is produced to improve the product or integrate it. Similar-minded users can become Co-Founders.
8. Why not invest in fruit/vegetables, inspired by digital farming? The landowner obtains free fruit without spending much money on maintenance. Investors can get fruits/vegetables in larger quantities, fresher, and cheaper during harvest. Fruits and vegetables are often harmed if delivered too slowly. Rich investors with limited land can invest in teak, agarwood, and other trees. When harvesting, investors might choose raw results or direct wood sales earnings. Teak takes at least 7 years to harvest, therefore long-term wood investments carry the risk of crop failure.
9. Teenagers in distant locations can't count, read, or write. Many factors hinder locals' success. Life's demands force them to work instead of study. Creating a learning playground may attract young people to learning. Make a skatepark at school. Skateboarders must learn in school. Donations buy skateboards.
10. Globally, online taxi-bike is known. By hiring a motorcycle/car online, people no longer bother traveling without a vehicle. What if you wish to cross the island or visit remote areas? Is online boat or helicopter rental possible like online taxi-bike? Such a renting process has been done independently thus far and cannot be done quickly.
11. What do startups need now? A startup or investor consultant. How many startups fail to become Unicorns? Many founders don't know how to manage investor money, therefore they waste it on promotions and other things. Many investors only know how to invest and can't guide a struggling firm.
“In times of crisis, the wise build bridges, while the foolish build barriers.” — T’Challa [Black Panther]
Don't chase cash. Money is a byproduct. Profit-seeking is stressful. Market requirements are opportunities. If you have something to say, please comment.
This is only informational. Before implementing ideas, do further study.

Mangu Solutions
3 years ago
Growing a New App to $15K/mo in 6 Months [SaaS Case Study]
Discover How We Used Facebook Ads to Grow a New Mobile App from $0 to $15K MRR in Just 6 Months and Our Strategy to Hit $100K a Month.
Our client introduced a mobile app for Poshmark resellers in December and wanted as many to experience it and subscribe to the monthly plan.
An Error We Committed
We initiated a Facebook ad campaign with a "awareness" goal, not "installs." This sent them to a landing page that linked to the iPhone App Store and Android Play Store. Smart, right?
We got some installs, but we couldn't tell how many came from the ad versus organic/other channels because the objective we chose only reported landing page clicks, not app installs.
We didn't know which interest groups/audiences had the best cost per install (CPI) to optimize and scale our budget.
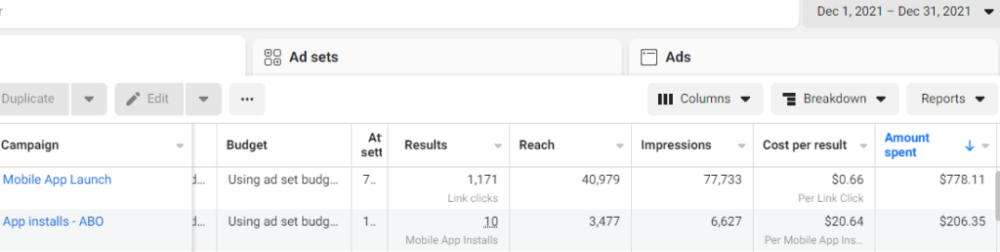
After spending $700 without adequate data (installs and trials report), we stopped the campaign and worked with our client's app developer to set up app events tracking.
This allowed us to create an installs campaign and track installs, trials, and purchases (in some cases).
Finding a Successful Audience
Once we knew what ad sets brought in what installs at what cost, we began optimizing and testing other interest groups and audiences, growing the profitable low CPI ones and eliminating the high CPI ones.
We did all our audience testing using an ABO campaign (Ad Set Budget Optimization), spending $10 to $30 on each ad set for three days and optimizing afterward. All ad sets under $30 were moved to a CBO campaign (Campaign Budget Optimization).
We let Facebook's AI decide how much to spend on each ad set, usually the one most likely to convert at the lowest cost.
If the CBO campaign maintains a nice CPI, we keep increasing the budget by $50 every few days or duplicating it sometimes in order to double the budget. This is how we've scaled to $400/day profitably.
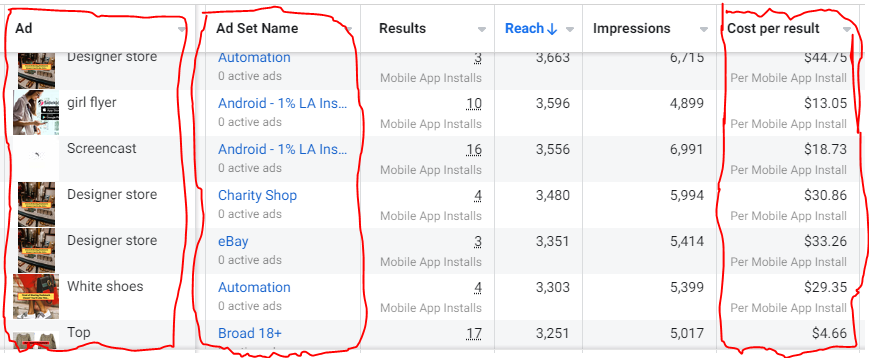
Finding Successful Creatives
Per campaign, we tested 2-6 images/videos. Same ad copy and CTA. There was no clear winner because some images did better with some interest groups.
The image above with mail packages, for example, got us a cheap CPI of $9.71 from our Goodwill Stores interest group but, a high $48 CPI from our lookalike audience. Once we had statistically significant data, we turned off the high-cost ad.
New marketers who are just discovering A/B testing may assume it's black and white — winner and loser. However, Facebook ads' machine learning and reporting has gotten so sophisticated that it's hard to call a creative a flat-out loser, but rather a 'bad fit' for some audiences, and perfect for others.
You can see how each creative performs across age groups and optimize.
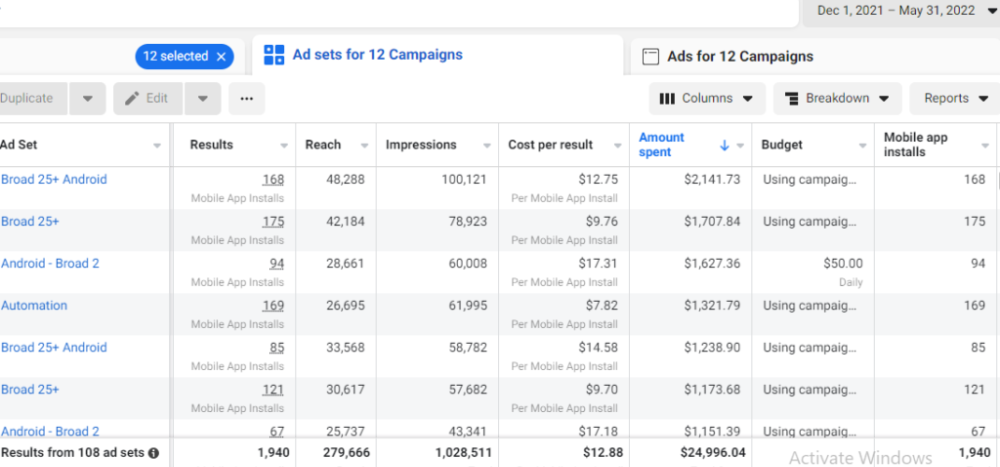
How Many Installs Did It Take Us to Earn $15K Per Month?
Six months after paying $25K, we got 1,940 app installs, 681 free trials, and 522 $30 monthly subscriptions. 522 * $30 gives us $15,660 in monthly recurring revenue (MRR).
Next, what? $100K per month
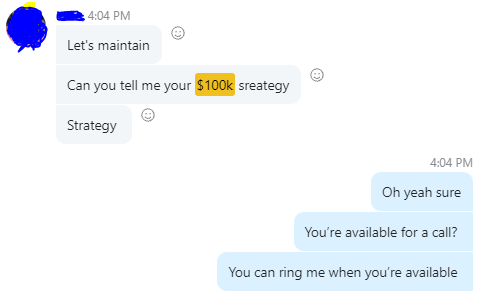
The conversation above is with the app's owner. We got on a 30-minute call where I shared how I plan to get the app to be making $100K a month like I’ve done for other businesses.
Reverse Engineering $100K
Formula:
For $100K/month, we need 3,334 people to pay $30/month. 522 people pay that. We need 2,812 more paid users.
522 paid users from 1,940 installs is a 27% conversion rate. To hit $100K/month, we need 10,415 more installs. Assuming...
With a $400 daily ad spend, we average 40 installs per day. This means that if everything stays the same, it would take us 260 days (around 9 months) to get to $100K a month (MRR).
Conclusion
You must market your goods to reach your income objective (without waiting forever). Paid ads is the way to go if you hate knocking on doors or irritating friends and family (who aren’t scalable anyways).
You must also test and optimize different angles, audiences, interest groups, and creatives.