


More on Technology

Stephen Moore
3 years ago
A Meta-Reversal: Zuckerberg's $71 Billion Loss
The company's epidemic gains are gone.
Mark Zuckerberg was in line behind Jeff Bezos and Bill Gates less than two years ago. His wealth soared to $142 billion. Facebook's shares reached $382 in September 2021.
What comes next is either the start of something truly innovative or the beginning of an epic rise and fall story.
In order to start over (and avoid Facebook's PR issues), he renamed the firm Meta. Along with the new logo, he announced a turn into unexplored territory, the Metaverse, as the next chapter for the internet after mobile. Or, Zuckerberg believed Facebook's death was near, so he decided to build a bigger, better, cooler ship. Then we saw his vision (read: dystopian nightmare) in a polished demo that showed Zuckerberg in a luxury home and on a spaceship with aliens. Initially, it looked entertaining. A problem was obvious, though. He might claim this was the future and show us using the Metaverse for business, play, and more, but when I took off my headset, I'd realize none of it was genuine.
The stock price is almost as low as January 2019, when Facebook was dealing with the aftermath of the Cambridge Analytica crisis.
Irony surrounded the technology's aim. Zuckerberg says the Metaverse connects people. Despite some potential uses, this is another step away from physical touch with people. Metaverse worlds can cause melancholy, addiction, and mental illness. But forget all the cool stuff you can't afford. (It may be too expensive online, too.)
Metaverse activity slowed for a while. In early February 2022, we got an earnings call update. Not good. Reality Labs lost $10 billion on Oculus and Zuckerberg's Metaverse. Zuckerberg expects losses to rise. Meta's value dropped 20% in 11 minutes after markets closed.
It was a sign of things to come.
The corporation has failed to create interest in Metaverse, and there is evidence the public has lost interest. Meta still relies on Facebook's ad revenue machine, which is also struggling. In July, the company announced a decrease in revenue and missed practically all its forecasts, ending a decade of exceptional growth and relentless revenue. They blamed a dismal advertising demand climate, and Apple's monitoring changes smashed Meta's ad model. Throw in whistleblowers, leaked data revealing the firm knows Instagram negatively affects teens' mental health, the current Capital Hill probe, and the fact TikTok is eating its breakfast, lunch, and dinner, and 2022 might be the corporation's worst year ever.
After a rocky start, tech saw unprecedented growth during the pandemic. It was a tech bubble and then some.
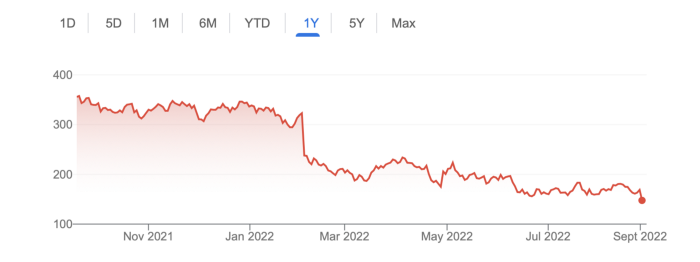
The gains reversed after the dust settled and stock markets adjusted. Meta's year-to-date decline is 60%. Apple Inc is down 14%, Amazon is down 26%, and Alphabet Inc is down 29%. At the time of writing, Facebook's stock price is almost as low as January 2019, when the Cambridge Analytica scandal broke. Zuckerberg owns 350 million Meta shares. This drop costs him $71 billion.
The company's problems are growing, and solutions won't be easy.
Facebook's period of unabated expansion and exorbitant ad revenue is ended, and the company's impact is dwindling as it continues to be the program that only your parents use. Because of the decreased ad spending and stagnant user growth, Zuckerberg will have less time to create his vision for the Metaverse because of the declining stock value and decreasing ad spending.
Instagram is progressively dying in its attempt to resemble TikTok, alienating its user base and further driving users away from Meta-products.
And now that the corporation has shifted its focus to the Metaverse, it is clear that, in its eagerness to improve its image, it fired the launch gun too early. You're fighting a lost battle when you announce an idea and then claim it won't happen for 10-15 years. When the idea is still years away from becoming a reality, the public is already starting to lose interest.
So, as I questioned earlier, is it the beginning of a technological revolution that will take this firm to stratospheric growth and success, or are we witnessing the end of Meta and Zuckerberg himself?

Farhad Malik
3 years ago
How This Python Script Makes Me Money Every Day
Starting a passive income stream with data science and programming
My website is fresh. But how do I monetize it?
Creating a passive-income website is difficult. Advertise first. But what useful are ads without traffic?
Let’s Generate Traffic And Put Our Programming Skills To Use
SEO boosts traffic (Search Engine Optimisation). Traffic generation is complex. Keywords matter more than text, URL, photos, etc.
My Python skills helped here. I wanted to find relevant, Google-trending keywords (tags) for my topic.
First The Code
I wrote the script below here.
import re
from string import punctuation

import nltk
from nltk import TreebankWordTokenizer, sent_tokenize
from nltk.corpus import stopwords


class KeywordsGenerator:
    def __init__(self, pytrends):
        self._pytrends = pytrends

    def generate_tags(self, file_path, top_words=30):
        file_text = self._get_file_contents(file_path)
        clean_text = self._remove_noise(file_text)
        top_words = self._get_top_words(clean_text, top_words)
        suggestions = []
        for top_word in top_words:
            suggestions.extend(self.get_suggestions(top_word))
        suggestions.extend(top_words)
        tags = self._clean_tokens(suggestions)
        return ",".join(list(set(tags)))

    def _remove_noise(self, text):
        #1. Convert Text To Lowercase and remove numbers
        lower_case_text = str.lower(text)
        just_text = re.sub(r'\d+', '', lower_case_text)
        #2. Tokenise Paragraphs To words
        list = sent_tokenize(just_text)
        tokenizer = TreebankWordTokenizer()
        tokens = tokenizer.tokenize(just_text)
        #3. Clean text
        clean = self._clean_tokens(tokens)
        return clean

    def _clean_tokens(self, tokens):
        clean_words = [w for w in tokens if w not in punctuation]
        stopwords_to_remove = stopwords.words('english')
        clean = [w for w in clean_words if w not in stopwords_to_remove and not w.isnumeric()]
        return clean

    def get_suggestions(self, keyword):
        print(f'Searching pytrends for {keyword}')
        result = []
        self._pytrends.build_payload([keyword], cat=0, timeframe='today 12-m')
        data = self._pytrends.related_queries()[keyword]['top']
        if data is None or data.values is None:
            return result
        result.extend([x[0] for x in data.values.tolist()][:2])
        return result

    def _get_file_contents(self, file_path):
        return open(file_path, "r", encoding='utf-8',errors='ignore').read()

    def _get_top_words(self, words, top):
        counts = dict()

        for word in words:
            if word in counts:
                counts[word] += 1
            else:
                counts[word] = 1

        return list({k: v for k, v in sorted(counts.items(), key=lambda item: item[1])}.keys())[:top]


if __name__ == "1__main__":
    from pytrends.request import TrendReq

    nltk.download('punkt')
    nltk.download('stopwords')
    pytrends = TrendReq(hl='en-GB', tz=360)
    tags = KeywordsGenerator(pytrends)\
              .generate_tags('text_file.txt')
    print(tags)
Then The Dependencies
This script requires:
nltk==3.7
pytrends==4.8.0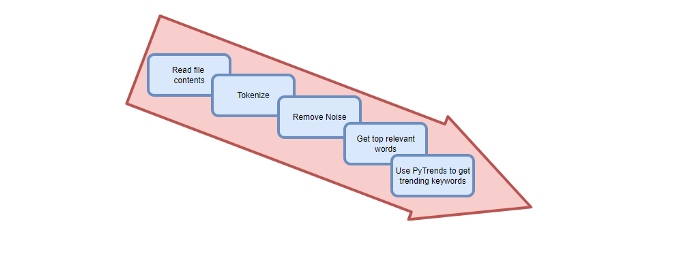
Analysis of the Script
I copy and paste my article into text file.txt, and the code returns the keywords as a comma-separated string.
To achieve this:
A class I made is called KeywordsGenerator.
This class has a function:
generate_tagsThe function
generate_tagsperforms the following tasks:
retrieves text file contents
uses NLP to clean the text by tokenizing sentences into words, removing punctuation, and other elements.
identifies the most frequent words that are relevant.
The
pytrendsAPI is then used to retrieve related phrases that are trending for each word from Google.finally adds a comma to the end of the word list.
4. I then use the keywords and paste them into the SEO area of my website.
These terms are trending on Google and relevant to my topic. My site's rankings and traffic have improved since I added new keywords. This little script puts our knowledge to work. I shared the script in case anyone faces similar issues.
I hope it helps readers sell their work.

Ben "The Hosk" Hosking
3 years ago
The Yellow Cat Test Is Typically Failed by Software Developers.
Believe what you see, what people say
It’s sad that we never get trained to leave assumptions behind. - Sebastian Thrun
Many problems in software development are not because of code but because developers create the wrong software. This isn't rare because software is emergent and most individuals only realize what they want after it's built.
Inquisitive developers who pass the yellow cat test can improve the process.
Carpenters measure twice and cut the wood once. Developers are rarely so careful.
The Yellow Cat Test
Game of Thrones made dragons cool again, so I am reading The Game of Thrones book.
The yellow cat exam is from Syrio Forel, Arya Stark's fencing instructor.
Syrio tells Arya he'll strike left when fencing. He hits her after she dodges left. Arya says “you lied”. Syrio says his words lied, but his eyes and arm told the truth.
Arya learns how Syrio became Bravos' first sword.
“On the day I am speaking of, the first sword was newly dead, and the Sealord sent for me. Many bravos had come to him, and as many had been sent away, none could say why. When I came into his presence, he was seated, and in his lap was a fat yellow cat. He told me that one of his captains had brought the beast to him, from an island beyond the sunrise. ‘Have you ever seen her like?’ he asked of me.
“And to him I said, ‘Each night in the alleys of Braavos I see a thousand like him,’ and the Sealord laughed, and that day I was named the first sword.”
Arya screwed up her face. “I don’t understand.”
Syrio clicked his teeth together. “The cat was an ordinary cat, no more. The others expected a fabulous beast, so that is what they saw. How large it was, they said. It was no larger than any other cat, only fat from indolence, for the Sealord fed it from his own table. What curious small ears, they said. Its ears had been chewed away in kitten fights. And it was plainly a tomcat, yet the Sealord said ‘her,’ and that is what the others saw. Are you hearing?” Reddit discussion.
Development teams should not believe what they are told.
We created an appointment booking system. We thought it was an appointment-booking system. Later, we realized the software's purpose was to book the right people for appointments and discourage the unneeded ones.
The first 3 months of the project had half-correct requirements and software understanding.
Open your eyes
“Open your eyes is all that is needed. The heart lies and the head plays tricks with us, but the eyes see true. Look with your eyes, hear with your ears. Taste with your mouth. Smell with your nose. Feel with your skin. Then comes the thinking afterwards, and in that way, knowing the truth” Syrio Ferel
We must see what exists, not what individuals tell the development team or how developers think the software should work. Initial criteria cover 50/70% and change.
Developers build assumptions problems by assuming how software should work. Developers must quickly explain assumptions.
When a development team's assumptions are inaccurate, they must alter the code, DevOps, documentation, and tests.
It’s always faster and easier to fix requirements before code is written.
First-draft requirements can be based on old software. Development teams must grasp corporate goals and consider needs from many angles.
Testers help rethink requirements. They look at how software requirements shouldn't operate.
Technical features and benefits might misdirect software projects.
The initiatives that focused on technological possibilities developed hard-to-use software that needed extensive rewriting following user testing.
Software development
High-level criteria are different from detailed ones.
The interpretation of words determines their meaning.
Presentations are lofty, upbeat, and prejudiced.
People's perceptions may be unclear, incorrect, or just based on one perspective (half the story)
Developers can be misled by requirements, circumstances, people, plans, diagrams, designs, documentation, and many other things.
Developers receive misinformation, misunderstandings, and wrong assumptions. The development team must avoid building software with erroneous specifications.
Once code and software are written, the development team changes and fixes them.
Developers create software with incomplete information, they need to fill in the blanks to create the complete picture.
Conclusion
Yellow cats are often inaccurate when communicating requirements.
Before writing code, clarify requirements, assumptions, etc.
Everyone will pressure the development team to generate code rapidly, but this will slow down development.
Code changes are harder than requirements.
You might also like

Simon Ash
2 years ago
The Three Most Effective Questions for Ongoing Development
The Traffic Light Approach to Reviewing Personal, Team and Project Development

What needs improvement? If you want to improve, you need to practice your sport, musical instrument, habit, or work project. You need to assess your progress.
Continuous improvement is the foundation of focused practice and a growth mentality. Not just individually. High-performing teams pursue improvement. Right? Why is it hard?
As a leadership coach, senior manager, and high-level athlete, I've found three key questions that may unlock high performance in individuals and teams.
Problems with Reviews
Reviewing and improving performance is crucial, however I hate seeing review sessions in my diary. I rarely respond to questionnaire pop-ups or emails. Why?
Time constrains. Requests to fill out questionnaires often state they will take 10–15 minutes, but I can think of a million other things to do with that time. Next, review overload. Businesses can easily request comments online. No matter what you buy, someone will ask for your opinion. This bombardment might make feedback seem bad, which is bad.
The problem is that we might feel that way about important things like personal growth and work performance. Managers and team leaders face a greater challenge.
When to Conduct a Review
We must be wise about reviewing things that matter to us. Timing and duration matter. Reviewing the experience as quickly as possible preserves information and sentiments. Time must be brief. The review's importance and size will determine its length. We might only take a few seconds to review our morning coffee, but we might require more time for that six-month work project.
These post-event reviews should be supplemented by periodic reflection. Journaling can help with daily reflections, but I also like to undertake personal reviews every six months on vacation or at a retreat.
As an employee or line manager, you don't want to wait a year for a performance assessment. Little and frequently is best, with a more formal and in-depth assessment (typically with a written report) in 6 and 12 months.
The Easiest Method to Conduct a Review Session
I follow Einstein's review process:
“Make things as simple as possible but no simpler.”
Thus, it should be brief but deliver the necessary feedback. Quality critique is hard to receive if the process is overly complicated or long.
I have led or participated in many review processes, from strategic overhauls of big organizations to personal goal coaching. Three key questions guide the process at either end:
What ought to stop being done?
What should we do going forward?
What should we do first?
Following the Rule of 3, I compare it to traffic lights. Red, amber, and green lights:
Red What ought should we stop?
Amber What ought to we keep up?
Green Where should we begin?
This approach is easy to understand and self-explanatory, however below are some examples under each area.
Red What ought should we stop?
As a team or individually, we must stop doing things to improve.
Sometimes they're bad. If we want to lose weight, we should avoid sweets. If a team culture is bad, we may need to stop unpleasant behavior like gossiping instead of having difficult conversations.
Not all things we should stop are wrong. Time matters. Since it is finite, we sometimes have to stop nice things to focus on the most important. Good to Great author Jim Collins famously said:
“Don’t let the good be the enemy of the great.”
Prioritizing requires this idea. Thus, decide what to stop to prioritize.
Amber What ought to we keep up?
Should we continue with the amber light? It helps us decide what to keep doing during review. Many items fall into this category, so focus on those that make the most progress.
Which activities have the most impact? Which behaviors create the best culture? Success-building habits?
Use these questions to find positive momentum. These are the fly-wheel motions, according to Jim Collins. The Compound Effect author Darren Hardy says:
“Consistency is the key to achieving and maintaining momentum.”
What can you do consistently to reach your goal?
Green Where should we begin?
Finally, green lights indicate new beginnings. Red/amber difficulties may be involved. Stopping a red issue may give you more time to do something helpful (in the amber).
This green space inspires creativity. Kolbs learning cycle requires active exploration to progress. Thus, it's crucial to think of new approaches, try them out, and fail if required.
This notion underpins lean start-build, up's measure, learn approach and agile's trying, testing, and reviewing. Try new things until you find what works. Thomas Edison, the lighting legend, exclaimed:
“There is a way to do it better — find it!”
Failure is acceptable, but if you want to fail forward, look back on what you've done.
John Maxwell concurred with Edison:
“Fail early, fail often, but always fail forward”
A good review procedure lets us accomplish that. To avoid failure, we must act, experiment, and reflect.
Use the traffic light system to prioritize queries. Ask:
Red What needs to stop?
Amber What should continue to occur?
Green What might be initiated?
Take a moment to reflect on your day. Check your priorities with these three questions. Even if merely to confirm your direction, it's a terrific exercise!

Jari Roomer
3 years ago
After 240 articles and 2.5M views on Medium, 9 Raw Writing Tips
Late in 2018, I published my first Medium article, but I didn't start writing seriously until 2019. Since then, I've written more than 240 articles, earned over $50,000 through Medium's Partner Program, and had over 2.5 million page views.
Write A Lot
Most people don't have the patience and persistence for this simple writing secret:
Write + Write + Write = possible success
Writing more improves your skills.
The more articles you publish, the more likely one will go viral.
If you only publish once a month, you have no views. If you publish 10 or 20 articles a month, your success odds increase 10- or 20-fold.
Tim Denning, Ayodeji Awosika, Megan Holstein, and Zulie Rane. Medium is their jam. How are these authors alike? They're productive and consistent. They're prolific.
80% is publishable
Many writers battle perfectionism.
To succeed as a writer, you must publish often. You'll never publish if you aim for perfection.
Adopt the 80 percent-is-good-enough mindset to publish more. It sounds terrible, but it'll boost your writing success.
Your work won't be perfect. Always improve. Waiting for perfection before publishing will take a long time.
Second, readers are your true critics, not you. What you consider "not perfect" may be life-changing for the reader. Don't let perfectionism hinder the reader.
Don't let perfectionism hinder the reader. ou don't want to publish mediocre articles. When the article is 80% done, publish it. Don't spend hours editing. Realize it. Get feedback. Only this will work.
Make Your Headline Irresistible
We all judge books by their covers, despite the saying. And headlines. Readers, including yourself, judge articles by their titles. We use it to decide if an article is worth reading.
Make your headlines irresistible. Want more article views? Then, whether you like it or not, write an attractive article title.
Many high-quality articles are collecting dust because of dull, vague headlines. It didn't make the reader click.
As a writer, you must do more than produce quality content. You must also make people click on your article. This is a writer's job. How to create irresistible headlines:
Curiosity makes readers click. Here's a tempting example...
Example: What Women Actually Look For in a Guy, According to a Huge Study by Luba Sigaud
Use Numbers: Click-bait lists. I mean, which article would you click first? ‘Some ways to improve your productivity’ or ’17 ways to improve your productivity.’ Which would I click?
Example: 9 Uncomfortable Truths You Should Accept Early in Life by Sinem Günel
Most headlines are dull. If you want clicks, get 'sexy'. Buzzword-ify. Invoke emotion. Trendy words.
Example: 20 Realistic Micro-Habits To Live Better Every Day by Amardeep Parmar
Concise paragraphs
Our culture lacks focus. If your headline gets a click, keep paragraphs short to keep readers' attention.
Some writers use 6–8 lines per paragraph, but I prefer 3–4. Longer paragraphs lose readers' interest.
A writer should help the reader finish an article, in my opinion. I consider it a job requirement. You can't force readers to finish an article, but you can make it 'snackable'
Help readers finish an article with concise paragraphs, interesting subheadings, exciting images, clever formatting, or bold attention grabbers.
Work And Move On
I've learned over the years not to get too attached to my articles. Many writers report a strange phenomenon:
The articles you're most excited about usually bomb, while the ones you're not tend to do well.
This isn't always true, but I've noticed it in my own writing. My hopes for an article usually make it worse. The more objective I am, the better an article does.
Let go of a finished article. 40 or 40,000 views, whatever. Now let the article do its job. Onward. Next story. Start another project.
Disregard Haters
Online content creators will encounter haters, whether on YouTube, Instagram, or Medium. More views equal more haters. Fun, right?
As a web content creator, I learned:
Don't debate haters. Never.
It's a mistake I've made several times. It's tempting to prove haters wrong, but they'll always find a way to be 'right'. Your response is their fuel.
I smile and ignore hateful comments. I'm indifferent. I won't enter a negative environment. I have goals, money, and a life to build. "I'm not paid to argue," Drake once said.
Use Grammarly
Grammarly saves me as a non-native English speaker. You know Grammarly. It shows writing errors and makes article suggestions.
As a writer, you need Grammarly. I have a paid plan, but their free version works. It improved my writing greatly.
Put The Reader First, Not Yourself
Many writers write for themselves. They focus on themselves rather than the reader.
Ask yourself:
This article teaches what? How can they be entertained or educated?
Personal examples and experiences improve writing quality. Don't focus on yourself.
It's not about you, the content creator. Reader-focused. Putting the reader first will change things.
Extreme ownership: Stop blaming others
I remember writing a lot on Medium but not getting many views. I blamed Medium first. Poor algorithm. Poor publishing. All sucked.
Instead of looking at what I could do better, I blamed others.
When you blame others, you lose power. Owning your results gives you power.
As a content creator, you must take full responsibility. Extreme ownership means 100% responsibility for work and results.
You don’t blame others. You don't blame the economy, president, platform, founders, or audience. Instead, you look for ways to improve. Few people can do this.
Blaming is useless. Zero. Taking ownership of your work and results will help you progress. It makes you smarter, better, and stronger.
Instead of blaming others, you'll learn writing, marketing, copywriting, content creation, productivity, and other skills. Game-changer.

Davlin Knight
3 years ago
2 pitfalls to stay away from when launching a YouTube channel
You do not want to miss these
Stop! Stop it! Two things to avoid when starting a YouTube channel. Critical. Possible channel-killers Its future revenue.
I'll tell you now, so don't say "I wish I knew."
The Notorious Copyright Allegation
My YouTube channel received a copyright claim before I sold it. This claim was on a one-minute video I thought I'd changed enough to make mine, but the original owner disagreed.
It cost me thousands in ad revenue. Original owner got the profits.
Well, it wasn't your video, you say.
Touché.
I've learned. Sorta
I couldn't stop looking at the video's views. The video got 1,000,000 views without any revenue. I made 4 more similar videos.
If they didn't get copyrighted, I'd be rolling in dough.
You've spent a week editing and are uploading to YouTube. You're thrilled as you stand and stretch your back. You see the video just before publishing.
No way!
The red exclamation point on checks.
Copyright claim!
YouTube lets you publish, but you won't make money.
Sounds fair? Well, it is.
Copyright claims mean you stole someone's work. Song, image, or video clip.
We wouldn't want our content used for money.
The only problem with this is that almost everything belongs to someone else. I doubt some of the biggest creators are sitting down and making their music for their videos. That just seems really excessive when you could make a quick search on YouTube and download a song (I definitely don’t do this because that would be stealing).
So how do you defeat a copyright defense?
Even copyright-free songs on YouTube aren't guaranteed. Some copyrighted songs claim to be free.
Use YouTube's free music library or pay for a subscription to adobe stock, epidemic sound, or artlist.io.
Most of my videos have Nintendo music. Almost all game soundtracks are copyright-free and offer a variety of songs.
Restriction on age
Age restrictions are a must-avoid. A channel dies.
YouTube never suggests age-restricted videos.
Shadow banning means YouTube hides your content from subscribers and non-subscribers.
Keeping your channel family-friendly can help.
I hear you complaining that your channel isn't for kids. I agree. Not everyone has a clean mouth or creates content for minors.
YouTube has changed rapidly in recent years. Focusing on kids. Fewer big creators are using profanity or explicit content in videos. Not YouTube-worthy.
Youtube wants to be family-friendly. A family-friendly movie. It won't promote illegal content. Yes, it allows profanity.
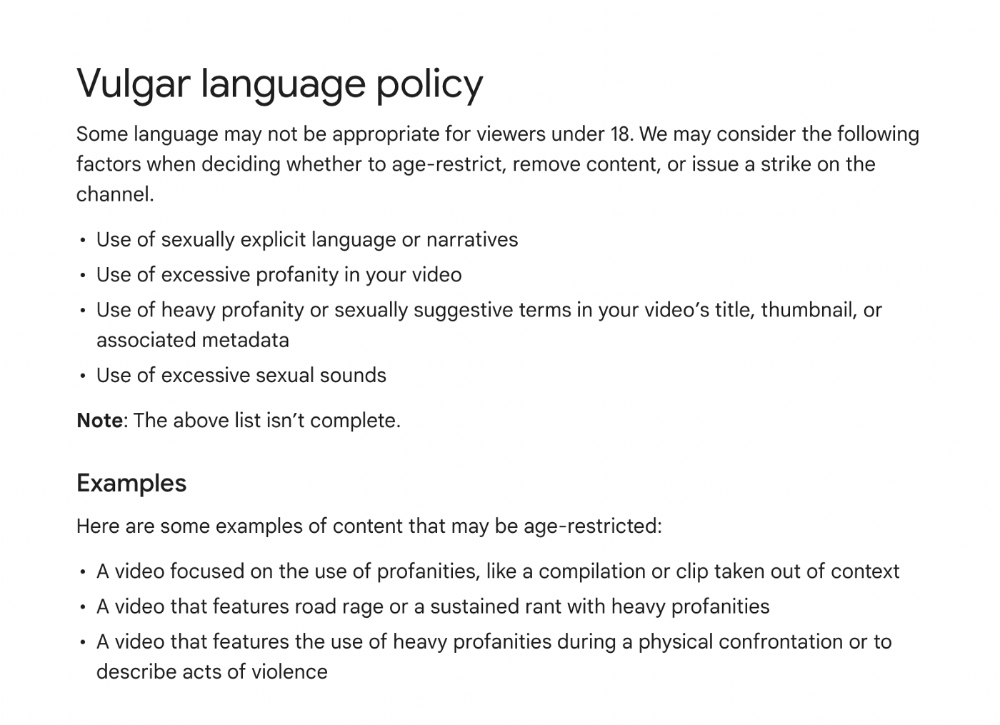
Do I recommend avoiding no-no words in videos? Never. Okay. YouTube's policies are shaky. YouTube uses video content to determine ad suitability.
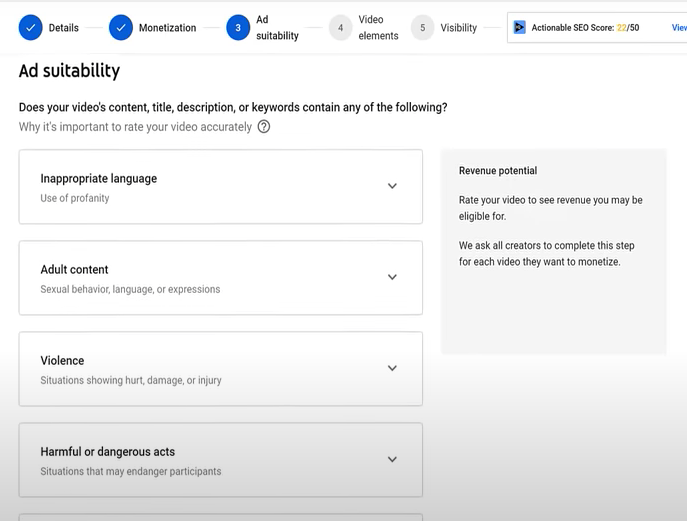
No joke. If you're serious about becoming a content creator, avoid profanity and inappropriate topics.
If your channel covers 18+ topics, like crime or commentary, censor as much as possible.
YouTube can be like walking on eggshells. You never know what is gonna upset the boss. So play it safe and try to avoid getting on their bad side.
Mr. Beast, Dream, Markplier, Faze Rug, and PewDewPie are popular creators. They maintain it family-friendly while entertaining fans.
You got this.