


More on Technology

Christianlauer
3 years ago
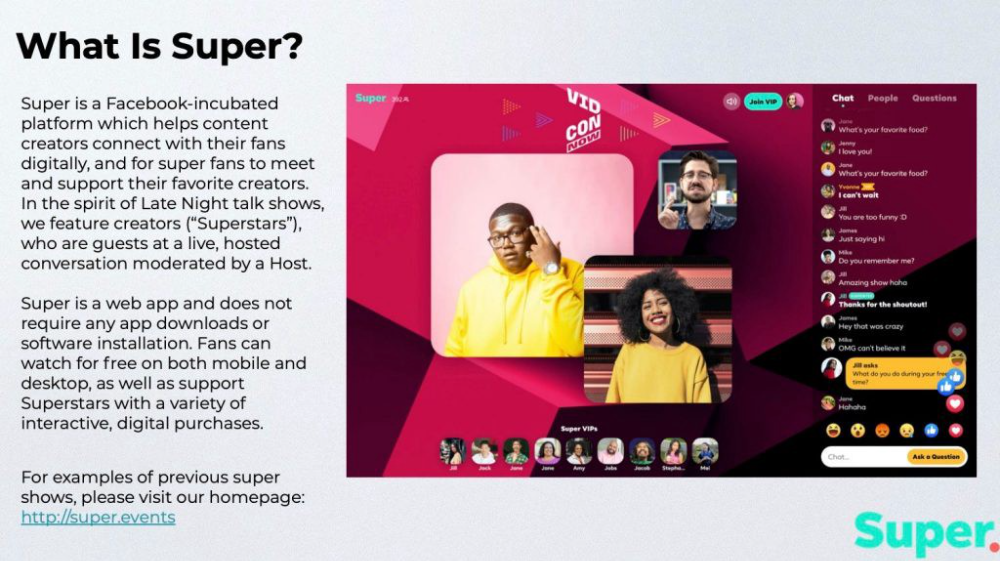
Looker Studio Pro is now generally available, according to Google.
Great News about the new Google Business Intelligence Solution

Google has renamed Data Studio to Looker Studio and Looker Studio Pro.
Now, Google releases Looker Studio Pro. Similar to the move from Data Studio to Looker Studio, Looker Studio Pro is basically what Looker was previously, but both solutions will merge. Google says the Pro edition will acquire new enterprise management features, team collaboration capabilities, and SLAs.
![Dashboard Example in Looker Studio Pro — Image Source: Google[2]](https://storage.googleapis.com/int3grity/posts/m9yb4IqJCm7D/images/ZuJudlWT6GUeTKKNVduA5)
In addition to Google's announcements and sales methods, additional features include:
Looker Studio assets can now have organizational ownership. Customers can link Looker Studio to a Google Cloud project and migrate existing assets once. This provides:
Your users' created Looker Studio assets are all kept in a Google Cloud project.
When the users who own assets leave your organization, the assets won't be removed.
Using IAM, you may provide each Looker Studio asset in your company project-level permissions.
Other Cloud services can access Looker Studio assets that are owned by a Google Cloud project.
Looker Studio Pro clients may now manage report and data source access at scale using team workspaces.
Google announcing these features for the pro version is fascinating. Both products will likely converge, but Google may only release many features in the premium version in the future. Microsoft with Power BI and its free and premium variants already achieves this.
Sources and Further Readings
Google, Release Notes (2022)
Google, Looker (2022)

The Mystique
3 years ago
Four Shocking Dark Web Incidents that Should Make You Avoid It
Dark Web activity? Is it as horrible as they say?

We peruse our phones for hours. Internet has improved our worldview.
However, the world's harshest realities remain buried on the internet and unattainable by everyone.
Browsers cannot access the Dark Web. Browse it with high-security authentication and exclusive access. There are compelling reasons to avoid the dark web at all costs.
1. The Dark Web and I

Darius wrote My Dark Web Story on reddit two years ago. The user claimed to have shared his dark web experience. DaRealEddyYT wanted to surf the dark web after hearing several stories.
He curiously downloaded Tor Browser, which provides anonymity and security.
In the Dark Room, bound
As Darius logged in, a text popped up: “Want a surprise? Click on this link.”
The link opened to a room with a chair. Only one light source illuminated the room. The chair held a female tied.
As the screen read "Let the game begin," a man entered the room and was paid in bitcoins to torment the girl.
The man dragged and tortured the woman.
A danger to safety
Leaving so soon, Darius, disgusted Darius tried to leave the stream. The anonymous user then sent Darius his personal information, including his address, which frightened him because he didn't know Tor was insecure.
After deleting the app, his phone camera was compromised.
He also stated that he left his residence and returned to find it unlocked and a letter saying, Thought we wouldn't find you? Reddit never updated the story.
The story may have been a fake, but a much scarier true story about the dark side of the internet exists.
2. The Silk Road Market

The dark web is restricted for a reason. The dark web has everything illicit imaginable. It's awful central.
The dark web has everything, from organ sales to drug trafficking to money laundering to human trafficking. Illegal drugs, pirated software, credit card, bank, and personal information can be found in seconds.
The dark web has reserved websites like Google. The Silk Road Website, which operated from 2011 to 2013, was a leading digital black market.
The FBI grew obsessed with site founder and processor Ross William Ulbricht.
The site became a criminal organization as money laundering and black enterprises increased. Bitcoin was utilized for credit card payment.
The FBI was close to arresting the site's administrator. Ross was detained after the agency closed Silk Road in 2013.
Two years later, in 2015, he was convicted and sentenced to two consecutive life terms and forty years. He appealed in 2016 but was denied, thus he is currently serving time.
The hefty sentence was for more than running a black marketing site. He was also convicted of murder-for-hire, earning about $730,000 in a short time.
3. Person-buying auctions

Bidding on individuals is another weird internet activity. After a Milan photo shoot, 20-year-old British model Chloe Ayling was kidnapped.
An ad agency in Milan made a bogus offer to shoot with the mother of a two-year-old boy. Four men gave her anesthetic and put her in a duffel bag when she arrived.
She was held captive for several days, and her images and $300,000 price were posted on the dark web. Black Death Trafficking Group kidnapped her to sell her for sex.
She was told two black death foot warriors abducted her. The captors released her when they found she was a mother because mothers were less desirable to sex slave buyers.
In July 2018, Lukasz Pawel Herba was arrested and sentenced to 16 years and nine months in prison. Being a young mother saved Chloe from creepy bidding.
However, it exceeds expectations of how many more would be in such danger daily without their knowledge.
4. Organ sales

Many are unaware of dark web organ sales. Patients who cannot acquire organs often turn to dark web brokers.
Brokers handle all transactions between donors and customers.
Bitcoins are used for dark web transactions, and the Tor server permits personal data on the web.
The WHO reports approximately 10,000 unlawful organ transplants annually. The black web sells kidneys, hearts, even eyes.
To protect our lives and privacy, we should manage our curiosity and never look up dangerous stuff.
While it's fascinating and appealing to know what's going on in the world we don't know about, it's best to prioritize our well-being because one never knows how bad it might get.
Sources
James Brockbank
3 years ago
Canonical URLs for Beginners
Canonicalization and canonical URLs are essential for SEO, and improper implementation can negatively impact your site's performance.
Canonical tags were introduced in 2009 to help webmasters with duplicate or similar content on multiple URLs.
To use canonical tags properly, you must understand their purpose, operation, and implementation.
Canonical URLs and Tags
Canonical tags tell search engines that a certain URL is a page's master copy. They specify a page's canonical URL. Webmasters can avoid duplicate content by linking to the "canonical" or "preferred" version of a page.
How are canonical tags and URLs different? Can these be specified differently?
Tags
Canonical tags are found in an HTML page's head></head> section.
<link rel="canonical" href="https://www.website.com/page/" />These can be self-referencing or reference another page's URL to consolidate signals.
Canonical tags and URLs are often used interchangeably, which is incorrect.
The rel="canonical" tag is the most common way to set canonical URLs, but it's not the only way.
Canonical URLs
What's a canonical link? Canonical link is the'master' URL for duplicate pages.
In Google's own words:
A canonical URL is the page Google thinks is most representative of duplicate pages on your site.
— Google Search Console Help
You can indicate your preferred canonical URL. For various reasons, Google may choose a different page than you.
When set correctly, the canonical URL is usually your specified URL.
Canonical URLs determine which page will be shown in search results (unless a duplicate is explicitly better for a user, like a mobile version).
Canonical URLs can be on different domains.
Other ways to specify canonical URLs
Canonical tags are the most common way to specify a canonical URL.
You can also set canonicals by:
Setting the HTTP header rel=canonical.
All pages listed in a sitemap are suggested as canonicals, but Google decides which pages are duplicates.
Redirects 301.
Google recommends these methods, but they aren't all appropriate for every situation, as we'll see below. Each has its own recommended uses.
Setting canonical URLs isn't required; if you don't, Google will use other signals to determine the best page version.
To control how your site appears in search engines and to avoid duplicate content issues, you should use canonicalization effectively.
Why Duplicate Content Exists
Before we discuss why you should use canonical URLs and how to specify them in popular CMSs, we must first explain why duplicate content exists. Nobody intentionally duplicates website content.
Content management systems create multiple URLs when you launch a page, have indexable versions of your site, or use dynamic URLs.
Assume the following URLs display the same content to a user:
A search engine sees eight duplicate pages, not one.
URLs #1 and #2: the CMS saves product URLs with and without the category name.
#3, #4, and #5 result from the site being accessible via HTTP, HTTPS, www, and non-www.
#6 is a subdomain mobile-friendly URL.
URL #7 lacks URL #2's trailing slash.
URL #8 uses a capital "A" instead of a lowercase one.
Duplicate content may also exist in URLs like:
https://www.website.com
https://www.website.com/index.php
Duplicate content is easy to create.
Canonical URLs help search engines identify different page variations as a single URL on many sites.
SEO Canonical URLs
Canonical URLs help you manage duplicate content that could affect site performance.
Canonical URLs are a technical SEO focus area for many reasons.
Specify URL for search results
When you set a canonical URL, you tell Google which page version to display.
Which would you click?
https://www.domain.com/page-1/
https://www.domain.com/index.php?id=2
First, probably.
Canonicals tell search engines which URL to rank.
Consolidate link signals on similar pages
When you have duplicate or nearly identical pages on your site, the URLs may get external links.
Canonical URLs consolidate multiple pages' link signals into a single URL.
This helps your site rank because signals from multiple URLs are consolidated into one.
Syndication management
Content is often syndicated to reach new audiences.
Canonical URLs consolidate ranking signals to prevent duplicate pages from ranking and ensure the original content ranks.
Avoid Googlebot duplicate page crawling
Canonical URLs ensure that Googlebot crawls your new pages rather than duplicated versions of the same one across mobile and desktop versions, for example.
Crawl budgets aren't an issue for most sites unless they have 100,000+ pages.
How to Correctly Implement the rel=canonical Tag
Using the header tag rel="canonical" is the most common way to specify canonical URLs.
Adding tags and HTML code may seem daunting if you're not a developer, but most CMS platforms allow canonicals out-of-the-box.
These URLs each have one product.
How to Correctly Implement a rel="canonical" HTTP Header
A rel="canonical" HTTP header can replace canonical tags.
This is how to implement a canonical URL for PDFs or non-HTML documents.
You can specify a canonical URL in your site's.htaccess file using the code below.
<Files "file-to-canonicalize.pdf"> Header add Link "< http://www.website.com/canonical-page/>; rel=\"canonical\"" </Files>301 redirects for canonical URLs
Google says 301 redirects can specify canonical URLs.
Only the canonical URL will exist if you use 301 redirects. This will redirect duplicates.
This is the best way to fix duplicate content across:
HTTPS and HTTP
Non-WWW and WWW
Trailing-Slash and Non-Trailing Slash URLs
On a single page, you should use canonical tags unless you can confidently delete and redirect the page.
Sitemaps' canonical URLs
Google assumes sitemap URLs are canonical, so don't include non-canonical URLs.
This does not guarantee canonical URLs, but is a best practice for sitemaps.
Best-practice Canonical Tag
Once you understand a few simple best practices for canonical tags, spotting and cleaning up duplicate content becomes much easier.
Always include:
One canonical URL per page
If you specify multiple canonical URLs per page, they will likely be ignored.
Correct Domain Protocol
If your site uses HTTPS, use this as the canonical URL. It's easy to reference the wrong protocol, so check for it to catch it early.
Trailing slash or non-trailing slash URLs
Be sure to include trailing slashes in your canonical URL if your site uses them.
Specify URLs other than WWW
Search engines see non-WWW and WWW URLs as duplicate pages, so use the correct one.
Absolute URLs
To ensure proper interpretation, canonical tags should use absolute URLs.
So use:
<link rel="canonical" href="https://www.website.com/page-a/" />And not:
<link rel="canonical" href="/page-a/" />If not canonicalizing, use self-referential canonical URLs.
When a page isn't canonicalizing to another URL, use self-referencing canonical URLs.
Canonical tags refer to themselves here.
Common Canonical Tags Mistakes
Here are some common canonical tag mistakes.
301 Canonicalization
Set the canonical URL as the redirect target, not a redirected URL.
Incorrect Domain Canonicalization
If your site uses HTTPS, don't set canonical URLs to HTTP.
Irrelevant Canonicalization
Canonicalize URLs to duplicate or near-identical content only.
SEOs sometimes try to pass link signals via canonical tags from unrelated content to increase rank. This isn't how canonicalization should be used and should be avoided.
Multiple Canonical URLs
Only use one canonical tag or URL per page; otherwise, they may all be ignored.
When overriding defaults in some CMSs, you may accidentally include two canonical tags in your page's <head>.
Pagination vs. Canonicalization
Incorrect pagination can cause duplicate content. Canonicalizing URLs to the first page isn't always the best solution.
Canonicalize to a 'view all' page.
How to Audit Canonical Tags (and Fix Issues)
Audit your site's canonical tags to find canonicalization issues.
SEMrush Site Audit can help. You'll find canonical tag checks in your website's site audit report.
Let's examine these issues and their solutions.
No Canonical Tag on AMP
Site Audit will flag AMP pages without canonical tags.
Canonicalization between AMP and non-AMP pages is important.
Add a rel="canonical" tag to each AMP page's head>.
No HTTPS redirect or canonical from HTTP homepage
Duplicate content issues will be flagged in the Site Audit if your site is accessible via HTTPS and HTTP.
You can fix this by 301 redirecting or adding a canonical tag to HTTP pages that references HTTPS.
Broken canonical links
Broken canonical links won't be considered canonical URLs.
This error could mean your canonical links point to non-existent pages, complicating crawling and indexing.
Update broken canonical links to the correct URLs.
Multiple canonical URLs
This error occurs when a page has multiple canonical URLs.
Remove duplicate tags and leave one.
Canonicalization is a key SEO concept, and using it incorrectly can hurt your site's performance.
Once you understand how it works, what it does, and how to find and fix issues, you can use it effectively to remove duplicate content from your site.
Canonicalization SEO Myths
You might also like

Sarah Bird
3 years ago
Memes Help This YouTube Channel Earn Over $12k Per Month

Take a look at a YouTube channel making anything up to over $12k a month from making very simple videos.
And the best part? Its replicable by anyone. Basic videos can be generated for free without design abilities.
Join me as I deconstruct the channel to estimate how much they make, how they do it, and how you can too.
What Do They Do Exactly?
Happy Land posts memes with a simple caption they wrote. So, it's new. The videos are a slideshow of meme photos with stock music.
The site posts 12 times a day.
8-10-minute videos show 10 second images. Thus, each video needs 48-60 memes.
Memes are video titles (e.g. times a boyfriend was hilarious, back to school fails, funny restaurant signs).
Some stats about the channel:
Founded on October 30, 2020
873 videos were added.
81.8k subscribers
67,244,196 views of the video
What Value Are They Adding?
Everyone can find free memes online. This channel collects similar memes into a single video so you don't have to scroll or click for more. It’s right there, you just keep watching and more will come.
By theming it, the audience is prepared for the video's content.
If you want hilarious animal memes or restaurant signs, choose the video and you'll get up to 60 memes without having to look for them. Genius!
How much money do they make?
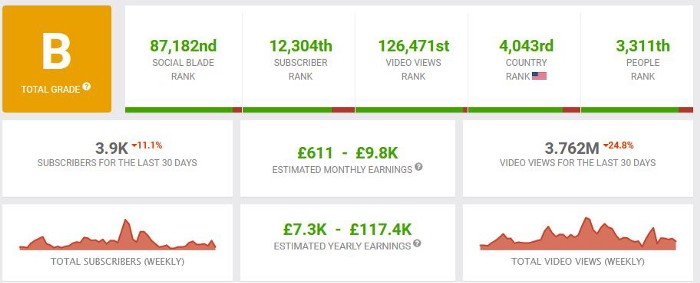
According to www.socialblade.com, the channel earns $800-12.8k (image shown in my home currency of GBP).
That's a crazy estimate, but it highlights the unbelievable potential of a channel that presents memes.
This channel thrives on quantity, thus putting out videos is necessary to keep the flow continuing and capture its audience's attention.
How Are the Videos Made?
Straightforward. Memes are added to a presentation without editing (so you could make this in PowerPoint or Keynote).
Each slide should include a unique image and caption. Set 10 seconds per slide.
Add music and post the video.
Finding enough memes for the material and theming is difficult, but if you enjoy memes, this is a fun job.
This case study should have shown you that you don't need expensive software or design expertise to make entertaining videos. Why not try fresh, easy-to-do ideas and see where they lead?
Isobel Asher Hamilton
3 years ago
$181 million in bitcoin buried in a dump. $11 million to get them back
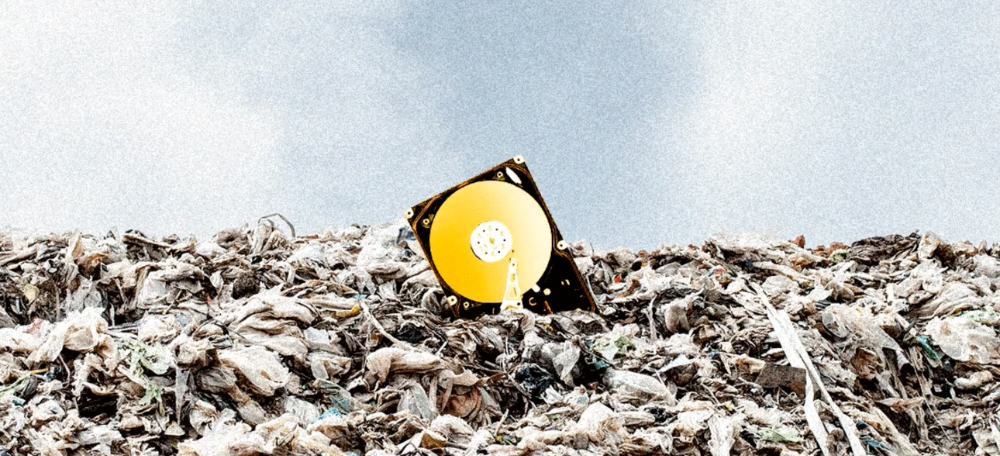
James Howells lost 8,000 bitcoins. He has $11 million to get them back.
His life altered when he threw out an iPhone-sized hard drive.
Howells, from the city of Newport in southern Wales, had two identical laptop hard drives squirreled away in a drawer in 2013. One was blank; the other had 8,000 bitcoins, currently worth around $181 million.
He wanted to toss out the blank one, but the drive containing the Bitcoin went to the dump.
He's determined to reclaim his 2009 stash.
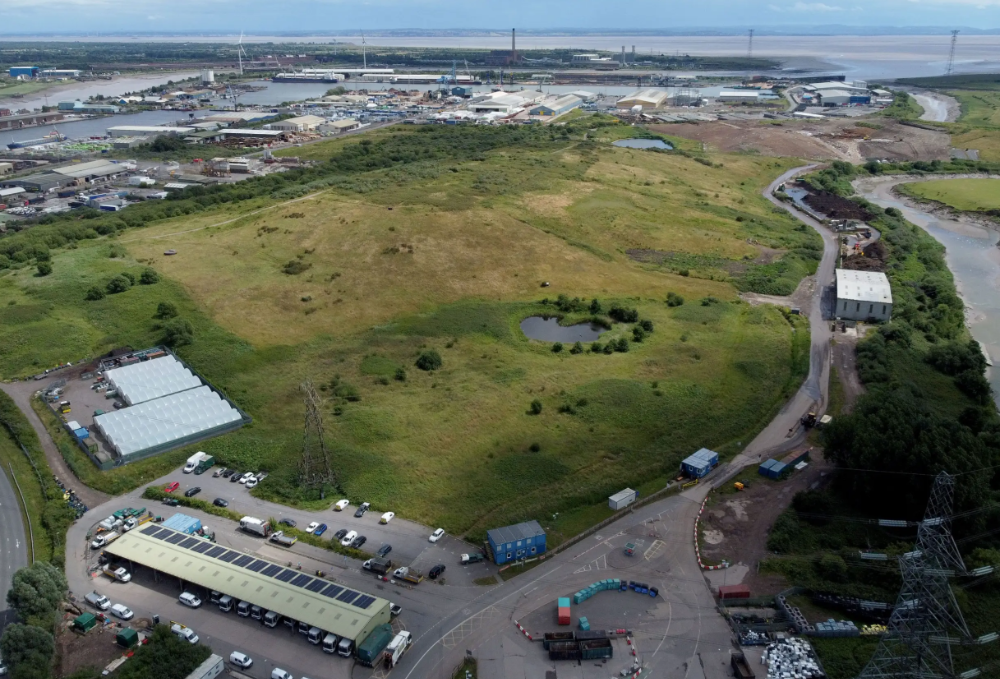
Howells, 36, wants to arrange a high-tech treasure hunt for bitcoins. He can't enter the landfill.

Newport's city council has rebuffed Howells' requests to dig for his hard drive for almost a decade, stating it would be expensive and environmentally destructive.
I got an early look at his $11 million idea to search 110,000 tons of trash. He expects submitting it to the council would convince it to let him recover the hard disk.
110,000 tons of trash, 1 hard drive
Finding a hard disk among heaps of trash may seem Herculean.
Former IT worker Howells claims it's possible with human sorters, robot dogs, and an AI-powered computer taught to find hard drives on a conveyor belt.
His idea has two versions, depending on how much of the landfill he can search.
His most elaborate solution would take three years and cost $11 million to sort 100,000 metric tons of waste. Scaled-down version costs $6 million and takes 18 months.
He's created a team of eight professionals in AI-powered sorting, landfill excavation, garbage management, and data extraction, including one who recovered Columbia's black box data.
The specialists and their companies would be paid a bonus if they successfully recovered the bitcoin stash.
Howells: "We're trying to commercialize this project."
Howells claimed rubbish would be dug up by machines and sorted near the landfill.
Human pickers and a Max-AI machine would sort it. The machine resembles a scanner on a conveyor belt.
Remi Le Grand of Max-AI told us it will train AI to recognize Howells-like hard drives. A robot arm would select candidates.
Howells has added security charges to his scheme because he fears people would steal the hard drive.
He's budgeted for 24-hour CCTV cameras and two robotic "Spot" canines from Boston Dynamics that would patrol at night and look for his hard drive by day.
Howells said his crew met in May at the Celtic Manor Resort outside Newport for a pitch rehearsal.
Richard Hammond's narrative swings from banal to epic.
Richard Hammond filmed the meeting and created a YouTube documentary on Howells.
Hammond said of Howells' squad, "They're committed and believe in him and the idea."
Hammond: "It goes from banal to gigantic." "If I were in his position, I wouldn't have the strength to answer the door."
Howells said trash would be cleaned and repurposed after excavation. Reburying the rest.
"We won't pollute," he declared. "We aim to make everything better."
After the project is finished, he hopes to develop a solar or wind farm on the dump site. The council is unlikely to accept his vision soon.
A council representative told us, "Mr. Howells can't convince us of anything." "His suggestions constitute a significant ecological danger, which we can't tolerate and are forbidden by our permit."
Will the recovered hard drive work?
The "platter" is a glass or metal disc that holds the hard drive's data. Howells estimates 80% to 90% of the data will be recoverable if the platter isn't damaged.
Phil Bridge, a data-recovery expert who consulted Howells, confirmed these numbers.
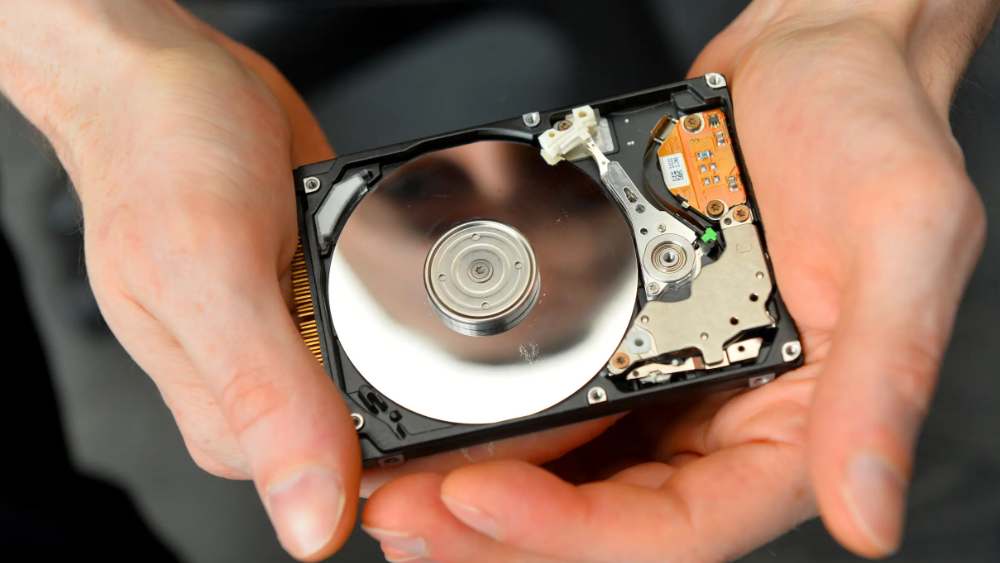
If the platter is broken, Bridge adds, data recovery is unlikely.
Bridge says he was intrigued by the proposal. "It's an intriguing case," he added. Helping him get it back and proving everyone incorrect would be a great success story.
Who'd pay?
Swiss and German venture investors Hanspeter Jaberg and Karl Wendeborn told us they would fund the project if Howells received council permission.
Jaberg: "It's a needle in a haystack and a high-risk investment."
Howells said he had no contract with potential backers but had discussed the proposal in Zoom meetings. "Until Newport City Council gives me something in writing, I can't commit," he added.
Suppose he finds the bitcoins.
Howells said he would keep 30% of the data, worth $54 million, if he could retrieve it.
A third would go to the recovery team, 30% to investors, and the remainder to local purposes, including gifting £50 ($61) in bitcoin to each of Newport's 150,000 citizens.
Howells said he opted to spend extra money on "professional firms" to help convince the council.
What if the council doesn't approve?
If Howells can't win the council's support, he'll sue, claiming its actions constitute a "illegal embargo" on the hard drive. "I've avoided that path because I didn't want to cause complications," he stated. I wanted to cooperate with Newport's council.
Howells never met with the council face-to-face. He mentioned he had a 20-minute Zoom meeting in May 2021 but thought his new business strategy would help.
He met with Jessica Morden on June 24. Morden's office confirmed meeting.
After telling the council about his proposal, he can only wait. "I've never been happier," he said. This is our most professional operation, with the best employees.
The "crypto proponent" buys bitcoin every month and sells it for cash.
Howells tries not to think about what he'd do with his part of the money if the hard disk is found functional. "Otherwise, you'll go mad," he added.
This post is a summary. Read the full article here.

Tim Denning
3 years ago
I Posted Six Times a Day for 210 Days on Twitter. Here's What Happened.
I'd spend hours composing articles only to find out they were useless. Twitter solved the problem.

Twitter is wrinkled, say critics.
Nope. Writing is different. It won't make sense until you write there.
Twitter is resurgent. People are reading again. 15-second TikToks overloaded our senses.
After nuking my 20,000-follower Twitter account and starting again, I wrote every day for 210 days.
I'll explain.
I came across the strange world of microblogging.
Traditional web writing is filler-heavy.
On Twitter, you must be brief. I played Wordle.
Twitter Threads are the most popular writing format. Like a blog post. It reminds me of the famous broetry posts on LinkedIn a few years ago.
Threads combine tweets into an article.
Sharp, concise sentences
No regard for grammar
As important as the information is how the text looks.
Twitter Threads are like Michael Angelo's David monument. He chipped away at an enormous piece of marble until a man with a big willy appeared.
That's Twitter Threads.
I tried to remove unnecessary layers from several of my Wordpress blog posts. Then I realized something.
Tweeting from scratch is easier and more entertaining. It's quicker and makes you think more concisely.
Superpower: saying much with little words. My long-form writing has improved. My article sentences resemble tweets.
You never know what will happen.
Twitter's subcultures are odd. Best-performing tweets are strange.
Unusual trend: working alone and without telling anyone. It's a rebellion against Instagram influencers who share their every moment.
Early on, random thoughts worked:
My friend’s wife is Ukrainian. Her family are trapped in the warzone. He is devastated. And here I was complaining about my broken garage door. War puts everything in perspective. Today is a day to be grateful for peace.
Documenting what's happening triggers writing. It's not about viral tweets. Helping others matters.
There are numerous anonymous users.
Twitter uses pseudonyms.
You don't matter. On sites like LinkedIn, you must use your real name. Welcome to the Cyberpunk metaverse of Twitter :)
One daily piece of writing is a powerful habit.
Habits build creator careers. Read that again.
Twitter is an easy habit to pick up. If you can't tweet in one sentence, something's wrong. Easy-peasy-japanese.
Not what I tweeted, but my constancy, made the difference.
Daily writing is challenging, especially if your supervisor is on your back. Twitter encourages writing.
Tweets evolved as the foundation of all other material.
During my experiment, I enjoyed Twitter's speed.
Tweets get immediate responses, comments, and feedback. My popular tweets become newspaper headlines. I've also written essays from tweet discussions.
Sometimes the tweet and article were clear. Twitter sometimes helped me overcome writer's block.
I used to spend hours composing big things that had little real-world use.
Twitter helped me. No guessing. Data guides my coverage and validates concepts.
Test ideas on Twitter.
It took some time for my email list to grow.
Subscribers are a writer's lifeblood.
Without them, you're broke and homeless when Mark Zuckerberg tweaks the algorithms for ad dollars. Twitter has three ways to obtain email subscribers:
1. Add a link to your bio.
Twitter allows bio links (LinkedIn now does too). My eBook's landing page is linked. I collect emails there.
2. Start an online newsletter.
Twitter bought newsletter app Revue. They promote what they own.
I just established up a Revue email newsletter. I imported them weekly into my ConvertKit email list.
3. Create Twitter threads and include a link to your email list in the final tweet.
Write Twitter Threads and link the last tweet to your email list (example below).
Initial email subscribers were modest.
Numbers are growing. Twitter provides 25% of my new email subscribers. Some days, 50 people join.
Without them, my writing career is over. I'd be back at a 9-5 job begging for time off to spend with my newborn daughter. Nope.
Collect email addresses or die trying.
As insurance against unsubscribes and Zucks, use a second email list or Discord community.
What I still need to do
Twitter's fun. I'm wiser. I need to enable auto-replies and auto-DMs (direct messages).
This adds another way to attract subscribers. I schedule tweets with Tweet Hunter.
It’s best to go slow. People assume you're an internet marketer if you spam them with click requests.
A human internet marketer is preferable to a robot. My opinion.
210 days on Twitter taught me that. I plan to use the platform until I'm a grandfather unless Elon ruins it.