


Apple AR/VR heaset
Apple is said to have opted for a standalone AR/VR headset over a more powerful tethered model.
It has had a tumultuous history.
Apple's alleged mixed reality headset appears to be the worst-kept secret in tech, and a fresh story from The Information is jam-packed with details regarding the device's rocky development.
Apple's decision to use a separate headgear is one of the most notable aspects of the story. Apple had yet to determine whether to pursue a more powerful VR headset that would be linked with a base station or a standalone headset. According to The Information, Apple officials chose the standalone product over the version with the base station, which had a processor that later arrived as the M1 Ultra. In 2020, Bloomberg published similar information.
That decision appears to have had a long-term impact on the headset's development. "The device's many processors had already been in development for several years by the time the choice was taken, making it impossible to go back to the drawing board and construct, say, a single chip to handle all the headset's responsibilities," The Information stated. "Other difficulties, such as putting 14 cameras on the headset, have given hardware and algorithm engineers stress."
Jony Ive remained to consult on the project's design even after his official departure from Apple, according to the story. Ive "prefers" a wearable battery, such as that offered by Magic Leap. Other prototypes, according to The Information, placed the battery in the headset's headband, and it's unknown which will be used in the final design.
The headset was purportedly shown to Apple's board of directors last week, indicating that a public unveiling is imminent. However, it is possible that it will not be introduced until later this year, and it may not hit shop shelves until 2023, so we may have to wait a bit to try it.
For further down the line, Apple is working on a pair of AR spectacles that appear like Ray-Ban wayfarer sunglasses, but according to The Information, they're "still several years away from release." (I'm interested to see how they compare to Meta and Ray-Bans' true wayfarer-style glasses.)
More on Technology

Shawn Mordecai
3 years ago
The Apple iPhone 14 Pill is Easier to Swallow
Is iPhone's Dynamic Island invention or a marketing ploy?
First of all, why the notch?
When Apple debuted the iPhone X with the notch, some were surprised, confused, and amused by the goof. Let the Brits keep the new meaning of top-notch.
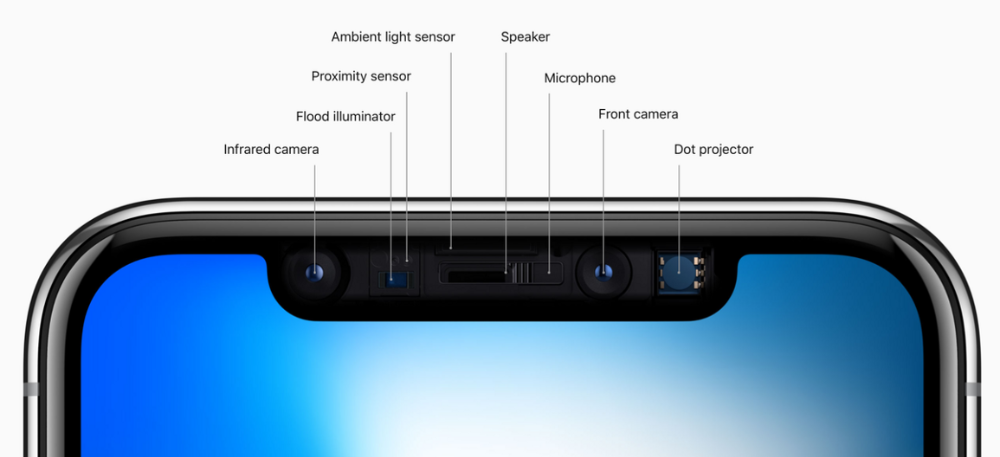
Apple removed the bottom home button to enhance screen space. The tides couldn't overtake part of the top. This section contained sensors, a speaker, a microphone, and cameras for facial recognition. A town resisted Apple's new iPhone design.
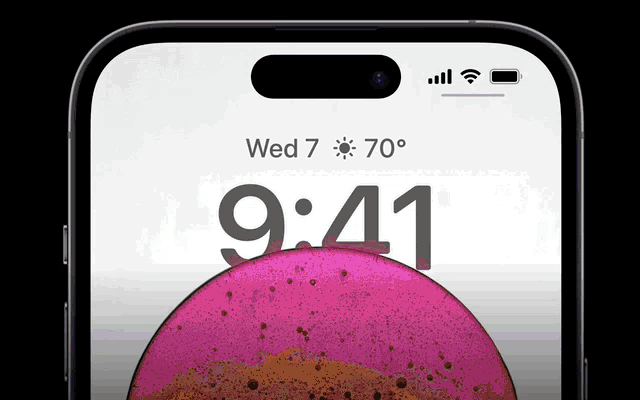
From iPhone X to 13, the notch has gotten smaller. We expected this as technology and engineering progressed, but we hated the notch. Apple approved. They attached it to their other gadgets.
Apple accepted, owned, and ran with the iPhone notch, it has become iconic (or infamous); and that’s intentional.
The Island Where Apple Is
Apple needs to separate itself, but they know how to do it well. The iPhone 14 Pro finally has us oohing and aahing. Life-changing, not just higher pixel density or longer battery.
Dynamic Island turned a visual differentiation into great usefulness, which may not be life-changing. Apple always welcomes the controversy, whether it's $700 for iMac wheels, no charging block with a new phone, or removing the headphone jack.
Apple knows its customers will be loyal, even if they're irritated. Their odd design choices often cause controversy. It's calculated that people blog, review, and criticize Apple's products. We accept what works for them.
While the competition zigs, Apple zags. Sometimes they zag too hard and smash into a wall, but we talk about it anyways, and that’s great publicity for them.
Getting Dependent on the drug
The notch became a crop. Dynamic Island's design is helpful, intuitive, elegant, and useful. It increases iPhone usability, productivity (slightly), and joy. No longer unsightly.
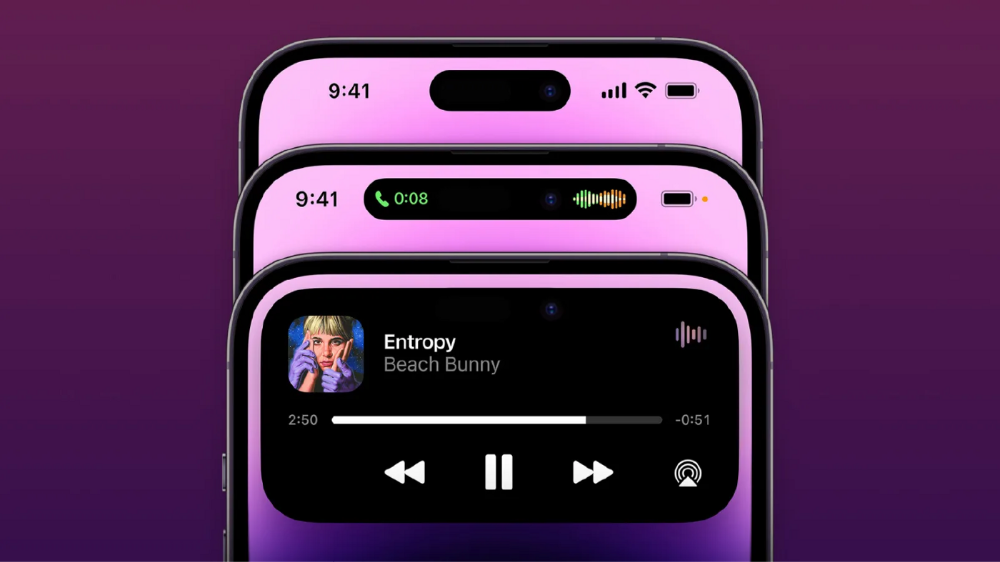
The medication helps with multitasking. It's a compact version of the iPhone's Live Activities lock screen function. Dynamic Island enhances apps and activities with visual effects and animations whether you engage with it or not. As you use the pill, its usefulness lessens. It lowers user notifications and consolidates them with live and permanent feeds, delivering quick app statuses. It uses the black pixels on the iPhone 14's display, which looked like a poor haircut.
The pill may be a gimmick to entice customers to use more Apple products and services. Apps may promote to their users like a live billboard.
Be prepared to get a huge dose of Dynamic Island’s “pill” like you never had before with the notch. It might become so satisfying and addicting to use, that every interaction with it will become habit-forming, and you’re going to forget that it ever existed.
WARNING: A Few Potential Side Effects
Vision blurred Dynamic Island's proximity to the front-facing camera may leave behind grease that blurs photos. Before taking a selfie, wipe the camera clean.
Strained thumb To fully use Dynamic Island, extend your thumb's reach 6.7 inches beyond your typical, comfortable range.
Happiness, contentment The Dynamic Island may enhance Endorphins and Dopamine. Multitasking, interactions, animations, and haptic feedback make you want to use this function again and again.
Motion-sickness Dynamic Island's motions and effects may make some people dizzy. If you can disable animations, you can avoid motion sickness.
I'm not a doctor, therefore they aren't established adverse effects.
Does Dynamic Island Include Multiple Tasks?
Dynamic Islands is a placebo for multitasking. Apple might have compromised on iPhone multitasking. It won't make you super productive, but it's a step up.
iPhone is primarily for personal use, like watching videos, messaging friends, sending money to friends, calling friends about the money you were supposed to send them, taking 50 photos of the same leaf, investing in crypto, driving for Uber because you lost all your money investing in crypto, listening to music and hailing an Uber from a deserted crop field because while you were driving for Uber your passenger stole your car and left you stranded, so you used Apple’s new SOS satellite feature to message your friend, who still didn’t receive their money, to hail you an Uber; now you owe them more money… karma?
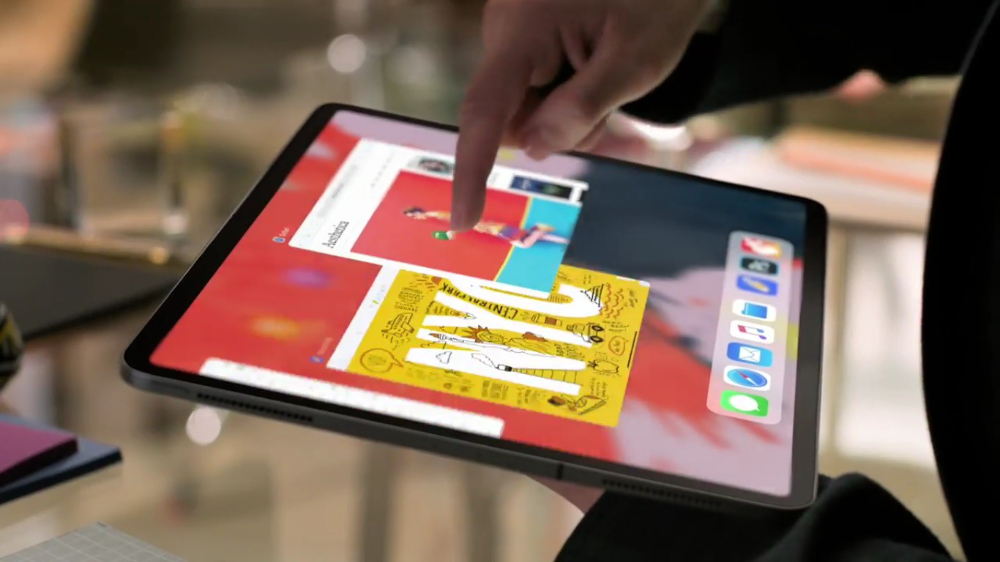
We won't be watching videos on iPhones while perusing 10,000-row spreadsheets anytime soon. True multitasking and productivity aren't priorities for Apple's iPhone. Apple doesn't to preserve the iPhone's experience. Like why there's no iPad calculator. Apple doesn't want iPad users to do math, but isn't essential for productivity?
Digressing.
Apple will block certain functions so you must buy and use their gadgets and services, immersing yourself in their ecosystem and dictating how to use their goods.
Dynamic Island is a poor man’s multi-task for iPhone, and that’s fine it works for most iPhone users. For substantial productivity Apple prefers you to get an iPad or a MacBook. That’s part of the reason for restrictive features on certain Apple devices, but sometimes it’s based on principles to preserve the integrity of the product, according to Apple’s definition.
Is Apple using deception?
Dynamic Island may be distracting you from a design decision. The answer is kind of. Elegant distraction
When you pull down a smartphone webpage to refresh it or minimize an app, you get seamless animations. It's not simply because it appears better; it's due to iPhone and smartphone processing speeds. Such limits reduce the system's response to your activity, slowing the experience. Designers and developers use animations and effects to distract us from the time lag (most of the time) and sometimes because it looks cooler and smoother.
Dynamic Island makes apps more useable and interactive. It shows system states visually. Turn signal audio and visual cues, voice assistance, physical and digital haptic feedbacks, heads-up displays, fuel and battery level gauges, and gear shift indicators helped us overcome vehicle design problems.
Dynamic Island is a wonderfully delightful (and temporary) solution to a design “problem” until Apple or other companies can figure out a way to sink the cameras under the smartphone screen.
Apple Has Returned to Being an Innovative & Exciting Company
Now Apple's products are exciting. Next, bring back real Apple events, not pre-recorded demos.
Dynamic Island integrates hardware and software. What will this new tech do? How would this affect device use? Or is it just hype?
Dynamic Island may be an insignificant improvement to the iPhone, but it sure is promising for the future of bridging the human and computer interaction gap.

Tim Soulo
3 years ago
Here is why 90.63% of Pages Get No Traffic From Google.
The web adds millions or billions of pages per day.
How much Google traffic does this content get?
In 2017, we studied 2 million randomly-published pages to answer this question. Only 5.7% of them ranked in Google's top 10 search results within a year of being published.
94.3 percent of roughly two million pages got no Google traffic.
Two million pages is a small sample compared to the entire web. We did another study.
We analyzed over a billion pages to see how many get organic search traffic and why.
How many pages get search traffic?
90% of pages in our index get no Google traffic, and 5.2% get ten visits or less.
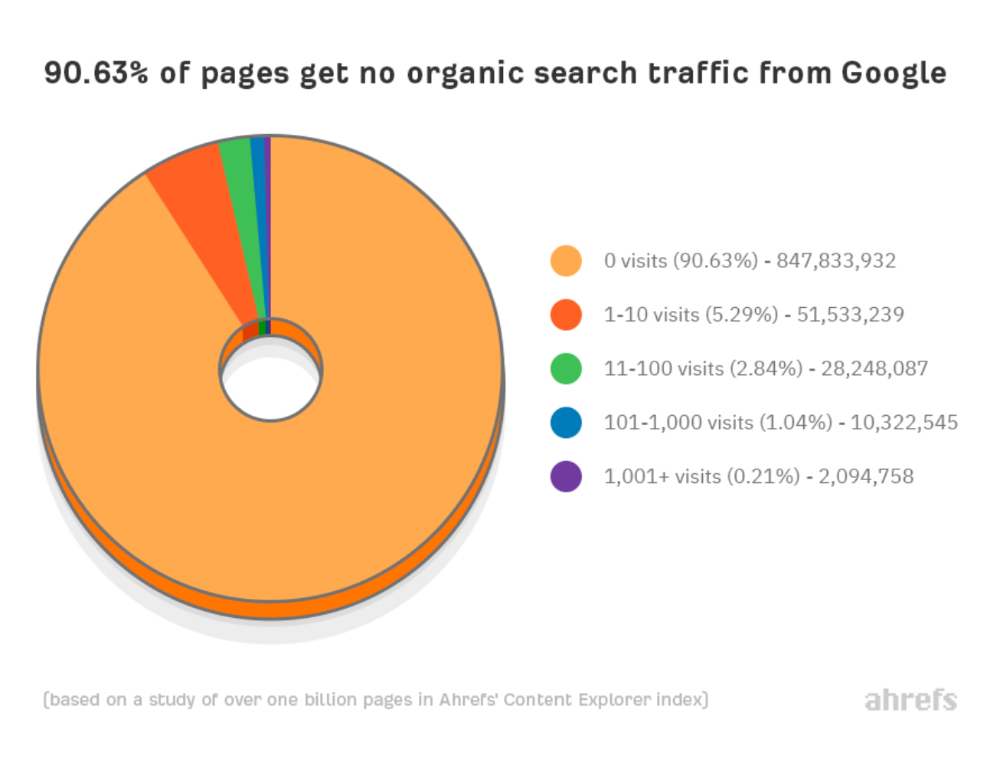
90% of google pages get no organic traffic
How can you join the minority that gets Google organic search traffic?
There are hundreds of SEO problems that can hurt your Google rankings. If we only consider common scenarios, there are only four.
Reason #1: No backlinks
I hate to repeat what most SEO articles say, but it's true:
Backlinks boost Google rankings.
Google's "top 3 ranking factors" include them.
Why don't we divide our studied pages by the number of referring domains?
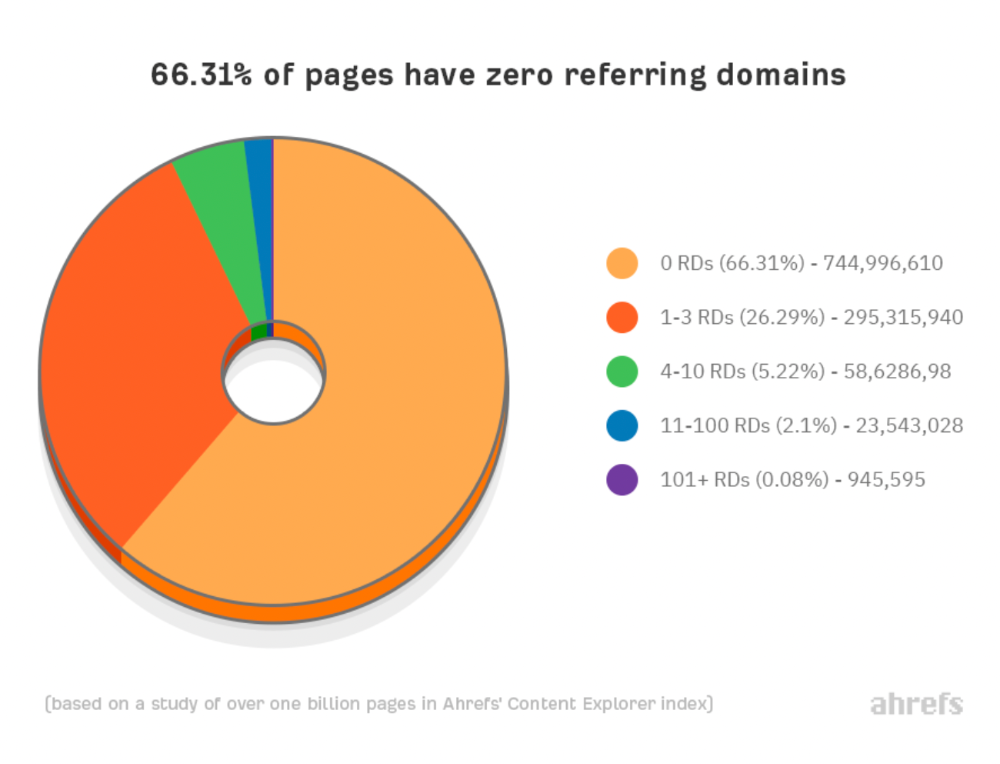
66.31 percent of pages have no backlinks, and 26.29 percent have three or fewer.
Did you notice the trend already?
Most pages lack search traffic and backlinks.
But are these the same pages?
Let's compare monthly organic search traffic to backlinks from unique websites (referring domains):

More backlinks equals more Google organic traffic.
Referring domains and keyword rankings are correlated.
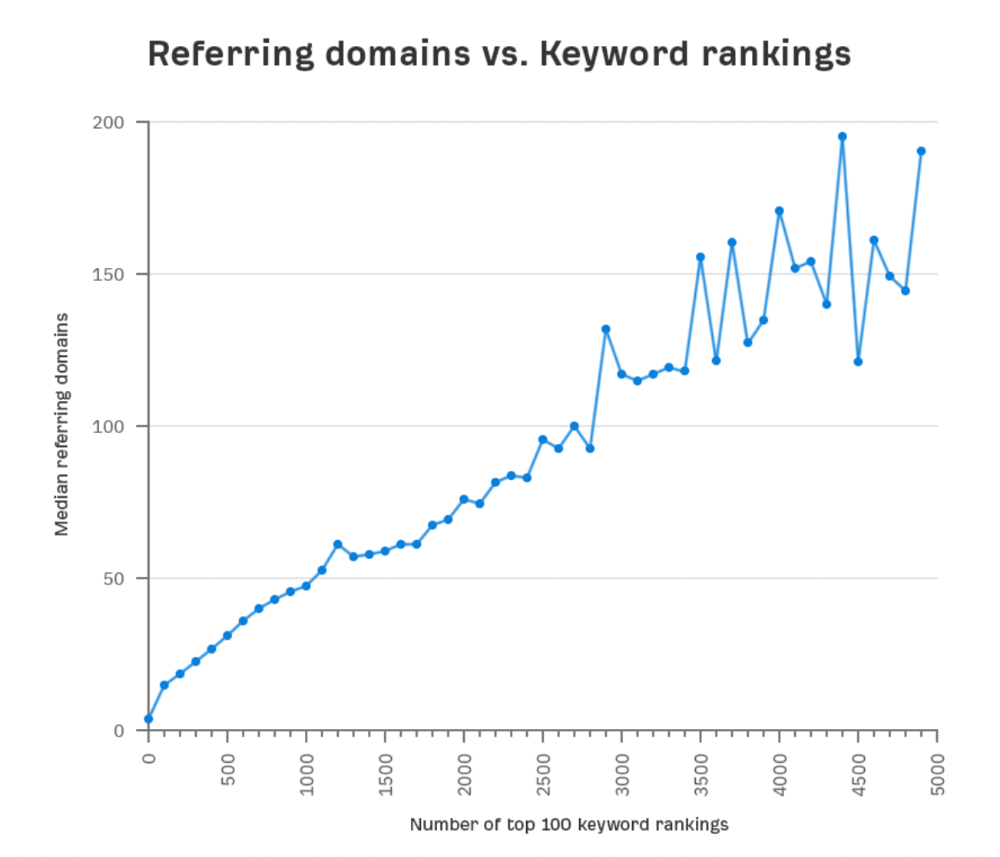
It's important to note that correlation does not imply causation, and none of these graphs prove backlinks boost Google rankings. Most SEO professionals agree that it's nearly impossible to rank on the first page without backlinks.
You'll need high-quality backlinks to rank in Google and get search traffic.
Is organic traffic possible without links?
Here are the numbers:
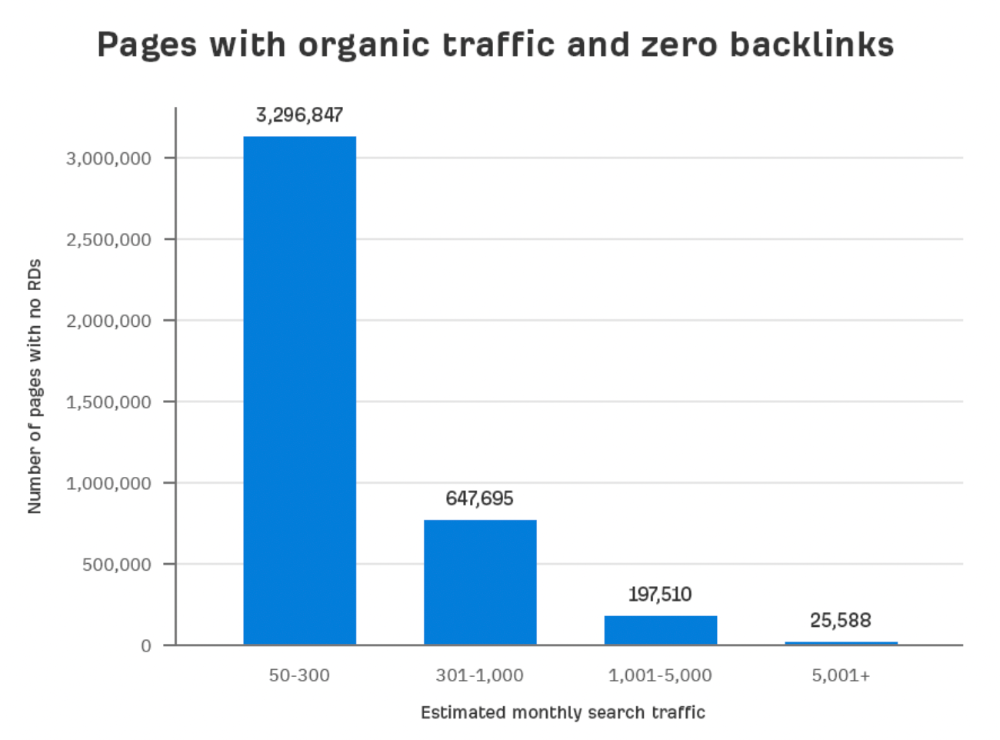
Four million pages get organic search traffic without backlinks. Only one in 20 pages without backlinks has traffic, which is 5% of our sample.
Most get 300 or fewer organic visits per month.
What happens if we exclude high-Domain-Rating pages?
The numbers worsen. Less than 4% of our sample (1.4 million pages) receive organic traffic. Only 320,000 get over 300 monthly organic visits, or 0.1% of our sample.
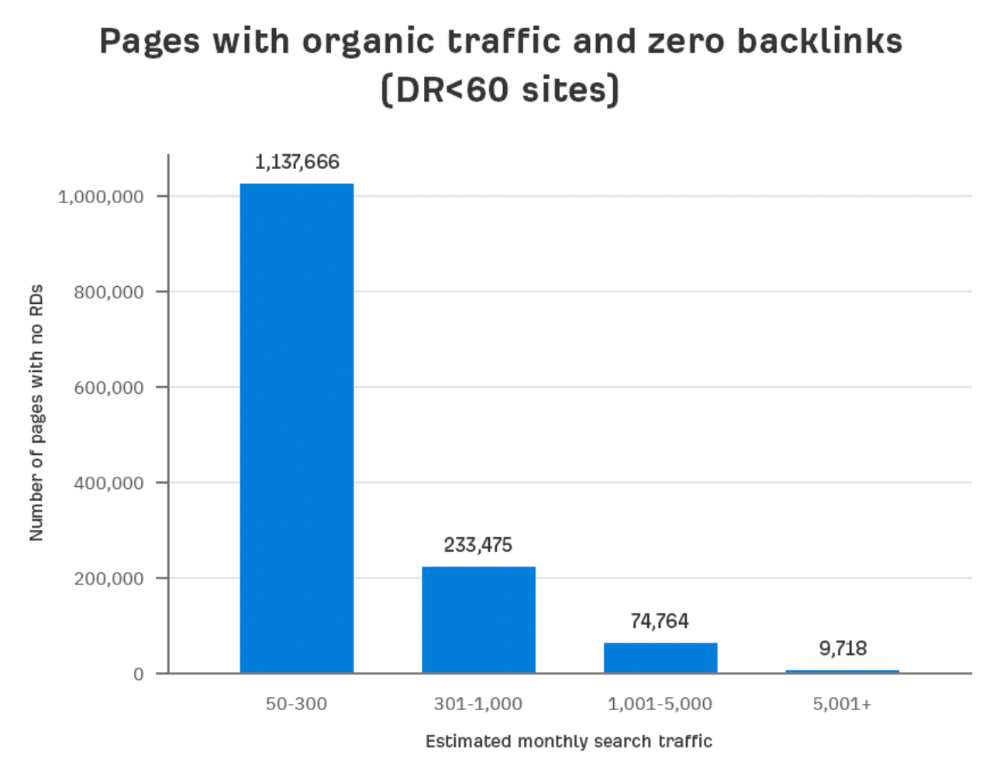
This suggests high-authority pages without backlinks are more likely to get organic traffic than low-authority pages.
Internal links likely pass PageRank to new pages.
Two other reasons:
Our crawler's blocked. Most shady SEOs block backlinks from us. This prevents competitors from seeing (and reporting) PBNs.
They choose low-competition subjects. Low-volume queries are less competitive, requiring fewer backlinks to rank.
If the idea of getting search traffic without building backlinks excites you, learn about Keyword Difficulty and how to find keywords/topics with decent traffic potential and low competition.
Reason #2: The page has no long-term traffic potential.
Some pages with many backlinks get no Google traffic.
Why? I filtered Content Explorer for pages with no organic search traffic and divided them into four buckets by linking domains.
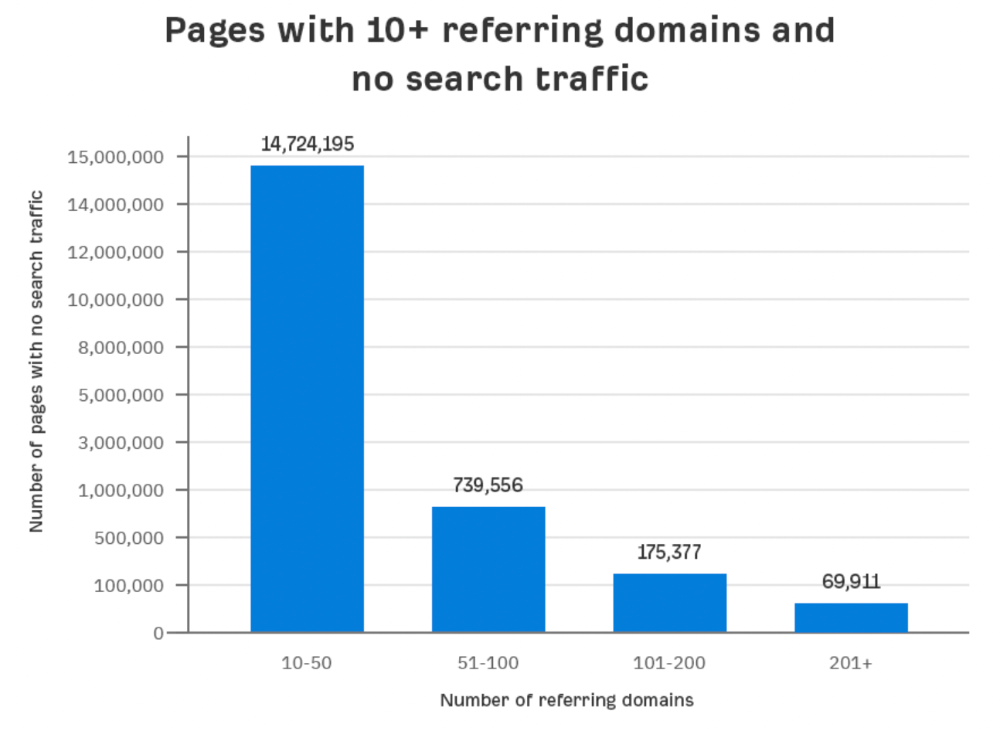
Almost 70k pages have backlinks from over 200 domains, but no search traffic.
By manually reviewing these (and other) pages, I noticed two general trends that explain why they get no traffic:
They overdid "shady link building" and got penalized by Google;
They're not targeting a Google-searched topic.
I won't elaborate on point one because I hope you don't engage in "shady link building"
#2 is self-explanatory:
If nobody searches for what you write, you won't get search traffic.
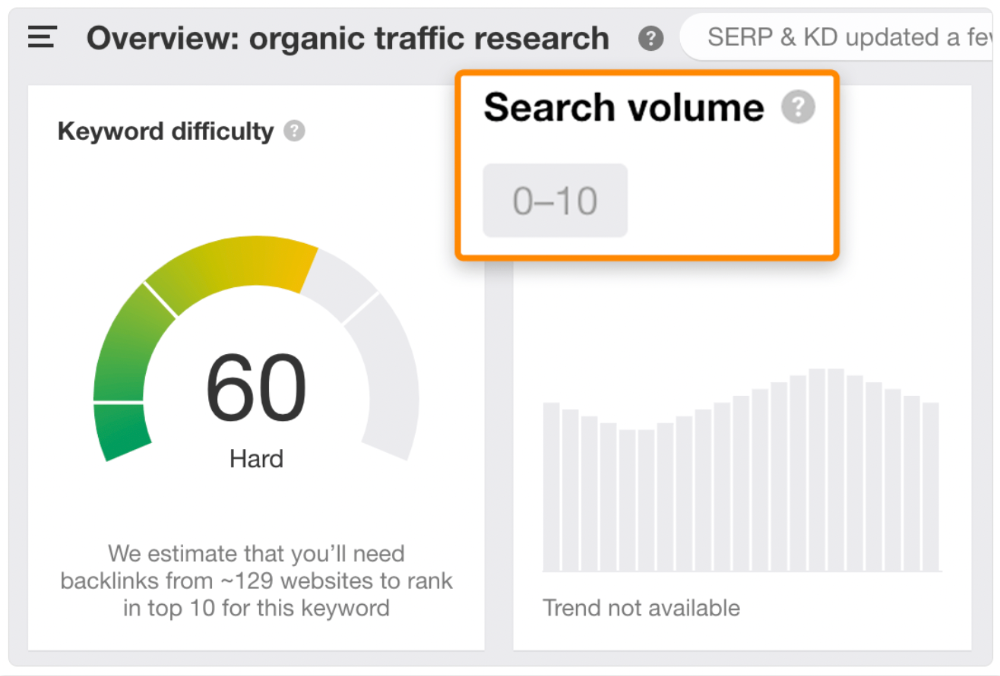
Consider one of our blog posts' metrics:

No organic traffic despite 337 backlinks from 132 sites.
The page is about "organic traffic research," which nobody searches for.
News articles often have this. They get many links from around the web but little Google traffic.
People can't search for things they don't know about, and most don't care about old events and don't search for them.
Note:
Some news articles rank in the "Top stories" block for relevant, high-volume search queries, generating short-term organic search traffic.
The Guardian's top "Donald Trump" story:
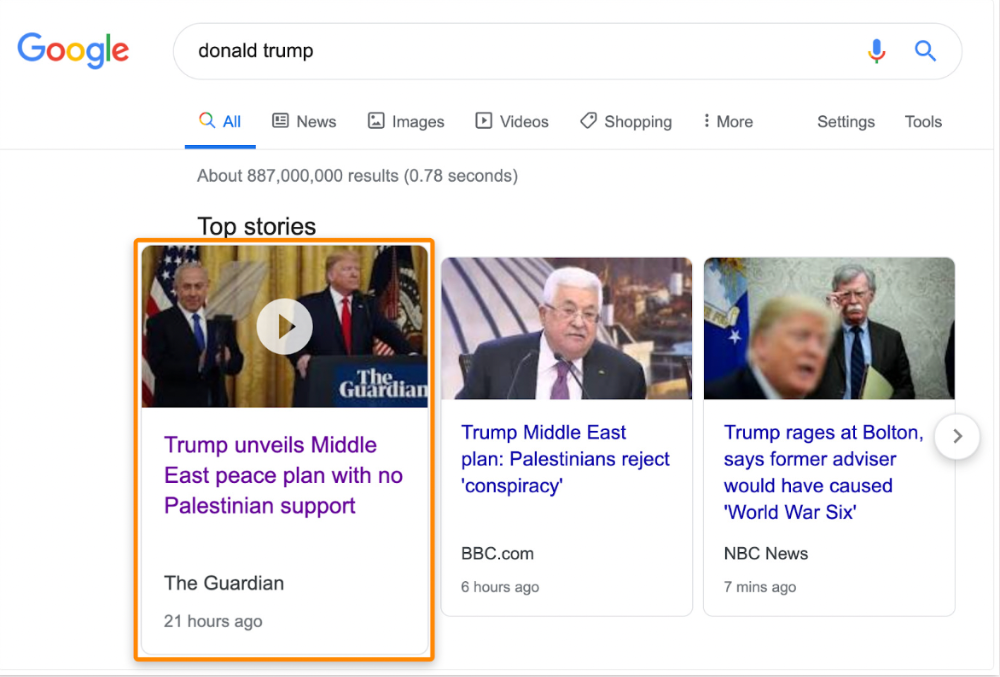
Ahrefs caught on quickly:
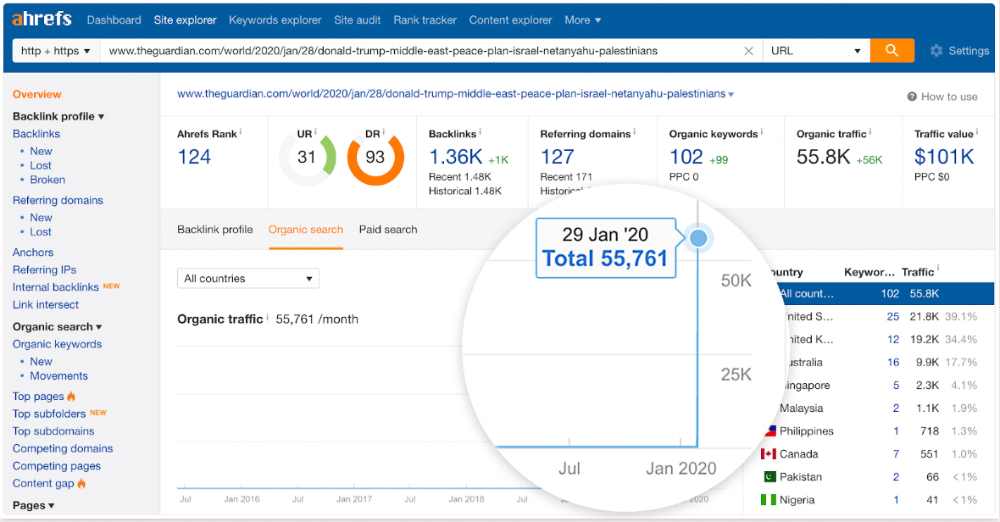
"Donald Trump" gets 5.6M monthly searches, so this page got a lot of "Top stories" traffic.
I bet traffic has dropped if you check now.
One of the quickest and most effective SEO wins is:
Find your website's pages with the most referring domains;
Do keyword research to re-optimize them for relevant topics with good search traffic potential.
Bryan Harris shared this "quick SEO win" during a course interview:
He suggested using Ahrefs' Site Explorer's "Best by links" report to find your site's most-linked pages and analyzing their search traffic. This finds pages with lots of links but little organic search traffic.
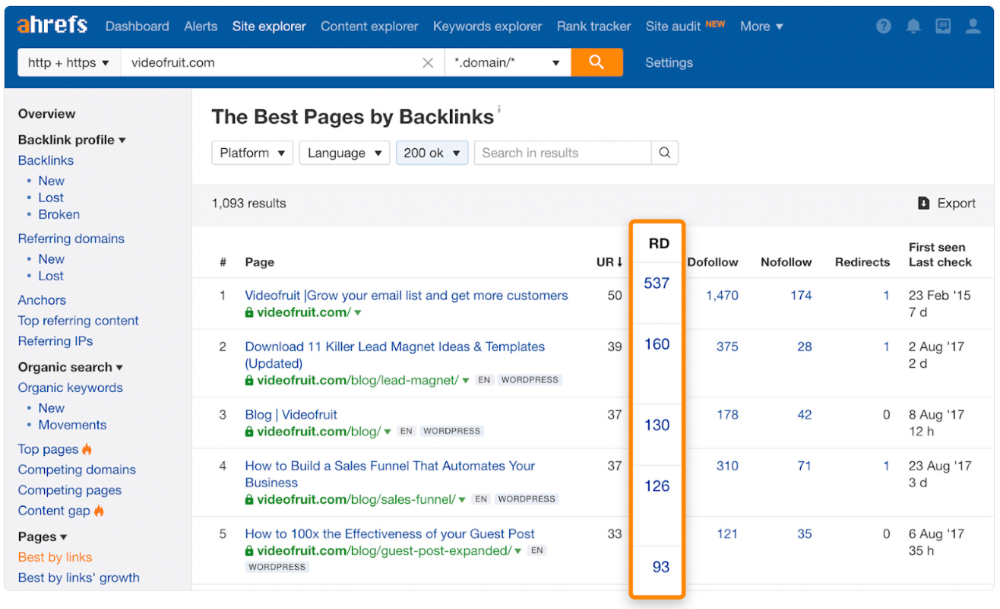
We see:
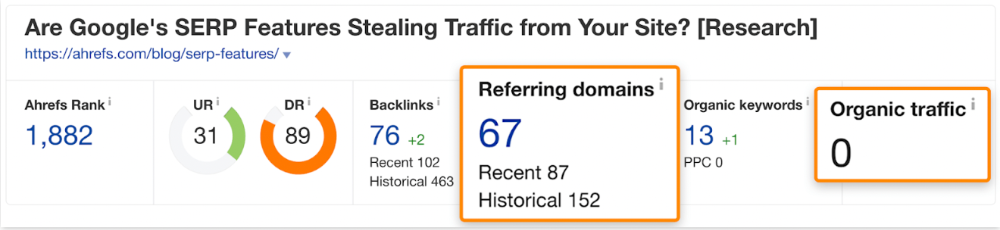
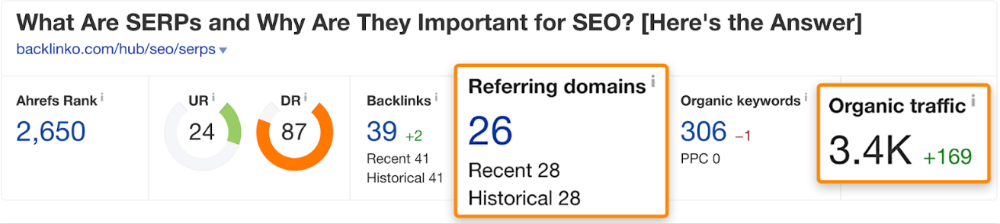
The guide has 67 backlinks but no organic traffic.
We could fix this by re-optimizing the page for "SERP"
A similar guide with 26 backlinks gets 3,400 monthly organic visits, so we should easily increase our traffic.
Don't do this with all low-traffic pages with backlinks. Choose your battles wisely; some pages shouldn't be ranked.
Reason #3: Search intent isn't met
Google returns the most relevant search results.
That's why blog posts with recommendations rank highest for "best yoga mat."
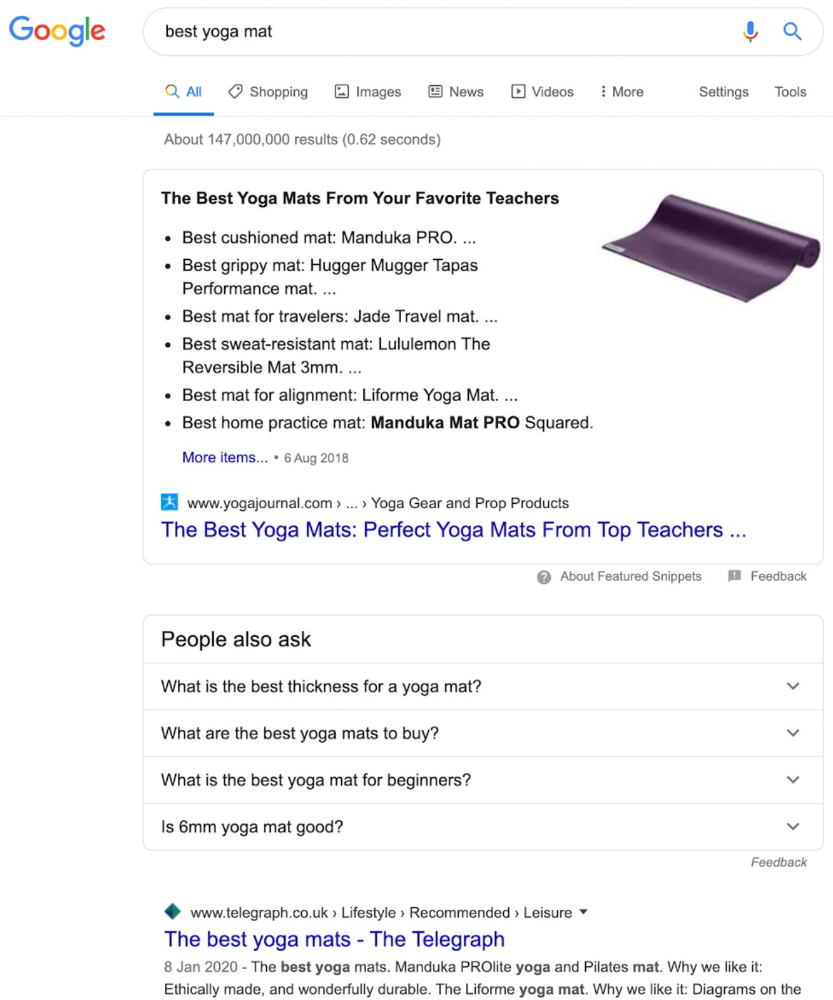
Google knows that most searchers aren't buying.
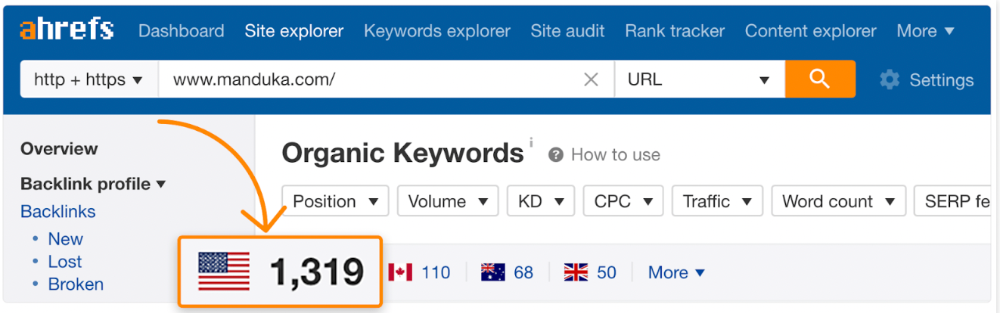
It's also why this yoga mats page doesn't rank, despite having seven times more backlinks than the top 10 pages:
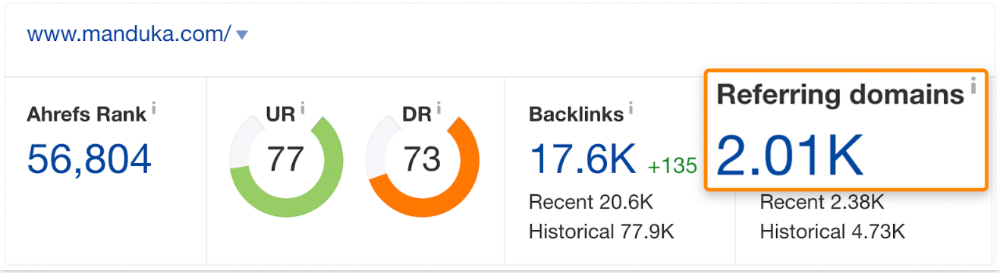
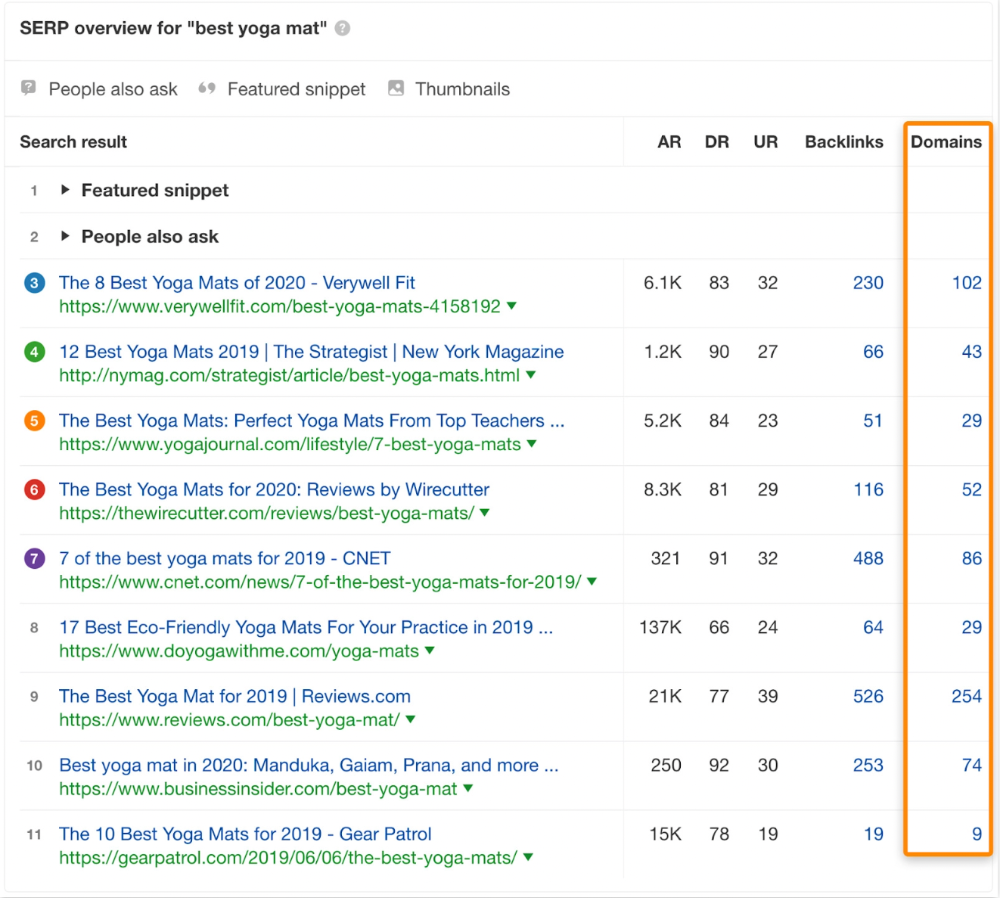
The page ranks for thousands of other keywords and gets tens of thousands of monthly organic visits. Not being the "best yoga mat" isn't a big deal.
If you have pages with lots of backlinks but no organic traffic, re-optimizing them for search intent can be a quick SEO win.
It was originally a boring landing page describing our product's benefits and offering a 7-day trial.
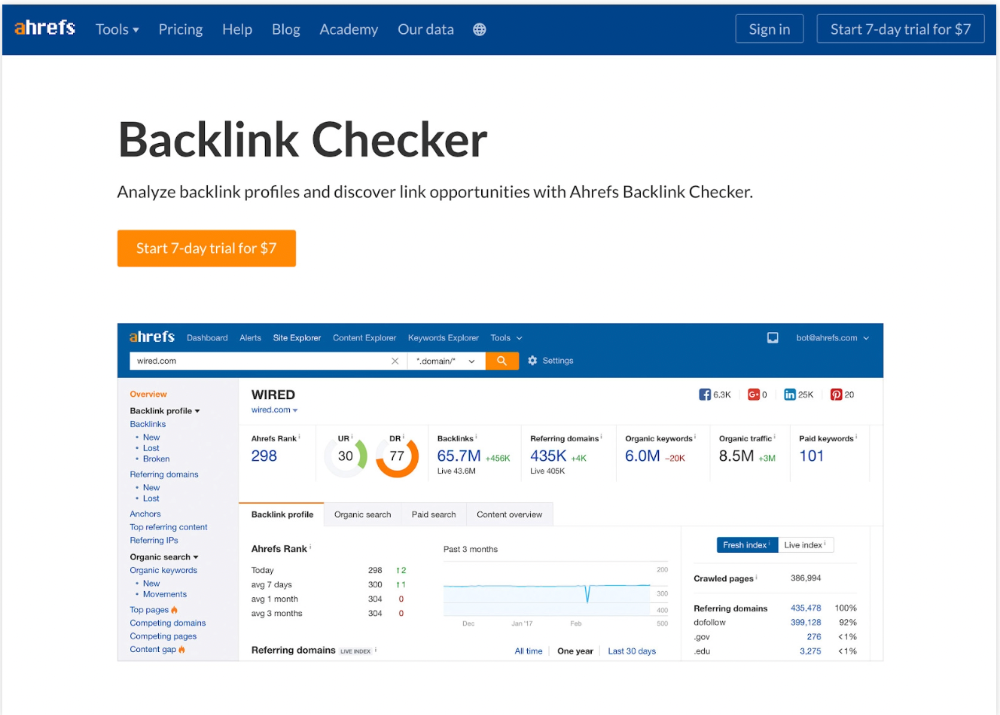
We realized the problem after analyzing search intent.
People wanted a free tool, not a landing page.
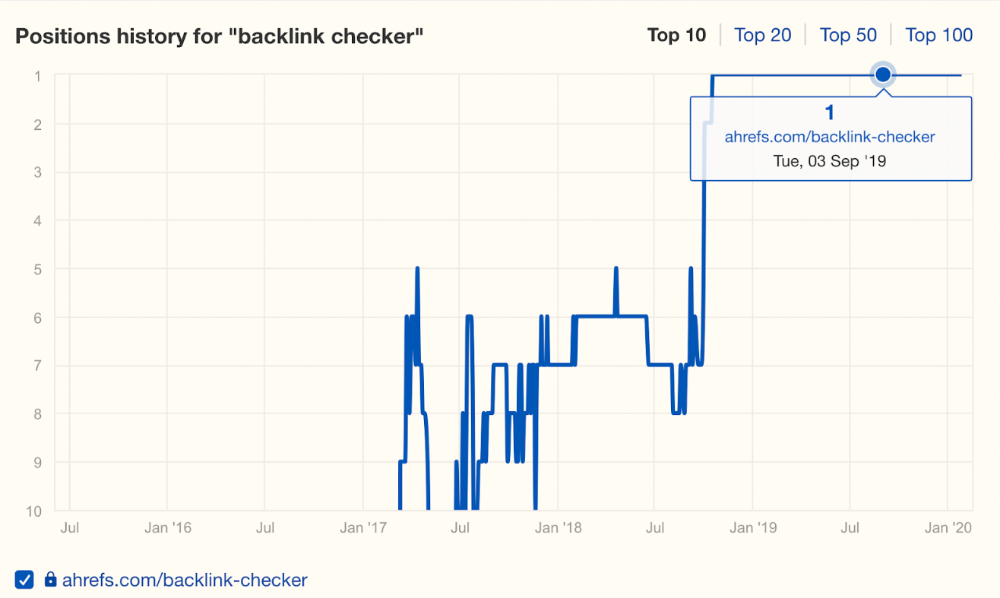
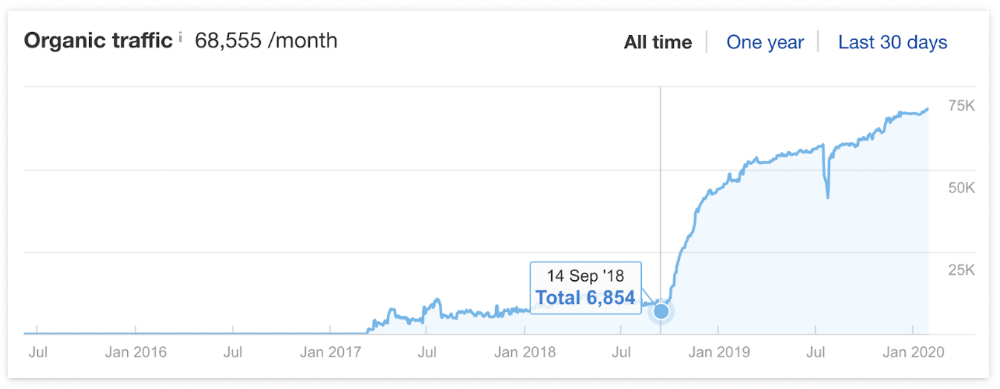
In September 2018, we published a free tool at the same URL. Organic traffic and rankings skyrocketed.
Reason #4: Unindexed page
Google can’t rank pages that aren’t indexed.
If you think this is the case, search Google for site:[url]. You should see at least one result; otherwise, it’s not indexed.
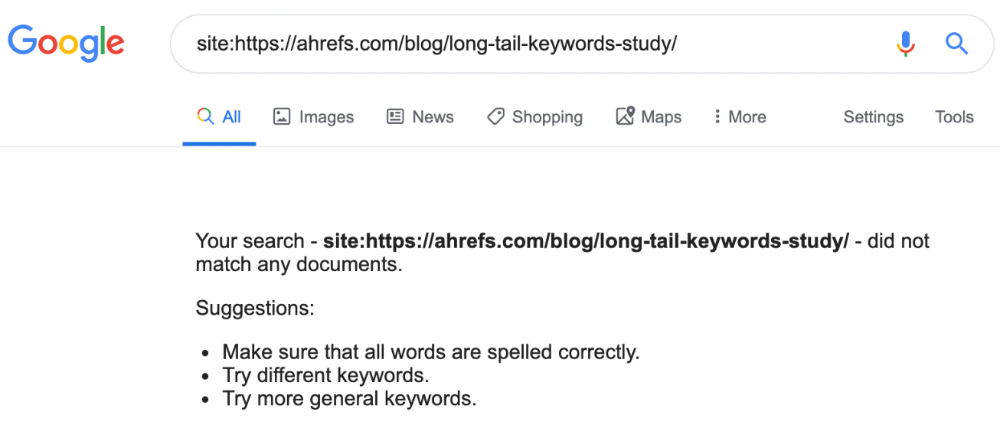
A rogue noindex meta tag is usually to blame. This tells search engines not to index a URL.
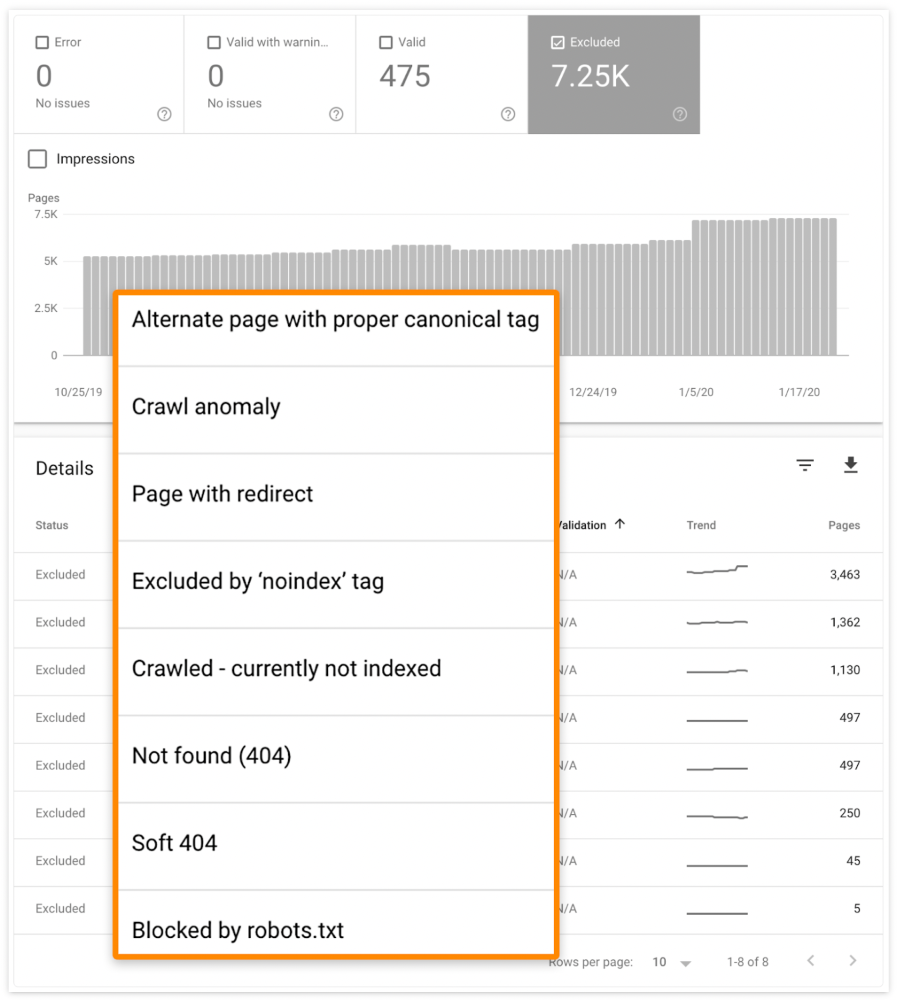
Rogue canonicals, redirects, and robots.txt blocks prevent indexing.
Check the "Excluded" tab in Google Search Console's "Coverage" report to see excluded pages.
Google doesn't index broken pages, even with backlinks.
Surprisingly common.
In Ahrefs' Site Explorer, the Best by Links report for a popular content marketing blog shows many broken pages.
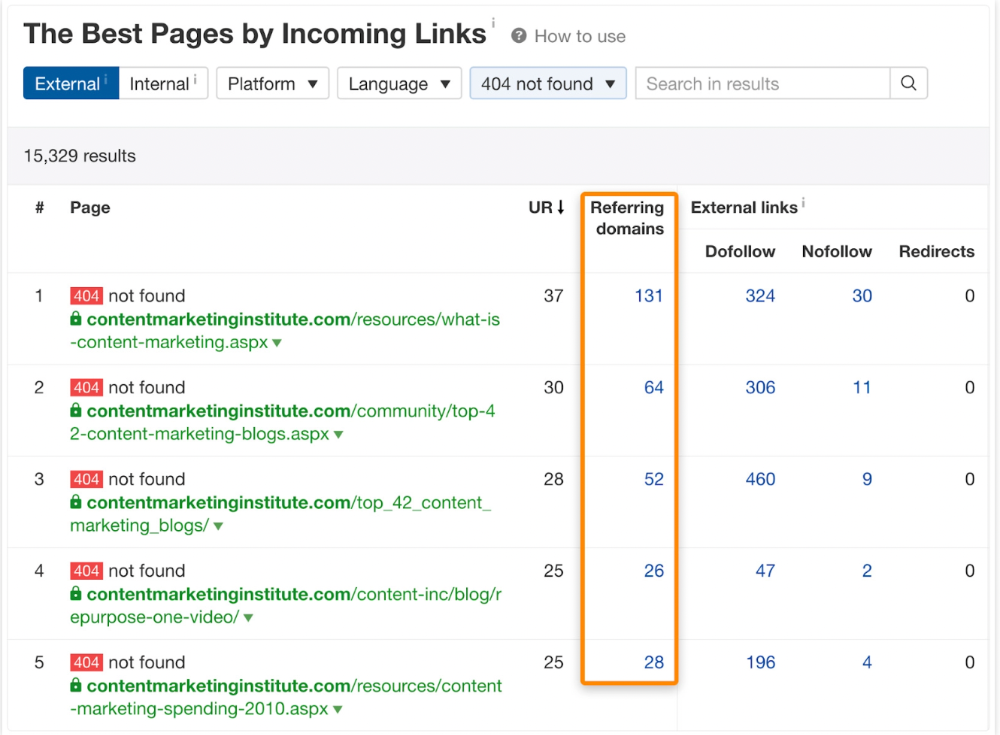
One dead page has 131 backlinks:

According to the URL, the page defined content marketing. —a keyword with a monthly search volume of 5,900 in the US.
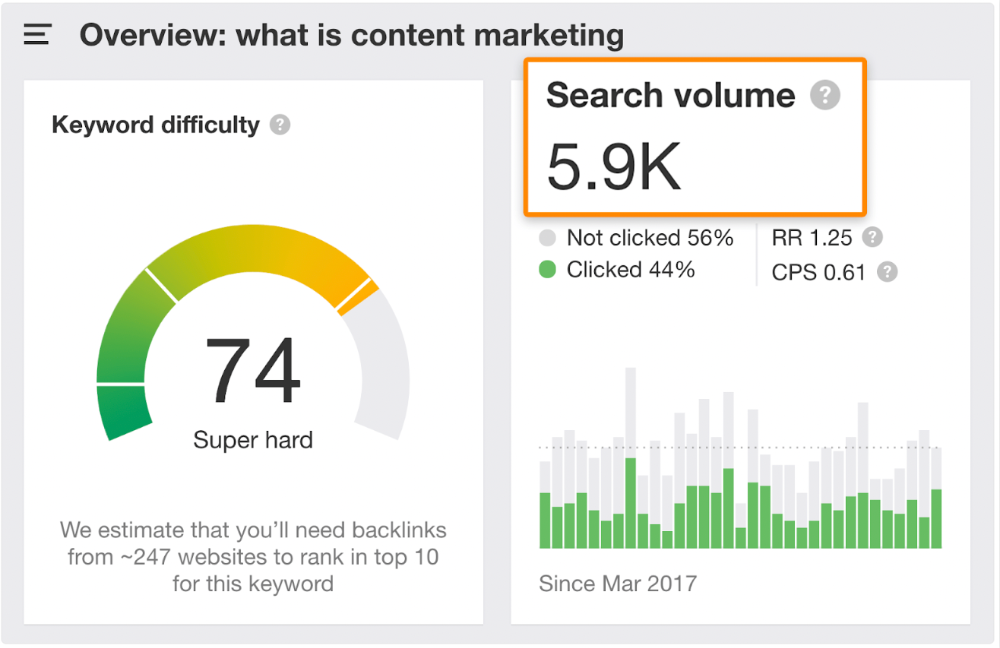
Luckily, another page ranks for this keyword. Not a huge loss.
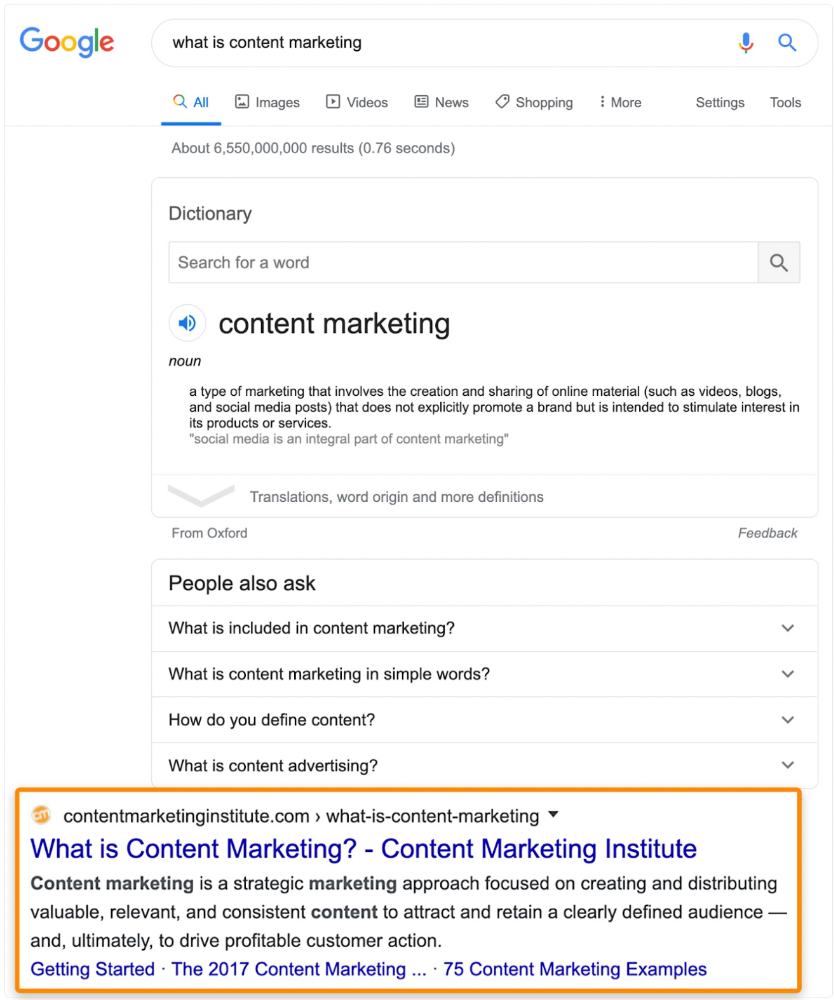
At least redirect the dead page's backlinks to a working page on the same topic. This may increase long-tail keyword traffic.
This post is a summary. See the original post here

Ben "The Hosk" Hosking
3 years ago
The Yellow Cat Test Is Typically Failed by Software Developers.
Believe what you see, what people say
It’s sad that we never get trained to leave assumptions behind. - Sebastian Thrun
Many problems in software development are not because of code but because developers create the wrong software. This isn't rare because software is emergent and most individuals only realize what they want after it's built.
Inquisitive developers who pass the yellow cat test can improve the process.
Carpenters measure twice and cut the wood once. Developers are rarely so careful.
The Yellow Cat Test
Game of Thrones made dragons cool again, so I am reading The Game of Thrones book.
The yellow cat exam is from Syrio Forel, Arya Stark's fencing instructor.
Syrio tells Arya he'll strike left when fencing. He hits her after she dodges left. Arya says “you lied”. Syrio says his words lied, but his eyes and arm told the truth.
Arya learns how Syrio became Bravos' first sword.
“On the day I am speaking of, the first sword was newly dead, and the Sealord sent for me. Many bravos had come to him, and as many had been sent away, none could say why. When I came into his presence, he was seated, and in his lap was a fat yellow cat. He told me that one of his captains had brought the beast to him, from an island beyond the sunrise. ‘Have you ever seen her like?’ he asked of me.
“And to him I said, ‘Each night in the alleys of Braavos I see a thousand like him,’ and the Sealord laughed, and that day I was named the first sword.”
Arya screwed up her face. “I don’t understand.”
Syrio clicked his teeth together. “The cat was an ordinary cat, no more. The others expected a fabulous beast, so that is what they saw. How large it was, they said. It was no larger than any other cat, only fat from indolence, for the Sealord fed it from his own table. What curious small ears, they said. Its ears had been chewed away in kitten fights. And it was plainly a tomcat, yet the Sealord said ‘her,’ and that is what the others saw. Are you hearing?” Reddit discussion.
Development teams should not believe what they are told.
We created an appointment booking system. We thought it was an appointment-booking system. Later, we realized the software's purpose was to book the right people for appointments and discourage the unneeded ones.
The first 3 months of the project had half-correct requirements and software understanding.
Open your eyes
“Open your eyes is all that is needed. The heart lies and the head plays tricks with us, but the eyes see true. Look with your eyes, hear with your ears. Taste with your mouth. Smell with your nose. Feel with your skin. Then comes the thinking afterwards, and in that way, knowing the truth” Syrio Ferel
We must see what exists, not what individuals tell the development team or how developers think the software should work. Initial criteria cover 50/70% and change.
Developers build assumptions problems by assuming how software should work. Developers must quickly explain assumptions.
When a development team's assumptions are inaccurate, they must alter the code, DevOps, documentation, and tests.
It’s always faster and easier to fix requirements before code is written.
First-draft requirements can be based on old software. Development teams must grasp corporate goals and consider needs from many angles.
Testers help rethink requirements. They look at how software requirements shouldn't operate.
Technical features and benefits might misdirect software projects.
The initiatives that focused on technological possibilities developed hard-to-use software that needed extensive rewriting following user testing.
Software development
High-level criteria are different from detailed ones.
The interpretation of words determines their meaning.
Presentations are lofty, upbeat, and prejudiced.
People's perceptions may be unclear, incorrect, or just based on one perspective (half the story)
Developers can be misled by requirements, circumstances, people, plans, diagrams, designs, documentation, and many other things.
Developers receive misinformation, misunderstandings, and wrong assumptions. The development team must avoid building software with erroneous specifications.
Once code and software are written, the development team changes and fixes them.
Developers create software with incomplete information, they need to fill in the blanks to create the complete picture.
Conclusion
Yellow cats are often inaccurate when communicating requirements.
Before writing code, clarify requirements, assumptions, etc.
Everyone will pressure the development team to generate code rapidly, but this will slow down development.
Code changes are harder than requirements.
You might also like

Tim Denning
3 years ago
One of the biggest publishers in the world offered me a book deal, but I don't feel deserving of it.

My ego is so huge it won't fit through the door.
I don't know how I feel about it. I should be excited. Many of you have this exact dream to publish a book with a well-known book publisher and get a juicy advance.
Let me dissect how I'm thinking about it to help you.
How it happened
An email comes in. A generic "can we put a backlink on your website and get a freebie" email.
Almost deleted it.
Then I noticed the logo. It seemed shady. I found the URL. Check. I searched the employee's LinkedIn. Legit. I avoided middlemen. Check.
Mixed feelings. LinkedIn hasn't valued my writing for years. I'm just a guy in an unironed t-shirt whose content they sell advertising against.
They get big dollars. I get $0 and a few likes, plus some email subscribers.
Still, I felt adrenaline for hours.
I texted a few friends to see how they felt. I wrapped them.
Messages like "No shocker. You're entertaining online." I didn't like praises, so I blushed.
The thrill faded after hours. Who knows?
Most authors desire this chance.
"You entitled piece of crap, Denning!"
You may think so. Okay. My job is to stand on the internet and get bananas thrown at me.
I approached writing backwards. More important than a book deal was a social media audience converted to an email list.
Romantic authors think backward. They hope a fantastic book will land them a deal and an audience.
Rarely occurs. So I never pursued it. It's like permission-seeking or the lottery.
Not being a professional writer, I've never written a good book. I post online for fun and to express my opinions.
Writing is therapeutic. I overcome mental illness and rebuilt my life this way. Without blogging, I'd be dead.
I've always dreamed of staying alive and doing something I love, not getting a book contract. Writing is my passion. I'm a winner without a book deal.
Why I was given a book deal
You may assume I received a book contract because of my views or follows. Nope.
They gave me a deal because they like my writing style. I've heard this for eight years.
Several authors agree. One asked me to improve their writer's voice.
Takeaway: highlight your writer's voice.
What if they discover I'm writing incompetently?
An edited book is published. It's edited.
I need to master writing mechanics, thus this concerns me. I need help with commas and sentence construction.
I must learn verb, noun, and adjective. Seriously.
Writing a book may reveal my imposter status to a famous publisher. Imagine the email
"It happened again. He doesn't even know how to spell. He thinks 'less' is the correct word, not 'fewer.' Are you sure we should publish his book?"
Fears stink.

I'm capable of blogging. Even listicles. So what?
Writing for a major publisher feels advanced.
I only blog. I'm good at listicles. Digital media executives have criticized me for this.
It is allegedly clickbait.
Or it is following trends.
Alternately, growth hacking.
Never. I learned copywriting to improve my writing.
Apple, Amazon, and Tesla utilize copywriting to woo customers. Whoever thinks otherwise is the wisest person in the room.
Old-schoolers loathe copywriters.
Their novels sell nothing.
They assume their elitist version of writing is better and that the TikTok generation will invest time in random writing with no subheadings and massive walls of text they can't read on their phones.
I'm terrified of book proposals.
My friend's book proposal suggestion was contradictory and made no sense.
They told him to compose another genre. This book got three Amazon reviews. Is that a good model?
The process disappointed him. I've heard other book proposal horror stories. Tim Ferriss' book "The 4-Hour Workweek" was criticized.
Because he has thick skin, his book came out. He wouldn't be known without that.
I hate book proposals.
An ongoing commitment
Writing a book is time-consuming.
I appreciate time most. I want to focus on my daughter for the next few years. I can't recreate her childhood because of a book.
No idea how parents balance kids' goals.
My silly face in a bookstore. Really?
Genuine thought.
I don't want my face in bookstores. I fear fame. I prefer anonymity.
I want to purchase a property in a bad Australian area, then piss off and play drums. Is bookselling worth it?
Are there even bookstores anymore?
(Except for Ryan Holiday's legendary Painted Porch Bookshop in Texas.)
What's most important about books
Many were duped.
Tweets and TikTok hopscotch vids are their future. Short-form content creates devoted audiences that buy newsletter subscriptions.
Books=depth.
Depth wins (if you can get people to buy your book). Creating a book will strengthen my reader relationships.
It's cheaper than my classes, so more people can benefit from my life lessons.
A deeper justification for writing a book
Mind wandered.
If I write this book, my daughter will follow it. "Look what you can do, love, when you ignore critics."
That's my favorite.
I'll be her best leader and teacher. If her dad can accomplish this, she can too.
My kid can read my book when I'm gone to remember her loving father.
Last paragraph made me cry.
The positive
This book thing might make me sound like Karen.
The upside is... Building in public, like I have with online writing, attracts the right people.
Proof-of-work over proposals, beautiful words, or huge aspirations. If you want a book deal, try writing online instead of the old manner.
Next steps
No idea.
I'm a rural Aussie. Writing a book in the big city is intimidating. Will I do it? Lots to think about. Right now, some level of reflection and gratitude feels most appropriate.
Sometimes when you don't feel worthy, it gives you the greatest lessons. That's how I feel about getting offered this book deal.
Perhaps you can relate.
CyberPunkMetalHead
3 years ago
Developed an automated cryptocurrency trading tool for nearly a year before unveiling it this month.


Overview
I'm happy to provide this important update. We've worked on this for a year and a half, so I'm glad to finally write it. We named the application AESIR because we’ve love Norse Mythology. AESIR automates and runs trading strategies.
Volatility, technical analysis, oscillators, and other signals are currently supported by AESIR.
Additionally, we enhanced AESIR's ability to create distinctive bespoke signals by allowing it to analyze many indicators and produce a single signal.
AESIR has a significant social component that allows you to copy the best-performing public setups and use them right away.
Enter your email here to be notified when AEISR launches.
Views on algorithmic trading
First, let me clarify. Anyone who claims algorithmic trading platforms are money-printing plug-and-play devices is a liar. Algorithmic trading platforms are a collection of tools.
A trading algorithm won't make you a competent trader if you lack a trading strategy and yolo your funds without testing. It may hurt your trade. Test and alter your plans to account for market swings, but comprehend market signals and trends.
Status Report
Throughout closed beta testing, we've communicated closely with users to design a platform they want to use.
To celebrate, we're giving you free Aesir Viking NFTs and we cover gas fees.
Why use a trading Algorithm?
Automating a successful manual approach
experimenting with and developing solutions that are impossible to execute manually
One AESIR strategy lets you buy any cryptocurrency that rose by more than x% in y seconds.
AESIR can scan an exchange for coins that have gained more than 3% in 5 minutes. It's impossible to manually analyze over 1000 trading pairings every 5 minutes. Auto buy dips or DCA around a Dip
Sneak Preview
Here's the Leaderboard, where you can clone the best public settings.

As a tiny, self-funded team, we're excited to unveil our product. It's a beta release, so there's still more to accomplish, but we know where we stand.
If this sounds like a project that you might want to learn more about, you can sign up to our newsletter and be notified when AESIR launches.
Useful Links:
Join the Discord | Join our subreddit | Newsletter | Mint Free NFT

Katrina Paulson
3 years ago
Dehumanization Against Anthropomorphization
We've fought for humanity's sake. We need equilibrium.

We live in a world of opposites (black/white, up/down, love/hate), thus life is a game of achieving equilibrium. We have a universe of paradoxes within ourselves, not just in physics.
Individually, you balance your intellect and heart, but as a species, we're full of polarities. They might be gentle and compassionate, then ruthless and unsympathetic.
We desire for connection so much that we personify non-human beings and objects while turning to violence and hatred toward others. These contrasts baffle me. Will we find balance?
Anthropomorphization
Assigning human-like features or bonding with objects is common throughout childhood. Cartoons often give non-humans human traits. Adults still anthropomorphize this trait. Researchers agree we start doing it as infants and continue throughout life.
Humans of all ages are good at humanizing stuff. We build emotional attachments to weather events, inanimate objects, animals, plants, and locales. Gods, goddesses, and fictitious figures are anthropomorphized.
Cast Away, starring Tom Hanks, features anthropization. Hanks is left on an island, where he builds an emotional bond with a volleyball he calls Wilson.
We became emotionally invested in Wilson, including myself.
Why do we do it, though?
Our instincts and traits helped us survive and thrive. Our brain is alert to other people's thoughts, feelings, and intentions to assist us to determine who is safe or hazardous. We can think about others and our own mental states, or about thinking. This is the Theory of Mind.
Neurologically, specialists believe the Theory of Mind has to do with our mirror neurons, which exhibit the same activity while executing or witnessing an action.
Mirror neurons may contribute to anthropization, but they're not the only ones. In 2021, Harvard Medical School researchers at MGH and MIT colleagues published a study on the brain's notion of mind.
“Our study provides evidence to support theory of mind by individual neurons. Until now, it wasn’t clear whether or how neurons were able to perform these social cognitive computations.”
Neurons have particular functions, researchers found. Others encode information that differentiates one person's beliefs from another's. Some neurons reflect tale pieces, whereas others aren't directly involved in social reasoning but may multitask contributing factors.
Combining neuronal data gives a precise portrait of another's beliefs and comprehension. The theory of mind describes how we judge and understand each other in our species, and it likely led to anthropomorphism. Neuroscience indicates identical brain regions react to human or non-human behavior, like mirror neurons.
Some academics believe we're wired for connection, which explains why we anthropomorphize. When we're alone, we may anthropomorphize non-humans.
Humanizing non-human entities may make them deserving of moral care, according to another theory. Animamorphizing something makes it responsible for its actions and deserves punishments or rewards. This mental shift is typically apparent in our connections with pets and leads to deanthropomorphization.
Dehumanization
Dehumanizing involves denying someone or anything ethical regard, the opposite of anthropomorphizing.
Dehumanization occurs throughout history. We do it to everything in nature, including ourselves. We experiment on and torture animals. We enslave, hate, and harm other groups of people.
Race, immigrant status, dress choices, sexual orientation, social class, religion, gender, politics, need I go on? Our degrading behavior is promoting fascism and division everywhere.
Dehumanizing someone or anything reduces their agency and value. Many assume they're immune to this feature, but tests disagree.
It's inevitable. Humans are wired to have knee-jerk reactions to differences. We are programmed to dehumanize others, and it's easier than we'd like to admit.
Why do we do it, though?
Dehumanizing others is simpler than humanizing things for several reasons. First, we consider everything unusual as harmful, which has helped our species survive for hundreds of millions of years. Our propensity to be distrustful of others, like our fear of the unknown, promotes an us-vs.-them mentality.
Since WWII, various studies have been done to explain how or why the holocaust happened. How did so many individuals become radicalized to commit such awful actions and feel morally justified? Researchers quickly showed how easily the mind can turn gloomy.
Stanley Milgram's 1960s electroshock experiment highlighted how quickly people bow to authority to injure others. Philip Zimbardo's 1971 Stanford Prison Experiment revealed how power may be abused.
The us-versus-them attitude is natural and even young toddlers act on it. Without a relationship, empathy is more difficult.
It's terrifying how quickly dehumanizing behavior becomes commonplace. The current pandemic is an example. Most countries no longer count deaths. Long Covid is a major issue, with predictions of a handicapped tsunami in the future years. Mostly, we shrug.
In 2020, we panicked. Remember everyone's caution? Now Long Covid is ruining more lives, threatening to disable an insane amount of our population for months or their entire lives.
There's little research. Experts can't even classify or cure it. The people should be outraged, but most have ceased caring. They're over covid.
We're encouraged to find a method to live with a terrible pandemic that will cause years of damage. People aren't worried about infection anymore. They shrug and say, "We'll all get it eventually," then hope they're not one of the 30% who develops Long Covid.
We can correct course before further damage. Because we can recognize our urges and biases, we're not captives to them. We can think critically about our thoughts and behaviors, then attempt to improve. We can recognize our deficiencies and work to attain balance.
Changing perspectives
We're currently attempting to find equilibrium between opposites. It's superficial to defend extremes by stating we're only human or wired this way because both imply we have no control.
Being human involves having self-awareness, and by being careful of our thoughts and acts, we can find balance and recognize opposites' purpose.
Extreme anthropomorphizing and dehumanizing isolate and imperil us. We anthropomorphize because we desire connection and dehumanize because we're terrified, frequently of the connection we crave. Will we find balance?
Katrina Paulson ponders humanity, unanswered questions, and discoveries. Please check out her newsletters, Curious Adventure and Curious Life.