


More on Entrepreneurship/Creators

The woman
3 years ago
Because he worked on his side projects during working hours, my junior was fired and sued.
Many developers do it, but I don't approve.

Aren't many programmers part-time? Many work full-time but also freelance. If the job agreement allows it, I see no problem.
Tech businesses' policies vary. I have a friend in Google, Germany. According to his contract, he couldn't do an outside job. Google owns any code he writes while employed.
I was shocked. Later, I found that different Google regions have different policies.
A corporation can normally establish any agreement before hiring you. They're negotiable. When there's no agreement, state law may apply. In court, law isn't so simple.
I won't delve into legal details. Instead, let’s talk about the incident.
How he was discovered
In one month, he missed two deadlines. His boss was frustrated because the assignment wasn't difficult to miss twice. When a team can't finish work on time, they all earn bad grades.
He annoyed the whole team. One team member (anonymous) told the project manager he worked on side projects during office hours. He may have missed deadlines because of this.
The project manager was furious. He needed evidence. The manager caught him within a week. The manager told higher-ups immediately.
The company wanted to set an example
Management could terminate him and settle the problem. But the company wanted to set an example for those developers who breached the regulation.
Because dismissal isn't enough. Every organization invests heavily in developer hiring. If developers depart or are fired after a few months, the company suffers.
The developer spent 10 months there. The employer sacked him and demanded ten months' pay. Or they'd sue him.
It was illegal and unethical. The youngster paid the fine and left the company quietly to protect his career.
Right or wrong?
Is the developer's behavior acceptable? Let's discuss developer malpractice.
During office hours, may developers work on other projects? If they're bored during office hours, they might not. Check the employment contract or state law.
If there's no employment clause, check country/state law. Because you can't justify breaking the law. Always. Most employers own their employees' work hours unless it's a contractual position.
If the company agrees, it's fine.
I also oppose companies that force developers to work overtime without pay.
Most states and countries have laws that help companies and workers. Law supports employers in this case. If any of the following are true, the company/employer owns the IP under California law.
using the business's resources
any equipment, including a laptop used for business.
company's mobile device.
offices of the company.
business time as well. This is crucial. Because this occurred in the instance of my junior.
Company resources are dangerous. Because your company may own the product's IP. If you have seen the TV show Silicon Valley, you have seen a similar situation there, right?
Conclusion
Simple rule. I avoid big side projects. I work on my laptop on weekends for side projects. I'm safe. But I also know that my company might not be happy with that.
As an employee, I suppose I can. I can make side money. I won't promote it, but I'll respect their time, resources, and task. I also sometimes work extra time to finish my company’s deadlines.

Davlin Knight
3 years ago
2 pitfalls to stay away from when launching a YouTube channel
You do not want to miss these
Stop! Stop it! Two things to avoid when starting a YouTube channel. Critical. Possible channel-killers Its future revenue.
I'll tell you now, so don't say "I wish I knew."
The Notorious Copyright Allegation
My YouTube channel received a copyright claim before I sold it. This claim was on a one-minute video I thought I'd changed enough to make mine, but the original owner disagreed.
It cost me thousands in ad revenue. Original owner got the profits.
Well, it wasn't your video, you say.
Touché.
I've learned. Sorta
I couldn't stop looking at the video's views. The video got 1,000,000 views without any revenue. I made 4 more similar videos.
If they didn't get copyrighted, I'd be rolling in dough.
You've spent a week editing and are uploading to YouTube. You're thrilled as you stand and stretch your back. You see the video just before publishing.
No way!
The red exclamation point on checks.
Copyright claim!
YouTube lets you publish, but you won't make money.
Sounds fair? Well, it is.
Copyright claims mean you stole someone's work. Song, image, or video clip.
We wouldn't want our content used for money.
The only problem with this is that almost everything belongs to someone else. I doubt some of the biggest creators are sitting down and making their music for their videos. That just seems really excessive when you could make a quick search on YouTube and download a song (I definitely don’t do this because that would be stealing).
So how do you defeat a copyright defense?
Even copyright-free songs on YouTube aren't guaranteed. Some copyrighted songs claim to be free.
Use YouTube's free music library or pay for a subscription to adobe stock, epidemic sound, or artlist.io.
Most of my videos have Nintendo music. Almost all game soundtracks are copyright-free and offer a variety of songs.
Restriction on age
Age restrictions are a must-avoid. A channel dies.
YouTube never suggests age-restricted videos.
Shadow banning means YouTube hides your content from subscribers and non-subscribers.
Keeping your channel family-friendly can help.
I hear you complaining that your channel isn't for kids. I agree. Not everyone has a clean mouth or creates content for minors.
YouTube has changed rapidly in recent years. Focusing on kids. Fewer big creators are using profanity or explicit content in videos. Not YouTube-worthy.
Youtube wants to be family-friendly. A family-friendly movie. It won't promote illegal content. Yes, it allows profanity.
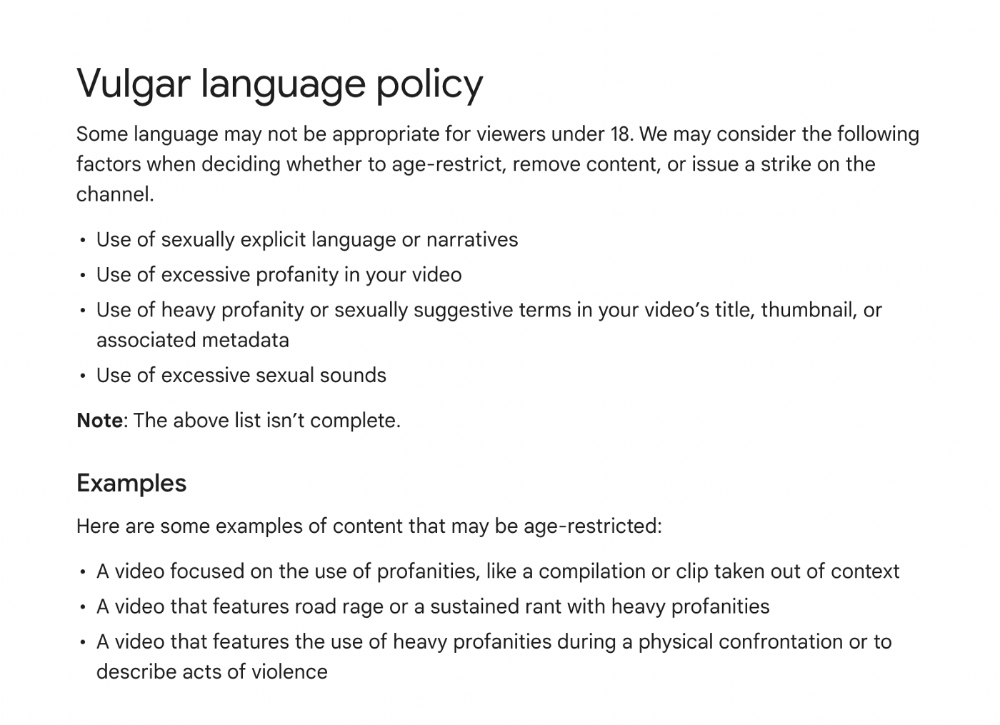
Do I recommend avoiding no-no words in videos? Never. Okay. YouTube's policies are shaky. YouTube uses video content to determine ad suitability.
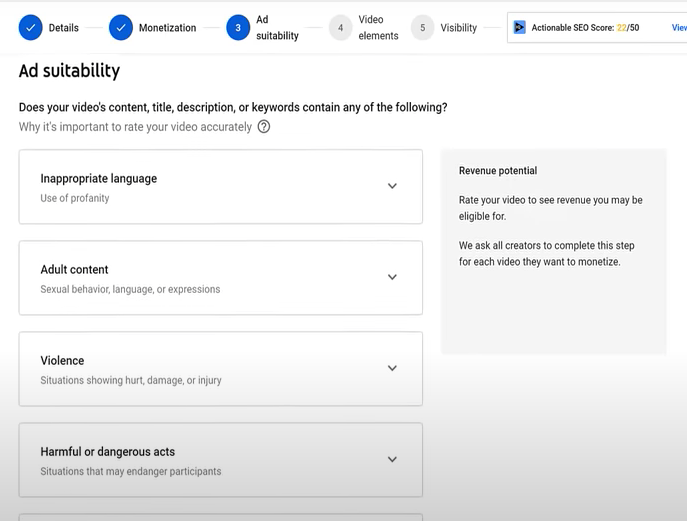
No joke. If you're serious about becoming a content creator, avoid profanity and inappropriate topics.
If your channel covers 18+ topics, like crime or commentary, censor as much as possible.
YouTube can be like walking on eggshells. You never know what is gonna upset the boss. So play it safe and try to avoid getting on their bad side.
Mr. Beast, Dream, Markplier, Faze Rug, and PewDewPie are popular creators. They maintain it family-friendly while entertaining fans.
You got this.

Eitan Levy
3 years ago
The Top 8 Growth Hacking Techniques for Startups
The Top 8 Growth Hacking Techniques for Startups

These startups, and how they used growth-hack marketing to flourish, are some of the more ethical ones, while others are less so.
Before the 1970 World Cup began, Puma paid footballer Pele $120,000 to tie his shoes. The cameras naturally focused on Pele and his Pumas, causing people to realize that Puma was the top football brand in the world.
Early workers of Uber canceled over 5,000 taxi orders made on competing applications in an effort to financially hurt any of their rivals.
PayPal developed a bot that advertised cheap goods on eBay, purchased them, and paid for them with PayPal, fooling eBay into believing that customers preferred this payment option. Naturally, Paypal became eBay's primary method of payment.
Anyone renting a space on Craigslist had their emails collected by AirBnB, who then urged them to use their service instead. A one-click interface was also created to list immediately on AirBnB from Craigslist.
To entice potential single people looking for love, Tinder developed hundreds of bogus accounts of attractive people. Additionally, for at least a year, users were "accidentally" linked.
Reddit initially created a huge number of phony accounts and forced them all to communicate with one another. It eventually attracted actual users—the real meaning of "fake it 'til you make it"! Additionally, this gave Reddit control over the tone of voice they wanted for their site, which is still present today.
To disrupt the conferences of their main rival, Salesforce recruited fictitious protestors. The founder then took over all of the event's taxis and gave a 45-minute pitch for his startup. No place to hide!
When a wholesaler required a minimum purchase of 10, Amazon CEO Jeff Bezos wanted a way to purchase only one book from them. A wholesaler would deliver the one book he ordered along with an apology for the other eight books after he discovered a loophole and bought the one book before ordering nine books about lichens. On Amazon, he increased this across all of the users.
Original post available here
You might also like

Simon Egersand
3 years ago
Working from home for more than two years has taught me a lot.
Since the pandemic, I've worked from home. It’s been +2 years (wow, time flies!) now, and during this time I’ve learned a lot. My 4 remote work lessons.
I work in a remote distributed team. This team setting shaped my experience and teachings.
Isolation ("I miss my coworkers")
The most obvious point. I miss going out with my coworkers for coffee, weekend chats, or just company while I work. I miss being able to go to someone's desk and ask for help. On a remote world, I must organize a meeting, share my screen, and avoid talking over each other in Zoom - sigh!
Social interaction is more vital for my health than I believed.
Online socializing stinks
My company used to come together every Friday to play Exploding Kittens, have food and beer, and bond over non-work things.
Different today. Every Friday afternoon is for fun, but it's not the same. People with screen weariness miss meetings, which makes sense. Sometimes you're too busy on Slack to enjoy yourself.
We laugh in meetings, but it's not the same as face-to-face.
Digital social activities can't replace real-world ones
Improved Work-Life Balance, if You Let It
At the outset of the pandemic, I recognized I needed to take better care of myself to survive. After not leaving my apartment for a few days and feeling miserable, I decided to walk before work every day. This turned into a passion for exercise, and today I run or go to the gym before work. I use my commute time for healthful activities.
Working from home makes it easier to keep working after hours. I sometimes forget the time and find myself writing coding at dinnertime. I said, "One more test." This is a disadvantage, therefore I keep my office schedule.
Spend your commute time properly and keep to your office schedule.
Remote Pair Programming Is Hard
As a software developer, I regularly write code. My team sometimes uses pair programming to write code collaboratively. One person writes code while another watches, comments, and asks questions. I won't list them all here.
Internet pairing is difficult. My team struggles with this. Even with Tuple, it's challenging. I lose attention when I get a notification or check my computer.
I miss a pen and paper to rapidly sketch down my thoughts for a colleague or a whiteboard for spirited talks with others. Best answers are found through experience.
Real-life pair programming beats the best remote pair programming tools.
Lessons Learned
Here are 4 lessons I've learned working remotely for 2 years.
-
Socializing is more vital to my health than I anticipated.
-
Digital social activities can't replace in-person ones.
-
Spend your commute time properly and keep your office schedule.
-
Real-life pair programming beats the best remote tools.
Conclusion
Our era is fascinating. Remote labor has existed for years, but software companies have just recently had to adapt. Companies who don't offer remote work will lose talent, in my opinion.
We're still figuring out the finest software development approaches, programming language features, and communication methods since the 1960s. I can't wait to see what advancements assist us go into remote work.
I'll certainly work remotely in the next years, so I'm interested to see what I've learnt from this post then.
This post is a summary of this one.
Gill Pratt
4 years ago
War's Human Cost
War's Human Cost
I didn't start crying until I was outside a McDonald's in an Olempin, Poland rest area on highway S17.
Children pick toys at a refugee center, Olempin, Poland, March 4, 2022.
Refugee children, mostly alone with their mothers, but occasionally with a gray-haired grandfather or non-Ukrainian father, were coaxed into picking a toy from boxes provided by a kind-hearted company and volunteers.
I went to Warsaw to continue my research on my family's history during the Holocaust. In light of the ongoing Ukrainian conflict, I asked former colleagues in the US Department of Defense and Intelligence Community if it was safe to travel there. They said yes, as Poland was a NATO member.
I stayed in a hotel in the Warsaw Ghetto, where 90% of my mother's family was murdered in the Holocaust. Across the street was the first Warsaw Judenrat. It was two blocks away from the apartment building my mother's family had owned and lived in, now dilapidated and empty.
Building of my great-grandfather, December 2021.
A mass grave of thousands of rocks for those killed in the Warsaw Ghetto, I didn't cry when I touched its cold walls.
Warsaw Jewish Cemetery, 200,000–300,000 graves.
Mass grave, Warsaw Jewish Cemetery.
My mother's family had two homes, one in Warszawa and the rural one was a forest and sawmill complex in Western Ukraine. For the past half-year, a local Ukrainian historian had been helping me discover faint traces of her family’s life there — in fact, he had found some people still alive who remembered the sawmill and that it belonged to my mother’s grandfather. The historian was good at his job, and we had become close.
My historian friend, December 2021, talking to a Ukrainian.
With war raging, my second trip to Warsaw took on a different mission. To see his daughter and one-year-old grandson, I drove east instead of to Ukraine. They had crossed the border shortly after the war began, leaving men behind, and were now staying with a friend on Poland's eastern border.
I entered after walking up to the house and settling with the dog. The grandson greeted me with a huge smile and the Ukrainian word for “daddy,” “Tato!” But it was clear he was awaiting his real father's arrival, and any man he met would be so tentatively named.
After a few moments, the boy realized I was only a stranger. He had musical talent, like his mother and grandfather, both piano teachers, as he danced to YouTube videos of American children's songs dubbed in Ukrainian, picking the ones he liked and crying when he didn't.
Songs chosen by my historian friend's grandson, March 4, 2022
He had enough music and began crying regardless of the song. His mother picked him up and started nursing him, saying she was worried about him. She had no idea where she would live or how she would survive outside Ukraine. She showed me her father's family history of losses in the Holocaust, which matched my own research.
After an hour of drinking tea and trying to speak of hope, I left for the 3.5-hour drive west to Warsaw.
It was unlike my drive east. It was reminiscent of the household goods-filled carts pulled by horses and people fleeing war 80 years ago.
Jewish refugees relocating, USHMM Holocaust Encyclopaedia, 1939.
The carefully chosen trinkets by children to distract them from awareness of what is really happening and the anxiety of what lies ahead, made me cry despite all my research on the Holocaust. There is no way for them to communicate with their mothers, who are worried, absent, and without their fathers.
It's easy to see war as a contest of nations' armies, weapons, and land. The most costly aspect of war is its psychological toll. My father screamed in his sleep from nightmares of his own adolescent trauma in Warsaw 80 years ago.
Survivor father studying engineering, 1961.
In the airport, I waited to return home while Ukrainian public address systems announced refugee assistance. Like at McDonald's, many mothers were alone with their children, waiting for a flight to distant relatives.
That's when I had my worst trip experience.
A woman near me, clearly a refugee, answered her phone, cried out, and began wailing.
The human cost of war descended like a hammer, and I realized that while I was going home, she never would

Tim Soulo
3 years ago
Here is why 90.63% of Pages Get No Traffic From Google.
The web adds millions or billions of pages per day.
How much Google traffic does this content get?
In 2017, we studied 2 million randomly-published pages to answer this question. Only 5.7% of them ranked in Google's top 10 search results within a year of being published.
94.3 percent of roughly two million pages got no Google traffic.
Two million pages is a small sample compared to the entire web. We did another study.
We analyzed over a billion pages to see how many get organic search traffic and why.
How many pages get search traffic?
90% of pages in our index get no Google traffic, and 5.2% get ten visits or less.
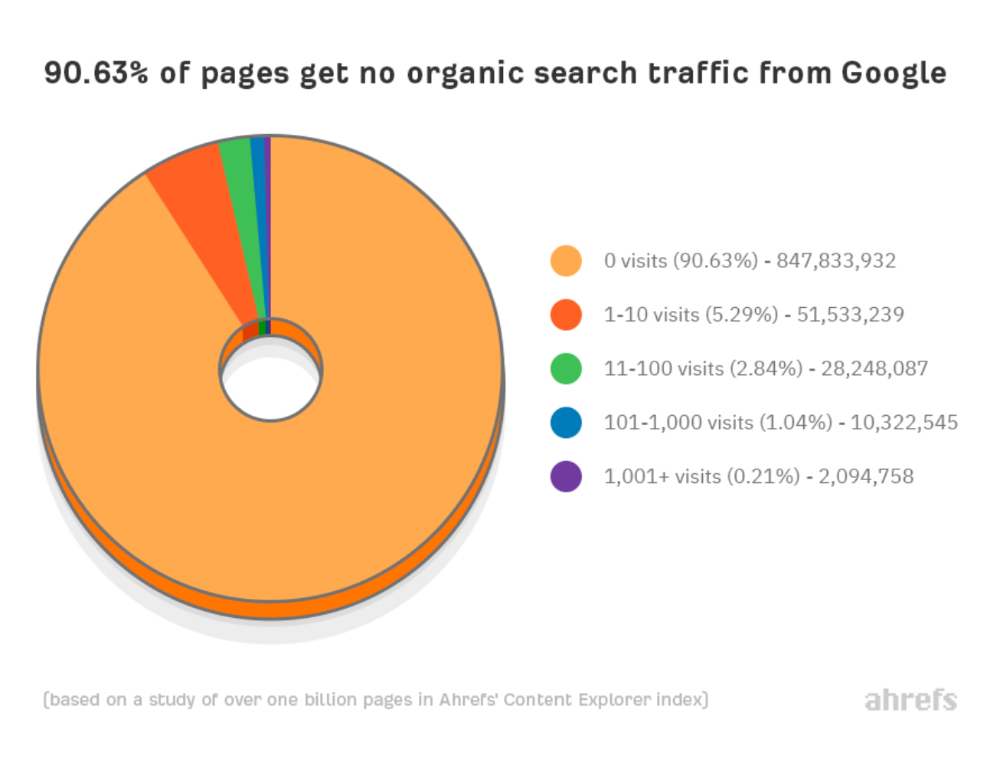
90% of google pages get no organic traffic
How can you join the minority that gets Google organic search traffic?
There are hundreds of SEO problems that can hurt your Google rankings. If we only consider common scenarios, there are only four.
Reason #1: No backlinks
I hate to repeat what most SEO articles say, but it's true:
Backlinks boost Google rankings.
Google's "top 3 ranking factors" include them.
Why don't we divide our studied pages by the number of referring domains?
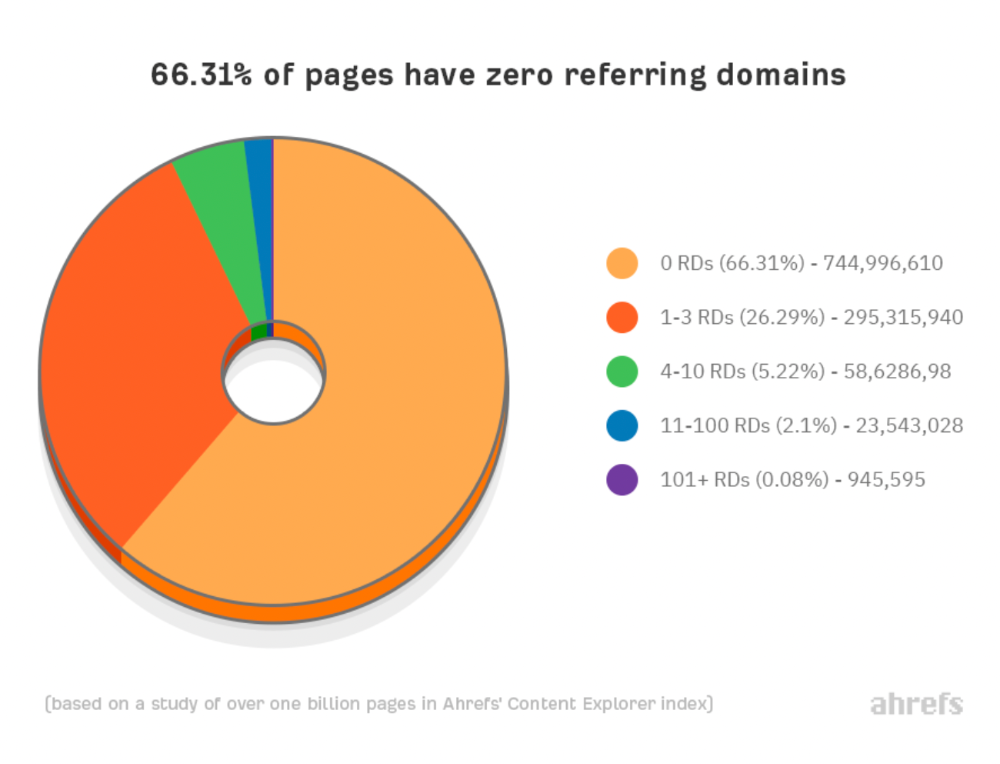
66.31 percent of pages have no backlinks, and 26.29 percent have three or fewer.
Did you notice the trend already?
Most pages lack search traffic and backlinks.
But are these the same pages?
Let's compare monthly organic search traffic to backlinks from unique websites (referring domains):

More backlinks equals more Google organic traffic.
Referring domains and keyword rankings are correlated.
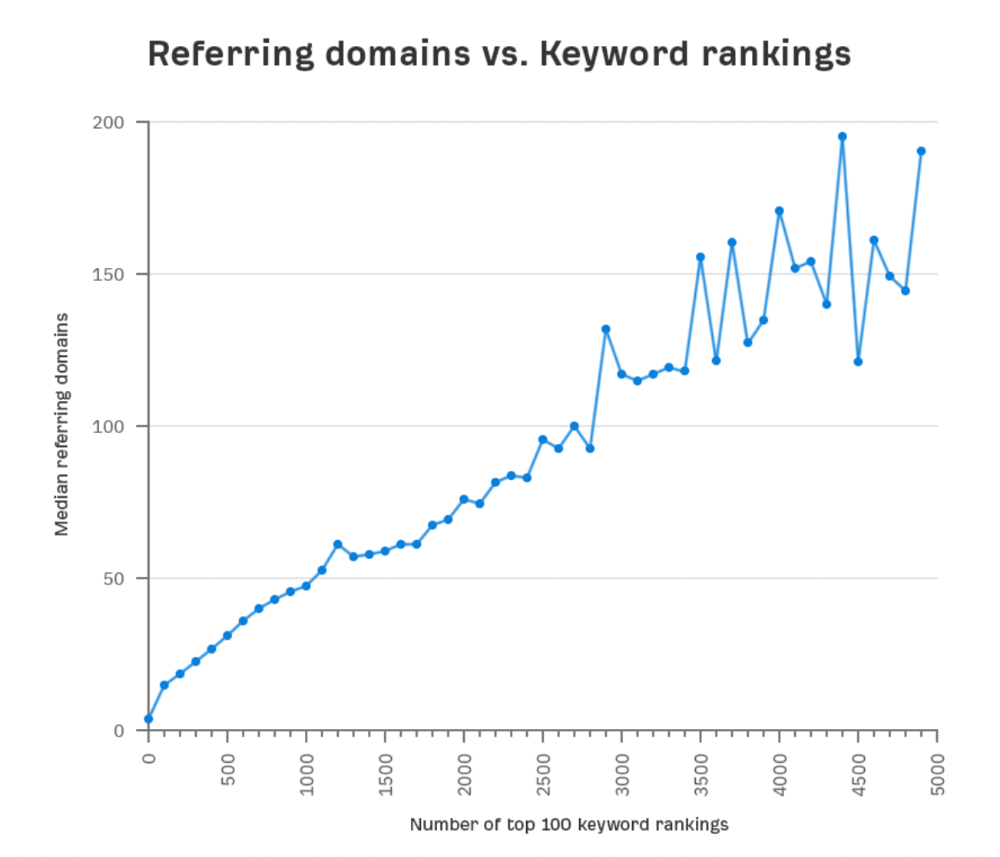
It's important to note that correlation does not imply causation, and none of these graphs prove backlinks boost Google rankings. Most SEO professionals agree that it's nearly impossible to rank on the first page without backlinks.
You'll need high-quality backlinks to rank in Google and get search traffic.
Is organic traffic possible without links?
Here are the numbers:
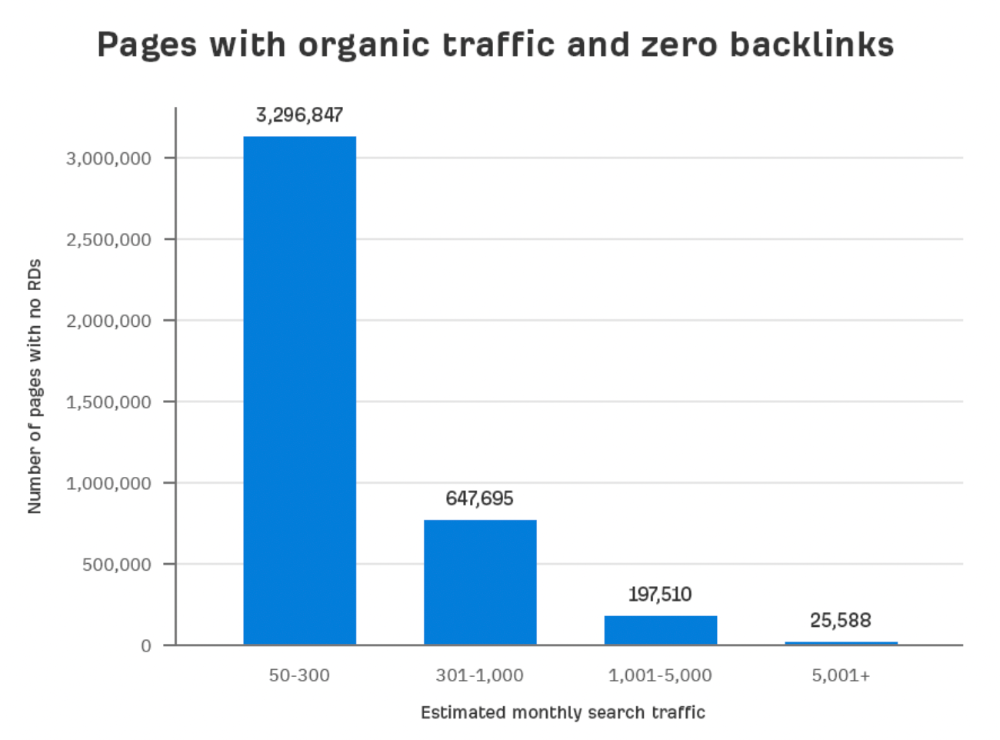
Four million pages get organic search traffic without backlinks. Only one in 20 pages without backlinks has traffic, which is 5% of our sample.
Most get 300 or fewer organic visits per month.
What happens if we exclude high-Domain-Rating pages?
The numbers worsen. Less than 4% of our sample (1.4 million pages) receive organic traffic. Only 320,000 get over 300 monthly organic visits, or 0.1% of our sample.
This suggests high-authority pages without backlinks are more likely to get organic traffic than low-authority pages.
Internal links likely pass PageRank to new pages.
Two other reasons:
Our crawler's blocked. Most shady SEOs block backlinks from us. This prevents competitors from seeing (and reporting) PBNs.
They choose low-competition subjects. Low-volume queries are less competitive, requiring fewer backlinks to rank.
If the idea of getting search traffic without building backlinks excites you, learn about Keyword Difficulty and how to find keywords/topics with decent traffic potential and low competition.
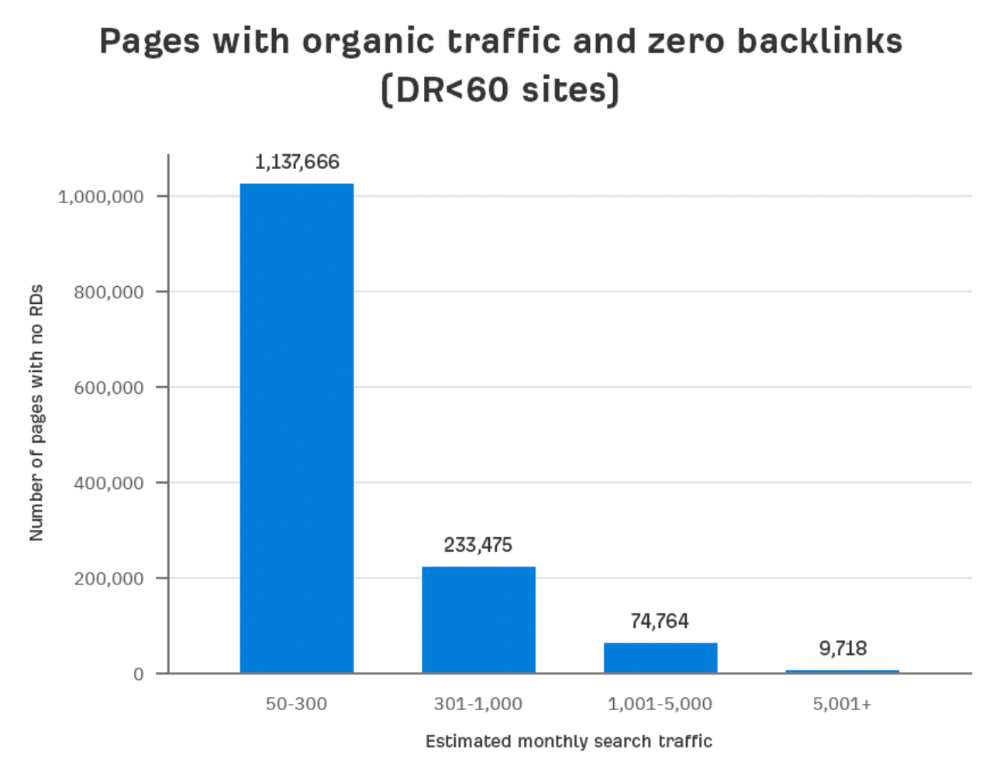
Reason #2: The page has no long-term traffic potential.
Some pages with many backlinks get no Google traffic.
Why? I filtered Content Explorer for pages with no organic search traffic and divided them into four buckets by linking domains.
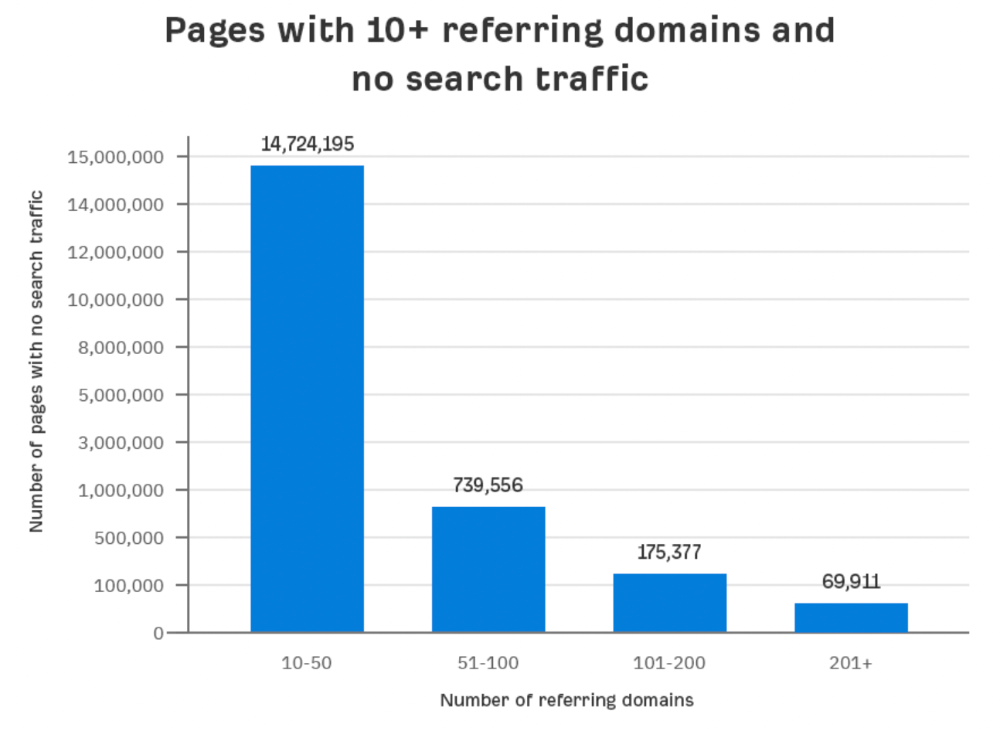
Almost 70k pages have backlinks from over 200 domains, but no search traffic.
By manually reviewing these (and other) pages, I noticed two general trends that explain why they get no traffic:
They overdid "shady link building" and got penalized by Google;
They're not targeting a Google-searched topic.
I won't elaborate on point one because I hope you don't engage in "shady link building"
#2 is self-explanatory:
If nobody searches for what you write, you won't get search traffic.
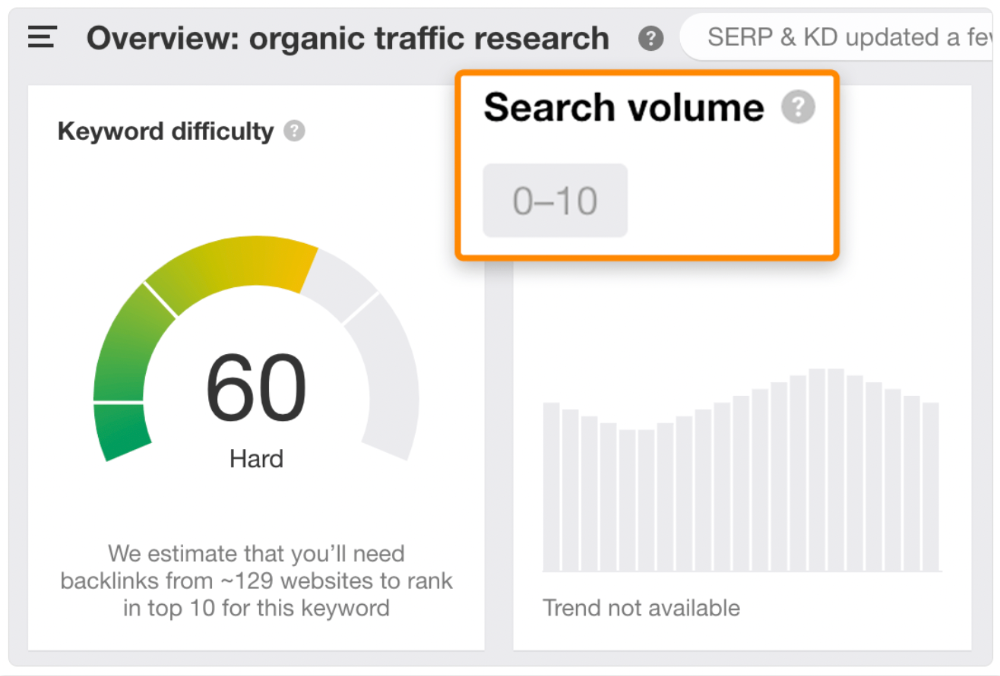
Consider one of our blog posts' metrics:

No organic traffic despite 337 backlinks from 132 sites.
The page is about "organic traffic research," which nobody searches for.
News articles often have this. They get many links from around the web but little Google traffic.
People can't search for things they don't know about, and most don't care about old events and don't search for them.
Note:
Some news articles rank in the "Top stories" block for relevant, high-volume search queries, generating short-term organic search traffic.
The Guardian's top "Donald Trump" story:
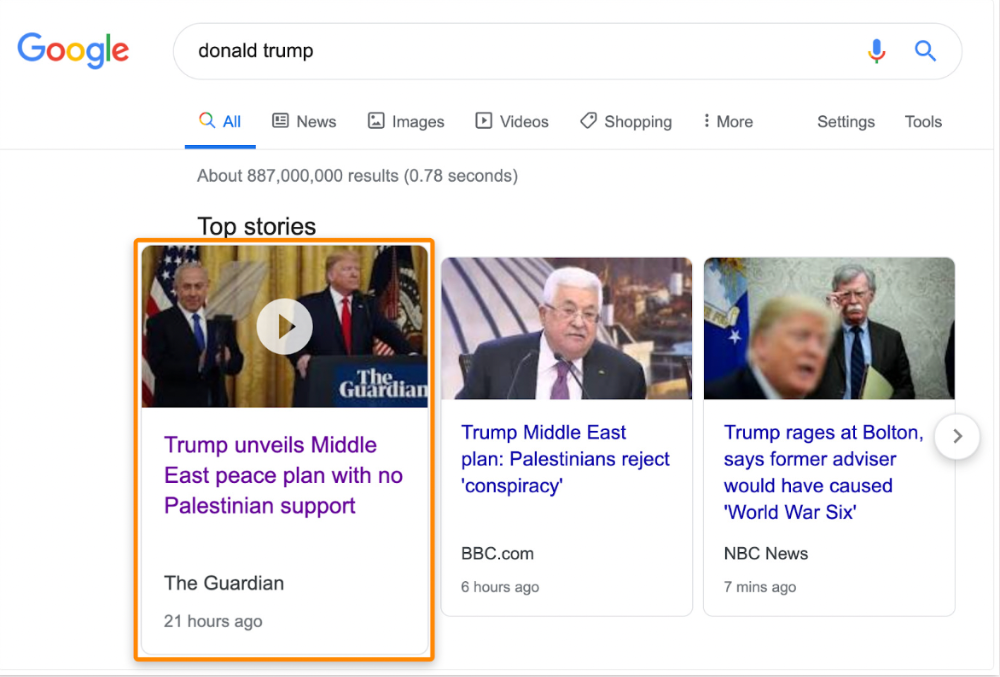
Ahrefs caught on quickly:
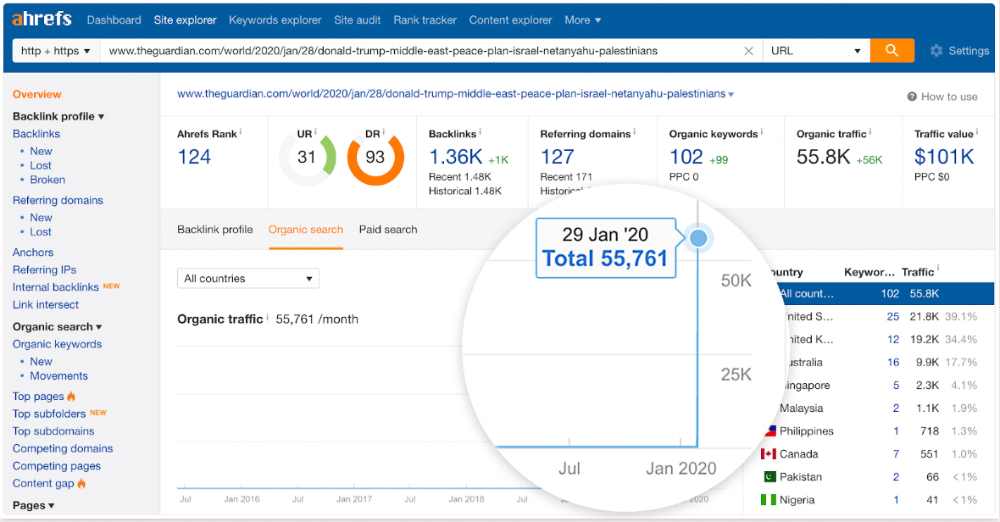
"Donald Trump" gets 5.6M monthly searches, so this page got a lot of "Top stories" traffic.
I bet traffic has dropped if you check now.
One of the quickest and most effective SEO wins is:
Find your website's pages with the most referring domains;
Do keyword research to re-optimize them for relevant topics with good search traffic potential.
Bryan Harris shared this "quick SEO win" during a course interview:
He suggested using Ahrefs' Site Explorer's "Best by links" report to find your site's most-linked pages and analyzing their search traffic. This finds pages with lots of links but little organic search traffic.
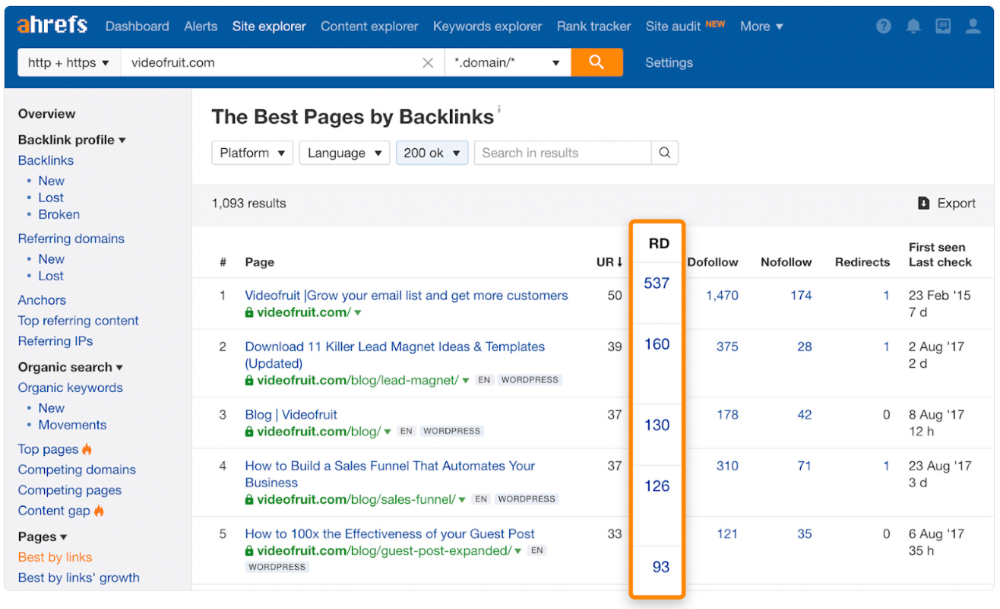
We see:
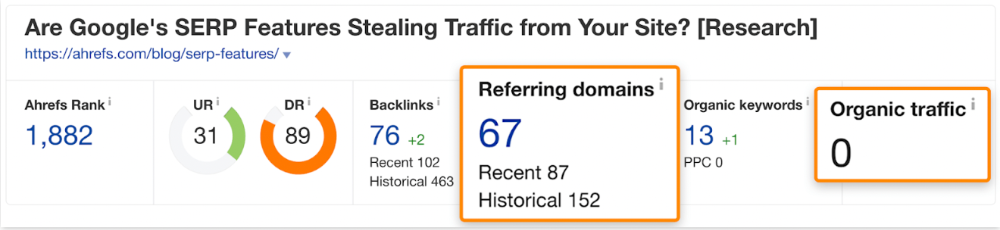
The guide has 67 backlinks but no organic traffic.
We could fix this by re-optimizing the page for "SERP"
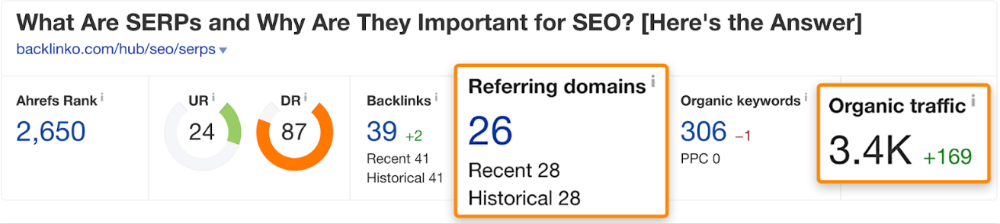
A similar guide with 26 backlinks gets 3,400 monthly organic visits, so we should easily increase our traffic.
Don't do this with all low-traffic pages with backlinks. Choose your battles wisely; some pages shouldn't be ranked.
Reason #3: Search intent isn't met
Google returns the most relevant search results.
That's why blog posts with recommendations rank highest for "best yoga mat."
Google knows that most searchers aren't buying.
It's also why this yoga mats page doesn't rank, despite having seven times more backlinks than the top 10 pages:
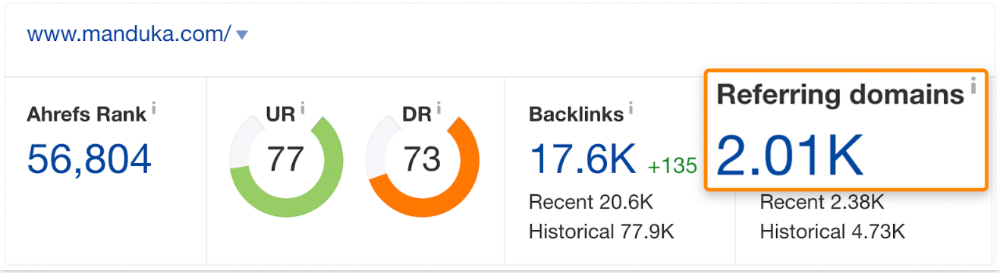
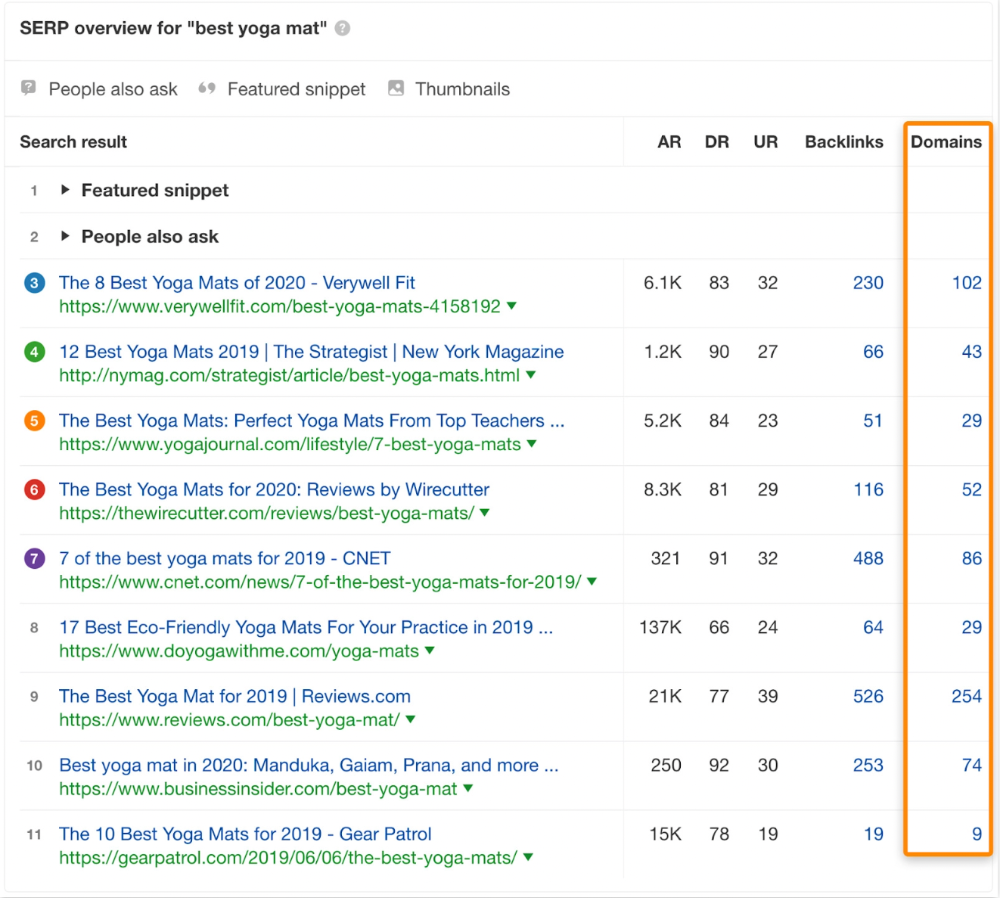
The page ranks for thousands of other keywords and gets tens of thousands of monthly organic visits. Not being the "best yoga mat" isn't a big deal.
If you have pages with lots of backlinks but no organic traffic, re-optimizing them for search intent can be a quick SEO win.
It was originally a boring landing page describing our product's benefits and offering a 7-day trial.
We realized the problem after analyzing search intent.
People wanted a free tool, not a landing page.
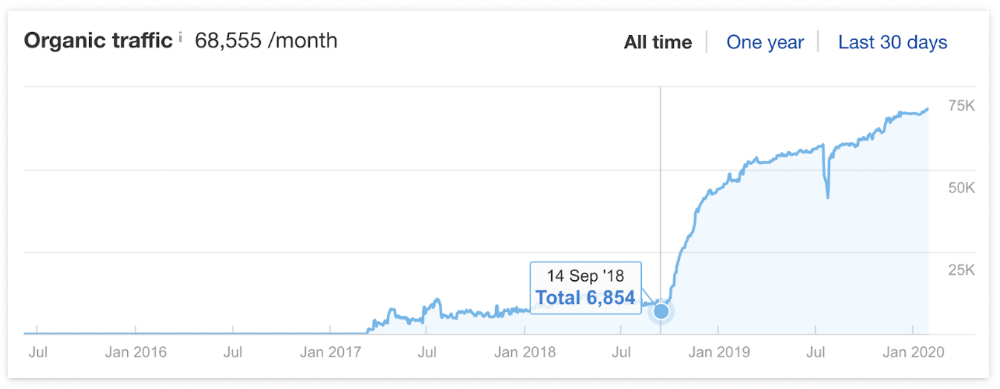
In September 2018, we published a free tool at the same URL. Organic traffic and rankings skyrocketed.
Reason #4: Unindexed page
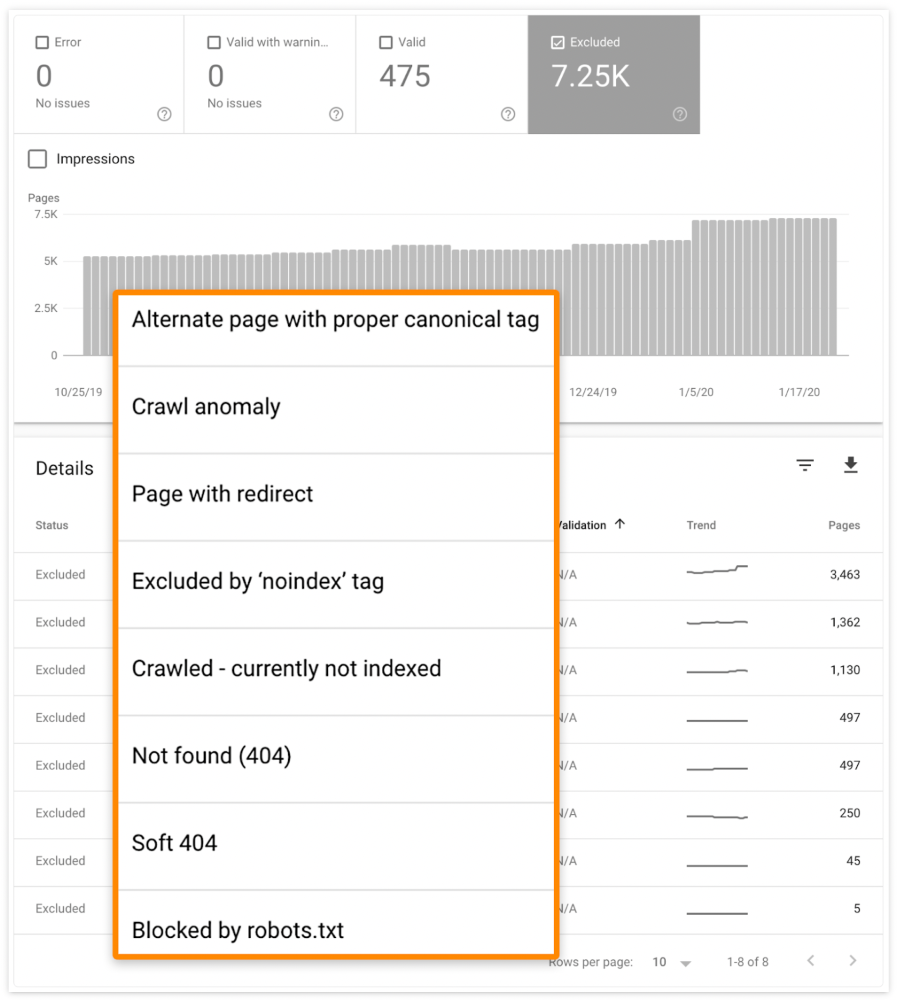
Google can’t rank pages that aren’t indexed.
If you think this is the case, search Google for site:[url]. You should see at least one result; otherwise, it’s not indexed.
A rogue noindex meta tag is usually to blame. This tells search engines not to index a URL.
Rogue canonicals, redirects, and robots.txt blocks prevent indexing.
Check the "Excluded" tab in Google Search Console's "Coverage" report to see excluded pages.
Google doesn't index broken pages, even with backlinks.
Surprisingly common.
In Ahrefs' Site Explorer, the Best by Links report for a popular content marketing blog shows many broken pages.
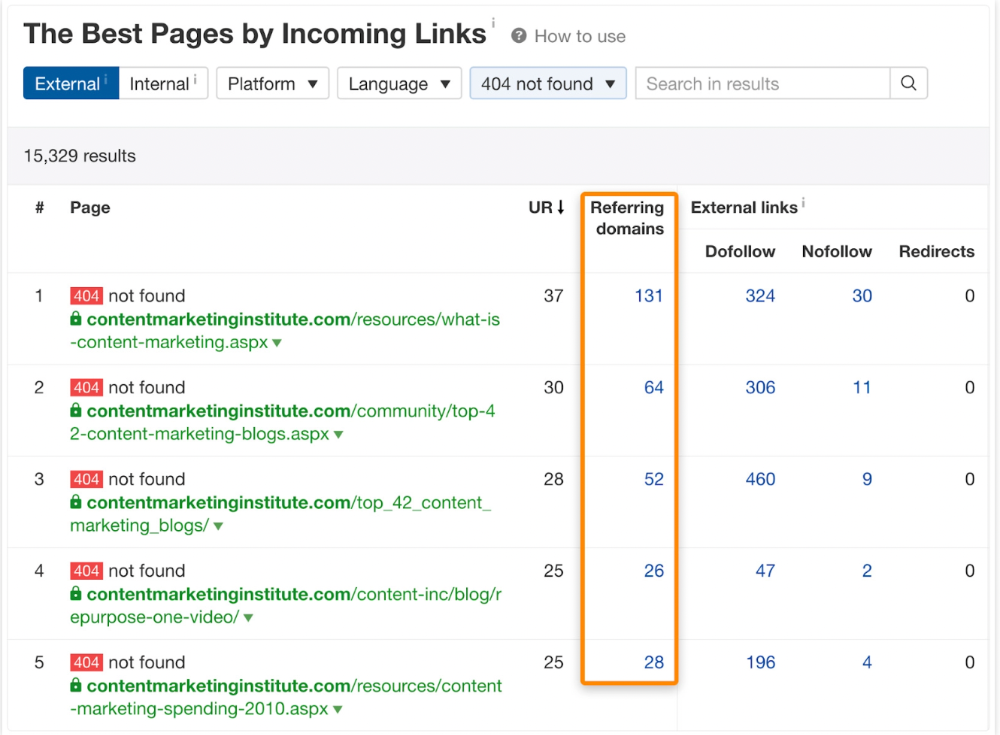
One dead page has 131 backlinks:

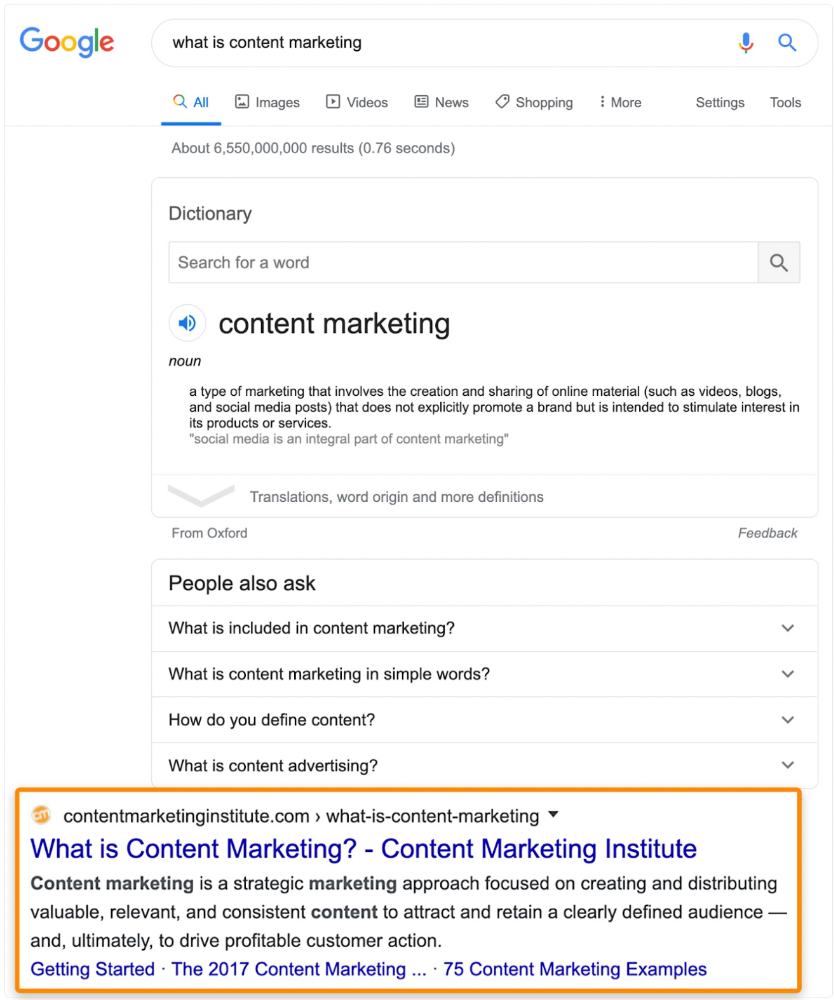
According to the URL, the page defined content marketing. —a keyword with a monthly search volume of 5,900 in the US.
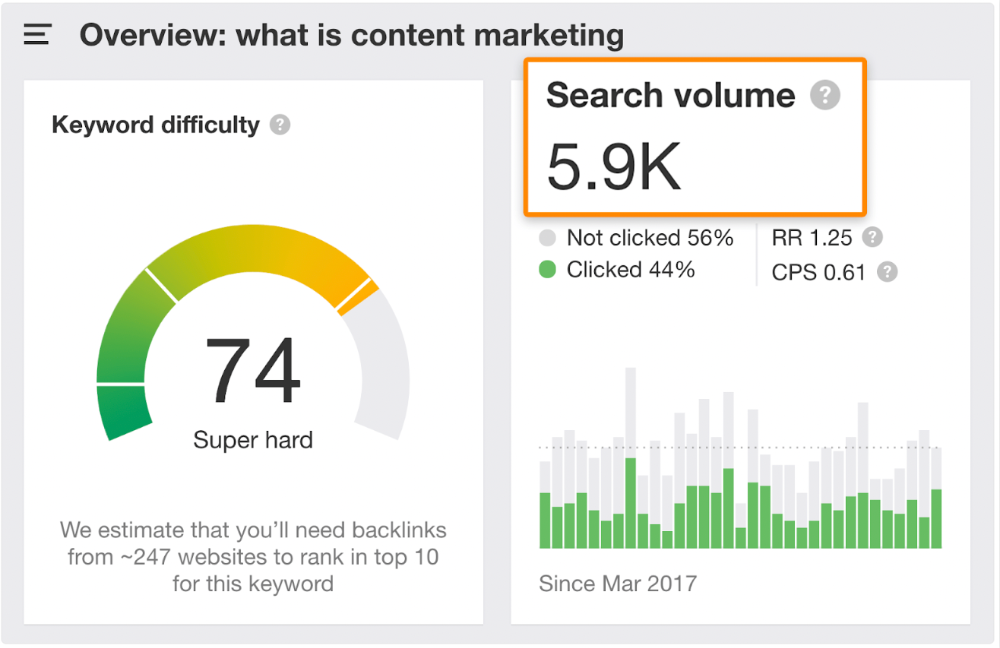
Luckily, another page ranks for this keyword. Not a huge loss.
At least redirect the dead page's backlinks to a working page on the same topic. This may increase long-tail keyword traffic.
This post is a summary. See the original post here