


More on Marketing

Jano le Roux
3 years ago
Here's What I Learned After 30 Days Analyzing Apple's Microcopy
Move people with tiny words.
Apple fanboy here.
Macs are awesome.
Their iPhones rock.
$19 cloths are great.
$999 stands are amazing.
I love Apple's microcopy even more.
It's like the marketing goddess bit into the Apple logo and blessed the world with microcopy.
I took on a 30-day micro-stalking mission.
Every time I caught myself wasting time on YouTube, I had to visit Apple’s website to learn the secrets of the marketing goddess herself.
We've learned. Golden apples are calling.
Cut the friction
Benefit-first, not commitment-first.
Brands lose customers through friction.
Most brands don't think like customers.
Brands want sales.
Brands want newsletter signups.
Here's their microcopy:
“Buy it now.”
“Sign up for our newsletter.”
Both are difficult. They ask for big commitments.
People are simple creatures. Want pleasure without commitment.
Apple nails this.
So, instead of highlighting the commitment, they highlight the benefit of the commitment.
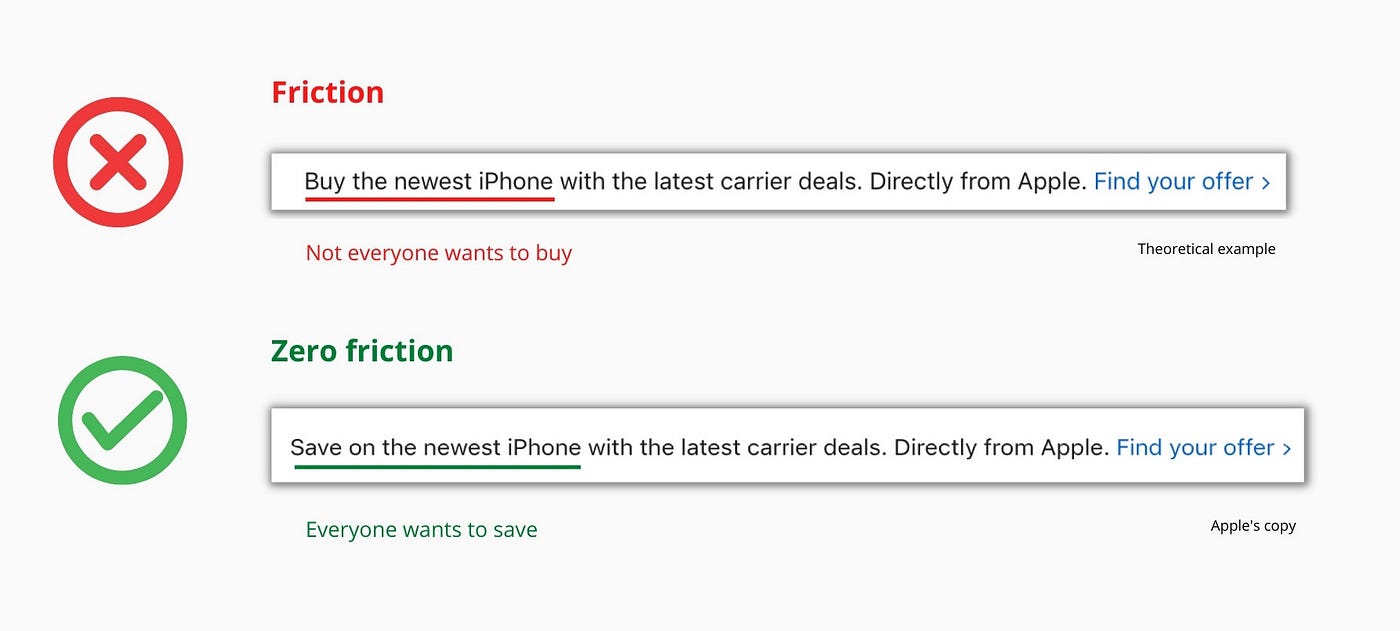
Saving on the latest iPhone sounds easier than buying it. Everyone saves, but not everyone buys.
A subtle change in framing reduces friction.
Apple eliminates customer objections to reduce friction.
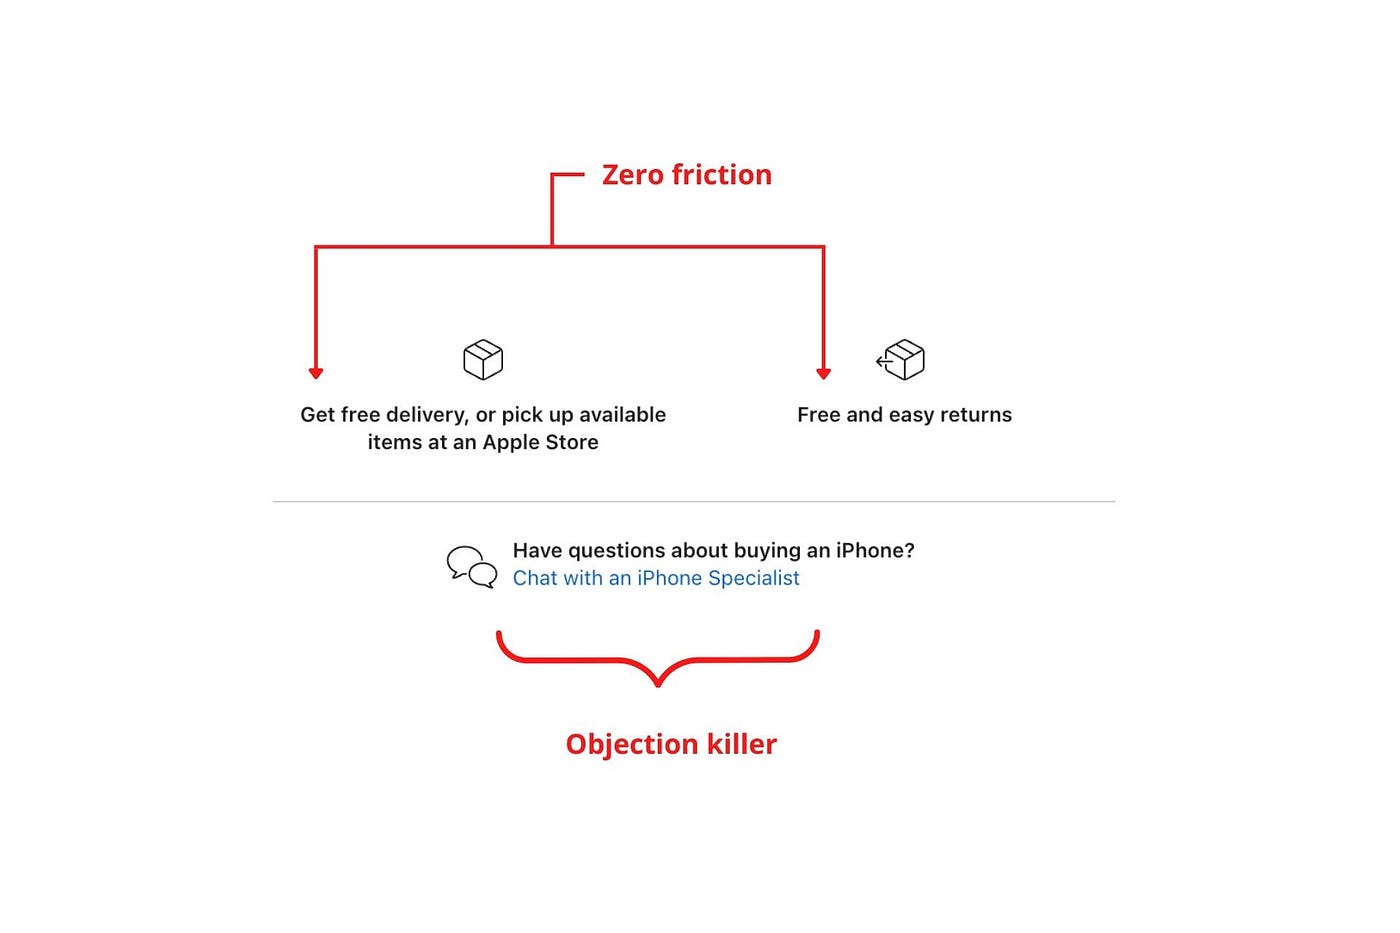
Less customer friction means simpler processes.
Apple's copy expertly reassures customers about shipping fees and not being home. Apple assures customers that returning faulty products is easy.
Apple knows that talking to a real person is the best way to reduce friction and improve their copy.
Always rhyme
Learn about fine rhyme.
Poets make things beautiful with rhyme.
Copywriters use rhyme to stand out.
Apple’s copywriters have mastered the art of corporate rhyme.
Two techniques are used.
1. Perfect rhyme
Here, rhymes are identical.

2. Imperfect rhyme
Here, rhyming sounds vary.

Apple prioritizes meaning over rhyme.
Apple never forces rhymes that don't fit.
It fits so well that the copy seems accidental.
Add alliteration
Alliteration always entertains.
Alliteration repeats initial sounds in nearby words.
Apple's copy uses alliteration like no other brand I've seen to create a rhyming effect or make the text more fun to read.
For example, in the sentence "Sam saw seven swans swimming," the initial "s" sound is repeated five times. This creates a pleasing rhythm.
Microcopy overuse is like pouring ketchup on a Michelin-star meal.
Alliteration creates a memorable phrase in copywriting. It's subtler than rhyme, and most people wouldn't notice; it simply resonates.
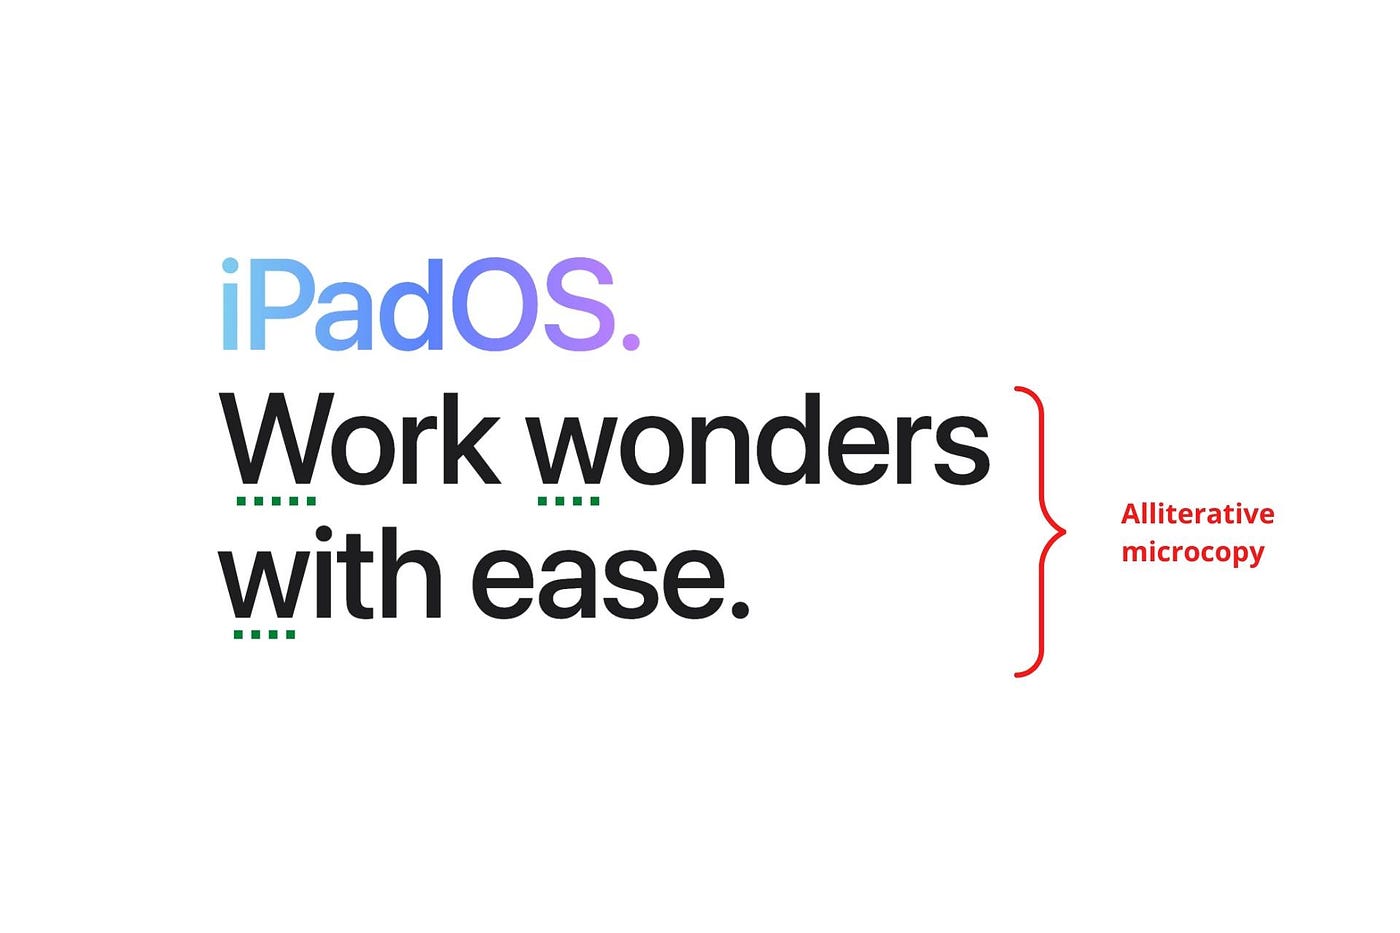
I love how Apple uses alliteration and contrast between "wonders" and "ease".
Assonance, or repeating vowels, isn't Apple's thing.
You ≠ Hero, Customer = Hero
Your brand shouldn't be the hero.
Because they'll be using your product or service, your customer should be the hero of your copywriting. With your help, they should feel like they can achieve their goals.
I love how Apple emphasizes what you can do with the machine in this microcopy.

It's divine how they position their tools as sidekicks to help below.

This one takes the cake:

Dialogue-style writing
Conversational copy engages.
Excellent copy Like sharing gum with a friend.
This helps build audience trust.
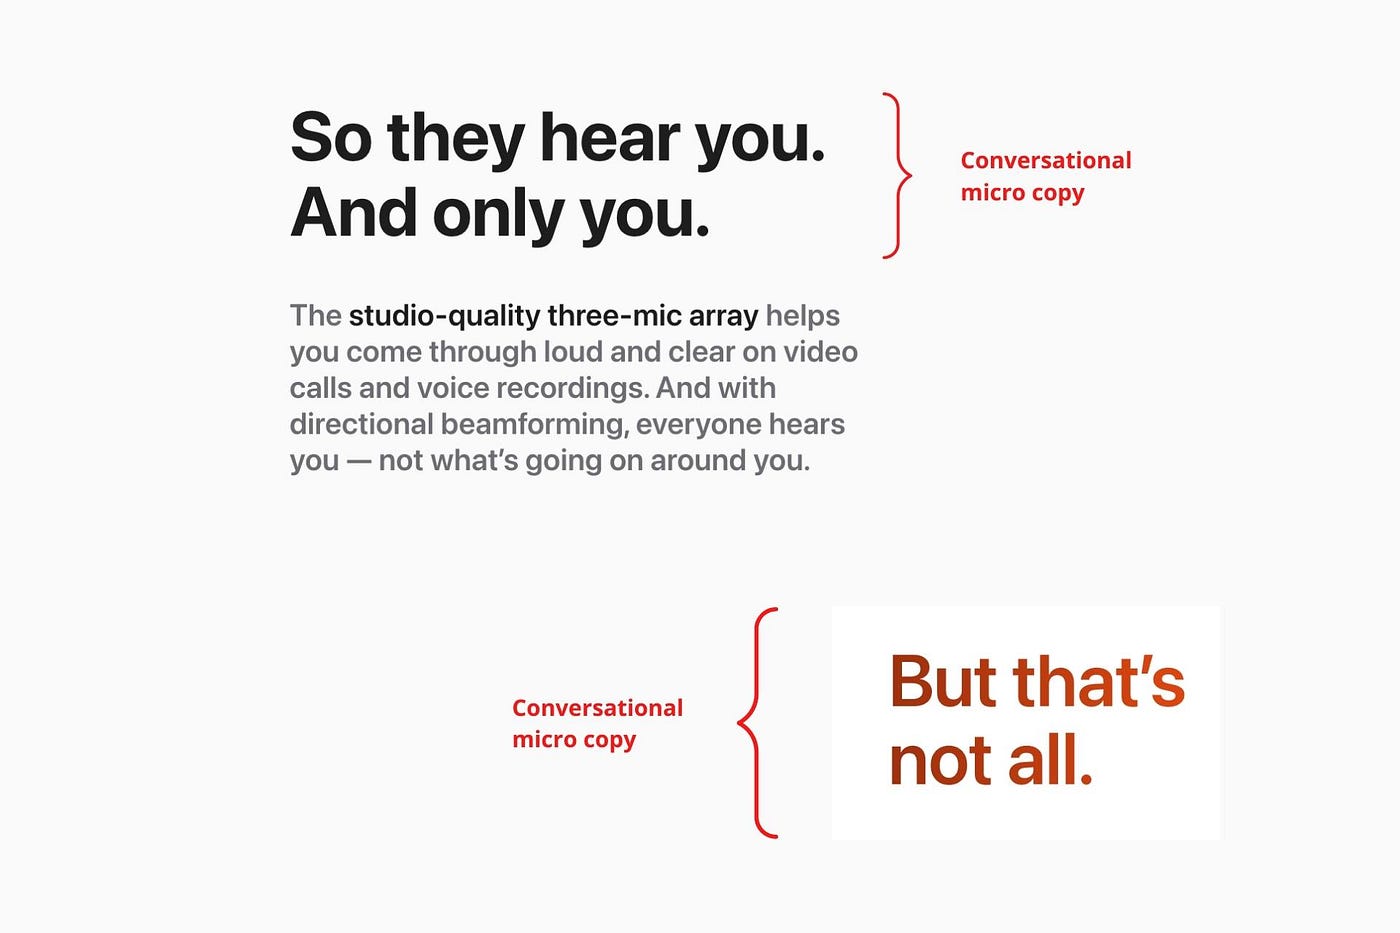
Apple does this by using natural connecting words like "so" and phrases like "But that's not all."
Snowclone-proof
The mother of all microcopy techniques.
A snowclone uses an existing phrase or sentence to create a new one. The new phrase or sentence uses the same structure but different words.
It’s usually a well know saying like:
To be or not to be.
This becomes a formula:
To _ or not to _.
Copywriters fill in the blanks with cause-related words. Example:
To click or not to click.

Apple turns "survival of the fittest" into "arrival of the fittest."
It's unexpected and surprises the reader.
So this was fun.
But my fun has just begun.
Microcopy is 21st-century poetry.
I came as an Apple fanboy.
I leave as an Apple fanatic.
Now I’m off to find an apple tree.
Cause you know how it goes.
(Apples, trees, etc.)
This post is a summary. Original post available here.

Emma Jade
3 years ago
6 hacks to create content faster
Content gurus' top time-saving hacks.

I'm a content strategist, writer, and graphic designer. Time is more valuable than money.
Money is always available. Even if you're poor. Ways exist.
Time is passing, and one day we'll run out.
Sorry to be morbid.
In today's digital age, you need to optimize how you create content for your organization. Here are six content creation hacks.
1. Use templates
Use templates to streamline your work whether generating video, images, or documents.
Setup can take hours. Using a free resource like Canva, you can create templates for any type of material.
This will save you hours each month.
2. Make a content calendar
You post without a plan? A content calendar solves 50% of these problems.
You can prepare, organize, and plan your material ahead of time so you're not scrambling when you remember, "Shit, it's Mother's Day!"
3. Content Batching
Batching content means creating a lot in one session. This is helpful for video content that requires a lot of setup time.
Batching monthly content saves hours. Time is a valuable resource.
When working on one type of task, it's easy to get into a flow state. This saves time.
4. Write Caption
On social media, we generally choose the image first and then the caption. Writing captions first sometimes work better, though.
Writing the captions first can allow you more creative flexibility and be easier if you're not excellent with language.
Say you want to tell your followers something interesting.
Writing a caption first is easier than choosing an image and then writing a caption to match.
Not everything works. You may have already-created content that needs captioning. When you don't know what to share, think of a concept, write the description, and then produce a video or graphic.
Cats can be skinned in several ways..
5. Repurpose
Reuse content when possible. You don't always require new stuff. In fact, you’re pretty stupid if you do #SorryNotSorry.
Repurpose old content. All those blog entries, videos, and unfinished content on your desk or hard drive.
This blog post can be turned into a social media infographic. Canva's motion graphic function can animate it. I can record a YouTube video regarding this issue for a podcast. I can make a post on each point in this blog post and turn it into an eBook or paid course.
And it doesn’t stop there.
My point is, to think outside the box and really dig deep into ways you can leverage the content you’ve already created.
6. Schedule Them
If you're still manually posting content, get help. When you batch your content, schedule it ahead of time.
Some scheduling apps are free or cheap. No excuses.
Don't publish and ghost.
Scheduling saves time by preventing you from doing it manually. But if you never engage with your audience, the algorithm won't reward your material.
Be online and engage your audience.
Content Machine
Use these six content creation hacks. They help you succeed and save time.

Jenn Leach
3 years ago
This clever Instagram marketing technique increased my sales to $30,000 per month.
No Paid Ads Required

I had an online store. After a year of running the company alongside my 9-to-5, I made enough to resign.
That day was amazing.
This Instagram marketing plan helped the store succeed.
How did I increase my sales to five figures a month without using any paid advertising?
I used customer event marketing.
I'm not sure this term exists. I invented it to describe what I was doing.
Instagram word-of-mouth, fan engagement, and interaction drove sales.
If a customer liked or disliked a product, the buzz would drive attention to the store.
I used customer-based events to increase engagement and store sales.
Success!
Here are the weekly Instagram customer events I coordinated while running my business:
Be the Buyer Days
Flash sales
Mystery boxes
Be the Buyer Days: How do they work?
Be the Buyer Days are exactly that.
You choose a day to share stock selections with social media followers.
This is an easy approach to engaging customers and getting fans enthusiastic about new releases.
First, pick a handful of items you’re considering ordering. I’d usually pick around 3 for Be the Buyer Day.
Then I'd poll the crowd on Instagram to vote on their favorites.
This was before Instagram stories, polls, and all the other cool features Instagram offers today. I think using these tools now would make this event even better.
I'd ask customers their favorite back then.
The growing comments excited customers.
Then I'd declare the winner, acquire the products, and start selling it.
How do flash sales work?
I mostly ran flash sales.
You choose a limited number of itemsdd for a few-hour sale.
We wanted most sales to result in sold-out items.
When an item sells out, it contributes to the sensation of scarcity and can inspire customers to visit your store to buy a comparable product, join your email list, become a fan, etc.
We hoped they'd act quickly.
I'd hold flash deals twice a week, which generated scarcity and boosted sales.
The store had a few thousand Instagram followers when I started flash deals.
Each flash sale item would make $400 to $600.
$400 x 3= $1,200
That's $1,200 on social media!
Twice a week, you'll make roughly $10K a month from Instagram.
$1,200/day x 8 events/month=$9,600
Flash sales did great.
We held weekly flash deals and sent social media and email reminders. That’s about it!
How are mystery boxes put together?
All you do is package a box of store products and sell it as a mystery box on TikTok or retail websites.
A $100 mystery box would cost $30.
You're discounting high-value boxes.
This is a clever approach to get rid of excess inventory and makes customers happy.
It worked!
Be the Buyer Days, flash deals, and mystery boxes helped build my company without paid advertisements.
All companies can use customer event marketing. Involving customers and providing an engaging environment can boost sales.
Try it!
You might also like
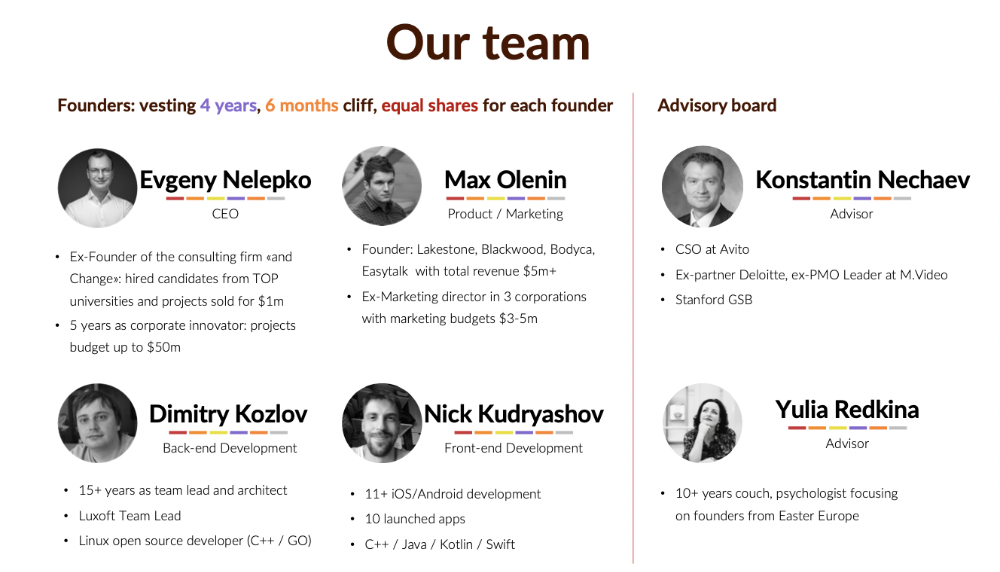
Evgenii Nelepko
3 years ago
My 3 biggest errors as a co-founder and CEO
Reflections on the closed company Hola! Dating app
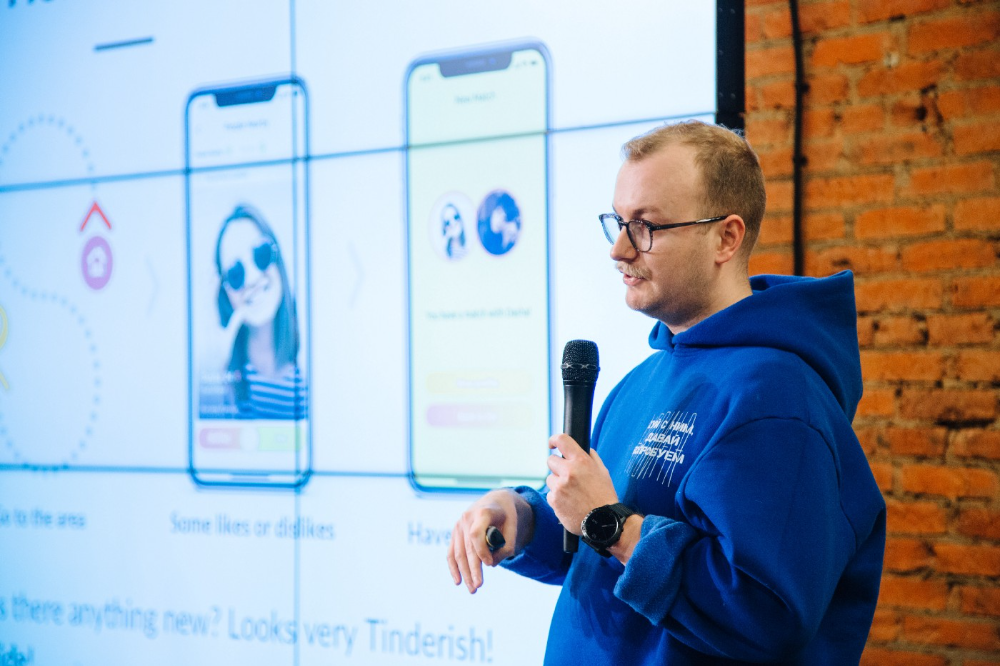
I'll discuss my fuckups as an entrepreneur and CEO. All of them refer to the dating app Hola!, which I co-founded and starred in.
Spring 2021 was when we started. Two techies and two non-techies created a dating app. Pokemon Go and Tinder were combined.
Online dating is a business, and it takes two weeks from a like to a date. We questioned online dating app users if they met anyone offline last year.
75% replied yes, 50% sometimes, 25% usually.
Offline dating is popular, yet people have concerns.
Men are reluctant to make mistakes in front of others.
Women are curious about the background of everyone who approaches them.
We designed unique mechanics that let people date after a match. No endless chitchat. Women would be safe while men felt like cowboys.
I wish to emphasize three faults that lead to founders' estrangement.
This detachment ultimately led to us shutting down the company.
The wrong technology stack
Situation
Instead of generating a faster MVP and designing an app in a universal stack for iOS and Android, I argued we should pilot the app separately for iOS and Android. Technical founders' expertise made this possible.
Self-reflection
Mistaken strategy. We lost time and resources developing two apps at once. We chose iOS since it's more profitable. Apple took us out after the release, citing Guideline 4.3 Spam. After 4 months, we had nothing. We had a long way to go to get the app on Android and the Store.
I suggested creating a uniform platform for the company's growth. This makes parallel product development easier. The strategist's lack of experience and knowledge made it a piece of crap.
What would I have changed if I could?
We should have designed an Android universal stack. I expected Apple to have issues with a dating app.
Our approach should have been to launch something and subsequently improve it, but prejudice won.
The lesson
Discuss the IT stack with your CTO. It saves time and money. Choose the easiest MVP method.

2. A tardy search for investments
Situation
Though the universe and other founders encouraged me to locate investors first, I started pitching when we almost had an app.
When angels arrived, it was time to close. The app was banned, war broke out, I left the country, and the other co-founders stayed. We had no savings.
Self-reflection
I loved interviewing users. I'm proud of having done 1,000 interviews. I wanted to understand people's pain points and improve the product.
Interview results no longer affected the product. I was terrified to start pitching. I filled out accelerator applications and redid my presentation. You must go through that so you won't be terrified later.
What would I have changed if I could?
Get an external or internal mentor to help me with my first pitch as soon as possible. I'd be supported if criticized. He'd cheer with me if there was enthusiasm.
In 99% of cases, I'm comfortable jumping into the unknown, but there are exceptions. The mentor's encouragement would have prompted me to act sooner.
The lesson
Begin fundraising immediately. Months may pass. Show investors your pre-MVP project. Draw inferences from feedback.
3. Role ambiguity
Situation
My technical co-founders were also part-time lead developers, which produced communication issues. As co-founders, we communicated well and recognized the problems. Stakes, vesting, target markets, and approach were agreed upon.
We were behind schedule. Technical debt and strategic gap grew.
Bi-daily and weekly reviews didn't help. Each time, there were explanations. Inside, I was freaking out.
Self-reflection
I am a fairly easy person to talk to. I always try to stick to agreements; otherwise, my head gets stuffed with unnecessary information, interpretations, and emotions.
Sit down -> talk -> decide -> do -> evaluate the results. Repeat it.
If I don't get detailed comments, I start ruining everyone's mood. If there's a systematic violation of agreements without a good justification, I won't join the project or I'll end the collaboration.
What would I have done otherwise?
This is where it’s scariest to draw conclusions. Probably the most logical thing would have been not to start the project as we started it. But that was already a completely different project. So I would not have done anything differently and would have failed again.
But I drew conclusions for the future.
The lesson
First-time founders should find an adviser or team coach for a strategic session. It helps split the roles and responsibilities.

ANDREW SINGER
3 years ago
Crypto seen as the ‘future of money’ in inflation-mired countries
Crypto as the ‘future of money' in inflation-stricken nations
Citizens of devalued currencies “need” crypto. “Nice to have” in the developed world.
According to Gemini's 2022 Global State of Crypto report, cryptocurrencies “evolved from what many considered a niche investment into an established asset class” last year.
More than half of crypto owners in Brazil (51%), Hong Kong (51%), and India (54%), according to the report, bought cryptocurrency for the first time in 2021.
The study found that inflation and currency devaluation are powerful drivers of crypto adoption, especially in emerging market (EM) countries:
“Respondents in countries that have seen a 50% or greater devaluation of their currency against the USD over the last decade were more than 5 times as likely to plan to purchase crypto in the coming year.”
Between 2011 and 2021, the real lost 218 percent of its value against the dollar, and 45 percent of Brazilians surveyed by Gemini said they planned to buy crypto in 2019.
The rand (South Africa's currency) has fallen 103 percent in value over the last decade, second only to the Brazilian real, and 32 percent of South Africans expect to own crypto in the coming year. Mexico and India, the third and fourth highest devaluation countries, followed suit.
Compared to the US dollar, Hong Kong and the UK currencies have not devalued in the last decade. Meanwhile, only 5% and 8% of those surveyed in those countries expressed interest in buying crypto.
What can be concluded? Noah Perlman, COO of Gemini, sees various crypto use cases depending on one's location.
‘Need to have' investment in countries where the local currency has devalued against the dollar, whereas in the developed world it is still seen as a ‘nice to have'.
Crypto as money substitute
As an adjunct professor at New York University School of Law, Winston Ma distinguishes between an asset used as an inflation hedge and one used as a currency replacement.
Unlike gold, he believes Bitcoin (BTC) is not a “inflation hedge”. They acted more like growth stocks in 2022. “Bitcoin correlated more closely with the S&P 500 index — and Ether with the NASDAQ — than gold,” he told Cointelegraph. But in the developing world, things are different:
“Inflation may be a primary driver of cryptocurrency adoption in emerging markets like Brazil, India, and Mexico.”
According to Justin d'Anethan, institutional sales director at the Amber Group, a Singapore-based digital asset firm, early adoption was driven by countries where currency stability and/or access to proper banking services were issues. Simply put, he said, developing countries want alternatives to easily debased fiat currencies.
“The larger flows may still come from institutions and developed countries, but the actual users may come from places like Lebanon, Turkey, Venezuela, and Indonesia.”
“Inflation is one of the factors that has and continues to drive adoption of Bitcoin and other crypto assets globally,” said Sean Stein Smith, assistant professor of economics and business at Lehman College.
But it's only one factor, and different regions have different factors, says Stein Smith. As a “instantaneously accessible, traceable, and cost-effective transaction option,” investors and entrepreneurs increasingly recognize the benefits of crypto assets. Other places promote crypto adoption due to “potential capital gains and returns”.
According to the report, “legal uncertainty around cryptocurrency,” tax questions, and a general education deficit could hinder adoption in Asia Pacific and Latin America. In Africa, 56% of respondents said more educational resources were needed to explain cryptocurrencies.
Not only inflation, but empowering our youth to live better than their parents without fear of failure or allegiance to legacy financial markets or products, said Monica Singer, ConsenSys South Africa lead. Also, “the issue of cash and remittances is huge in Africa, as is the issue of social grants.”
Money's future?
The survey found that Brazil and Indonesia had the most cryptocurrency ownership. In each country, 41% of those polled said they owned crypto. Only 20% of Americans surveyed said they owned cryptocurrency.
These markets are more likely to see cryptocurrencies as the future of money. The survey found:
“The majority of respondents in Latin America (59%) and Africa (58%) say crypto is the future of money.”
Brazil (66%), Nigeria (63%), Indonesia (61%), and South Africa (57%). Europe and Australia had the fewest believers, with Denmark at 12%, Norway at 15%, and Australia at 17%.
Will the Ukraine conflict impact adoption?
The poll was taken before the war. Will the devastating conflict slow global crypto adoption growth?
With over $100 million in crypto donations directly requested by the Ukrainian government since the war began, Stein Smith says the war has certainly brought crypto into the mainstream conversation.
“This real-world demonstration of decentralized money's power could spur wider adoption, policy debate, and increased use of crypto as a medium of exchange.”
But the war may not affect all developing nations. “The Ukraine war has no impact on African demand for crypto,” Others loom larger. “Yes, inflation, but also a lack of trust in government in many African countries, and a young demographic very familiar with mobile phones and the internet.”
A major success story like Mpesa in Kenya has influenced the continent and may help accelerate crypto adoption. Creating a plan when everyone you trust fails you is directly related to the African spirit, she said.
On the other hand, Ma views the Ukraine conflict as a sort of crisis check for cryptocurrencies. For those in emerging markets, the Ukraine-Russia war has served as a “stress test” for the cryptocurrency payment rail, he told Cointelegraph.
“These emerging markets may see the greatest future gains in crypto adoption.”
Inflation and currency devaluation are persistent global concerns. In such places, Bitcoin and other cryptocurrencies are now seen as the “future of money.” Not in the developed world, but that could change with better regulation and education. Inflation and its impact on cash holdings are waking up even Western nations.
Read original post here.

Pen Magnet
3 years ago
Why Google Staff Doesn't Work

Sundar Pichai unveiled Simplicity Sprint at Google's latest all-hands conference.
To boost employee efficiency.
Not surprising. Few envisioned Google declaring a productivity drive.
Sunder Pichai's speech:
“There are real concerns that our productivity as a whole is not where it needs to be for the head count we have. Help me create a culture that is more mission-focused, more focused on our products, more customer focused. We should think about how we can minimize distractions and really raise the bar on both product excellence and productivity.”
The primary driver driving Google's efficiency push is:
Google's efficiency push follows 13% quarterly revenue increase. Last year in the same quarter, it was 62%.
Market newcomers may argue that the previous year's figure was fuelled by post-Covid reopening and growing consumer spending. Investors aren't convinced. A promising company like Google can't afford to drop so quickly.
Google’s quarterly revenue growth stood at 13%, against 62% in last year same quarter.
Google isn't alone. In my recent essay regarding 2025 programmers, I warned about the economic downturn's effects on FAAMG's workforce. Facebook had suspended hiring, and Microsoft had promised hefty bonuses for loyal staff.
In the same article, I predicted Google's troubles. Online advertising, especially the way Google and Facebook sell it using user data, is over.
FAAMG and 2nd rung IT companies could be the first to fall without Post-COVID revival and uncertain global geopolitics.
Google has hardly ever discussed effectiveness:
Apparently openly.
Amazon treats its employees like robots, even in software positions. It has significant turnover and a terrible reputation as a result. Because of this, it rarely loses money due to staff productivity.
Amazon trumps Google. In reality, it treats its employees poorly.
Google was the founding father of the modern-day open culture.
Larry and Sergey Google founded the IT industry's Open Culture. Silicon Valley called Google's internal democracy and transparency near anarchy. Management rarely slammed decisions on employees. Surveys and internal polls ensured everyone knew the company's direction and had a vote.
20% project allotment (weekly free time to build own project) was Google's open-secret innovation component.
After Larry and Sergey's exit in 2019, this is Google's first profitability hurdle. Only Google insiders can answer these questions.
Would Google's investors compel the company's management to adopt an Amazon-style culture where the developers are treated like circus performers?
If so, would Google follow suit?
If so, how does Google go about doing it?
Before discussing Google's likely plan, let's examine programming productivity.
What determines a programmer's productivity is simple:
How would we answer Google's questions?
As a programmer, I'm more concerned about Simplicity Sprint's aftermath than its economic catalysts.
Large organizations don't care much about quarterly and annual productivity metrics. They have 10-year product-launch plans. If something seems horrible today, it's likely due to someone's lousy judgment 5 years ago who is no longer in the blame game.
Deconstruct our main question.
How exactly do you change the culture of the firm so that productivity increases?
How can you accomplish that without affecting your capacity to profit? There are countless ways to increase output without decreasing profit.
How can you accomplish this with little to no effect on employee motivation? (While not all employers care about it, in this case we are discussing the father of the open company culture.)
How do you do it for a 10-developer IT firm that is losing money versus a 1,70,000-developer organization with a trillion-dollar valuation?
When implementing a large-scale organizational change, success must be carefully measured.
The fastest way to do something is to do it right, no matter how long it takes.
You require clearly-defined group/team/role segregation and solid pass/fail matrices to:
You can give performers rewards.
Ones that are average can be inspired to improve
Underachievers may receive assistance or, in the worst-case scenario, rehabilitation
As a 20-year programmer, I associate productivity with greatness.
Doing something well, no matter how long it takes, is the fastest way to do it.
Let's discuss a programmer's productivity.
Why productivity is a strange term in programming:
Productivity is work per unit of time.
Money=time This is an economic proverb. More hours worked, more pay. Longer projects cost more.
As a buyer, you desire a quick supply. As a business owner, you want employees who perform at full capacity, creating more products to transport and boosting your profits.
All economic matrices encourage production because of our obsession with it. Productivity is the only organic way a nation may increase its GDP.
Time is money — is not just a proverb, but an economical fact.
Applying the same productivity theory to programming gets problematic. An automating computer. Its capacity depends on the software its master writes.
Today, a sophisticated program can process a billion records in a few hours. Creating one takes a competent coder and the necessary infrastructure. Learning, designing, coding, testing, and iterations take time.
Programming productivity isn't linear, unlike manufacturing and maintenance.
Average programmers produce code every day yet miss deadlines. Expert programmers go days without coding. End of sprint, they often surprise themselves by delivering fully working solutions.
Reversing the programming duties has no effect. Experts aren't needed for productivity.
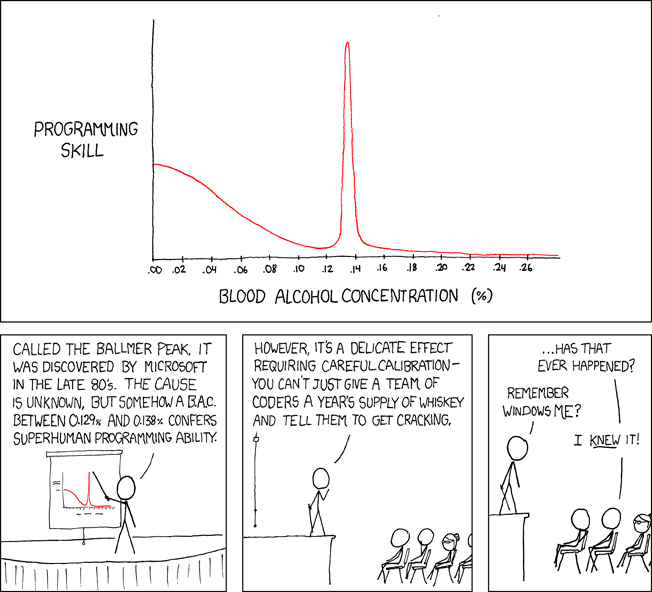
These patterns remind me of an XKCD comic.
Programming productivity depends on two factors:
The capacity of the programmer and his or her command of the principles of computer science
His or her productive bursts, how often they occur, and how long they last as they engineer the answer
At some point, productivity measurement becomes Schrödinger’s cat.
Product companies measure productivity using use cases, classes, functions, or LOCs (lines of code). In days of data-rich source control systems, programmers' merge requests and/or commits are the most preferred yardstick. Companies assess productivity by tickets closed.
Every organization eventually has trouble measuring productivity. Finer measurements create more chaos. Every measure compares apples to oranges (or worse, apples with aircraft.) On top of the measuring overhead, the endeavor causes tremendous and unnecessary stress on teams, lowering their productivity and defeating its purpose.
Macro productivity measurements make sense. Amazon's factory-era management has done it, but at great cost.
Google can pull it off if it wants to.
What Google meant in reality when it said that employee productivity has decreased:
When Google considers its employees unproductive, it doesn't mean they don't complete enough work in the allotted period.
They can't multiply their work's influence over time.
Programmers who produce excellent modules or products are unsure on how to use them.
The best data scientists are unable to add the proper parameters in their models.
Despite having a great product backlog, managers struggle to recruit resources with the necessary skills.
Product designers who frequently develop and A/B test newer designs are unaware of why measures are inaccurate or whether they have already reached the saturation point.
Most ignorant: All of the aforementioned positions are aware of what to do with their deliverables, but neither their supervisors nor Google itself have given them sufficient authority.
So, Google employees aren't productive.
How to fix it?
Business analysis: White suits introducing novel items can interact with customers from all regions. Track analytics events proactively, especially the infrequent ones.
SOLID, DRY, TEST, and AUTOMATION: Do less + reuse. Use boilerplate code creation. If something already exists, don't implement it yourself.
Build features-building capabilities: N features are created by average programmers in N hours. An endless number of features can be built by average programmers thanks to the fact that expert programmers can produce 1 capability in N hours.
Work on projects that will have a positive impact: Use the same algorithm to search for images on YouTube rather than the Mars surface.
Avoid tasks that can only be measured in terms of time linearity at all costs (if a task can be completed in N minutes, then M copies of the same task would cost M*N minutes).
In conclusion:
Software development isn't linear. Why should the makers be measured?
Notation for The Big O
I'm discussing a new way to quantify programmer productivity. (It applies to other professions, but that's another subject)
The Big O notation expresses the paradigm (the algorithmic performance concept programmers rot to ace their Google interview)
Google (or any large corporation) can do this.
Sort organizational roles into categories and specify their impact vs. time objectives. A CXO role's time vs. effect function, for instance, has a complexity of O(log N), meaning that if a CEO raises his or her work time by 8x, the result only increases by 3x.
Plot the influence of each employee over time using the X and Y axes, respectively.
Add a multiplier for Y-axis values to the productivity equation to make business objectives matter. (Example values: Support = 5, Utility = 7, and Innovation = 10).
Compare employee scores in comparable categories (developers vs. devs, CXOs vs. CXOs, etc.) and reward or help employees based on whether they are ahead of or behind the pack.
After measuring every employee's inventiveness, it's straightforward to help underachievers and praise achievers.
Example of a Big(O) Category:
If I ran Google (God forbid, its worst days are far off), here's how I'd classify it. You can categorize Google employees whichever you choose.
The Google interview truth:
O(1) < O(log n) < O(n) < O(n log n) < O(n^x) where all logarithmic bases are < n.
O(1): Customer service workers' hours have no impact on firm profitability or customer pleasure.
CXOs Most of their time is spent on travel, strategic meetings, parties, and/or meetings with minimal floor-level influence. They're good at launching new products but bad at pivoting without disaster. Their directions are being followed.
Devops, UX designers, testers Agile projects revolve around deployment. DevOps controls the levers. Their automation secures results in subsequent cycles.
UX/UI Designers must still prototype UI elements despite improved design tools.
All test cases are proportional to use cases/functional units, hence testers' work is O(N).
Architects Their effort improves code quality. Their right/wrong interference affects product quality and rollout decisions even after the design is set.
Core Developers Only core developers can write code and own requirements. When people understand and own their labor, the output improves dramatically. A single character error can spread undetected throughout the SDLC and cost millions.
Core devs introduce/eliminate 1000x bugs, refactoring attempts, and regression. Following our earlier hypothesis.
The fastest way to do something is to do it right, no matter how long it takes.
Conclusion:
Google is at the liberal extreme of the employee-handling spectrum
Microsoft faced an existential crisis after 2000. It didn't choose Amazon's data-driven people management to revitalize itself.
Instead, it entrusted developers. It welcomed emerging technologies and opened up to open source, something it previously opposed.
Google is too lax in its employee-handling practices. With that foundation, it can only follow Amazon, no matter how carefully.
Any attempt to redefine people's measurements will affect the organization emotionally.
The more Google compares apples to apples, the higher its chances for future rebirth.