


More on Entrepreneurship/Creators

Sammy Abdullah
24 years ago
How to properly price SaaS
Price Intelligently put out amazing content on pricing your SaaS product. This blog's link to the whole report is worth reading. Our key takeaways are below.

Don't base prices on the competition. Competitor-based pricing has clear drawbacks. Their pricing approach is yours. Your company offers customers something unique. Otherwise, you wouldn't create it. This strategy is static, therefore you can't add value by raising prices without outpricing competitors. Look, but don't touch is the competitor-based moral. You want to know your competitors' prices so you're in the same ballpark, but they shouldn't guide your selections. Competitor-based pricing also drives down prices.
Value-based pricing wins. This is customer-based pricing. Value-based pricing looks outward, not inward or laterally at competitors. Your clients are the best source of pricing information. By valuing customer comments, you're focusing on buyers. They'll decide if your pricing and packaging are right. In addition to asking consumers about cost savings or revenue increases, look at data like number of users, usage per user, etc.
Value-based pricing increases prices. As you learn more about the client and your worth, you'll know when and how much to boost rates. Every 6 months, examine pricing.
Cloning top customers. You clone your consumers by learning as much as you can about them and then reaching out to comparable people or organizations. You can't accomplish this without knowing your customers. Segmenting and reproducing them requires as much detail as feasible. Offer pricing plans and feature packages for 4 personas. The top plan should state Contact Us. Your highest-value customers want more advice and support.
Question your 4 personas. What's the one item you can't live without? Which integrations matter most? Do you do analytics? Is support important or does your company self-solve? What's too cheap? What's too expensive?
Not everyone likes per-user pricing. SaaS organizations often default to per-user analytics. About 80% of companies utilizing per-user pricing should use an alternative value metric because their goods don't give more value with more users, so charging for them doesn't make sense.
At least 3:1 LTV/CAC. Break even on the customer within 2 years, and LTV to CAC is greater than 3:1. Because customer acquisition costs are paid upfront but SaaS revenues accrue over time, SaaS companies face an early financial shortfall while paying back the CAC.
ROI should be >20:1. Indeed. Ensure the customer's ROI is 20x the product's cost. Microsoft Office costs $80 a year, but consumers would pay much more to maintain it.
A/B Testing. A/B testing is guessing. When your pricing page varies based on assumptions, you'll upset customers. You don't have enough customers anyway. A/B testing optimizes landing pages, design decisions, and other site features when you know the problem but not pricing.
Don't discount. It cheapens the product, makes it permanent, and increases churn. By discounting, you're ruining your pricing analysis.

Startup Journal
3 years ago
The Top 14 Software Business Ideas That Are Sure To Succeed in 2023
Software can change any company.

Software is becoming essential. Everyone should consider how software affects their lives and others'.
Software on your phone, tablet, or computer offers many new options. We're experts in enough ways now.
Software Business Ideas will be popular by 2023.
ERP Programs
ERP software meets rising demand.
ERP solutions automate and monitor tasks that large organizations, businesses, and even schools would struggle to do manually.
ERP software could reach $49 billion by 2024.
CRM Program
CRM software is a must-have for any customer-focused business.
Having an open mind about your business services and products allows you to change platforms.
Another company may only want your CRM service.
Medical software
Healthcare facilities need reliable, easy-to-use software.
EHRs, MDDBs, E-Prescribing, and more are software options.
The global medical software market could reach $11 billion by 2025, and mobile medical apps may follow.
Presentation Software in the Cloud
SaaS presentation tools are great.
They're easy to use, comprehensive, and full of traditional Software features.
In today's cloud-based world, these solutions make life easier for people. We don't know about you, but we like it.
Software for Project Management
People began working remotely without signs or warnings before the 2020 COVID-19 pandemic.
Many organizations found it difficult to track projects and set deadlines.
With PMP software tools, teams can manage remote units and collaborate effectively.
App for Blockchain-Based Invoicing
This advanced billing and invoicing solution is for businesses and freelancers.
These blockchain-based apps can calculate taxes, manage debts, and manage transactions.
Intelligent contracts help blockchain track transactions more efficiently. It speeds up and improves invoice generation.
Software for Business Communications
Internal business messaging is tricky.
Top business software tools for communication can share files, collaborate on documents, host video conferences, and more.
Payroll Automation System
Software development also includes developing an automated payroll system.
These software systems reduce manual tasks for timely employee payments.
These tools help enterprise clients calculate total wages quickly, simplify tax calculations, improve record-keeping, and support better financial planning.
System for Detecting Data Leaks
Both businesses and individuals value data highly. Yahoo's data breach is dangerous because of this.
This area of software development can help people protect their data.
You can design an advanced data loss prevention system.
AI-based Retail System
AI-powered shopping systems are popular. The systems analyze customers' search and purchase patterns and store history and are equipped with a keyword database.
These systems offer many customers pre-loaded products.
AI-based shopping algorithms also help users make purchases.
Software for Detecting Plagiarism
Software can help ensure your projects are original and not plagiarized.
These tools detect plagiarized content that Google, media, and educational institutions don't like.
Software for Converting Audio to Text
Machine Learning converts speech to text automatically.
These programs can quickly transcribe cloud-based files.
Software for daily horoscopes
Daily and monthly horoscopes will continue to be popular.
Software platforms that can predict forecasts, calculate birth charts, and other astrology resources are good business ideas.
E-learning Programs
Traditional study methods are losing popularity as virtual schools proliferate and physical space shrinks.
Khan Academy online courses are the best way to keep learning.
Online education portals can boost your learning. If you want to start a tech startup, consider creating an e-learning program.
Conclusion
Software is booming. There's never been a better time to start a software development business, with so many people using computers and smartphones. This article lists eight business ideas for 2023. Consider these ideas if you're just starting out or looking to expand.

Emils Uztics
3 years ago
This billionaire created a side business that brings around $90,000 per month.
Dharmesh Shah co-founded HubSpot. WordPlay reached $90,000 per month in revenue without utilizing any of his wealth.
His method:
Take Advantage Of An Established Trend
Remember Wordle? Dharmesh was instantly hooked. As was the tech world.
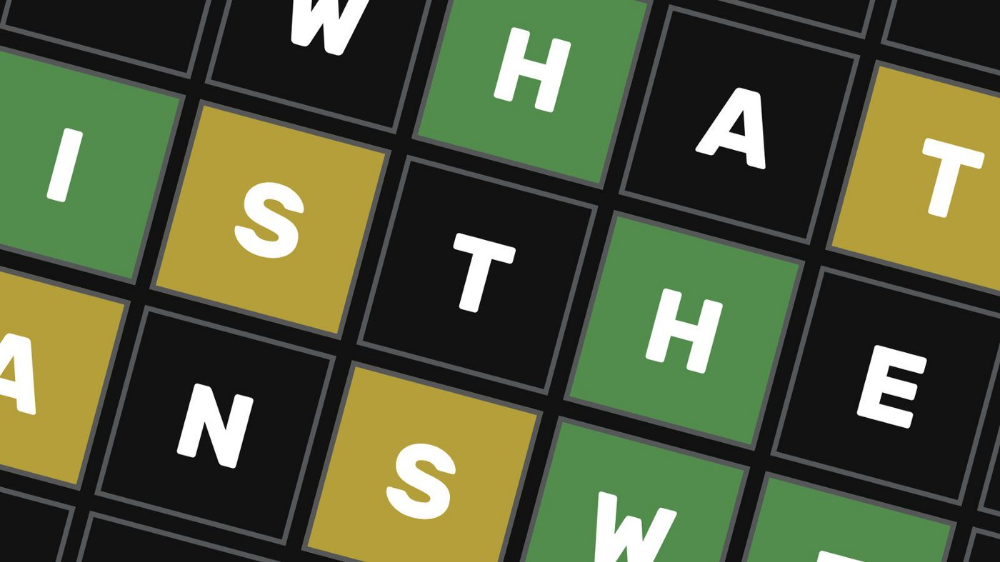
HubSpot's co-founder noted inefficiencies in a recent My First Million episode. He wanted to play daily. Dharmesh, a tinkerer and software engineer, decided to design a word game.
He's a billionaire. How could he?
Wordle had limitations in his opinion;
Dharmesh is fundamentally a developer. He desired to start something new and increase his programming knowledge;
This project may serve as an excellent illustration for his son, who had begun learning about software development.
Better It Up
Building a new Wordle wasn't successful.
WordPlay lets you play with friends and family. You could challenge them and compare the results. It is a built-in growth tool.
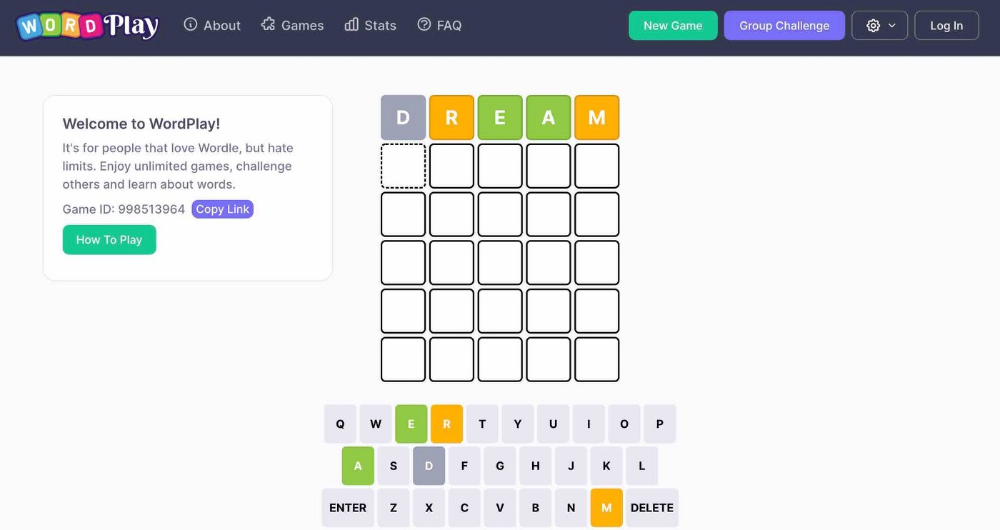
WordPlay features:
the capacity to follow sophisticated statistics after creating an account;
continuous feedback on your performance;
Outstanding domain name (wordplay.com).
Project Development
WordPlay has 9.5 million visitors and 45 million games played since February.
HubSpot co-founder credits tremendous growth to flywheel marketing, pushing the game through his own following.
Choosing an exploding specialty and making sharing easy also helped.
Shah enabled Google Ads on the website to test earning potential. Monthly revenue was $90,000.
That's just Google Ads. If monetization was the goal, a specialized ad network like Ezoic could double or triple the amount.
Wordle was a great buy for The New York Times at $1 million.
You might also like

Vitalik
4 years ago
An approximate introduction to how zk-SNARKs are possible (part 2)
If tasked with the problem of coming up with a zk-SNARK protocol, many people would make their way to this point and then get stuck and give up. How can a verifier possibly check every single piece of the computation, without looking at each piece of the computation individually? But it turns out that there is a clever solution.
Polynomials
Polynomials are a special class of algebraic expressions of the form:
- x+5
- x^4
- x^3+3x^2+3x+1
- 628x^{271}+318x^{270}+530x^{269}+…+69x+381
i.e. they are a sum of any (finite!) number of terms of the form cx^k
There are many things that are fascinating about polynomials. But here we are going to zoom in on a particular one: polynomials are a single mathematical object that can contain an unbounded amount of information (think of them as a list of integers and this is obvious). The fourth example above contained 816 digits of tau, and one can easily imagine a polynomial that contains far more.
Furthermore, a single equation between polynomials can represent an unbounded number of equations between numbers. For example, consider the equation A(x)+ B(x) = C(x). If this equation is true, then it's also true that:
- A(0)+B(0)=C(0)
- A(1)+B(1)=C(1)
- A(2)+B(2)=C(2)
- A(3)+B(3)=C(3)
And so on for every possible coordinate. You can even construct polynomials to deliberately represent sets of numbers so you can check many equations all at once. For example, suppose that you wanted to check:
- 12+1=13
- 10+8=18
- 15+8=23
- 15+13=28
You can use a procedure called Lagrange interpolation to construct polynomials A(x) that give (12,10,15,15) as outputs at some specific set of coordinates (eg. (0,1,2,3)), B(x) the outputs (1,8,8,13) on thos same coordinates, and so forth. In fact, here are the polynomials:
- A(x)=-2x^3+\frac{19}{2}x^2-\frac{19}{2}x+12
- B(x)=2x^3-\frac{19}{2}x^2+\frac{29}{2}x+1
- C(x)=5x+13
Checking the equation A(x)+B(x)=C(x) with these polynomials checks all four above equations at the same time.
Comparing a polynomial to itself
You can even check relationships between a large number of adjacent evaluations of the same polynomial using a simple polynomial equation. This is slightly more advanced. Suppose that you want to check that, for a given polynomial F, F(x+2)=F(x)+F(x+1) with the integer range {0,1…89} (so if you also check F(0)=F(1)=1, then F(100) would be the 100th Fibonacci number)
As polynomials, F(x+2)-F(x+1)-F(x) would not be exactly zero, as it could give arbitrary answers outside the range x={0,1…98}. But we can do something clever. In general, there is a rule that if a polynomial P is zero across some set S=\{x_1,x_2…x_n\} then it can be expressed as P(x)=Z(x)*H(x), where Z(x)=(x-x_1)*(x-x_2)*…*(x-x_n) and H(x) is also a polynomial. In other words, any polynomial that equals zero across some set is a (polynomial) multiple of the simplest (lowest-degree) polynomial that equals zero across that same set.
Why is this the case? It is a nice corollary of polynomial long division: the factor theorem. We know that, when dividing P(x) by Z(x), we will get a quotient Q(x) and a remainder R(x) is strictly less than that of Z(x). Since we know that P is zero on all of S, it means that R has to be zero on all of S as well. So we can simply compute R(x) via polynomial interpolation, since it's a polynomial of degree at most n-1 and we know n values (the zeros at S). Interpolating a polynomial with all zeroes gives the zero polynomial, thus R(x)=0 and H(x)=Q(x).
Going back to our example, if we have a polynomial F that encodes Fibonacci numbers (so F(x+2)=F(x)+F(x+1) across x=\{0,1…98\}), then I can convince you that F actually satisfies this condition by proving that the polynomial P(x)=F(x+2)-F(x+1)-F(x) is zero over that range, by giving you the quotient:
H(x)=\frac{F(x+2)-F(x+1)-F(x)}{Z(x)}
Where Z(x) = (x-0)*(x-1)*…*(x-98).
You can calculate Z(x) yourself (ideally you would have it precomputed), check the equation, and if the check passes then F(x) satisfies the condition!
Now, step back and notice what we did here. We converted a 100-step-long computation into a single equation with polynomials. Of course, proving the N'th Fibonacci number is not an especially useful task, especially since Fibonacci numbers have a closed form. But you can use exactly the same basic technique, just with some extra polynomials and some more complicated equations, to encode arbitrary computations with an arbitrarily large number of steps.
see part 3

Sam Hickmann
3 years ago
What is this Fed interest rate everybody is talking about that makes or breaks the stock market?
The Federal Funds Rate (FFR) is the target interest rate set by the Federal Reserve System (Fed)'s policy-making body (FOMC). This target is the rate at which the Fed suggests commercial banks borrow and lend their excess reserves overnight to each other.
The FOMC meets 8 times a year to set the target FFR. This is supposed to promote economic growth. The overnight lending market sets the actual rate based on commercial banks' short-term reserves. If the market strays too far, the Fed intervenes.
Banks must keep a certain percentage of their deposits in a Federal Reserve account. A bank's reserve requirement is a percentage of its total deposits. End-of-day bank account balances averaged over two-week reserve maintenance periods are used to determine reserve requirements.
If a bank expects to have end-of-day balances above what's needed, it can lend the excess to another institution.
The FOMC adjusts interest rates based on economic indicators that show inflation, recession, or other issues that affect economic growth. Core inflation and durable goods orders are indicators.
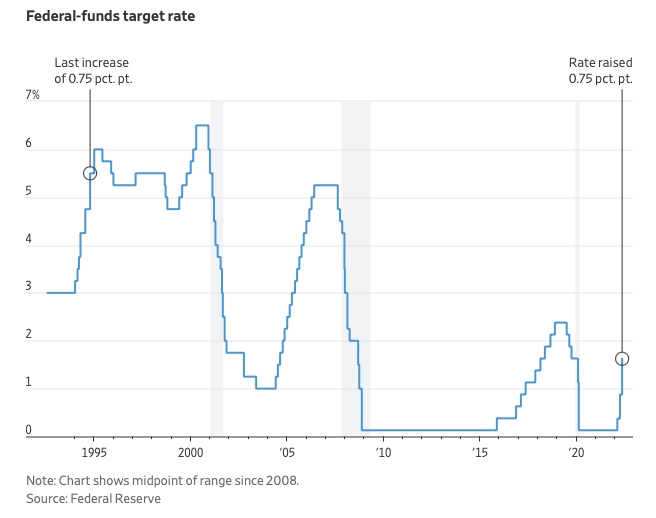
In response to economic conditions, the FFR target has changed over time. In the early 1980s, inflation pushed it to 20%. During the Great Recession of 2007-2009, the rate was slashed to 0.15 percent to encourage growth.
Inflation picked up in May 2022 despite earlier rate hikes, prompting today's 0.75 percent point increase. The largest increase since 1994. It might rise to around 3.375% this year and 3.1% by the end of 2024.

B Kean
3 years ago
To prove his point, Putin is prepared to add 200,000 more dead soldiers.
What does Ukraine's murderous craziness mean?

Vladimir Putin expressed his patience to Israeli Prime Minister Naftali Bennet. Thousands, even hundreds of thousands of young and middle-aged males in his country have no meaning to him.
During a meeting in March with Prime Minister Naftali Bennett of Israel, Mr. Putin admitted that the Ukrainians were tougher “than I was told,” according to two people familiar with the exchange. “This will probably be much more difficult than we thought. But the war is on their territory, not ours. We are a big country and we have patience (The Inside Story of a Catastrophe).”
Putin should explain to Russian mothers how patient he is with his invasion of Ukraine.
Putin is rich. Even while sanctions have certainly limited Putin's access to his fortune, he has access to everything in Russia. Unlimited wealth.
The Russian leader's infrastructure was designed with his whims in mind. Vladimir Putin is one of the wealthiest and most catered-to people alive. He's also all-powerful, as his lack of opposition shows. His incredible wealth and power have isolated him from average people so much that he doesn't mind turning lives upside down to prove a point.
For many, losing a Russian spouse or son is painful. Whether the soldier was a big breadwinner or unemployed, the loss of a male figure leaves many families bewildered and anxious. Putin, Russia's revered president, seems unfazed.
People who know Mr. Putin say he is ready to sacrifice untold lives and treasure for as long as it takes, and in a rare face-to-face meeting with the Americans last month the Russians wanted to deliver a stark message to President Biden: No matter how many Russian soldiers are killed or wounded on the battlefield, Russia will not give up (The Inside Story of a Catastrophe).
Imagine a country's leader publicly admitting a mistake he's made. Imagine getting Putin's undivided attention.
So, I underestimated Ukrainians. I can't allow them make me appear terrible, so I'll utilize as many drunken dopes as possible to cover up my error. They'll die fulfilled and heroic.
Russia's human resources are limited, but its willingness to cause suffering is not. How many Russian families must die before the curse is broken? If mass protests started tomorrow, Russia's authorities couldn't stop them.
When Moscovites faced down tanks in August 1991, the Gorbachev coup ended in three days. Even though few city residents showed up, everything collapsed. This wicked disaster won't require many Russians.
One NATO member is warning allies that Mr. Putin is ready to accept the deaths or injuries of as many as 300,000 Russian troops — roughly three times his estimated losses so far.
If 100,000 Russians have died in Ukraine and Putin doesn't mind another 200,000 dying, why don't these 200,000 ghosts stand up and save themselves? Putin plays the role of concerned and benevolent leader effectively, but things aren't going well for Russia.
What would 300,000 or more missing men signify for Russia's future? How many kids will have broken homes? How many families won't form, and what will the economy do?
Putin reportedly cared about his legacy. His place in Russian history Putin's invasion of Ukraine settled his legacy. He has single-handedly weakened and despaired Russia since the 1980s.
Putin will be viewed by sensible people as one of Russia's worst adversaries, but Russians will think he was fantastic despite Ukraine.
The more setbacks Mr. Putin endures on the battlefield, the more fears grow over how far he is willing to go. He has killed tens of thousands in Ukraine, leveled cities, and targeted civilians for maximum pain — obliterating hospitals, schools, and apartment buildings while cutting off power and water to millions before winter. Each time Ukrainian forces score a major blow against Russia, the bombing of their country intensifies. And Mr. Putin has repeatedly reminded the world that he can use anything at his disposal, including nuclear arms, to pursue his notion of victory.
How much death and damage will there be in Ukraine if Putin sends 200,000 more Russians to the front? It's scary, sad, and sick.
Monster.