


More on Marketing

Mark Shpuntov
3 years ago
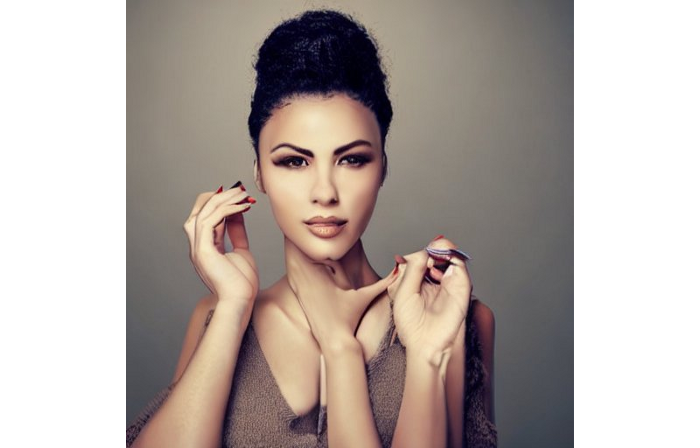
How to Produce a Month's Worth of Content for Social Media in a Day
New social media producers' biggest error

The Treadmill of Social Media Content
New creators focus on the wrong platforms.
They post to Instagram, Twitter, TikTok, etc.
They create daily material, but it's never enough for social media algorithms.
Creators recognize they're on a content creation treadmill.
They have to keep publishing content daily just to stay on the algorithm’s good side and avoid losing the audience they’ve built on the platform.
This is exhausting and unsustainable, causing creator burnout.
They focus on short-lived platforms, which is an issue.
Comparing low- and high-return social media platforms
Social media networks are great for reaching new audiences.
Their algorithm is meant to viralize material.
Social media can use you for their aims if you're not careful.
To master social media, focus on the right platforms.
To do this, we must differentiate low-ROI and high-ROI platforms:
Low ROI platforms are ones where content has a short lifespan. High ROI platforms are ones where content has a longer lifespan.
A tweet may be shown for 12 days. If you write an article or blog post, it could get visitors for 23 years.
ROI is drastically different.
New creators have limited time and high learning curves.
Nothing is possible.
First create content for high-return platforms.
ROI for social media platforms
Here are high-return platforms:
Your Blog - A single blog article can rank and attract a ton of targeted traffic for a very long time thanks to the power of SEO.
YouTube - YouTube has a reputation for showing search results or sidebar recommendations for videos uploaded 23 years ago. A superb video you make may receive views for a number of years.
Medium - A platform dedicated to excellent writing is called Medium. When you write an article about a subject that never goes out of style, you're building a digital asset that can drive visitors indefinitely.
These high ROI platforms let you generate content once and get visitors for years.
This contrasts with low ROI platforms:
Twitter
Instagram
TikTok
LinkedIn
Facebook
The posts you publish on these networks have a 23-day lifetime. Instagram Reels and TikToks are exceptions since viral content can last months.
If you want to make content creation sustainable and enjoyable, you must focus the majority of your efforts on creating high ROI content first. You can then use the magic of repurposing content to publish content to the lower ROI platforms to increase your reach and exposure.
How To Use Your Content Again
So, you’ve decided to focus on the high ROI platforms.
Great!
You've published an article or a YouTube video.
You worked hard on it.
Now you have fresh stuff.
What now?
If you are not repurposing each piece of content for multiple platforms, you are throwing away your time and efforts.
You've created fantastic material, so why not distribute it across platforms?
Repurposing Content Step-by-Step
For me, it's writing a blog article, but you might start with a video or podcast.
The premise is the same regardless of the medium.
Start by creating content for a high ROI platform (YouTube, Blog Post, Medium). Then, repurpose, edit, and repost it to the lower ROI platforms.
Here's how to repurpose pillar material for other platforms:
Post the article on your blog.
Put your piece on Medium (use the canonical link to point to your blog as the source for SEO)
Create a video and upload it to YouTube using the talking points from the article.
Rewrite the piece a little, then post it to LinkedIn.
Change the article's format to a Thread and share it on Twitter.
Find a few quick quotes throughout the article, then use them in tweets or Instagram quote posts.
Create a carousel for Instagram and LinkedIn using screenshots from the Twitter Thread.
Go through your film and select a few valuable 30-second segments. Share them on LinkedIn, Facebook, Twitter, TikTok, YouTube Shorts, and Instagram Reels.
Your video's audio can be taken out and uploaded as a podcast episode.
If you (or your team) achieve all this, you'll have 20-30 pieces of social media content.
If you're just starting, I wouldn't advocate doing all of this at once.
Instead, focus on a few platforms with this method.
You can outsource this as your company expands. (If you'd want to learn more about content repurposing, contact me.)
You may focus on relevant work while someone else grows your social media on autopilot.
You develop high-ROI pillar content, and it's automatically chopped up and posted on social media.
This lets you use social media algorithms without getting sucked in.
Thanks for reading!

Jon Brosio
3 years ago
This Landing Page is a (Legal) Money-Printing Machine
and it’s easy to build.

A landing page with good copy is a money-maker.
Let's be honest, page-builder templates are garbage.
They can help you create a nice-looking landing page, but not persuasive writing.
Over the previous 90 days, I've examined 200+ landing pages.
What's crazy?
Top digital entrepreneurs use a 7-part strategy to bring in email subscribers, generate prospects, and (passively) sell their digital courses.
Steal this 7-part landing page architecture to maximize digital product sales.
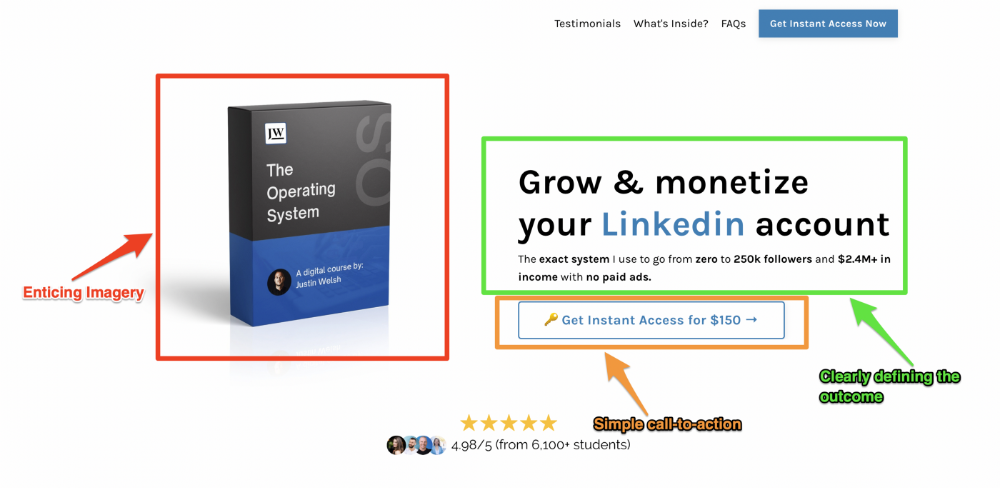
The offer
Landing pages require offers.
Newsletter, cohort, or course offer.
Your reader should see this offer first. Includind:
Headline
Imagery
Call-to-action
Clear, persuasive, and simplicity are key. Example: the Linkedin OS course home page of digital entrepreneur Justin Welsh offers:
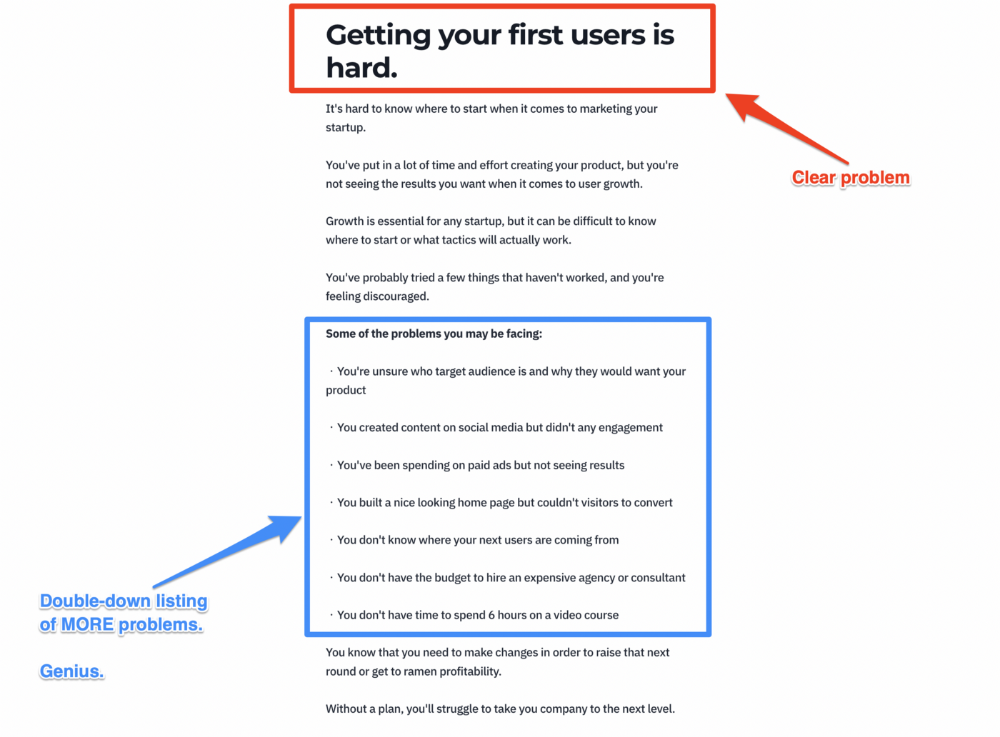
A distinctly defined problem
Everyone needs an enemy.
You need an opponent on your landing page. Problematic.
Next, employ psychology to create a struggle in your visitor's thoughts.
Don't be clever here; label your customer's problem. The more particular you are, the bigger the situation will seem.
When you build a clear monster, you invite defeat. I appreciate Theo Ohene's Growth Roadmaps landing page.
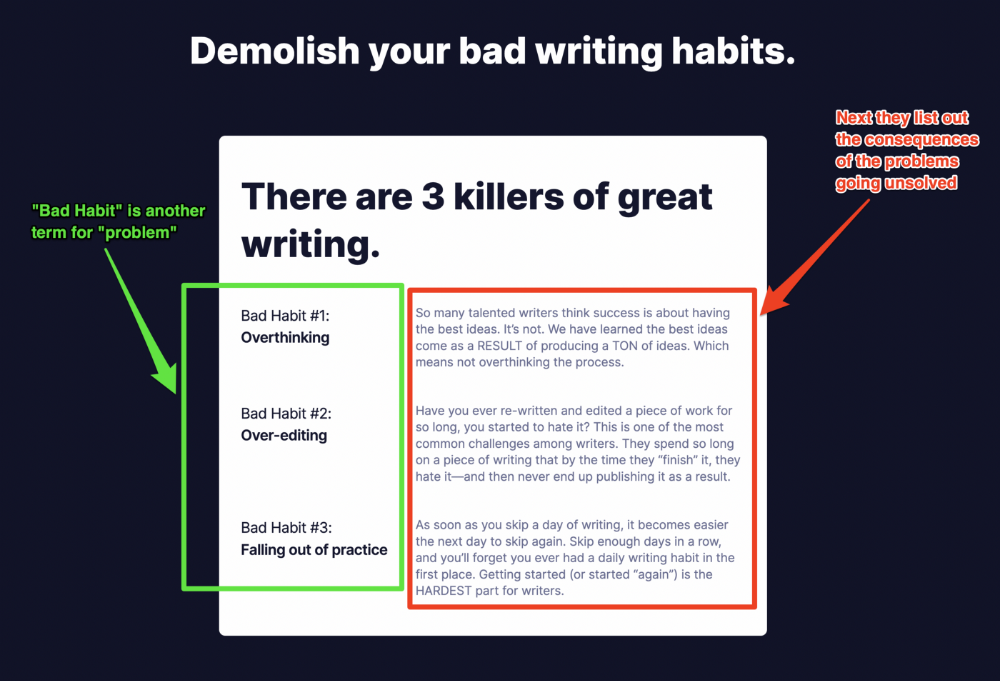
Exacerbation of the effects
Problem identification doesn't motivate action.
What would an unresolved problem mean?
This is landing page copy. When you describe the unsolved problem's repercussions, you accomplish several things:
You write a narrative (and stories are remembered better than stats)
You cause the reader to feel something.
You help the reader relate to the issue
Important!
My favorite script is:
"Sure, you can let [problem] go untreated. But what will happen if you do? Soon, you'll begin to notice [new problem 1] will start to arise. That might bring up [problem 2], etc."
Take the copywriting course, digital writer and entrepreneur Dickie Bush illustrates below when he labels the problem (see: "poor habit") and then illustrates the repercussions.
The tale of transformation
Every landing page needs that "ah-ha!" moment.
Transformation stories do this.
Did you find a solution? Someone else made the discovery? Have you tested your theory?
Next, describe your (or your subject's) metamorphosis.
Kieran Drew nails his narrative (and revelation) here. Right before the disclosure, he introduces his "ah-ha!" moment:
Testimonials
Social proof completes any landing page.
Social proof tells the reader, "If others do it, it must be worthwhile."
This is your argument.
Positive social proof helps (obviously).
Offer "free" training in exchange for a testimonial if you need social evidence. This builds social proof.
Most social proof is testimonies (recommended). Kurtis Hanni's creative take on social proof (using a screenshot of his colleague) is entertaining.
Bravo.

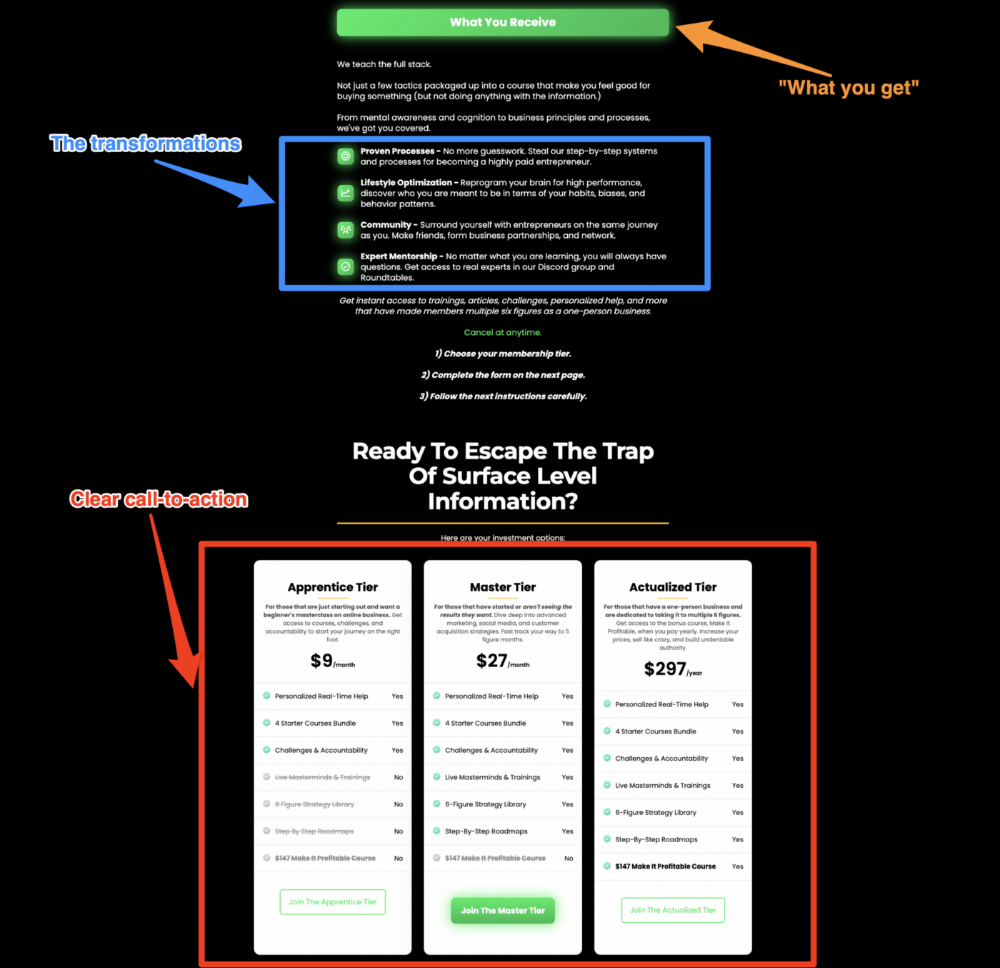
Reveal your offer
Now's the moment to act.
Describe the "bundle" that provides the transformation.
Here's:
Course
Cohort
Ebook
Whatever you're selling.
Include a product or service image, what the consumer is getting ("how it works"), the price, any "free" bonuses (preferred), and a CTA ("buy now").
Clarity is key. Don't make a cunning offer. Make sure your presentation emphasizes customer change (benefits). Dan Koe's Modern Mastery landing page makes an offer. Consider:
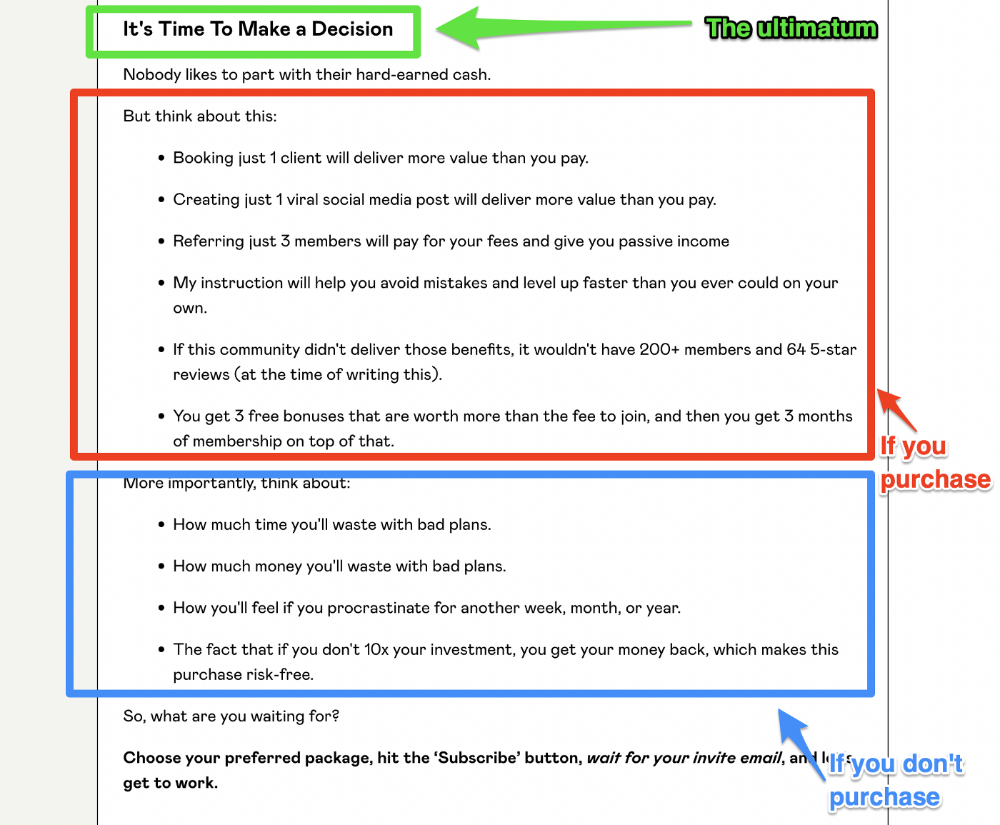
An ultimatum
Offering isn't enough.
You must give your prospect an ultimatum.
They can buy your merchandise from you.
They may exit the webpage.
That’s it.
It's crucial to show what happens if the reader does either. Stress the consequences of not buying (again, a little consequence amplification). Remind them of the benefits of buying.
I appreciate Charles Miller's product offer ending:
The top online creators use a 7-part landing page structure:
Offer the service
Describe the problem
Amplify the consequences
Tell the transformational story
Include testimonials and social proof.
Reveal the offer (with any bonuses if applicable)
Finally, give the reader a deadline to encourage them to take action.
Sequence these sections to develop a landing page that (essentially) prints money.

Rita McGrath
3 years ago
Flywheels and Funnels
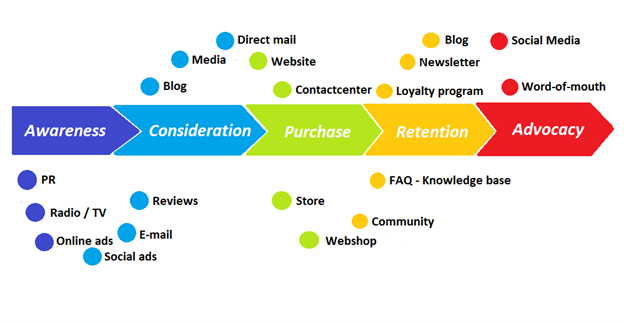
Traditional sales organizations used the concept of a sales “funnel” to describe the process through which potential customers move, ending up with sales at the end. Winners today have abandoned that way of thinking in favor of building flywheels — business models in which every element reinforces every other.
Ah, the marketing funnel…
Prospective clients go through a predictable set of experiences, students learn in business school marketing classes. It looks like this:

Understanding the funnel helps evaluate sales success indicators. Gail Goodwin, former CEO of small business direct mail provider Constant Contact, said managing the pipeline was key to escaping the sluggish SaaS ramp of death.
Like the funnel concept. To predict how well your business will do, measure how many potential clients are aware of it (awareness) and how many take the next step. If 1,000 people heard about your offering and 10% showed interest, you'd have 100 at that point. If 50% of these people made buyer-like noises, you'd know how many were, etc. It helped model buying trends.
TV, magazine, and radio advertising are pricey for B2C enterprises. Traditional B2B marketing involved armies of sales reps, which was expensive and a barrier to entry.
Cracks in the funnel model
Digital has exposed the funnel's limitations. Hubspot was born at a time when buyers and sellers had huge knowledge asymmetries, according to co-founder Brian Halligan. Those selling a product could use the buyer's lack of information to become a trusted partner.
As the world went digital, getting information and comparing offerings became faster, easier, and cheaper. Buyers didn't need a seller to move through a funnel. Interactions replaced transactions, and the relationship didn't end with a sale.
Instead, buyers and sellers interacted in a constant flow. In many modern models, the sale is midway through the process (particularly true with subscription and software-as-a-service models). Example:
You're creating a winding journey with many touch points, not a funnel (and lots of opportunities for customers to get lost).
From winding journey to flywheel
Beyond this revised view of an interactive customer journey, a company can create what Jim Collins famously called a flywheel. Imagine rolling a heavy disc on its axis. The first few times you roll it, you put in a lot of effort for a small response. The same effort yields faster turns as it gains speed. Over time, the flywheel gains momentum and turns without your help.
Modern digital organizations have created flywheel business models, in which any additional force multiplies throughout the business. The flywheel becomes a force multiplier, according to Collins.
Amazon is a famous flywheel example. Collins explained the concept to Amazon CEO Jeff Bezos at a corporate retreat in 2001. In The Everything Store, Brad Stone describes in his book The Everything Store how he immediately understood Amazon's levers.
The result (drawn on a napkin):
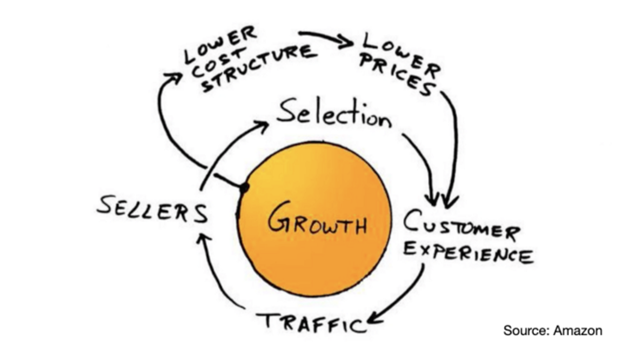
Low prices and a large selection of products attracted customers, while a focus on customer service kept them coming back, increasing traffic. Third-party sellers then increased selection. Low-cost structure supports low-price commitment. It's brilliant! Every wheel turn creates acceleration.
Where from here?
Flywheel over sales funnel! Consider these business terms.
You might also like

Jari Roomer
3 years ago
5 ways to never run out of article ideas
“Perfectionism is the enemy of the idea muscle. " — James Altucher

Writer's block is a typical explanation for low output. Success requires productivity.
In four years of writing, I've never had writer's block. And you shouldn't care.
You'll never run out of content ideas if you follow a few tactics. No, I'm not overpromising.
Take Note of Ideas
Brains are strange machines. Blank when it's time to write. Idiot. Nothing. We get the best article ideas when we're away from our workstation.
In the shower
Driving
In our dreams
Walking
During dull chats
Meditating
In the gym
No accident. The best ideas come in the shower, in nature, or while exercising.
(Your workstation is the worst place for creativity.)
The brain has time and space to link 'dots' of information during rest. It's eureka! New idea.
If you're serious about writing, capture thoughts as they come.
Immediately write down a new thought. Capture it. Don't miss it. Your future self will thank you.
As a writer, entrepreneur, or creative, letting ideas slide is bad.
I recommend using Evernote, Notion, or your device's basic note-taking tool to capture article ideas.
It doesn't matter whatever app you use as long as you collect article ideas.
When you practice 'idea-capturing' enough, you'll have an unending list of article ideas when writer's block hits.
High-Quality Content
More books, films, Medium pieces, and Youtube videos I consume, the more I'm inspired to write.
What you eat shapes who you are.
Celebrity gossip and fear-mongering news won't help your writing. It won't help you write regularly.
Instead, read expert-written books. Watch documentaries to improve your worldview. Follow amazing people online.
Develop your 'idea muscle' Daily creativity takes practice. The more you exercise your 'idea muscles,' the easier it is to generate article ideas.
I've trained my 'concept muscle' using James Altucher's exercise.
Write 10 ideas daily.
Write ten book ideas every day if you're an author. Write down 10 business ideas per day if you're an entrepreneur. Write down 10 investing ideas per day.
Write 10 article ideas per day. You become a content machine.
It doesn't state you need ten amazing ideas. You don't need 10 ideas. Ten ideas, regardless of quality.
Like at the gym, reps are what matter. With each article idea, you gain creativity. Writer's block is no match for this workout.
Quit Perfectionism
Perfectionism is bad for writers. You'll have bad articles. You'll have bad ideas. OK. It's creative.
Writing success requires prolificacy. You can't have 'perfect' articles.
“Perfectionism is the enemy of the idea muscle. Perfectionism is your brain trying to protect you from harm.” — James Altucher
Vincent van Gogh painted 900 pieces. The Starry Night is the most famous.
Thomas Edison invented 1093 things, but not all were as important as the lightbulb or the first movie camera.
Mozart composed nearly 600 compositions, but only Serenade No13 became popular.
Always do your best. Perfectionism shouldn't stop you from working. Write! Publicize. Make. Even if imperfect.
Write Your Story
Living an interesting life gives you plenty to write about. If you travel a lot, share your stories or lessons learned.
Describe your business's successes and shortcomings.
Share your experiences with difficulties or addictions.
More experiences equal more writing material.
If you stay indoors, perusing social media, you won't be inspired to write.
Have fun. Travel. Strive. Build a business. Be bold. Live a life worth writing about, and you won't run out of material.

Aaron Dinin, PhD
3 years ago
The Advantages and Disadvantages of Having Investors Sign Your NDA
Startup entrepreneurs assume what risks when pitching?

Last week I signed four NDAs.
Four!
NDA stands for non-disclosure agreement. A legal document given to someone receiving confidential information. By signing, the person pledges not to share the information for a certain time. If they do, they may be in breach of contract and face legal action.
Companies use NDAs to protect trade secrets and confidential internal information from employees and contractors. Appropriate. If you manage a huge, successful firm, you don't want your employees selling their information to your competitors. To be true, business NDAs don't always prevent corporate espionage, but they usually make employees and contractors think twice before sharing.
I understand employee and contractor NDAs, but I wasn't asked to sign one. I counsel entrepreneurs, thus the NDAs I signed last week were from startups that wanted my feedback on their concepts.
I’m not a startup investor. I give startup guidance online. Despite that, four entrepreneurs thought their company ideas were so important they wanted me to sign a generically written legal form they probably acquired from a shady, spam-filled legal templates website before we could chat.
False. One company tried to get me to sign their NDA a few days after our conversation. I gently rejected, but their tenacity encouraged me. I considered sending retroactive NDAs to everyone I've ever talked to about one of my startups in case they establish a successful company based on something I said.
Two of the other three NDAs were from nearly identical companies. Good thing I didn't sign an NDA for the first one, else they may have sued me for talking to the second one as though I control the firms people pitch me.
I wasn't talking to the fourth NDA company. Instead, I received an unsolicited email from someone who wanted comments on their fundraising pitch deck but required me to sign an NDA before sending it.
That's right, before I could read a random Internet stranger's unsolicited pitch deck, I had to sign his NDA, potentially limiting my ability to discuss what was in it.
You should understand. Advisors, mentors, investors, etc. talk to hundreds of businesses each year. They cannot manage all the companies they deal with, thus they cannot risk legal trouble by talking to someone. Well, if I signed NDAs for all the startups I spoke with, half of the 300+ articles I've written on Medium over the past several years could get me sued into the next century because I've undoubtedly addressed topics in my articles that I discussed with them.
The four NDAs I received last week are part of a recent trend of entrepreneurs sending out NDAs before meetings, despite the practical and legal issues. They act like asking someone to sign away their right to talk about all they see and hear in a day is as straightforward as asking for a glass of water.
Given this inflow of NDAs, I wanted to briefly remind entrepreneurs reading this blog about the merits and cons of requesting investors (or others in the startup ecosystem) to sign your NDA.
Benefits of having investors sign your NDA include:
None. Zero. Nothing.
Disadvantages of requesting investor NDAs:
You'll come off as an amateur who has no idea what it takes to launch a successful firm.
Investors won't trust you with their money since you appear to be a complete amateur.
Printing NDAs will be a waste of paper because no genuine entrepreneur will ever sign one.
I apologize for missing any cons. Please leave your remarks.

Dmitrii Eliuseev
3 years ago
Creating Images on Your Local PC Using Stable Diffusion AI
Deep learning-based generative art is being researched. As usual, self-learning is better. Some models, like OpenAI's DALL-E 2, require registration and can only be used online, but others can be used locally, which is usually more enjoyable for curious users. I'll demonstrate the Stable Diffusion model's operation on a standard PC.

Let’s get started.
What It Does
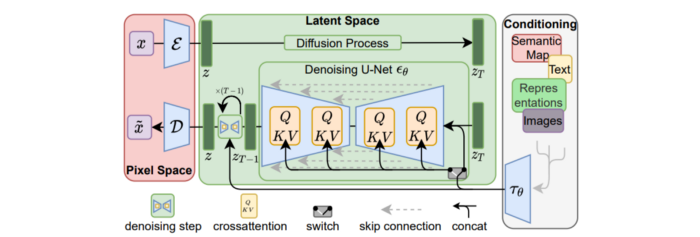
Stable Diffusion uses numerous components:
A generative model trained to produce images is called a diffusion model. The model is incrementally improving the starting data, which is only random noise. The model has an image, and while it is being trained, the reversed process is being used to add noise to the image. Being able to reverse this procedure and create images from noise is where the true magic is (more details and samples can be found in the paper).
An internal compressed representation of a latent diffusion model, which may be altered to produce the desired images, is used (more details can be found in the paper). The capacity to fine-tune the generation process is essential because producing pictures at random is not very attractive (as we can see, for instance, in Generative Adversarial Networks).
A neural network model called CLIP (Contrastive Language-Image Pre-training) is used to translate natural language prompts into vector representations. This model, which was trained on 400,000,000 image-text pairs, enables the transformation of a text prompt into a latent space for the diffusion model in the scenario of stable diffusion (more details in that paper).
This figure shows all data flow:
The weights file size for Stable Diffusion model v1 is 4 GB and v2 is 5 GB, making the model quite huge. The v1 model was trained on 256x256 and 512x512 LAION-5B pictures on a 4,000 GPU cluster using over 150.000 NVIDIA A100 GPU hours. The open-source pre-trained model is helpful for us. And we will.
Install
Before utilizing the Python sources for Stable Diffusion v1 on GitHub, we must install Miniconda (assuming Git and Python are already installed):
wget https://repo.anaconda.com/miniconda/Miniconda3-py39_4.12.0-Linux-x86_64.sh
chmod +x Miniconda3-py39_4.12.0-Linux-x86_64.sh
./Miniconda3-py39_4.12.0-Linux-x86_64.sh
conda update -n base -c defaults conda
Install the source and prepare the environment:
git clone https://github.com/CompVis/stable-diffusion
cd stable-diffusion
conda env create -f environment.yaml
conda activate ldm
pip3 install transformers --upgrade
Download the pre-trained model weights next. HiggingFace has the newest checkpoint sd-v14.ckpt (a download is free but registration is required). Put the file in the project folder and have fun:
python3 scripts/txt2img.py --prompt "hello world" --plms --ckpt sd-v1-4.ckpt --skip_grid --n_samples 1Almost. The installation is complete for happy users of current GPUs with 12 GB or more VRAM. RuntimeError: CUDA out of memory will occur otherwise. Two solutions exist.
Running the optimized version
Try optimizing first. After cloning the repository and enabling the environment (as previously), we can run the command:
python3 optimizedSD/optimized_txt2img.py --prompt "hello world" --ckpt sd-v1-4.ckpt --skip_grid --n_samples 1Stable Diffusion worked on my visual card with 8 GB RAM (alas, I did not behave well enough to get NVIDIA A100 for Christmas, so 8 GB GPU is the maximum I have;).
Running Stable Diffusion without GPU
If the GPU does not have enough RAM or is not CUDA-compatible, running the code on a CPU will be 20x slower but better than nothing. This unauthorized CPU-only branch from GitHub is easiest to obtain. We may easily edit the source code to use the latest version. It's strange that a pull request for that was made six months ago and still hasn't been approved, as the changes are simple. Readers can finish in 5 minutes:
Replace if attr.device!= torch.device(cuda) with if attr.device!= torch.device(cuda) and torch.cuda.is available at line 20 of ldm/models/diffusion/ddim.py ().
Replace if attr.device!= torch.device(cuda) with if attr.device!= torch.device(cuda) and torch.cuda.is available in line 20 of ldm/models/diffusion/plms.py ().
Replace device=cuda in lines 38, 55, 83, and 142 of ldm/modules/encoders/modules.py with device=cuda if torch.cuda.is available(), otherwise cpu.
Replace model.cuda() in scripts/txt2img.py line 28 and scripts/img2img.py line 43 with if torch.cuda.is available(): model.cuda ().
Run the script again.
Testing
Test the model. Text-to-image is the first choice. Test the command line example again:
python3 scripts/txt2img.py --prompt "hello world" --plms --ckpt sd-v1-4.ckpt --skip_grid --n_samples 1The slow generation takes 10 seconds on a GPU and 10 minutes on a CPU. Final image:
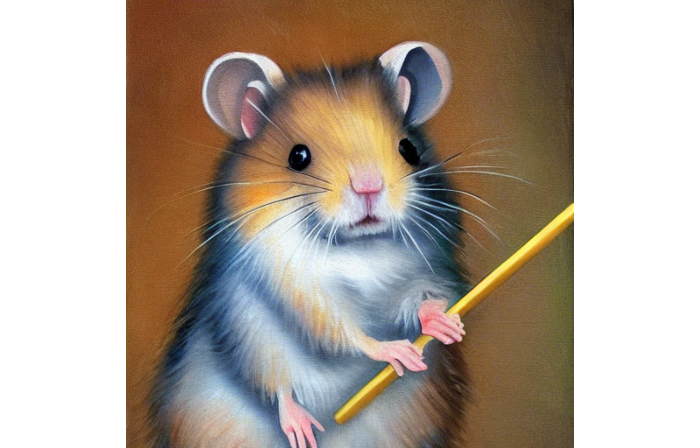
Hello world is dull and abstract. Try a brush-wielding hamster. Why? Because we can, and it's not as insane as Napoleon's cat. Another image:
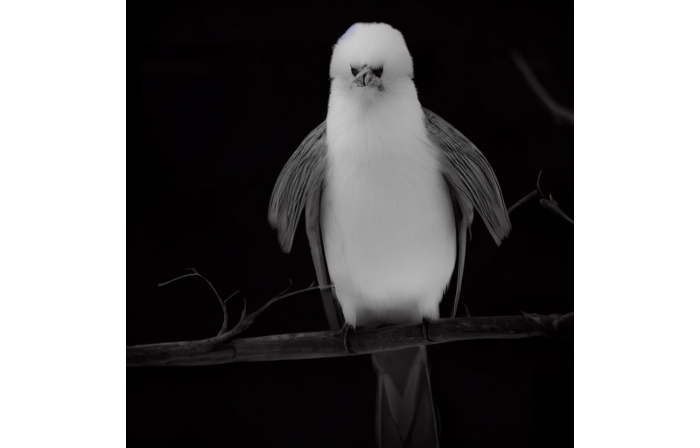
Generating an image from a text prompt and another image is interesting. I made this picture in two minutes using the image editor (sorry, drawing wasn't my strong suit):
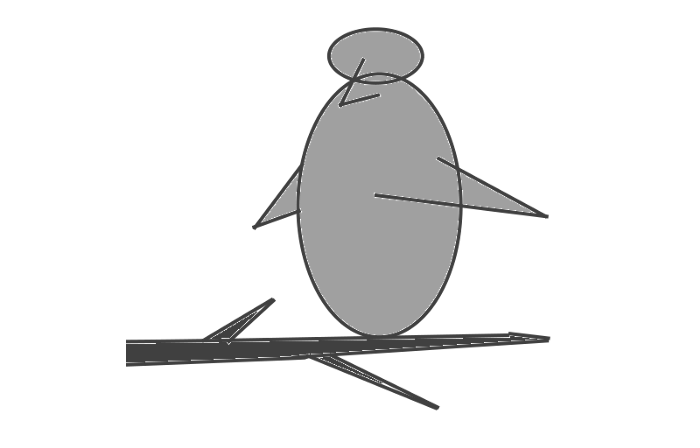
I can create an image from this drawing:
python3 scripts/img2img.py --prompt "A bird is sitting on a tree branch" --ckpt sd-v1-4.ckpt --init-img bird.png --strength 0.8It was far better than my initial drawing:
I hope readers understand and experiment.
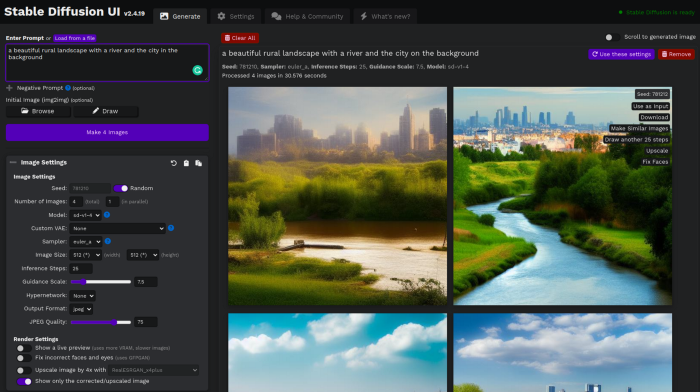
Stable Diffusion UI
Developers love the command line, but regular users may struggle. Stable Diffusion UI projects simplify image generation and installation. Simple usage:
Unpack the ZIP after downloading it from https://github.com/cmdr2/stable-diffusion-ui/releases. Linux and Windows are compatible with Stable Diffusion UI (sorry for Mac users, but those machines are not well-suitable for heavy machine learning tasks anyway;).
Start the script.
Done. The web browser UI makes configuring various Stable Diffusion features (upscaling, filtering, etc.) easy:
V2.1 of Stable Diffusion
I noticed the notification about releasing version 2.1 while writing this essay, and it was intriguing to test it. First, compare version 2 to version 1:
alternative text encoding. The Contrastive LanguageImage Pre-training (CLIP) deep learning model, which was trained on a significant number of text-image pairs, is used in Stable Diffusion 1. The open-source CLIP implementation used in Stable Diffusion 2 is called OpenCLIP. It is difficult to determine whether there have been any technical advancements or if legal concerns were the main focus. However, because the training datasets for the two text encoders were different, the output results from V1 and V2 will differ for the identical text prompts.
a new depth model that may be used to the output of image-to-image generation.
a revolutionary upscaling technique that can quadruple the resolution of an image.
Generally higher resolution Stable Diffusion 2 has the ability to produce both 512x512 and 768x768 pictures.
The Hugging Face website offers a free online demo of Stable Diffusion 2.1 for code testing. The process is the same as for version 1.4. Download a fresh version and activate the environment:
conda deactivate
conda env remove -n ldm  # Use this if version 1 was previously installed
git clone https://github.com/Stability-AI/stablediffusion
cd stablediffusion
conda env create -f environment.yaml
conda activate ldm
Hugging Face offers a new weights ckpt file.
The Out of memory error prevented me from running this version on my 8 GB GPU. Version 2.1 fails on CPUs with the slow conv2d cpu not implemented for Half error (according to this GitHub issue, the CPU support for this algorithm and data type will not be added). The model can be modified from half to full precision (float16 instead of float32), however it doesn't make sense since v1 runs up to 10 minutes on the CPU and v2.1 should be much slower. The online demo results are visible. The same hamster painting with a brush prompt yielded this result:
It looks different from v1, but it functions and has a higher resolution.
The superresolution.py script can run the 4x Stable Diffusion upscaler locally (the x4-upscaler-ema.ckpt weights file should be in the same folder):
python3 scripts/gradio/superresolution.py configs/stable-diffusion/x4-upscaling.yaml x4-upscaler-ema.ckptThis code allows the web browser UI to select the image to upscale:
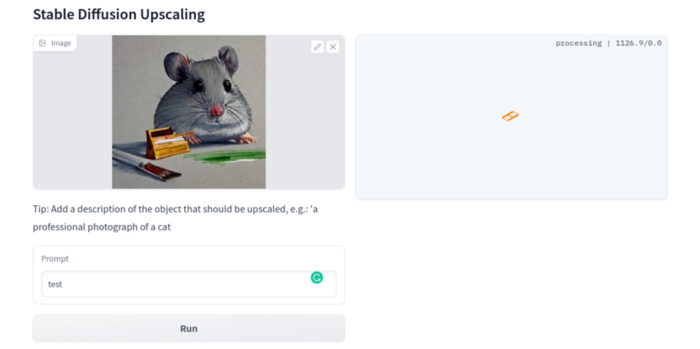
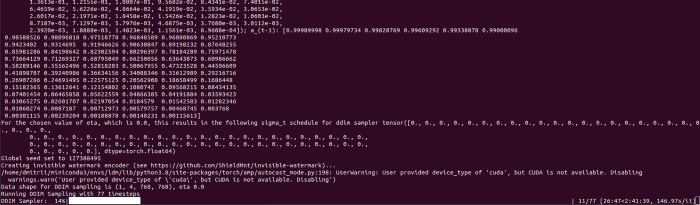
The copy-paste strategy may explain why the upscaler needs a text prompt (and the Hugging Face code snippet does not have any text input as well). I got a GPU out of memory error again, although CUDA can be disabled like v1. However, processing an image for more than two hours is unlikely:
Stable Diffusion Limitations
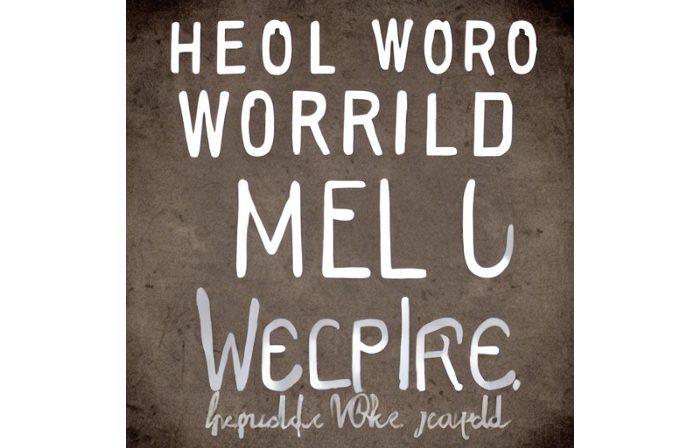
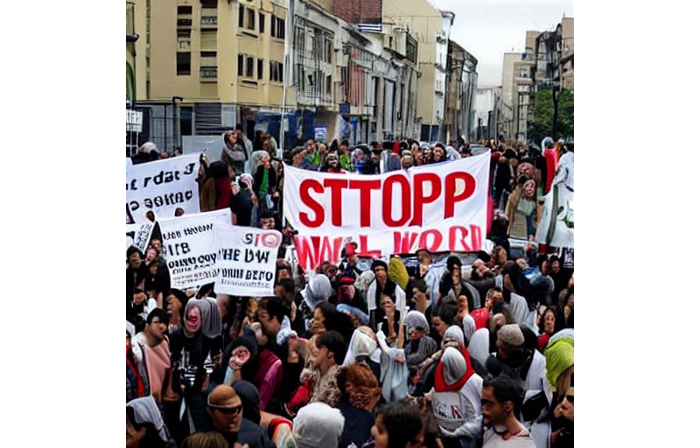
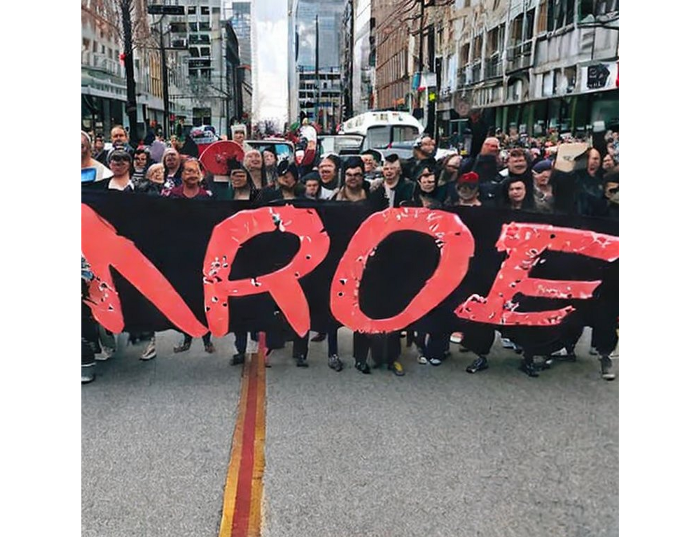
When we use the model, it's fun to see what it can and can't do. Generative models produce abstract visuals but not photorealistic ones. This fundamentally limits The generative neural network was trained on text and image pairs, but humans have a lot of background knowledge about the world. The neural network model knows nothing. If someone asks me to draw a Chinese text, I can draw something that looks like Chinese but is actually gibberish because I never learnt it. Generative AI does too! Humans can learn new languages, but the Stable Diffusion AI model includes only language and image decoder brain components. For instance, the Stable Diffusion model will pull NO WAR banner-bearers like this:
V1:
V2.1:
The shot shows text, although the model never learned to read or write. The model's string tokenizer automatically converts letters to lowercase before generating the image, so typing NO WAR banner or no war banner is the same.
I can also ask the model to draw a gorgeous woman:
V1:
V2.1:
The first image is gorgeous but physically incorrect. A second one is better, although it has an Uncanny valley feel. BTW, v2 has a lifehack to add a negative prompt and define what we don't want on the image. Readers might try adding horrible anatomy to the gorgeous woman request.
If we ask for a cartoon attractive woman, the results are nice, but accuracy doesn't matter:
V1:
V2.1:
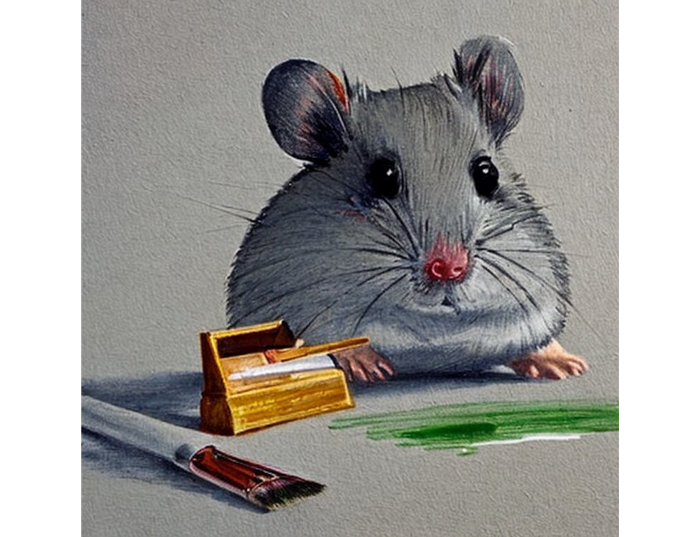
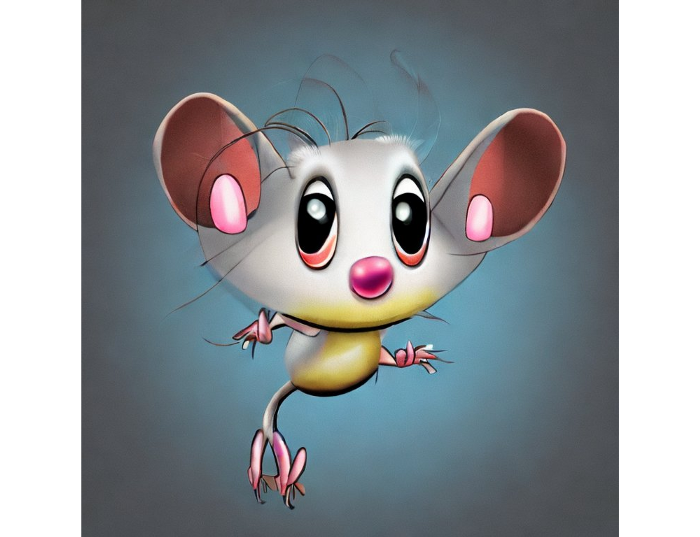
Another example: I ordered a model to sketch a mouse, which looks beautiful but has too many legs, ears, and fingers:
V1:
V2.1: improved but not perfect.
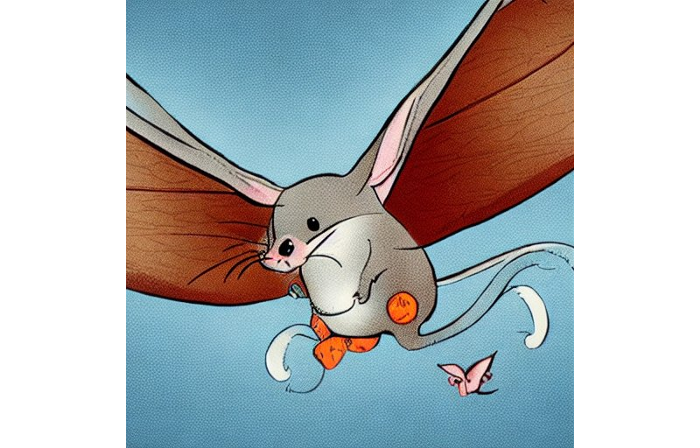
V1 produces a fun cartoon flying mouse if I want something more abstract:
I tried multiple times with V2.1 but only received this:
The image is OK, but the first version is closer to the request.
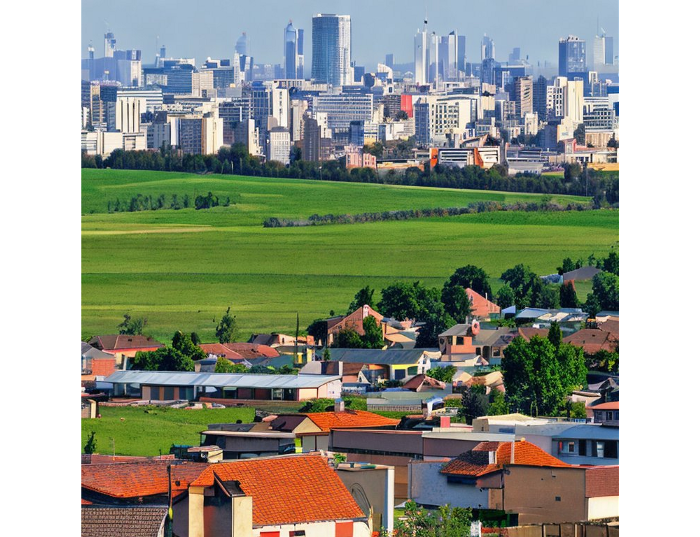
Stable Diffusion struggles to draw letters, fingers, etc. However, abstract images yield interesting outcomes. A rural landscape with a modern metropolis in the background turned out well:
V1:

V2.1:
Generative models help make paintings too (at least, abstract ones). I searched Google Image Search for modern art painting to see works by real artists, and this was the first image:
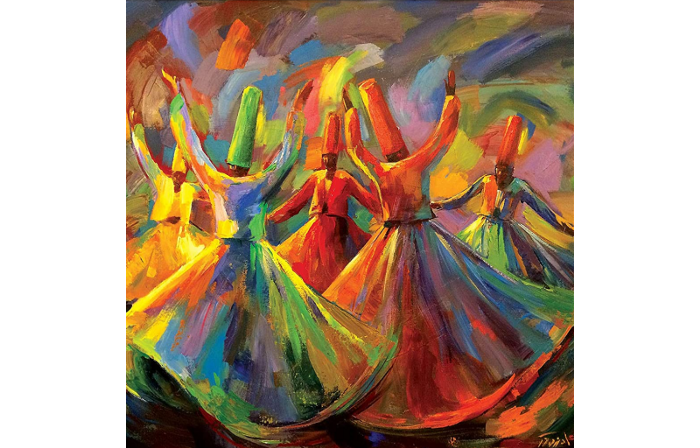
I typed "abstract oil painting of people dancing" and got this:
V1:
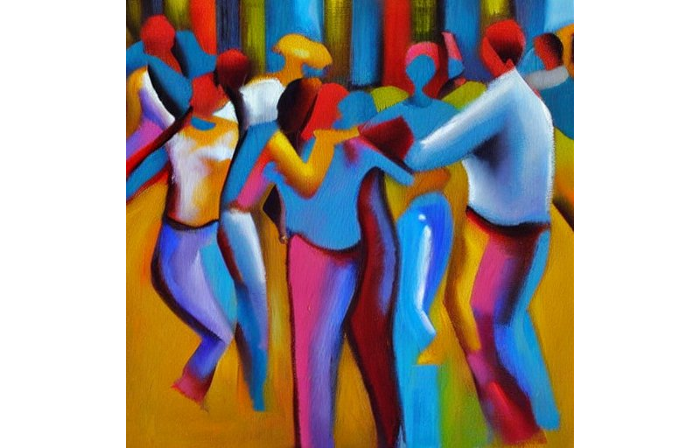
V2.1:
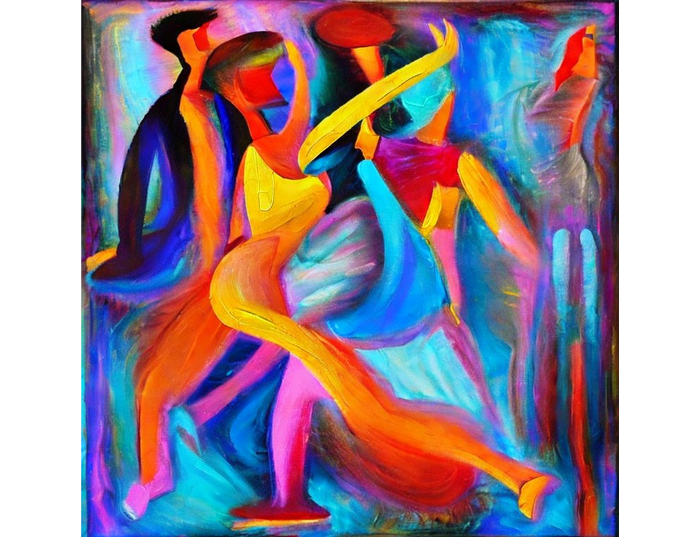
It's a different style, but I don't think the AI-generated graphics are worse than the human-drawn ones.
The AI model cannot think like humans. It thinks nothing. A stable diffusion model is a billion-parameter matrix trained on millions of text-image pairs. I input "robot is creating a picture with a pen" to create an image for this post. Humans understand requests immediately. I tried Stable Diffusion multiple times and got this:
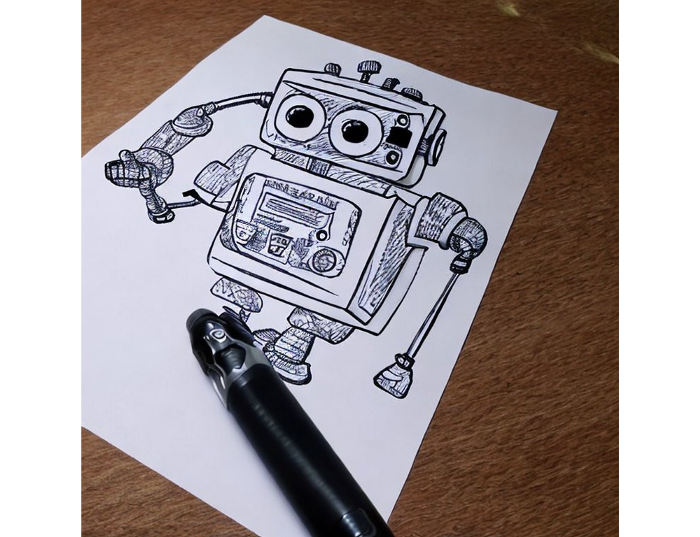
This great artwork has a pen, robot, and sketch, however it was not asked. Maybe it was because the tokenizer deleted is and a words from a statement, but I tried other requests such robot painting picture with pen without success. It's harder to prompt a model than a person.
I hope Stable Diffusion's general effects are evident. Despite its limitations, it can produce beautiful photographs in some settings. Readers who want to use Stable Diffusion results should be warned. Source code examination demonstrates that Stable Diffusion images feature a concealed watermark (text StableDiffusionV1 and SDV2) encoded using the invisible-watermark Python package. It's not a secret, because the official Stable Diffusion repository's test watermark.py file contains a decoding snippet. The put watermark line in the txt2img.py source code can be removed if desired. I didn't discover this watermark on photographs made by the online Hugging Face demo. Maybe I did something incorrectly (but maybe they are just not using the txt2img script on their backend at all).
Conclusion
The Stable Diffusion model was fascinating. As I mentioned before, trying something yourself is always better than taking someone else's word, so I encourage readers to do the same (including this article as well;).
Is Generative AI a game-changer? My humble experience tells me:
I think that place has a lot of potential. For designers and artists, generative AI can be a truly useful and innovative tool. Unfortunately, it can also pose a threat to some of them since if users can enter a text field to obtain a picture or a website logo in a matter of clicks, why would they pay more to a different party? Is it possible right now? unquestionably not yet. Images still have a very poor quality and are erroneous in minute details. And after viewing the image of the stunning woman above, models and fashion photographers may also unwind because it is highly unlikely that AI will replace them in the upcoming years.
Today, generative AI is still in its infancy. Even 768x768 images are considered to be of a high resolution when using neural networks, which are computationally highly expensive. There isn't an AI model that can generate high-resolution photographs natively without upscaling or other methods, at least not as of the time this article was written, but it will happen eventually.
It is still a challenge to accurately represent knowledge in neural networks (information like how many legs a cat has or the year Napoleon was born). Consequently, AI models struggle to create photorealistic photos, at least where little details are important (on the other side, when I searched Google for modern art paintings, the results are often even worse;).
When compared to the carefully chosen images from official web pages or YouTube reviews, the average output quality of a Stable Diffusion generation process is actually less attractive because to its high degree of randomness. When using the same technique on their own, consumers will theoretically only view those images as 1% of the results.
Anyway, it's exciting to witness this area's advancement, especially because the project is open source. Google's Imagen and DALL-E 2 can also produce remarkable findings. It will be interesting to see how they progress.