More on Web3 & Crypto

Ren & Heinrich
3 years ago
200 DeFi Projects were examined. Here is what I learned.

I analyze the top 200 DeFi crypto projects in this article.
This isn't a study. The findings benefit crypto investors.
Let’s go!
A set of data
I analyzed data from defillama.com. In my analysis, I used the top 200 DeFis by TVL in October 2022.
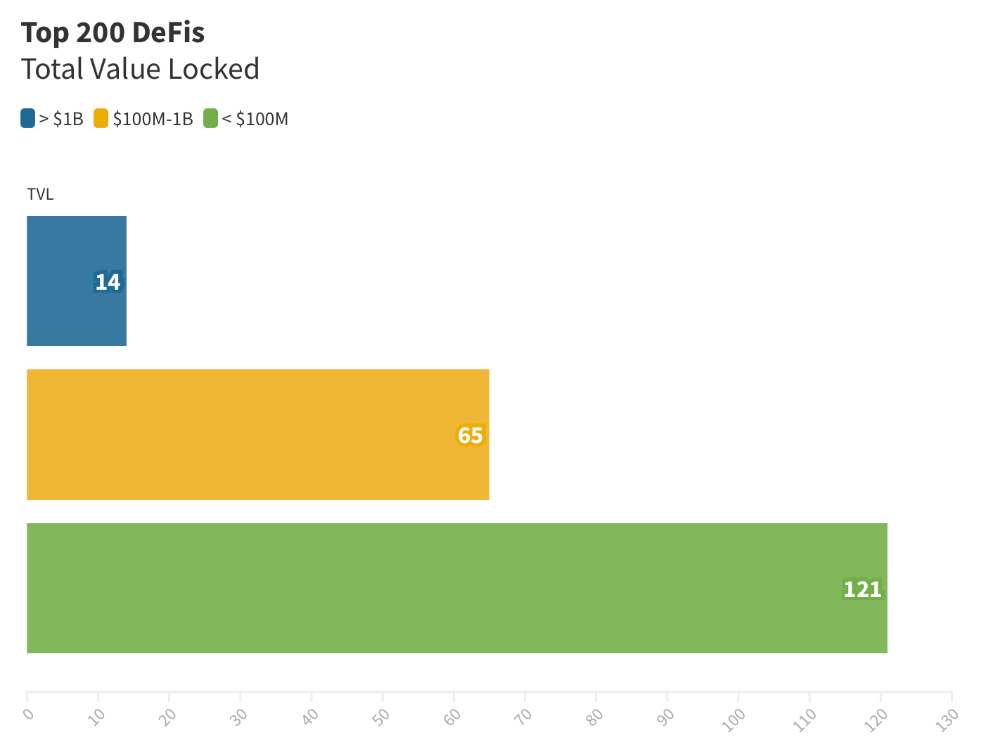
Total Locked Value
The chart below shows platform-specific locked value.
14 platforms had $1B+ TVL. 65 platforms have $100M-$1B TVL. The remaining 121 platforms had TVLs below $100 million, with the lowest being $23 million.
TVLs are distributed Pareto. Top 40% of DeFis account for 80% of TVLs.
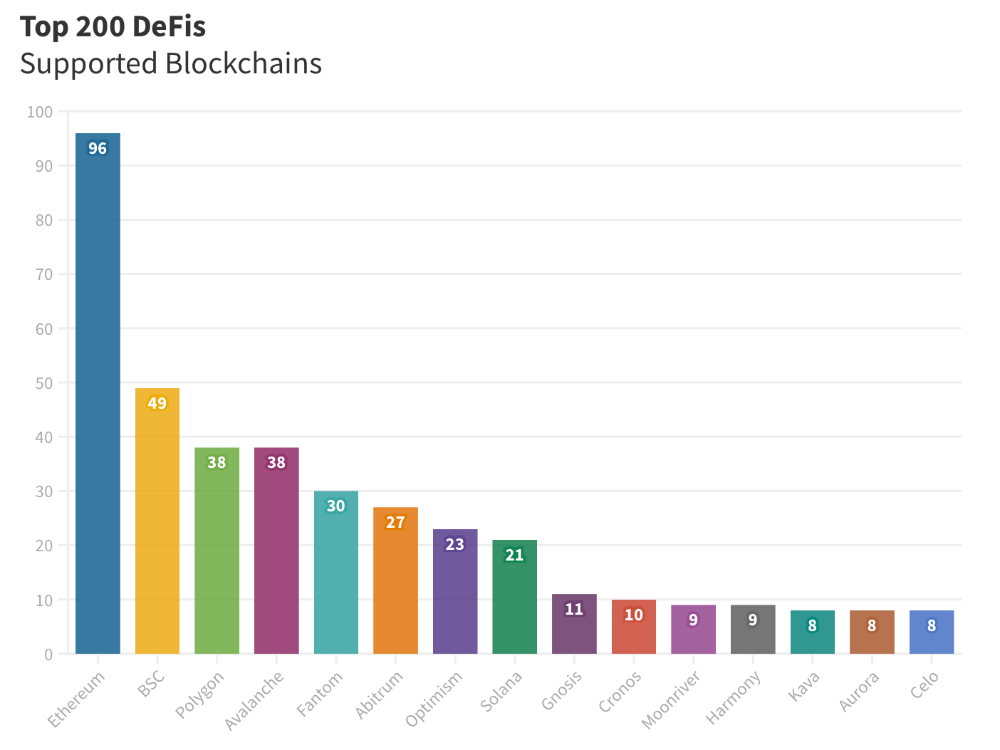
Compliant Blockchains
Ethereum's blockchain leads DeFi. 96 of the examined projects offer services on Ethereum. Behind BSC, Polygon, and Avalanche.
Five platforms used 10+ blockchains. 36 between 2-10 159 used 1 blockchain.
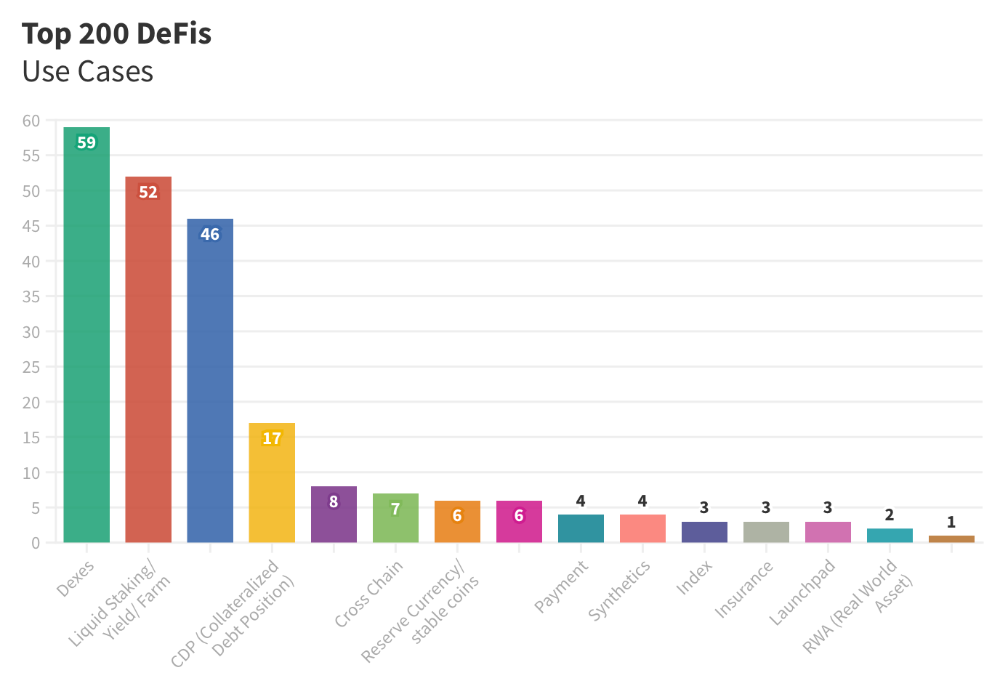
Use Cases for DeFi
The chart below shows platform use cases. Each platform has decentralized exchanges, liquid staking, yield farming, and lending.
These use cases are DefiLlama's main platform features.
Which use case costs the most? Chart explains. Collateralized debt, liquid staking, dexes, and lending have high TVLs.

The DeFi Industry
I compared three high-TVL platforms (Maker DAO, Balancer, AAVE). The columns show monthly TVL and token price changes. The graph shows monthly Bitcoin price changes.
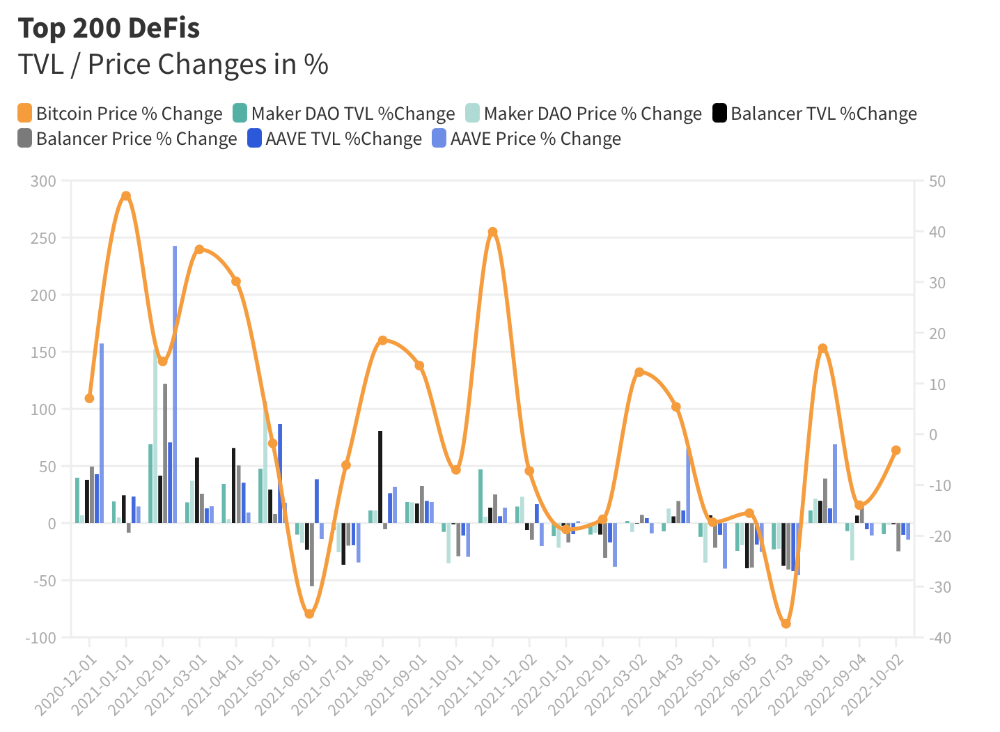
Each platform's market moves similarly.
Probably because most DeFi deposits are cryptocurrencies. Since individual currencies are highly correlated with Bitcoin, it's not surprising that they move in unison.
Takeaways
This analysis shows that the most common DeFi services (decentralized exchanges, liquid staking, yield farming, and lending) also have the highest average locked value.
Some projects run on one or two blockchains, while others use 15 or 20. Our analysis shows that a project's blockchain count has no correlation with its success.
It's hard to tell if certain use cases are rising. Bitcoin's price heavily affects the entire DeFi market.
TVL seems to be a good indicator of a DeFi platform's success and quality. Higher TVL platforms are cheaper. They're a better long-term investment because they gain or lose less value than DeFis with lower TVLs.

Yogesh Rawal
3 years ago
Blockchain to solve growing privacy challenges
Most online activity is now public. Businesses collect, store, and use our personal data to improve sales and services.
In 2014, Uber executives and employees were accused of spying on customers using tools like maps. Another incident raised concerns about the use of ‘FaceApp'. The app was created by a small Russian company, and the photos can be used in unexpected ways. The Cambridge Analytica scandal exposed serious privacy issues. The whole incident raised questions about how governments and businesses should handle data. Modern technologies and practices also make it easier to link data to people.
As a result, governments and regulators have taken steps to protect user data. The General Data Protection Regulation (GDPR) was introduced by the EU to address data privacy issues. The law governs how businesses collect and process user data. The Data Protection Bill in India and the General Data Protection Law in Brazil are similar.
Despite the impact these regulations have made on data practices, a lot of distance is yet to cover.
Blockchain's solution
Blockchain may be able to address growing data privacy concerns. The technology protects our personal data by providing security and anonymity. The blockchain uses random strings of numbers called public and private keys to maintain privacy. These keys allow a person to be identified without revealing their identity. Blockchain may be able to ensure data privacy and security in this way. Let's dig deeper.
Financial transactions
Online payments require third-party services like PayPal or Google Pay. Using blockchain can eliminate the need to trust third parties. Users can send payments between peers using their public and private keys without providing personal information to a third-party application. Blockchain will also secure financial data.
Healthcare data
Blockchain technology can give patients more control over their data. There are benefits to doing so. Once the data is recorded on the ledger, patients can keep it secure and only allow authorized access. They can also only give the healthcare provider part of the information needed.
The major challenge
We tried to figure out how blockchain could help solve the growing data privacy issues. However, using blockchain to address privacy concerns has significant drawbacks. Blockchain is not designed for data privacy. A ‘distributed' ledger will be used to store the data. Another issue is the immutability of blockchain. Data entered into the ledger cannot be changed or deleted. It will be impossible to remove personal data from the ledger even if desired.
MIT's Enigma Project aims to solve this. Enigma's ‘Secret Network' allows nodes to process data without seeing it. Decentralized applications can use Secret Network to use encrypted data without revealing it.
Another startup, Oasis Labs, uses blockchain to address data privacy issues. They are working on a system that will allow businesses to protect their customers' data.
Conclusion
Blockchain technology is already being used. Several governments use blockchain to eliminate centralized servers and improve data security. In this information age, it is vital to safeguard our data. How blockchain can help us in this matter is still unknown as the world explores the technology.

CyberPunkMetalHead
3 years ago
It's all about the ego with Terra 2.0.
UST depegs and LUNA crashes 99.999% in a fraction of the time it takes the Moon to orbit the Earth.
Fat Man, a Terra whistle-blower, promises to expose Do Kwon's dirty secrets and shady deals.

The Terra community has voted to relaunch Terra LUNA on a new blockchain. The Terra 2.0 Pheonix-1 blockchain went live on May 28, 2022, and people were airdropped the new LUNA, now called LUNA, while the old LUNA became LUNA Classic.
Does LUNA deserve another chance? To answer this, or at least start a conversation about the Terra 2.0 chain's advantages and limitations, we must assess its fundamentals, ideology, and long-term vision.
Whatever the result, our analysis must be thorough and ruthless. A failure of this magnitude cannot happen again, so we must magnify every potential breaking point by 10.
Will UST and LUNA holders be compensated in full?
The obvious. First, and arguably most important, is to restore previous UST and LUNA holders' bags.
Terra 2.0 has 1,000,000,000,000 tokens to distribute.
25% of a community pool
Holders of pre-attack LUNA: 35%
10% of aUST holders prior to attack
Holders of LUNA after an attack: 10%
UST holders as of the attack: 20%
Every LUNA and UST holder has been compensated according to the above proposal.
According to self-reported data, the new chain has 210.000.000 tokens and a $1.3bn marketcap. LUNC and UST alone lost $40bn. The new token must fill this gap. Since launch:
LUNA holders collectively own $1b worth of LUNA if we subtract the 25% community pool airdrop from the current market cap and assume airdropped LUNA was never sold.
At the current supply, the chain must grow 40 times to compensate holders. At the current supply, LUNA must reach $240.
LUNA needs a full-on Bull Market to make LUNC and UST holders whole.
Who knows if you'll be whole? From the time you bought to the amount and price, there are too many variables to determine if Terra can cover individual losses.
The above distribution doesn't consider individual cases. Terra didn't solve individual cases. It would have been huge.
What does LUNA offer in terms of value?
UST's marketcap peaked at $18bn, while LUNC's was $41bn. LUNC and UST drove the Terra chain's value.
After it was confirmed (again) that algorithmic stablecoins are bad, Terra 2.0 will no longer support them.
Algorithmic stablecoins contributed greatly to Terra's growth and value proposition. Terra 2.0 has no product without algorithmic stablecoins.
Terra 2.0 has an identity crisis because it has no actual product. It's like Volkswagen faking carbon emission results and then stopping car production.
A project that has already lost the trust of its users and nearly all of its value cannot survive without a clear and in-demand use case.
Do Kwon, how about him?
Oh, the Twitter-caller-poor? Who challenges crypto billionaires to break his LUNA chain? Who dissolved Terra Labs South Korea before depeg? Arrogant guy?
That's not a good image for LUNA, especially when making amends. I think he should step down and let a nicer person be Terra 2.0's frontman.
The verdict
Terra has a terrific community with an arrogant, unlikeable leader. The new LUNA chain must grow 40 times before it can start making up its losses, and even then, not everyone's losses will be covered.
I won't invest in Terra 2.0 or other algorithmic stablecoins in the near future. I won't be near any Do Kwon-related project within 100 miles. My opinion.
Can Terra 2.0 be saved? Comment below.
You might also like

Joseph Mavericks
3 years ago
The world's 36th richest man uses a 5-step system to get what he wants.
Ray Dalio's super-effective roadmap

Ray Dalio's $22 billion net worth ranks him 36th globally. From 1975 to 2011, he built the world's most successful hedge fund, never losing more than 4% from 1991 to 2020. (and only doing so during 3 calendar years).
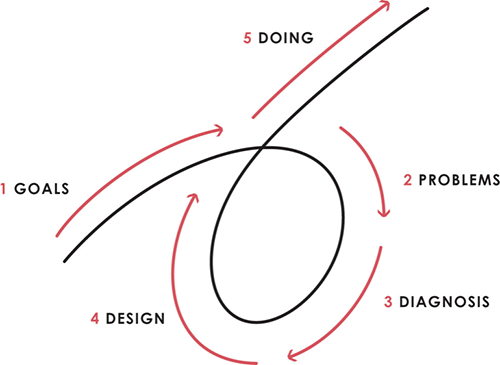
Dalio describes a 5-step process in his best-selling book Principles. It's the playbook he's used to build his hedge fund, beat the markets, and face personal challenges.
This 5-step system is so valuable and well-explained that I didn't edit or change anything; I only added my own insights in the parts I found most relevant and/or relatable as a young entrepreneur. The system's overview:
Have clear goals
Identify and don’t tolerate problems
Diagnose problems to get at their root causes
Design plans that will get you around those problems
Do what is necessary to push through the plans to get results
If you follow these 5 steps in a virtuous loop, you'll almost always see results. Repeat the process for each goal you have.
1. Have clear goals
a) Prioritize: You can have almost anything, but not everything.
I started and never launched dozens of projects for 10 years because I was scattered. I opened a t-shirt store, traded algorithms, sold art on Instagram, painted skateboards, and tinkered with electronics. I decided to try blogging for 6 months to see where it took me. Still going after 3 years.
b) Don’t confuse goals with desires.
A goal inspires you to act. Unreasonable desires prevent you from achieving your goals.
c) Reconcile your goals and desires to decide what you want.
d) Don't confuse success with its trappings.
e) Never dismiss a goal as unattainable.
Always one path is best. Your perception of what's possible depends on what you know now. I never thought I'd make money writing online so quickly, and now I see a whole new horizon of business opportunities I didn't know about before.
f) Expectations create abilities.
Don't limit your abilities. More you strive, the more you'll achieve.
g) Flexibility and self-accountability can almost guarantee success.
Flexible people accept what reality or others teach them. Self-accountability is the ability to recognize your mistakes and be more creative, flexible, and determined.
h) Handling setbacks well is as important as moving forward.
Learn when to minimize losses and when to let go and move on.
2. Don't ignore problems
a) See painful problems as improvement opportunities.
Every problem, painful situation, and challenge is an opportunity. Read The Art of Happiness for more.
b) Don't avoid problems because of harsh realities.
Recognizing your weaknesses isn't the same as giving in. It's the first step in overcoming them.
c) Specify your issues.
There is no "one-size-fits-all" solution.
d) Don’t mistake a cause of a problem with the real problem.
"I can't sleep" is a cause, not a problem. "I'm underperforming" could be a problem.
e) Separate big from small problems.
You have limited time and energy, so focus on the biggest problems.
f) Don't ignore a problem.
Identifying a problem and tolerating it is like not identifying it.
3. Identify problems' root causes
a) Decide "what to do" after assessing "what is."
"A good diagnosis takes 15 to 60 minutes, depending on its accuracy and complexity. [...] Like principles, root causes recur in different situations.
b) Separate proximate and root causes.
"You can only solve problems by removing their root causes, and to do that, you must distinguish symptoms from disease."
c) Knowing someone's (or your own) personality can help you predict their behavior.
4. Design plans that will get you around the problems
a) Retrace your steps.
Analyze your past to determine your future.
b) Consider your problem a machine's output.
Consider how to improve your machine. It's a game then.
c) There are many ways to reach your goals.
Find a solution.
d) Visualize who will do what in your plan like a movie script.
Consider your movie's actors and script's turning points, then act accordingly. The game continues.
e) Document your plan so others can judge your progress.
Accountability boosts success.
f) Know that a good plan doesn't take much time.
The execution is usually the hardest part, but most people either don't have a plan or keep changing it. Don't drive while building the car. Build it first, because it'll be bumpy.
5. Do what is necessary to push through the plans to get results
a) Great planners without execution fail.
Life is won with more than just planning. Similarly, practice without talent beats talent without practice.
b) Work ethic is undervalued.
Hyper-productivity is praised in corporate America, even if it leads nowhere. To get things done, use checklists, fewer emails, and more desk time.
c) Set clear metrics to ensure plan adherence.
I've written about the OKR strategy for organizations with multiple people here. If you're on your own, I recommend the Wheel of Life approach. Both systems start with goals and tasks to achieve them. Then start executing on a realistic timeline.
If you find solutions, weaknesses don't matter.
Everyone's weak. You, me, Gates, Dalio, even Musk. Nobody will be great at all 5 steps of the system because no one can think in all the ways required. Some are good at analyzing and diagnosing but bad at executing. Some are good planners but poor communicators. Others lack self-discipline.
Stay humble and ask for help when needed. Nobody has ever succeeded 100% on their own, without anyone else's help. That's the paradox of individual success: teamwork is the only way to get there.
Most people won't have the skills to execute even the best plan. You can get missing skills in two ways:
Self-taught (time-consuming)
Others' (requires humility) light
On knowing what to do with your life
“Some people have good mental maps and know what to do on their own. Maybe they learned them or were blessed with common sense. They have more answers than others. Others are more humble and open-minded. […] Open-mindedness and mental maps are most powerful.” — Ray Dalio
I've always known what I wanted to do, so I'm lucky. I'm almost 30 and have always had trouble executing. Good thing I never stopped experimenting, but I never committed to anything long-term. I jumped between projects. I decided 3 years ago to stick to one project for at least 6 months and haven't looked back.
Maybe you're good at staying focused and executing, but you don't know what to do. Maybe you have none of these because you haven't found your purpose. Always try new projects and talk to as many people as possible. It will give you inspiration and ideas and set you up for success.
There is almost always a way to achieve a crazy goal or idea.
Enjoy the journey, whichever path you take.

Katrine Tjoelsen
3 years ago
8 Communication Hacks I Use as a Young Employee
Learn these subtle cues to gain influence.
Hate being ignored?
As a 24-year-old, I struggled at work. Attention-getting tips How to avoid being judged by my size, gender, and lack of wrinkles or gray hair?
I've learned seniority hacks. Influence. Within two years as a product manager, I led a team. I'm a Stanford MBA student.
These communication hacks can make you look senior and influential.
1. Slowly speak
We speak quickly because we're afraid of being interrupted.
When I doubt my ideas, I speak quickly. How can we slow down? Jamie Chapman says speaking slowly saps our energy.
Chapman suggests emphasizing certain words and pausing.
2. Interrupted? Stop the stopper
Someone interrupt your speech?
Don't wait. "May I finish?" No pause needed. Stop interrupting. I first tried this in Leadership Laboratory at Stanford. How quickly I gained influence amazed me.
Next time, try “May I finish?” If that’s not enough, try these other tips from Wendy R.S. O’Connor.
3. Context
Others don't always see what's obvious to you.
Through explanation, you help others see the big picture. If a senior knows it, you help them see where your work fits.
4. Don't ask questions in statements
“Your statement lost its effect when you ended it on a high pitch,” a group member told me. Upspeak, it’s called. I do it when I feel uncertain.
Upspeak loses influence and credibility. Unneeded. When unsure, we can say "I think." We can even ask a proper question.
Someone else's boasting is no reason to be dismissive. As leaders and colleagues, we should listen to our colleagues even if they use this speech pattern.
Give your words impact.
5. Signpost structure
Signposts improve clarity by providing structure and transitions.
Communication coach Alexander Lyon explains how to use "first," "second," and "third" He explains classic and summary transitions to help the listener switch topics.
Signs clarify. Clarity matters.
6. Eliminate email fluff
“Fine. When will the report be ready? — Jeff.”
Notice how senior leaders write short, direct emails? I often use formalities like "dear," "hope you're well," and "kind regards"
Formality is (usually) unnecessary.
7. Replace exclamation marks with periods
See how junior an exclamation-filled email looks:
Hi, all!
Hope you’re as excited as I am for tomorrow! We’re celebrating our accomplishments with cake! Join us tomorrow at 2 pm!
See you soon!
Why the exclamation points? Why not just one?
Hi, all.
Hope you’re as excited as I am for tomorrow. We’re celebrating our accomplishments with cake. Join us tomorrow at 2 pm!
See you soon.
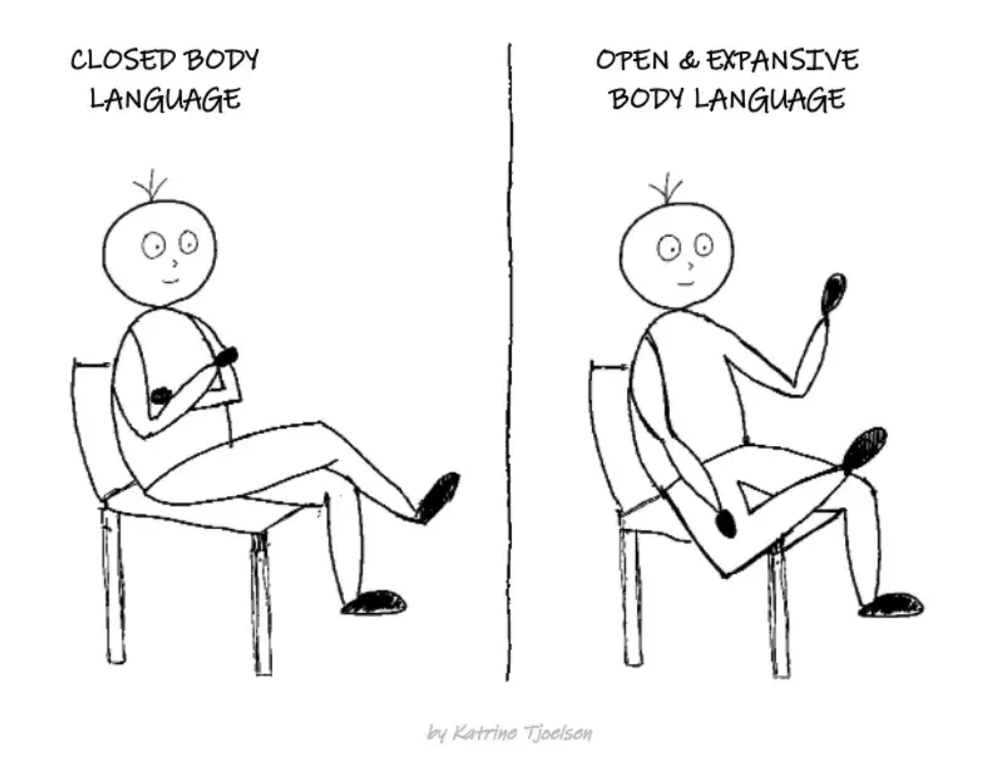
8. Take space
"Playing high" means having an open, relaxed body, says Stanford professor and author Deborah Gruenfield.
Crossed legs or looking small? Relax. Get bigger.

SAHIL SAPRU
3 years ago
How I grew my business to a $5 million annual recurring revenue
Scaling your startup requires answering customer demands, not growth tricks.
I cofounded Freedo Rentals in 2019. I reached 50 lakh+ ARR in 6 months before quitting owing to the epidemic.
Freedo aimed to solve 2 customer pain points:
Users lacked a reliable last-mile transportation option.
The amount that Auto walas charge for unmetered services
Solution?
Effectively simple.
Build ports at high-demand spots (colleges, residential societies, metros). Electric ride-sharing can meet demand.
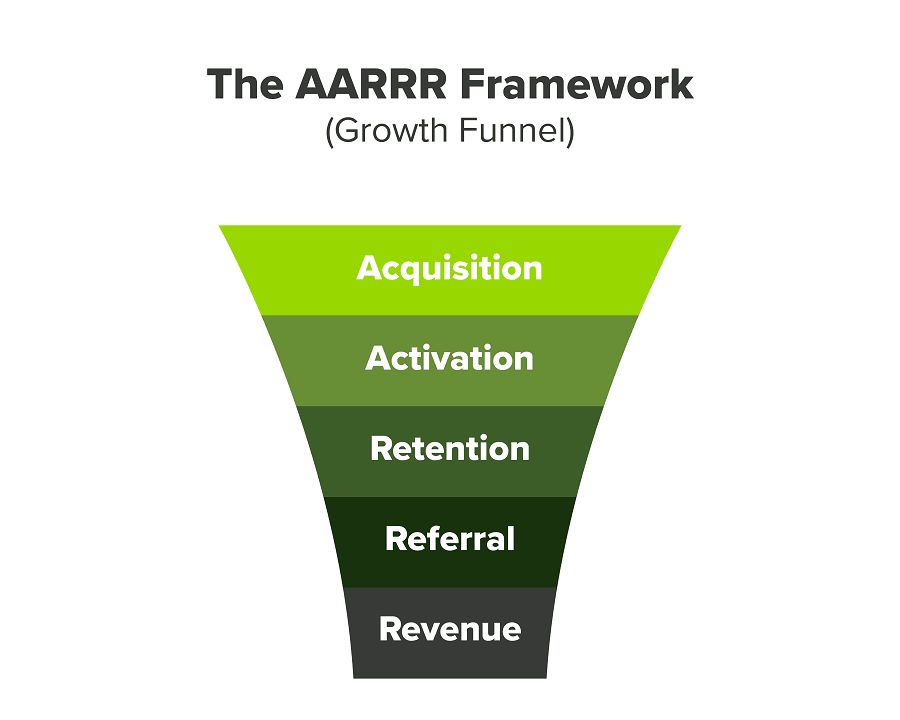
We had many problems scaling. I'll explain using the AARRR model.
Brand unfamiliarity or a novel product offering were the problems with awareness. Nobody knew what Freedo was or what it did.
Problem with awareness: Content and advertisements did a poor job of communicating the task at hand. The advertisements clashed with the white-collar part because they were too cheesy.
Retention Issue: We encountered issues, indicating that the product was insufficient. Problems with keyless entry, creating bills, stealing helmets, etc.
Retention/Revenue Issue: Costly compared to established rivals. Shared cars were 1/3 of our cost.
Referral Issue: Missing the opportunity to seize the AHA moment. After the ride, nobody remembered us.
Once you know where you're struggling with AARRR, iterative solutions are usually best.
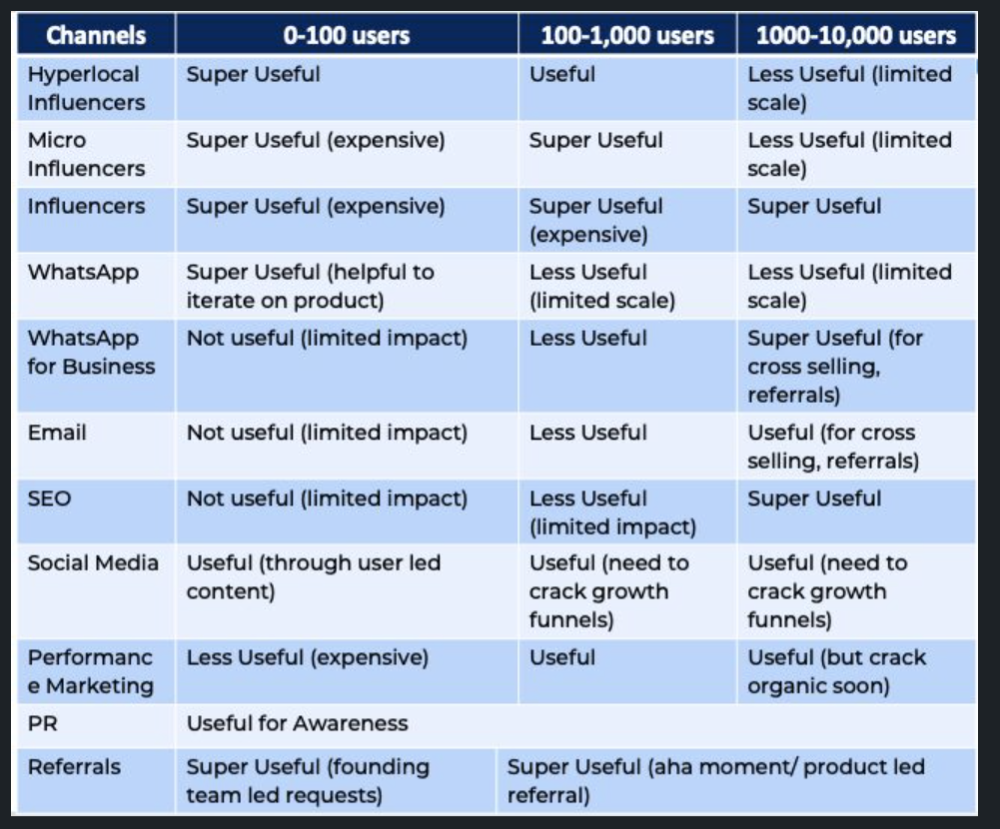
Once you have nailed the AARRR model, most startups use paid channels to scale. This dependence, on paid channels, increases with scale unless you crack your organic/inbound game.
Over-index growth loops. Growth loops increase inflow and customers as you scale.
When considering growth, ask yourself:
Who is the solution's ICP (Ideal Customer Profile)? (To whom are you selling)
What are the most important messages I should convey to customers? (This is an A/B test.)
Which marketing channels ought I prioritize? (Conduct analysis based on the startup's maturity/stage.)
Choose the important metrics to monitor for your AARRR funnel (not all metrics are equal)
Identify the Flywheel effect's growth loops (inertia matters)
My biggest mistakes:
not paying attention to consumer comments or satisfaction. It is the main cause of problems with referrals, retention, and acquisition for startups. Beyond your NPS, you should consider second-order consequences.
The tasks at hand should be quite clear.
Here's my scaling equation:
Growth = A x B x C
A = Funnel top (Traffic)
B = Product Valuation (Solving a real pain point)
C = Aha! (Emotional response)
Freedo's A, B, and C created a unique offering.
Freedo’s ABC:
A — Working or Studying population in NCR
B — Electric Vehicles provide last-mile mobility as a clean and affordable solution
C — One click booking with a no-noise scooter
Final outcome:
FWe scaled Freedo to Rs. 50 lakh MRR and were growing 60% month on month till the pandemic ceased our growth story.
How we did it?
We tried ambassadors and coupons. WhatsApp was our most successful A/B test.
We grew widespread adoption through college and society WhatsApp groups. We requested users for referrals in community groups.
What worked for us won't work for others. This scale underwent many revisions.
Every firm is different, thus you must know your customers. Needs to determine which channel to prioritize and when.
Users desired a safe, time-bound means to get there.
This (not mine) growth framework helped me a lot. You should follow suit.