

:max_bytes(150000):strip_icc():gifv():format(webp)/reiff_headshot-5bfc2a60c9e77c00519a70bd.jpg)
Howey Test and Cryptocurrencies: 'Every ICO Is a Security'
What Is the Howey Test?
To determine whether a transaction qualifies as a "investment contract" and thus qualifies as a security, the Howey Test refers to the U.S. Supreme Court cass: the Securities Act of 1933 and the Securities Exchange Act of 1934. According to the Howey Test, an investment contract exists when "money is invested in a common enterprise with a reasonable expectation of profits from others' efforts."
The test applies to any contract, scheme, or transaction. The Howey Test helps investors and project backers understand blockchain and digital currency projects. ICOs and certain cryptocurrencies may be found to be "investment contracts" under the test.
Understanding the Howey Test
The Howey Test comes from the 1946 Supreme Court case SEC v. W.J. Howey Co. The Howey Company sold citrus groves to Florida buyers who leased them back to Howey. The company would maintain the groves and sell the fruit for the owners. Both parties benefited. Most buyers had no farming experience and were not required to farm the land.
The SEC intervened because Howey failed to register the transactions. The court ruled that the leaseback agreements were investment contracts.
This established four criteria for determining an investment contract. Investing contract:
- An investment of money
- n a common enterprise
- With the expectation of profit
- To be derived from the efforts of others
In the case of Howey, the buyers saw the transactions as valuable because others provided the labor and expertise. An income stream was obtained by only investing capital. As a result of the Howey Test, the transaction had to be registered with the SEC.
Howey Test and Cryptocurrencies
Bitcoin is notoriously difficult to categorize. Decentralized, they evade regulation in many ways. Regardless, the SEC is looking into digital assets and determining when their sale qualifies as an investment contract.
The SEC claims that selling digital assets meets the "investment of money" test because fiat money or other digital assets are being exchanged. Like the "common enterprise" test.
Whether a digital asset qualifies as an investment contract depends on whether there is a "expectation of profit from others' efforts."
For example, buyers of digital assets may be relying on others' efforts if they expect the project's backers to build and maintain the digital network, rather than a dispersed community of unaffiliated users. Also, if the project's backers create scarcity by burning tokens, the test is met. Another way the "efforts of others" test is met is if the project's backers continue to act in a managerial role.
These are just a few examples given by the SEC. If a project's success is dependent on ongoing support from backers, the buyer of the digital asset is likely relying on "others' efforts."
Special Considerations
If the SEC determines a cryptocurrency token is a security, many issues arise. It means the SEC can decide whether a token can be sold to US investors and forces the project to register.
In 2017, the SEC ruled that selling DAO tokens for Ether violated federal securities laws. Instead of enforcing securities laws, the SEC issued a warning to the cryptocurrency industry.
Due to the Howey Test, most ICOs today are likely inaccessible to US investors. After a year of ICOs, then-SEC Chair Jay Clayton declared them all securities.
SEC Chairman Gensler Agrees With Predecessor: 'Every ICO Is a Security'
Howey Test FAQs
How Do You Determine If Something Is a Security?
The Howey Test determines whether certain transactions are "investment contracts." Securities are transactions that qualify as "investment contracts" under the Securities Act of 1933 and the Securities Exchange Act of 1934.
The Howey Test looks for a "investment of money in a common enterprise with a reasonable expectation of profits from others' efforts." If so, the Securities Act of 1933 and the Securities Exchange Act of 1934 require disclosure and registration.
Why Is Bitcoin Not a Security?
Former SEC Chair Jay Clayton clarified in June 2018 that bitcoin is not a security: "Cryptocurrencies: Replace the dollar, euro, and yen with bitcoin. That type of currency is not a security," said Clayton.
Bitcoin, which has never sought public funding to develop its technology, fails the SEC's Howey Test. However, according to Clayton, ICO tokens are securities.
A Security Defined by the SEC
In the public and private markets, securities are fungible and tradeable financial instruments. The SEC regulates public securities sales.
The Supreme Court defined a security offering in SEC v. W.J. Howey Co. In its judgment, the court defines a security using four criteria:
- An investment contract's existence
- The formation of a common enterprise
- The issuer's profit promise
- Third-party promotion of the offering
Read original post.
More on Web3 & Crypto

Julie Plavnik
3 years ago
How to Become a Crypto Broker [Complying and Making Money]
Three options exist. The third one is the quickest and most fruitful.
You've mastered crypto trading and want to become a broker.
So you may wonder: Where to begin?
If so, keep reading.
Today I'll compare three different approaches to becoming a cryptocurrency trader.
What are cryptocurrency brokers, and how do they vary from stockbrokers?
A stockbroker implements clients' market orders (retail or institutional ones).
Brokerage firms are regulated, insured, and subject to regulatory monitoring.
Stockbrokers are required between buyers and sellers. They can't trade without a broker. To trade, a trader must open a broker account and deposit money. When a trader shops, he tells his broker what orders to place.
Crypto brokerage is trade intermediation with cryptocurrency.
In crypto trading, however, brokers are optional.
Crypto exchanges offer direct transactions. Open an exchange account (no broker needed) and make a deposit.
Question:
Since crypto allows DIY trading, why use a broker?
Let's compare cryptocurrency exchanges vs. brokers.
Broker versus cryptocurrency exchange
Most existing crypto exchanges are basically brokers.
Examine their primary services:
connecting purchasers and suppliers
having custody of clients' money (with the exception of decentralized cryptocurrency exchanges),
clearance of transactions.
Brokerage is comparable, don't you think?
There are exceptions. I mean a few large crypto exchanges that follow the stock exchange paradigm. They outsource brokerage, custody, and clearing operations. Classic exchange setups are rare in today's bitcoin industry.
Back to our favorite “standard” crypto exchanges. All-in-one exchanges and brokers. And usually, they operate under a broker or a broker-dealer license, save for the exchanges registered somewhere in a free-trade offshore paradise. Those don’t bother with any licensing.
What’s the sense of having two brokers at a time?
Better liquidity and trading convenience.
The crypto business is compartmentalized.
We have CEXs, DEXs, hybrid exchanges, and semi-exchanges (those that aggregate liquidity but do not execute orders on their sides). All have unique regulations and act as sovereign states.
There are about 18k coins and hundreds of blockchain protocols, most of which are heterogeneous (i.e., different in design and not interoperable).
A trader must register many accounts on different exchanges, deposit funds, and manage them all concurrently to access global crypto liquidity.
It’s extremely inconvenient.
Crypto liquidity fragmentation is the largest obstacle and bottleneck blocking crypto from mass adoption.
Crypto brokers help clients solve this challenge by providing one-gate access to deep and diverse crypto liquidity from numerous exchanges and suppliers. Professionals and institutions need it.
Another killer feature of a brokerage may be allowing clients to trade crypto with fiat funds exclusively, without fiat/crypto conversion. It is essential for professional and institutional traders.
Who may work as a cryptocurrency broker?
Apparently, not anyone. Brokerage requires high-powered specialists because it involves other people's money.
Here's the essentials:
excellent knowledge, skills, and years of trading experience
high-quality, quick, and secure infrastructure
highly developed team
outstanding trading capital
High-ROI network: long-standing, trustworthy connections with customers, exchanges, liquidity providers, payment gates, and similar entities
outstanding marketing and commercial development skills.
What about a license for a cryptocurrency broker? Is it necessary?
Complex question.
If you plan to play in white-glove jurisdictions, you may need a license. For example, in the US, as a “money transmitter” or as a CASSP (crypto asset secondary services provider) in Australia.
Even in these jurisdictions, there are no clear, holistic crypto brokerage and licensing policies.
Your lawyer will help you decide if your crypto brokerage needs a license.
Getting a license isn't quick. Two years of patience are needed.
How can you turn into a cryptocurrency broker?
Finally, we got there! 🎉
Three actionable ways exist:
To kickstart a regulated stand-alone crypto broker
To get a crypto broker franchise, and
To become a liquidity network broker.
Let's examine each.
1. Opening a regulated cryptocurrency broker
It's difficult. Especially If you're targeting first-world users.
You must comply with many regulatory, technical, financial, HR, and reporting obligations to keep your organization running. Some are mentioned above.
The licensing process depends on the products you want to offer (spots or derivatives) and the geographic areas you plan to service. There are no general rules for that.
In an overgeneralized way, here are the boxes you will have to check:
capital availability (usually a large amount of capital c is required)
You will have to move some of your team members to the nation providing the license in order to establish an office presence there.
the core team with the necessary professional training (especially applies to CEO, Head of Trading, Assistant to Head of Trading, etc.)
insurance
infrastructure that is trustworthy and secure
adopted proper AML/KYC/financial monitoring policies, etc.
Assuming you passed, what's next?
I bet it won’t be mind-blowing for you that the license is just a part of the deal. It won't attract clients or revenue.
To bring in high-dollar clientele, you must be a killer marketer and seller. It's not easy to convince people to give you money.
You'll need to be a great business developer to form successful, long-term agreements with exchanges (ideally for no fees), liquidity providers, banks, payment gates, etc. Persuade clients.
It's a tough job, isn't it?

I expect a Quora-type question here:
Can I start an unlicensed crypto broker?
Well, there is always a workaround with crypto!
You can register your broker in a free-trade zone like Seychelles to avoid US and other markets with strong watchdogs.
This is neither wise nor sustainable.
First, such experiments are illegal.
Second, you'll have trouble attracting clients and strategic partners.
A license equals trust. That’s it.
Even a pseudo-license from Mauritius matters.
Here are this method's benefits and downsides.
Cons first.
As you navigate this difficult and expensive legal process, you run the risk of missing out on business prospects. It's quite simple to become excellent compliance yet unable to work. Because your competitors are already courting potential customers while you are focusing all of your effort on paperwork.
Only God knows how long it will take you to pass the break-even point when everything with the license has been completed.
It is a money-burning business, especially in the beginning when the majority of your expenses will go toward marketing, sales, and maintaining license requirements. Make sure you have the fortitude and resources necessary to face such a difficult challenge.
Pros
It may eventually develop into a tool for making money. Because big guys who are professionals at trading require a white-glove regulated brokerage. You have every possibility if you work hard in the areas of sales, marketing, business development, and wealth. Simply put, everything must align.
Launching a regulated crypto broker is analogous to launching a crypto exchange. It's ROUGH. Sure you can take it?
2. Franchise for Crypto Broker (Crypto Sub-Brokerage)
A broker franchise is easier and faster than becoming a regulated crypto broker. Not a traditional brokerage.
A broker franchisee, often termed a sub-broker, joins with a broker (a franchisor) to bring them new clients. Sub-brokers market a broker's products and services to clients.
Sub-brokers are the middlemen between a broker and an investor.
Why is sub-brokering easier?
less demanding qualifications and legal complexity. All you need to do is keep a few certificates on hand (each time depends on the jurisdiction).
No significant investment is required
there is no demand that you be a trading member of an exchange, etc.
As a sub-broker, you can do identical duties without as many rights and certifications.
What about the crypto broker franchise?
Sub-brokers aren't common in crypto.
In most existing examples (PayBito, PCEX, etc.), franchises are offered by crypto exchanges, not brokers. Though we remember that crypto exchanges are, in fact, brokers, do we?
Similarly:
For a commission, a franchiser crypto broker receives new leads from a crypto sub-broker.
See above for why enrolling is easy.
Finding clients is difficult. Most crypto traders prefer to buy-sell on their own or through brokers over sub-broker franchises.
3. Broker of the Crypto Trading Network (or a Network Broker)
It's the greatest approach to execute crypto brokerage, based on effort/return.
Network broker isn't an established word. I wrote it for clarity.
Remember how we called crypto liquidity fragmentation the current crypto finance paradigm's main bottleneck?
Where there's a challenge, there's progress.
Several well-funded projects are aiming to fix crypto liquidity fragmentation. Instead of launching another crypto exchange with siloed trading, the greatest minds create trading networks that aggregate crypto liquidity from desynchronized sources and enable quick, safe, and affordable cross-blockchain transactions. Each project offers a distinct option for users.
Crypto liquidity implies:
One-account access to cryptocurrency liquidity pooled from network participants' exchanges and other liquidity sources
compiled price feeds
Cross-chain transactions that are quick and inexpensive, even for HFTs
link between participants of all kinds, and
interoperability among diverse blockchains
Fast, diversified, and cheap global crypto trading from one account.
How does a trading network help cryptocurrency brokers?
I’ll explain it, taking Yellow Network as an example.
Yellow provides decentralized Layer-3 peer-to-peer trading.
trade across chains globally with real-time settlement and
Between cryptocurrency exchanges, brokers, trading companies, and other sorts of network members, there is communication and the exchange of financial information.
Have you ever heard about ECN (electronic communication network)? If not, it's an automated system that automatically matches buy and sell orders. Yellow is a decentralized digital asset ECN.
Brokers can:
Start trading right now without having to meet stringent requirements; all you need to do is integrate with Yellow Protocol and successfully complete some KYC verification.
Access global aggregated crypto liquidity through a single point.
B2B (Broker to Broker) liquidity channels that provide peer liquidity from other brokers. Orders from the other broker will appear in the order book of a broker who is peering with another broker on the market. It will enable a broker to broaden his offer and raise the total amount of liquidity that is available to his clients.
Select a custodian or use non-custodial practices.
Comparing network crypto brokerage to other types:
A licensed stand-alone brokerage business is much more difficult and time-consuming to launch than network brokerage, and
Network brokerage, in contrast to crypto sub-brokerage, is scalable, independent, and offers limitless possibilities for revenue generation.
Yellow Network Whitepaper. has more details on how to start a brokerage business and what rewards you'll obtain.
Final thoughts
There are three ways to become a cryptocurrency broker, including the non-conventional liquidity network brokerage. The last option appears time/cost-effective.
Crypto brokerage isn't crowded yet. Act quickly to find your right place in this market.
Choose the way that works for you best and see you in crypto trading.
Discover Web3 & DeFi with Yellow Network!
Yellow, powered by Openware, is developing a cross-chain P2P liquidity aggregator to unite the crypto sector and provide global remittance services that aid people.
Join the Yellow Community and plunge into this decade's biggest product-oriented crypto project.
Observe Yellow Twitter
Enroll in Yellow Telegram
Visit Yellow Discord.
On Hacker Noon, look us up.
Yellow Network will expose development, technology, developer tools, crypto brokerage nodes software, and community liquidity mining.

Sam Hickmann
3 years ago
Nomad.xyz got exploited for $190M
Key Takeaways:
Another hack. This time was different. This is a doozy.
Why? Nomad got exploited for $190m. It was crypto's 5th-biggest hack. Ouch.
It wasn't hackers, but random folks. What happened:
A Nomad smart contract flaw was discovered. They couldn't drain the funds at once, so they tried numerous transactions. Rookie!
People noticed and copied the attack.
They just needed to discover a working transaction, substitute the other person's address with theirs, and run it.

In a two-and-a-half-hour attack, $190M was siphoned from Nomad Bridge.
Nomad is a novel approach to blockchain interoperability that leverages an optimistic mechanism to increase the security of cross-chain communication. — nomad.xyz
This hack was permissionless, therefore anyone could participate.
After the fatal blow, people fought over the scraps.
Cross-chain bridges remain a DeFi weakness and exploit target. When they collapse, it's typically total.
$190M...gobbled.
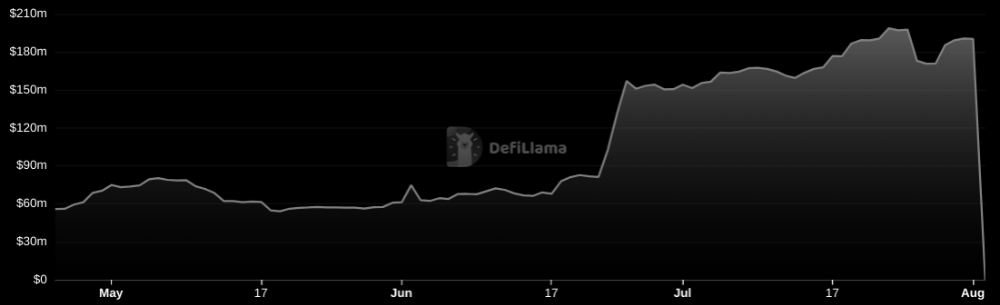
Unbacked assets are hurting Nomad-dependent chains. Moonbeam, EVMOS, and Milkomeda's TVLs dropped.
This incident is every-man-for-himself, although numerous whitehats exploited the issue...
But what triggered the feeding frenzy?
How did so many pick the bones?
After a normal upgrade in June, the bridge's Replica contract was initialized with a severe security issue. The 0x00 address was a trusted root, therefore all messages were valid by default.
After a botched first attempt (costing $350k in gas), the original attacker's exploit tx called process() without first 'proving' its validity.
The process() function executes all cross-chain messages and checks the merkle root of all messages (line 185).
The upgrade caused transactions with a'messages' value of 0 (invalid, according to old logic) to be read by default as 0x00, a trusted root, passing validation as 'proven'
Any process() calls were valid. In reality, a more sophisticated exploiter may have designed a contract to drain the whole bridge.
Copycat attackers simply copied/pasted the same process() function call using Etherscan, substituting their address.
The incident was a wild combination of crowdhacking, whitehat activities, and MEV-bot (Maximal Extractable Value) mayhem.
For example, 🍉🍉🍉. eth stole $4M from the bridge, but claims to be whitehat.

Others stood out for the wrong reasons. Repeat criminal Rari Capital (Artibrum) exploited over $3M in stablecoins, which moved to Tornado Cash.
The top three exploiters (with 95M between them) are:
$47M: 0x56D8B635A7C88Fd1104D23d632AF40c1C3Aac4e3
$40M: 0xBF293D5138a2a1BA407B43672643434C43827179
$8M: 0xB5C55f76f90Cc528B2609109Ca14d8d84593590E
Here's a list of all the exploiters:
The project conducted a Quantstamp audit in June; QSP-19 foreshadowed a similar problem.
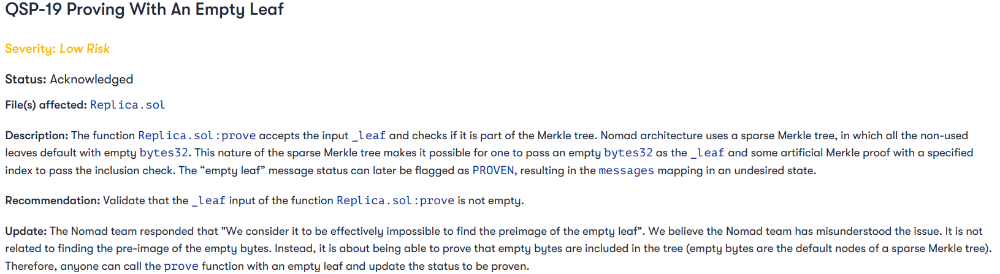
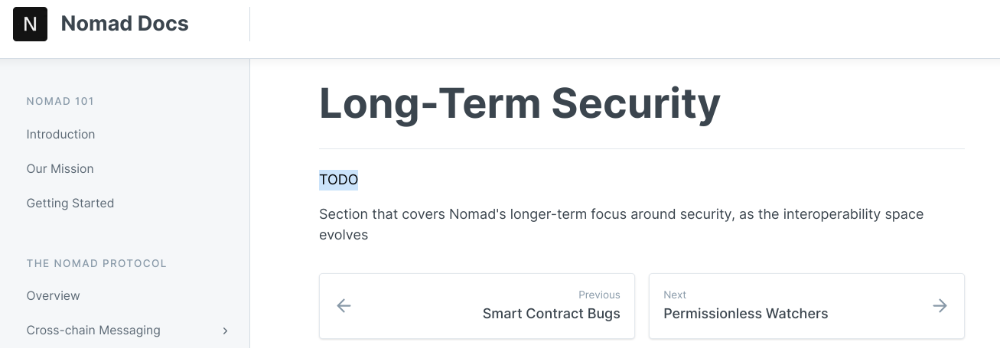
The auditor's comments that "We feel the Nomad team misinterpreted the issue" speak to a troubling attitude towards security that the project's "Long-Term Security" plan appears to confirm:
Concerns were raised about the team's response time to a live, public exploit; the team's official acknowledgement came three hours later.
"Removing the Replica contract as owner" stopped the exploit, but it was too late to preserve the cash.
Closed blockchain systems are only as strong as their weakest link.
The Harmony network is in turmoil after its bridge was attacked and lost $100M in late June.
What's next for Nomad's ecosystems?
Moonbeam's TVL is now $135M, EVMOS's is $3M, and Milkomeda's is $20M.
Loss of confidence may do more damage than $190M.
Cross-chain infrastructure is difficult to secure in a new, experimental sector. Bridge attacks can pollute an entire ecosystem or more.
Nomadic liquidity has no permanent home, so consumers will always migrate in pursuit of the "next big thing" and get stung when attentiveness wanes.
DeFi still has easy prey...
Sources: rekt.news & The Milk Road.

Max Parasol
4 years ago
What the hell is Web3 anyway?
"Web 3.0" is a trendy buzzword with a vague definition. Everyone agrees it has to do with a blockchain-based internet evolution, but what is it?
Yet, the meaning and prospects for Web3 have become hot topics in crypto communities. Big corporations use the term to gain a foothold in the space while avoiding the negative connotations of “crypto.”
But it can't be evaluated without a definition.
Among those criticizing Web3's vagueness is Cobie:
“Despite the dominie's deluge of undistinguished think pieces, nobody really agrees on what Web3 is. Web3 is a scam, the future, tokenizing the world, VC exit liquidity, or just another name for crypto, depending on your tribe.
“Even the crypto community is split on whether Bitcoin is Web3,” he adds.
The phrase was coined by an early crypto thinker, and the community has had years to figure out what it means. Many ideologies and commercial realities have driven reverse engineering.
Web3 is becoming clearer as a concept. It contains ideas. It was probably coined by Ethereum co-founder Gavin Wood in 2014. His definition of Web3 included “trustless transactions” as part of its tech stack. Wood founded the Web3 Foundation and the Polkadot network, a Web3 alternative future.
The 2013 Ethereum white paper had previously allowed devotees to imagine a DAO, for example.
Web3 now has concepts like decentralized autonomous organizations, sovereign digital identity, censorship-free data storage, and data divided by multiple servers. They intertwine discussions about the “Web3” movement and its viability.
These ideas are linked by Cobie's initial Web3 definition. A key component of Web3 should be “ownership of value” for one's own content and data.
Noting that “late-stage capitalism greedcorps that make you buy a fractionalized micropayment NFT on Cardano to operate your electric toothbrush” may build the new web, he notes that “crypto founders are too rich to care anymore.”
Very Important
Many critics of Web3 claim it isn't practical or achievable. Web3 critics like Moxie Marlinspike (creator of sslstrip and Signal/TextSecure) can never see people running their own servers. Early in January, he argued that protocols are more difficult to create than platforms.
While this is true, some projects, like the file storage protocol IPFS, allow users to choose which jurisdictions their data is shared between.
But full decentralization is a difficult problem. Suhaza, replying to Moxie, said:
”People don't want to run servers... Companies are now offering API access to an Ethereum node as a service... Almost all DApps interact with the blockchain using Infura or Alchemy. In fact, when a DApp uses a wallet like MetaMask to interact with the blockchain, MetaMask is just calling Infura!
So, here are the questions: Web3: Is it a go? Is it truly decentralized?
Web3 history is shaped by Web2 failure.
This is the story of how the Internet was turned upside down...
Then came the vision. Everyone can create content for free. Decentralized open-source believers like Tim Berners-Lee popularized it.
Real-world data trade-offs for content creation and pricing.
A giant Wikipedia page married to a giant Craig's List. No ads, no logins, and a private web carve-up. For free usage, you give up your privacy and data to the algorithmic targeted advertising of Web 2.
Our data is centralized and savaged by giant corporations. Data localization rules and geopolitical walls like China's Great Firewall further fragment the internet.
The decentralized Web3 reflects Berners-original Lee's vision: "No permission is required from a central authority to post anything... there is no central controlling node and thus no single point of failure." Now he runs Solid, a Web3 data storage startup.
So Web3 starts with decentralized servers and data privacy.
Web3 begins with decentralized storage.
Data decentralization is a key feature of the Web3 tech stack. Web2 has closed databases. Large corporations like Facebook, Google, and others go to great lengths to collect, control, and monetize data. We want to change it.
Amazon, Google, Microsoft, Alibaba, and Huawei, according to Gartner, currently control 80% of the global cloud infrastructure market. Web3 wants to change that.
Decentralization enlarges power structures by giving participants a stake in the network. Users own data on open encrypted networks in Web3. This area has many projects.
Apps like Filecoin and IPFS have led the way. Data is replicated across multiple nodes in Web3 storage providers like Filecoin.
But the new tech stack and ideology raise many questions.
Giving users control over their data
According to Ryan Kris, COO of Verida, his “Web3 vision” is “empowering people to control their own data.”
Verida targets SDKs that address issues in the Web3 stack: identity, messaging, personal storage, and data interoperability.
A big app suite? “Yes, but it's a frontier technology,” he says. They are currently building a credentialing system for decentralized health in Bermuda.
By empowering individuals, how will Web3 create a fairer internet? Kris, who has worked in telecoms, finance, cyber security, and blockchain consulting for decades, admits it is difficult:
“The viability of Web3 raises some good business questions,” he adds. “How can users regain control over centralized personal data? How are startups motivated to build products and tools that support this transition? How are existing Web2 companies encouraged to pivot to a Web3 business model to compete with market leaders?
Kris adds that new technologies have regulatory and practical issues:
"On storage, IPFS is great for redundantly sharing public data, but not designed for securing private personal data. It is not controlled by the users. When data storage in a specific country is not guaranteed, regulatory issues arise."
Each project has varying degrees of decentralization. The diehards say DApps that use centralized storage are no longer “Web3” companies. But fully decentralized technology is hard to build.
Web2.5?
Some argue that we're actually building Web2.5 businesses, which are crypto-native but not fully decentralized. This is vital. For example, the NFT may be on a blockchain, but it is linked to centralized data repositories like OpenSea. A server failure could result in data loss.
However, according to Apollo Capital crypto analyst David Angliss, OpenSea is “not exactly community-led”. Also in 2021, much to the chagrin of crypto enthusiasts, OpenSea tried and failed to list on the Nasdaq.
This is where Web2.5 is defined.
“Web3 isn't a crypto segment. “Anything that uses a blockchain for censorship resistance is Web3,” Angliss tells us.
“Web3 gives users control over their data and identity. This is not possible in Web2.”
“Web2 is like feudalism, with walled-off ecosystems ruled by a few. For example, an honest user owned the Instagram account “Meta,” which Facebook rebranded and then had to make up a reason to suspend. Not anymore with Web3. If I buy ‘Ethereum.ens,' Ethereum cannot take it away from me.”
Angliss uses OpenSea as a Web2.5 business example. Too decentralized, i.e. censorship resistant, can be unprofitable for a large company like OpenSea. For example, OpenSea “enables NFT trading”. But it also stopped the sale of stolen Bored Apes.”
Web3 (or Web2.5, depending on the context) has been described as a new way to privatize internet.
“Being in the crypto ecosystem doesn't make it Web3,” Angliss says. The biggest risk is centralized closed ecosystems rather than a growing Web3.
LooksRare and OpenDAO are two community-led platforms that are more decentralized than OpenSea. LooksRare has even been “vampire attacking” OpenSea, indicating a Web3 competitor to the Web2.5 NFT king could find favor.
The addition of a token gives these new NFT platforms more options for building customer loyalty. For example, OpenSea charges a fee that goes nowhere. Stakeholders of LOOKS tokens earn 100% of the trading fees charged by LooksRare on every basic sale.
Maybe Web3's time has come.
So whose data is it?
Continuing criticisms of Web3 platforms' decentralization may indicate we're too early. Users want to own and store their in-game assets and NFTs on decentralized platforms like the Metaverse and play-to-earn games. Start-ups like Arweave, Sia, and Aleph.im propose an alternative.
To be truly decentralized, Web3 requires new off-chain models that sidestep cloud computing and Web2.5.
“Arweave and Sia emerged as formidable competitors this year,” says the Messari Report. They seek to reduce the risk of an NFT being lost due to a data breach on a centralized server.
Aleph.im, another Web3 cloud competitor, seeks to replace cloud computing with a service network. It is a decentralized computing network that supports multiple blockchains by retrieving and encrypting data.
“The Aleph.im network provides a truly decentralized alternative where it is most needed: storage and computing,” says Johnathan Schemoul, founder of Aleph.im. For reasons of consensus and security, blockchains are not designed for large storage or high-performance computing.
As a result, large data sets are frequently stored off-chain, increasing the risk for centralized databases like OpenSea
Aleph.im enables users to own digital assets using both blockchains and off-chain decentralized cloud technologies.
"We need to go beyond layer 0 and 1 to build a robust decentralized web. The Aleph.im ecosystem is proving that Web3 can be decentralized, and we intend to keep going.”
Aleph.im raised $10 million in mid-January 2022, and Ubisoft uses its network for NFT storage. This is the first time a big-budget gaming studio has given users this much control.
It also suggests Web3 could work as a B2B model, even if consumers aren't concerned about “decentralization.” Starting with gaming is common.
Can Tokenomics help Web3 adoption?
Web3 consumer adoption is another story. The average user may not be interested in all this decentralization talk. Still, how much do people value privacy over convenience? Can tokenomics solve the privacy vs. convenience dilemma?
Holon Global Investments' Jonathan Hooker tells us that human internet behavior will change. “Do you own Bitcoin?” he asks in his Web3 explanation. How does it feel to own and control your own sovereign wealth? Then:
“What if you could own and control your data like Bitcoin?”
“The business model must find what that person values,” he says. Putting their own health records on centralized systems they don't control?
“How vital are those medical records to that person at a critical time anywhere in the world? Filecoin and IPFS can help.”
Web3 adoption depends on NFT storage competition. A free off-chain storage of NFT metadata and assets was launched by Filecoin in April 2021.
Denationalization and blockchain technology have significant implications for data ownership and compensation for lending, staking, and using data.
Tokenomics can change human behavior, but many people simply sign into Web2 apps using a Facebook API without hesitation. Our data is already owned by Google, Baidu, Tencent, and Facebook (and its parent company Meta). Is it too late to recover?
Maybe. “Data is like fruit, it starts out fresh but ages,” he says. "Big Tech's data on us will expire."
Web3 founder Kris agrees with Hooker that “value for data is the issue, not privacy.” People accept losing their data privacy, so tokenize it. People readily give up data, so why not pay for it?
"Personalized data offering is valuable in personalization. “I will sell my social media data but not my health data.”
Purists and mass consumer adoption struggle with key management.
Others question data tokenomics' optimism. While acknowledging its potential, Box founder Aaron Levie questioned the viability of Web3 models in a Tweet thread:
“Why? Because data almost always works in an app. A product and APIs that moved quickly to build value and trust over time.”
Levie contends that tokenomics may complicate matters. In addition to community governance and tokenomics, Web3 ideals likely add a new negotiation vector.
“These are hard problems about human coordination, not software or blockchains,”. Using a Facebook API is simple. The business model and user interface are crucial.
For example, the crypto faithful have a common misconception about logging into Web3. It goes like this: Web 1 had usernames and passwords. Web 2 uses Google, Facebook, or Twitter APIs, while Web 3 uses your wallet. Pay with Ethereum on MetaMask, for example.
But Levie is correct. Blockchain key management is stressed in this meme. Even seasoned crypto enthusiasts have heart attacks, let alone newbies.
Web3 requires a better user experience, according to Kris, the company's founder. “How does a user recover keys?”
And at this point, no solution is likely to be completely decentralized. So Web3 key management can be improved. ”The moment someone loses control of their keys, Web3 ceases to exist.”
That leaves a major issue for Web3 purists. Put this one in the too-hard basket.
Is 2022 the Year of Web3?
Web3 must first solve a number of issues before it can be mainstreamed. It must be better and cheaper than Web2.5, or have other significant advantages.
Web3 aims for scalability without sacrificing decentralization protocols. But decentralization is difficult and centralized services are more convenient.
Ethereum co-founder Vitalik Buterin himself stated recently"
This is why (centralized) Binance to Binance transactions trump Ethereum payments in some places because they don't have to be verified 12 times."
“I do think a lot of people care about decentralization, but they're not going to take decentralization if decentralization costs $8 per transaction,” he continued.
“Blockchains need to be affordable for people to use them in mainstream applications... Not for 2014 whales, but for today's users."
For now, scalability, tokenomics, mainstream adoption, and decentralization believers seem to be holding Web3 hostage.
Much like crypto's past.
But stay tuned.
You might also like

Deon Ashleigh
3 years ago
You can dominate your daily productivity with these 9 little-known Google Calendar tips.
Calendars are great unpaid employees.
After using Notion to organize my next three months' goals, my days were a mess.
I grew very chaotic afterward. I was overwhelmed, unsure of what to do, and wasting time attempting to plan the day after it had started.
Imagine if our skeletons were on the outside. Doesn’t work.
The goals were too big; I needed to break them into smaller chunks. But how?
Enters Google Calendar
RescueTime’s recommendations took me seven hours to make a daily planner. This epic narrative begins with a sheet of paper and concludes with a daily calendar that helps me focus and achieve more goals. Ain’t nobody got time for “what’s next?” all day.
Onward!
Return to the Paleolithic Era
Plan in writing.
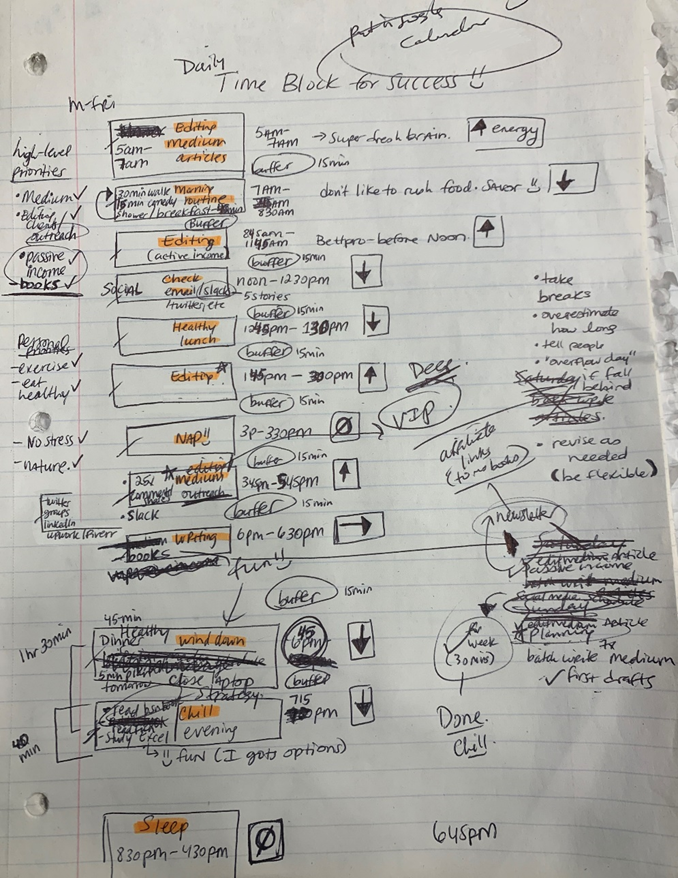
Not on the list, but it helped me plan my day. Physical writing boosts creativity and recall.
Find My Heart
i.e. prioritize
RescueTime suggested I prioritize before planning. Personal and business goals were proposed.
My top priorities are to exercise, eat healthily, spend time in nature, and avoid stress.
Priorities include writing and publishing Medium articles, conducting more freelance editing and Medium outreach, and writing/editing sci-fi books.
These eight things will help me feel accomplished every day.
Make a baby calendar.
Create daily calendar templates.
Make family, pleasure, etc. calendars.
Google Calendar instructions:
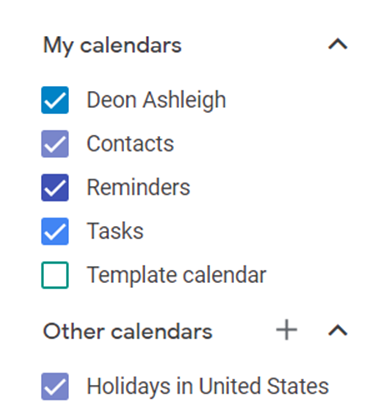
Other calendars
Press the “+” button
Create a new calendar
Create recurring events for each day
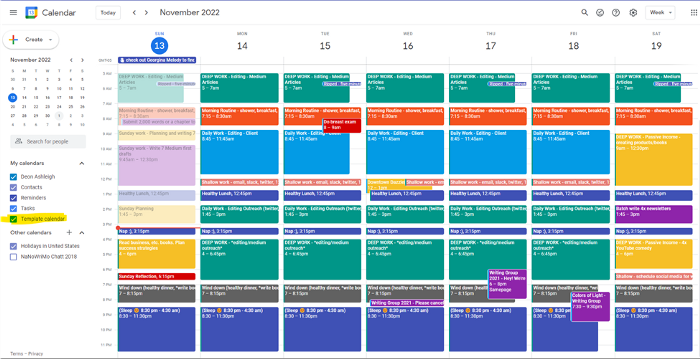
My calendar, without the template:
Empty, so I can fill it with vital tasks.
With the template:
My daily skeleton corresponds with my priorities. I've been overwhelmed for years because I lack daily, weekly, monthly, and yearly structure.
Google Calendars helps me reach my goals and focus my energy.
Get your colored pencils ready
Time-block color-coding.
Color labeling lets me quickly see what's happening. Maybe you are too.
Google Calendar instructions:
Determine which colors correspond to each time block.
When establishing new events, select a color.
Save
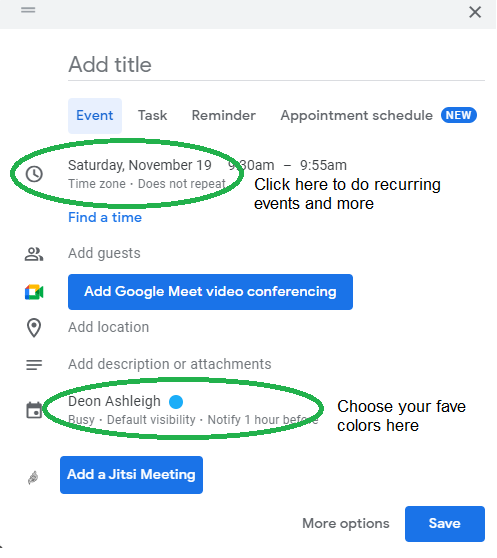
My calendar is color-coded as follows:
Yellow — passive income or other future-related activities
Red — important activities, like my monthly breast exam
Flamingo — shallow work, like emails, Twitter, etc.
Blue — all my favorite activities, like walking, watching comedy, napping, and sleeping. Oh, and eating.
Green — money-related events required for this adulting thing
Purple — writing-related stuff
Associating a time block with a color helps me stay focused. Less distractions mean faster work.
Open My Email
aka receive a daily email from Google Calendar.
Google Calendar sends a daily email feed of your calendars. I sent myself the template calendar in this email.
Google Calendar instructions:
Access settings
Select the calendar that you want to send (left side)
Go down the page to see more alerts
Under the daily agenda area, click Email.

Get in Touch With Your Red Bull Wings — Naturally
aka audit your energy levels.
My daily planner has arrows. These indicate how much energy each activity requires or how much I have.
Rightward arrow denotes medium energy.
I do my Medium and professional editing in the morning because it's energy-intensive.
Niharikaa Sodhi recommends morning Medium editing.
I’m a morning person. As long as I go to bed at a reasonable time, 5 a.m. is super wild GO-TIME. It’s like the world was just born, and I marvel at its wonderfulness.
Freelance editing lets me do what I want. An afternoon snooze will help me finish on time.
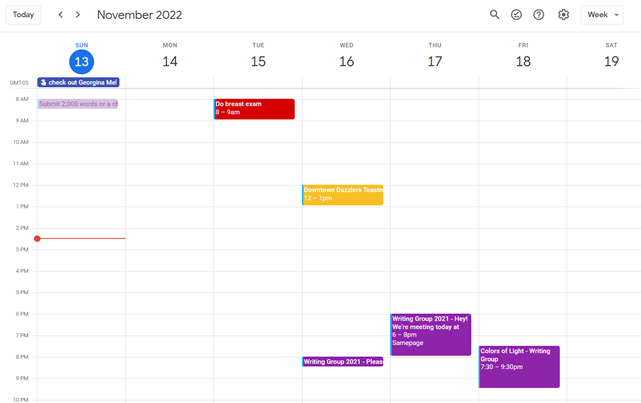
Ditch Schedule View
aka focus on the weekly view.
RescueTime advocated utilizing the weekly view of Google Calendar, so I switched.
When you launch the phone app or desktop calendar, a red line shows where you are in the day.
I'll follow the red line's instructions. My digital supervisor is easy to follow.
In the image above, it's almost 3 p.m., therefore the red line implies it's time to snooze.
I won't forget this block ;).
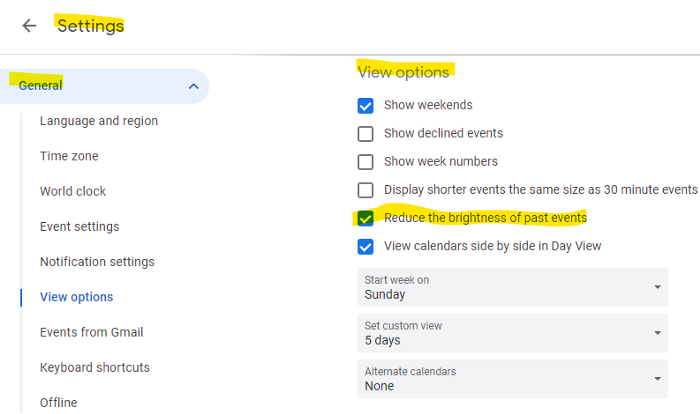
Reduce the Lighting
aka dim previous days.
This is another Google Calendar feature I didn't know about. Once the allotted time passes, the time block dims. This keeps me present.
Google Calendar instructions:
Access settings
remaining general
To view choices, click.
Check Diminish the glare of the past.
Bonus
Two additional RescueTimes hacks:
Maintain a space between tasks
I left 15 minutes between each time block to transition smoothly. This relates to my goal of less stress. If I set strict start and end times, I'll be stressed.
With a buffer, I can breathe, stroll around, and start the following time block fresh.
Find a time is related to the buffer.
This option allows you conclude small meetings five minutes early and longer ones ten. Before the next meeting, relax or go wild.
Decide on a backup day.
This productivity technique is amazing.
Spend this excess day catching up on work. It helps reduce tension and clutter.
That's all I can say about Google Calendar's functionality.

Max Chafkin
3 years ago
Elon Musk Bets $44 Billion on Free Speech's Future
Musk’s purchase of Twitter has sealed his bond with the American right—whether the platform’s left-leaning employees and users like it or not.
Elon Musk's pursuit of Twitter Inc. began earlier this month as a joke. It started slowly, then spiraled out of control, culminating on April 25 with the world's richest man agreeing to spend $44 billion on one of the most politically significant technology companies ever. There have been bigger financial acquisitions, but Twitter's significance has always outpaced its balance sheet. This is a unique Silicon Valley deal.
To recap: Musk announced in early April that he had bought a stake in Twitter, citing the company's alleged suppression of free speech. His complaints were vague, relying heavily on the dog whistles of the ultra-right. A week later, he announced he'd buy the company for $54.20 per share, four days after initially pledging to join Twitter's board. Twitter's directors noticed the 420 reference as well, and responded with a “shareholder rights” plan (i.e., a poison pill) that included a 420 joke.
Musk - Patrick Pleul/Getty Images
No one knew if the bid was genuine. Musk's Twitter plans seemed implausible or insincere. In a tweet, he referred to automated accounts that use his name to promote cryptocurrency. He enraged his prospective employees by suggesting that Twitter's San Francisco headquarters be turned into a homeless shelter, renaming the company Titter, and expressing solidarity with his growing conservative fan base. “The woke mind virus is making Netflix unwatchable,” he tweeted on April 19.
But Musk got funding, and after a frantic weekend of negotiations, Twitter said yes. Unlike most buyouts, Musk will personally fund the deal, putting up up to $21 billion in cash and borrowing another $12.5 billion against his Tesla stock.
Free Speech and Partisanship
Percentage of respondents who agree with the following
The deal is expected to replatform accounts that were banned by Twitter for harassing others, spreading misinformation, or inciting violence, such as former President Donald Trump's account. As a result, Musk is at odds with his own left-leaning employees, users, and advertisers, who would prefer more content moderation rather than less.
Dorsey - Photographer: Joe Raedle/Getty Images
Previously, the company's leadership had similar issues. Founder Jack Dorsey stepped down last year amid concerns about slowing growth and product development, as well as his dual role as CEO of payments processor Block Inc. Compared to Musk, a father of seven who already runs four companies (besides Tesla and SpaceX), Dorsey is laser-focused.
Musk's motivation to buy Twitter may be political. Affirming the American far right with $44 billion spent on “free speech” Right-wing activists have promoted a series of competing upstart Twitter competitors—Parler, Gettr, and Trump's own effort, Truth Social—since Trump was banned from major social media platforms for encouraging rioters at the US Capitol on Jan. 6, 2021. But Musk can give them a social network with lax content moderation and a real user base. Trump said he wouldn't return to Twitter after the deal was announced, but he wouldn't be the first to do so.
Trump - Eli Hiller/Bloomberg
Conservative activists and lawmakers are already ecstatic. “A great day for free speech in America,” said Missouri Republican Josh Hawley. The day the deal was announced, Tucker Carlson opened his nightly Fox show with a 10-minute laudatory monologue. “The single biggest political development since Donald Trump's election in 2016,” he gushed over Musk.
But Musk's supporters and detractors misunderstand how much his business interests influence his political ideology. He marketed Tesla's cars as carbon-saving machines that were faster and cooler than gas-powered luxury cars during George W. Bush's presidency. Musk gained a huge following among wealthy environmentalists who reserved hundreds of thousands of Tesla sedans years before they were made during Barack Obama's presidency. Musk in the Trump era advocated for a carbon tax, but he also fought local officials (and his own workers) over Covid rules that slowed the reopening of his Bay Area factory.
Teslas at the Las Vegas Convention Center Loop Central Station in April 2021. The Las Vegas Convention Center Loop was Musk's first commercial project. Ethan Miller/Getty Images
Musk's rightward shift matched the rise of the nationalist-populist right and the desire to serve a growing EV market. In 2019, he unveiled the Cybertruck, a Tesla pickup, and in 2018, he announced plans to manufacture it at a new plant outside Austin. In 2021, he decided to move Tesla's headquarters there, citing California's "land of over-regulation." After Ford and General Motors beat him to the electric truck market, Musk reframed Tesla as a company for pickup-driving dudes.
Similarly, his purchase of Twitter will be entwined with his other business interests. Tesla has a factory in China and is friendly with Beijing. This could be seen as a conflict of interest when Musk's Twitter decides how to treat Chinese-backed disinformation, as Amazon.com Inc. founder Jeff Bezos noted.
Musk has focused on Twitter's product and social impact, but the company's biggest challenges are financial: Either increase cash flow or cut costs to comfortably service his new debt. Even if Musk can't do that, he can still benefit from the deal. He has recently used the increased attention to promote other business interests: Boring has hyperloops and Neuralink brain implants on the way, Musk tweeted. Remember Tesla's long-promised robotaxis!
Musk may be comfortable saying he has no expectation of profit because it benefits his other businesses. At the TED conference on April 14, Musk insisted that his interest in Twitter was solely charitable. “I don't care about money.”
The rockets and weed jokes make it easy to see Musk as unique—and his crazy buyout will undoubtedly add to that narrative. However, he is a megabillionaire who is risking a small amount of money (approximately 13% of his net worth) to gain potentially enormous influence. Musk makes everything seem new, but this is a rehash of an old media story.

Ben "The Hosk" Hosking
3 years ago
The Yellow Cat Test Is Typically Failed by Software Developers.
Believe what you see, what people say

It’s sad that we never get trained to leave assumptions behind. - Sebastian Thrun
Many problems in software development are not because of code but because developers create the wrong software. This isn't rare because software is emergent and most individuals only realize what they want after it's built.
Inquisitive developers who pass the yellow cat test can improve the process.
Carpenters measure twice and cut the wood once. Developers are rarely so careful.
The Yellow Cat Test
Game of Thrones made dragons cool again, so I am reading The Game of Thrones book.
The yellow cat exam is from Syrio Forel, Arya Stark's fencing instructor.
Syrio tells Arya he'll strike left when fencing. He hits her after she dodges left. Arya says “you lied”. Syrio says his words lied, but his eyes and arm told the truth.
Arya learns how Syrio became Bravos' first sword.
“On the day I am speaking of, the first sword was newly dead, and the Sealord sent for me. Many bravos had come to him, and as many had been sent away, none could say why. When I came into his presence, he was seated, and in his lap was a fat yellow cat. He told me that one of his captains had brought the beast to him, from an island beyond the sunrise. ‘Have you ever seen her like?’ he asked of me.
“And to him I said, ‘Each night in the alleys of Braavos I see a thousand like him,’ and the Sealord laughed, and that day I was named the first sword.”
Arya screwed up her face. “I don’t understand.”
Syrio clicked his teeth together. “The cat was an ordinary cat, no more. The others expected a fabulous beast, so that is what they saw. How large it was, they said. It was no larger than any other cat, only fat from indolence, for the Sealord fed it from his own table. What curious small ears, they said. Its ears had been chewed away in kitten fights. And it was plainly a tomcat, yet the Sealord said ‘her,’ and that is what the others saw. Are you hearing?” Reddit discussion.
Development teams should not believe what they are told.
We created an appointment booking system. We thought it was an appointment-booking system. Later, we realized the software's purpose was to book the right people for appointments and discourage the unneeded ones.
The first 3 months of the project had half-correct requirements and software understanding.
Open your eyes
“Open your eyes is all that is needed. The heart lies and the head plays tricks with us, but the eyes see true. Look with your eyes, hear with your ears. Taste with your mouth. Smell with your nose. Feel with your skin. Then comes the thinking afterwards, and in that way, knowing the truth” Syrio Ferel
We must see what exists, not what individuals tell the development team or how developers think the software should work. Initial criteria cover 50/70% and change.
Developers build assumptions problems by assuming how software should work. Developers must quickly explain assumptions.
When a development team's assumptions are inaccurate, they must alter the code, DevOps, documentation, and tests.
It’s always faster and easier to fix requirements before code is written.
First-draft requirements can be based on old software. Development teams must grasp corporate goals and consider needs from many angles.
Testers help rethink requirements. They look at how software requirements shouldn't operate.
Technical features and benefits might misdirect software projects.
The initiatives that focused on technological possibilities developed hard-to-use software that needed extensive rewriting following user testing.
Software development
High-level criteria are different from detailed ones.
The interpretation of words determines their meaning.
Presentations are lofty, upbeat, and prejudiced.
People's perceptions may be unclear, incorrect, or just based on one perspective (half the story)
Developers can be misled by requirements, circumstances, people, plans, diagrams, designs, documentation, and many other things.
Developers receive misinformation, misunderstandings, and wrong assumptions. The development team must avoid building software with erroneous specifications.
Once code and software are written, the development team changes and fixes them.
Developers create software with incomplete information, they need to fill in the blanks to create the complete picture.
Conclusion
Yellow cats are often inaccurate when communicating requirements.
Before writing code, clarify requirements, assumptions, etc.
Everyone will pressure the development team to generate code rapidly, but this will slow down development.
Code changes are harder than requirements.