


More on Technology

Techletters
2 years ago
Using Synthesia, DALL-E 2, and Chat GPT-3, create AI news videos
Combining AIs creates realistic AI News Videos.
Powerful AI tools like Chat GPT-3 are trending. Have you combined AIs?
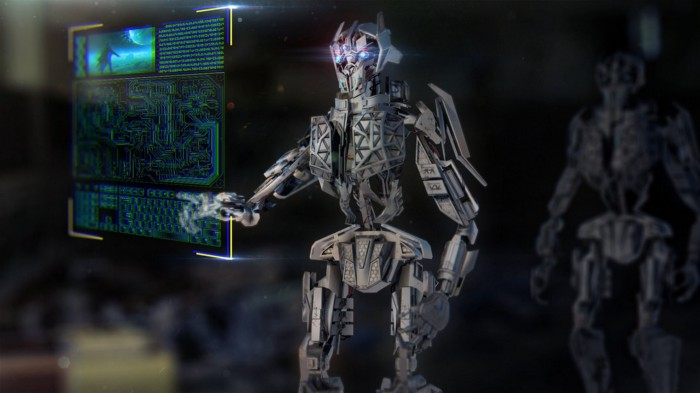
The 1-minute fake news video below is startlingly realistic. Artificial Intelligence developed NASA's Mars exploration breakthrough video (AI). However, integrating the aforementioned AIs generated it.
AI-generated text for the Chat GPT-3 based on a succinct tagline
DALL-E-2 AI generates an image from a brief slogan.
Artificial intelligence-generated avatar and speech
This article shows how to use and mix the three AIs to make a realistic news video. First, watch the video (1 minute).
Talk GPT-3
Chat GPT-3 is an OpenAI NLP model. It can auto-complete text and produce conversational responses.
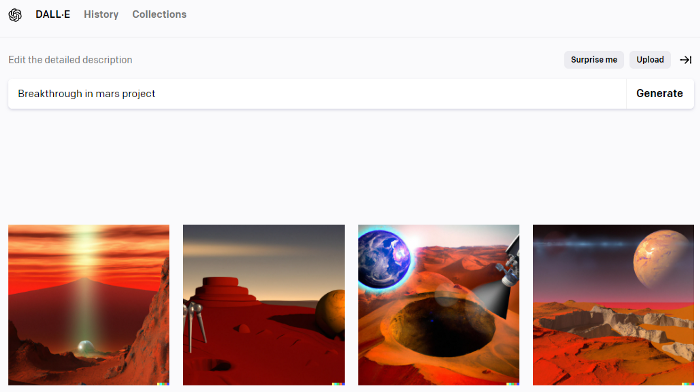
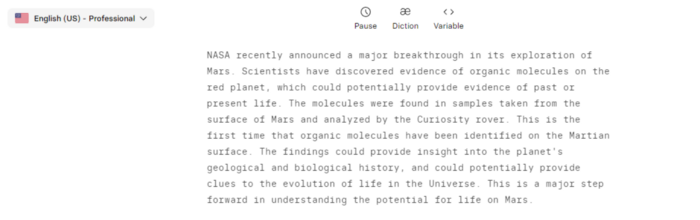
Try it at the playground. The AI will write a comprehensive text from a brief tagline. Let's see what the AI generates with "Breakthrough in Mars Project" as the headline.

Amazing. Our tagline matches our complete and realistic text. Fake news can start here.
DALL-E-2
OpenAI's huge transformer-based language model DALL-E-2. Its GPT-3 basis is geared for image generation. It can generate high-quality photos from a brief phrase and create artwork and images of non-existent objects.
DALL-E-2 can create a news video background. We'll use "Breakthrough in Mars project" again. Our AI creates four striking visuals. Last.
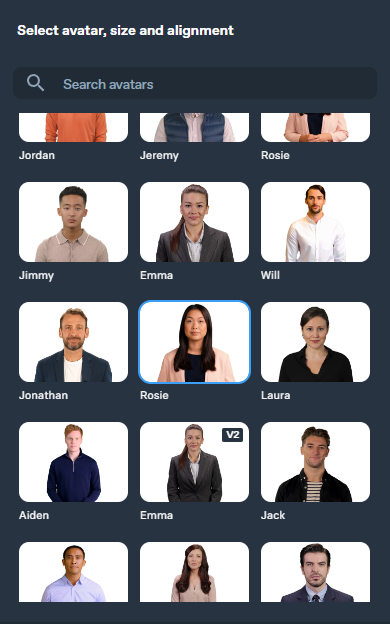
Synthesia
Synthesia lets you quickly produce videos with AI avatars and synthetic vocals.
Avatars are first. Rosie it is.
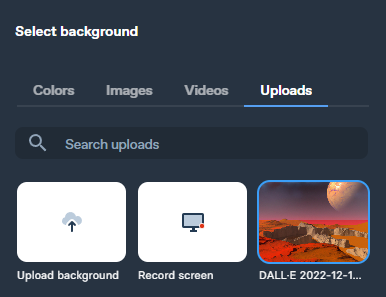
Upload and select DALL-backdrop. E-2's
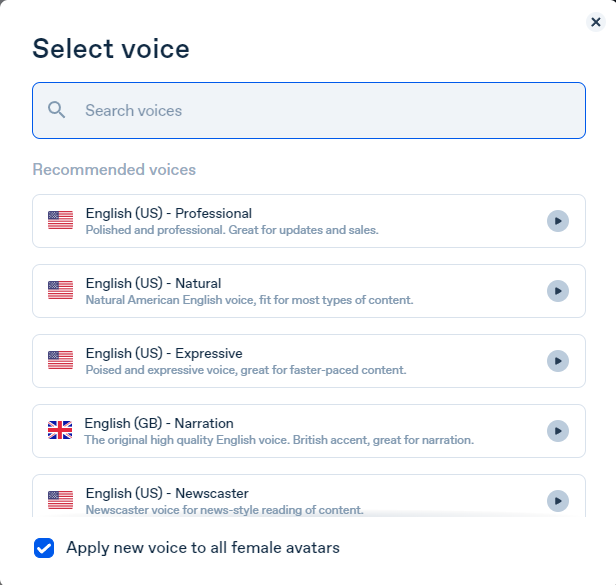
Copy the Chat GPT-3 content and choose a synthetic voice.
Voice: English (US) Professional.
Finally, we generate and watch or download our video.
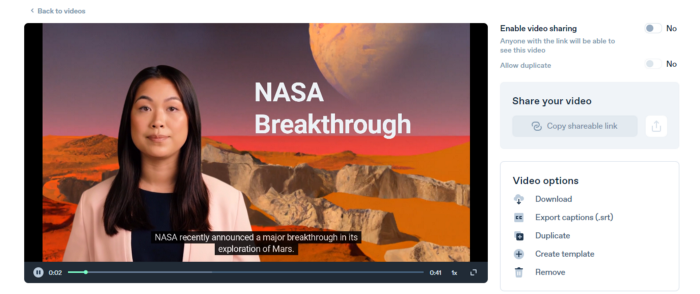
Synthesia AI completes the AI video.
Overview & Resources
We used three AIs to make surprisingly realistic NASA Mars breakthrough fake news in this post. Synthesia generates an avatar and a synthetic voice, therefore it may be four AIs.
These AIs created our fake news.
AI-generated text for the Chat GPT-3 based on a succinct tagline
DALL-E-2 AI generates an image from a brief slogan.
Artificial intelligence-generated avatar and speech

Christianlauer
3 years ago
Looker Studio Pro is now generally available, according to Google.
Great News about the new Google Business Intelligence Solution
Google has renamed Data Studio to Looker Studio and Looker Studio Pro.
Now, Google releases Looker Studio Pro. Similar to the move from Data Studio to Looker Studio, Looker Studio Pro is basically what Looker was previously, but both solutions will merge. Google says the Pro edition will acquire new enterprise management features, team collaboration capabilities, and SLAs.
![Dashboard Example in Looker Studio Pro — Image Source: Google[2]](https://storage.googleapis.com/int3grity/posts/m9yb4IqJCm7D/images/ZuJudlWT6GUeTKKNVduA5)
In addition to Google's announcements and sales methods, additional features include:
Looker Studio assets can now have organizational ownership. Customers can link Looker Studio to a Google Cloud project and migrate existing assets once. This provides:
Your users' created Looker Studio assets are all kept in a Google Cloud project.
When the users who own assets leave your organization, the assets won't be removed.
Using IAM, you may provide each Looker Studio asset in your company project-level permissions.
Other Cloud services can access Looker Studio assets that are owned by a Google Cloud project.
Looker Studio Pro clients may now manage report and data source access at scale using team workspaces.
Google announcing these features for the pro version is fascinating. Both products will likely converge, but Google may only release many features in the premium version in the future. Microsoft with Power BI and its free and premium variants already achieves this.
Sources and Further Readings
Google, Release Notes (2022)
Google, Looker (2022)

Asha Barbaschow
3 years ago
Apple WWDC 2022 Announcements
WWDC 2022 began early Tuesday morning. WWDC brought a ton of new features (which went for just shy of two hours).
With so many announcements, we thought we'd compile them. And now...
WWDC?
WWDC is Apple's developer conference. This includes iOS, macOS, watchOS, and iPadOS (all of its iPads). It's where Apple announces new features for developers to use. It's also where Apple previews new software.
Virtual WWDC runs June 6-10. You can rewatch the stream on Apple's website.
WWDC 2022 news:
Completely everything. Really. iOS 16 first.
iOS 16.
iOS 16 is a major iPhone update. iOS 16 adds the ability to customize the Lock Screen's color/theme. And widgets. It also organizes notifications and pairs Lock Screen with Focus themes. Edit or recall recently sent messages, recover recently deleted messages, and mark conversations as unread. Apple gives us yet another reason to stay in its walled garden with iMessage.
New iOS includes family sharing. Parents can set up a child's account with parental controls to restrict apps, movies, books, and music. iOS 16 lets large families and friend pods share iCloud photos. Up to six people can contribute photos to a separate iCloud library.
Live Text is getting creepier. Users can interact with text in any video frame. Touch and hold an image's subject to remove it from its background and place it in apps like messages. Dictation offers a new on-device voice-and-touch experience. Siri can run app shortcuts without setup in iOS 16. Apple also unveiled a new iOS 16 feature to help people break up with abusive partners who track their locations or read their messages. Safety Check.
Apple Pay Later allows iPhone users to buy products and pay for them later. iOS 16 pushes Mail. Users can schedule emails and cancel delivery before it reaches a recipient's inbox (be quick!). Mail now detects if you forgot an attachment, as Gmail has for years. iOS 16's Maps app gets "Multi-Stop Routing," .
Apple News also gets an iOS 16 update. Apple News adds My Sports. With iOS 16, the Apple Watch's Fitness app is also coming to iOS and the iPhone, using motion-sensing tech to track metrics and performance (as long as an athlete is wearing or carrying the device on their person).
iOS 16 includes accessibility updates like Door Detection.
watchOS9
Many of Apple's software updates are designed to take advantage of the larger screens in recent models, but they also improve health and fitness tracking.
The most obvious reason to upgrade watchOS every year is to get new watch faces from Apple. WatchOS 9 will add four new faces.
Runners' workout metrics improve.
Apple quickly realized that fitness tracking would be the Apple Watch's main feature, even though it's been the killer app for wearables since their debut. For watchOS 9, the Apple Watch will use its accelerometer and gyroscope to track a runner's form, stride length, and ground contact time. It also introduces the ability to specify heart rate zones, distance, and time intervals, with vibrating haptic feedback and voice alerts.
The Apple Watch's Fitness app is coming to iOS and the iPhone, using the smartphone's motion-sensing tech to track metrics and performance (as long as an athlete is wearing or carrying the device on their person).
We'll get sleep tracking, medication reminders, and drug interaction alerts. Your watch can create calendar events. A new Week view shows what meetings or responsibilities stand between you and the weekend.
iPadOS16
WWDC 2022 introduced iPad updates. iPadOS 16 is similar to iOS for the iPhone, but has features for larger screens and tablet accessories. The software update gives it many iPhone-like features.
iPadOS 16's Home app, like iOS 16, will have a new design language. iPad users who want to blame it on the rain finally have a Weather app. iPadOS 16 will have iCloud's Shared Photo Library, Live Text and Visual Look Up upgrades, and FaceTime Handoff, so you can switch between devices during a call.
Apple highlighted iPadOS 16's multitasking at WWDC 2022. iPad's Stage Manager sounds like a community theater app. It's a powerful multitasking tool for tablets and brings them closer to emulating laptops. Apple's iPadOS 16 supports multi-user collaboration. You can share content from Files, Keynote, Numbers, Pages, Notes, Reminders, Safari, and other third-party apps in Apple Messages.
M2-chip
WWDC 2022 revealed Apple's M2 chip. Apple has started the next generation of Apple Silicon for the Mac with M2. Apple says this device improves M1's performance.
M2's second-generation 5nm chip has 25% more transistors than M1's. 100GB/s memory bandwidth (50 per cent more than M1). M2 has 24GB of unified memory, up from 16GB but less than some ultraportable PCs' 32GB. The M2 chip has 10% better multi-core CPU performance than the M2, and it's nearly twice as fast as the latest 10-core PC laptop chip at the same power level (CPU performance is 18 per cent greater than M1).
New MacBooks
Apple introduced the M2-powered MacBook Air. Apple's entry-level laptop has a larger display, a new processor, new colors, and a notch.
M2 also powers the 13-inch MacBook Pro. The 13-inch MacBook Pro has 24GB of unified memory and 50% more memory bandwidth. New MacBook Pro batteries last 20 hours. As I type on the 2021 MacBook Pro, I can only imagine how much power the M2 will add.
macOS 13.0 (or, macOS Ventura)
macOS Ventura will take full advantage of M2 with new features like Stage Manager and Continuity Camera and Handoff for FaceTime. Safari, Mail, Messages, Spotlight, and more get updates in macOS Ventura.
Apple hasn't run out of California landmarks to name its OS after yet. macOS 13 will be called Ventura when it's released in a few months, but it's more than a name change and new wallpapers.
Stage Manager organizes windows
Stage Manager is a new macOS tool that organizes open windows and applications so they're still visible while focusing on a specific task. The main app sits in the middle of the desktop, while other apps and documents are organized and piled up to the side.
Improved Searching
Spotlight is one of macOS's least appreciated features, but with Ventura, it's becoming even more useful. Live Text lets you extract text from Spotlight results without leaving the window, including images from the photo library and the web.
Mail lets you schedule or unsend emails.
We've all sent an email we regret, whether it contained regrettable words or was sent at the wrong time. In macOS Ventura, Mail users can cancel or reschedule a message after sending it. Mail will now intelligently determine if a person was forgotten from a CC list or if a promised attachment wasn't included. Procrastinators can set a reminder to read a message later.
Safari adds tab sharing and password passkeys
Apple is updating Safari to make it more user-friendly... mostly. Users can share a group of tabs with friends or family, a useful feature when researching a topic with too many tabs. Passkeys will replace passwords in Safari's next version. Instead of entering random gibberish when creating a new account, macOS users can use TouchID to create an on-device passkey. Using an iPhone's camera and a QR system, Passkey syncs and works across all Apple devices and Windows computers.
Continuity adds Facetime device switching and iPhone webcam.
With macOS Ventura, iPhone users can transfer a FaceTime call from their phone to their desktop or laptop using Handoff, or vice versa if they started a call at their desk and need to continue it elsewhere. Apple finally admits its laptop and monitor webcams aren't the best. Continuity makes the iPhone a webcam. Apple demonstrated a feature where the wide-angle lens could provide a live stream of the desk below, while the standard zoom lens could focus on the speaker's face. New iPhone laptop mounts are coming.
System Preferences
System Preferences is Now System Settings and Looks Like iOS
Ventura's System Preferences has been renamed System Settings and is much more similar in appearance to iOS and iPadOS. As the iPhone and iPad are gateway devices into Apple's hardware ecosystem, new Mac users should find it easier to adjust.
This post is a summary. Read full article here
You might also like

Bernard Bado
3 years ago
Build This Before Someone Else Does!
Do you want to build and launch your own software company? To do this, all you need is a product that solves a problem.
Coming up with profitable ideas is not that easy. But you’re in luck because you got me!
I’ll give you the idea for free. All you need to do is execute it properly.
If you’re ready, let’s jump right into it! Starting with the problem.
Problem
Youtube has many creators. Every day, they think of new ways to entertain or inform us.
They work hard to make videos. Many of their efforts go to waste. They limit their revenue and reach.
Solution
Content repurposing solves this problem.
One video can become several TikToks. Creating YouTube videos from a podcast episode.
Or, one video might become a blog entry.
By turning videos into blog entries, Youtubers may develop evergreen SEO content, attract a new audience, and reach a non-YouTube audience.
Many YouTube creators want this easy feature.
Let's build it!
Implementation
We identified the problem, and we have a solution. All that’s left to do is see how it can be done.
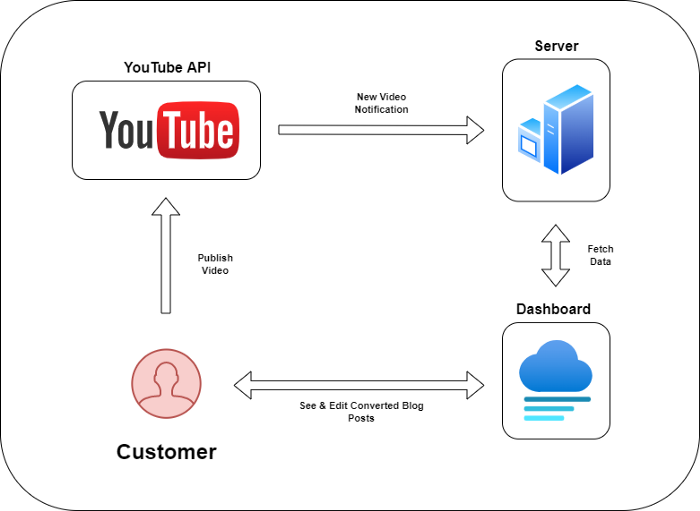
Monitoring new video uploads
First, watch when a friend uploads a new video. Everything should happen automatically without user input.
YouTube Webhooks make this easy. Our server listens for YouTube Webhook notifications.
After publishing a new video, we create a conversion job.
Creating a Blog Post from a Video
Next, turn a video into a blog article.
To convert, we must extract the video's audio (which can be achieved by using FFmpeg on the server).
Once we have the audio channel, we can use speech-to-text.
Services can accomplish this easily.
Speech-to-text on Google
Google Translate
Deepgram
Deepgram's affordability and integration make it my pick.
After conversion, the blog post needs formatting, error checking, and proofreading.
After this, a new blog post will appear in our web app's dashboard.
Completing a blog post
After conversion, users must examine and amend their blog posts.
Our application dashboard would handle all of this. It's a dashboard-style software where users can:
Link their Youtube account
Check out the converted videos in the future.
View the conversions that are ongoing.
Edit and format converted blog articles.
It's a web-based app.
It doesn't matter how it's made but I'd choose Next.js.
Next.js is a React front-end standard. Vercel serverless functions could conduct the conversions.
This would let me host the software for free and reduce server expenditures.
Taking It One Step Further
SaaS in a nutshell. Future improvements include integrating with WordPress or Ghost.
Our app users could then publish blog posts. Streamlining the procedure.
MVPs don't need this functionality.
Final Thoughts
Repurposing content helps you post more often, reach more people, and develop faster.
Many agencies charge a fortune for this service. Handmade means pricey.
Content creators will go crazy if you automate and cheaply solve this problem.
Just execute this idea!

Cammi Pham
3 years ago
7 Scientifically Proven Things You Must Stop Doing To Be More Productive
Smarter work yields better results.

17-year-old me worked and studied 20 hours a day. During school breaks, I did coursework and ran a nonprofit at night. Long hours earned me national campaigns, A-list opportunities, and a great career. As I aged, my thoughts changed. Working harder isn't necessarily the key to success.
In some cases, doing less work might lead to better outcomes.
Consider a hard-working small business owner. He can't beat his corporate rivals by working hard. Time's limited. An entrepreneur can work 24 hours a day, 7 days a week, but a rival can invest more money, create a staff, and put in more man hours. Why have small startups done what larger companies couldn't? Facebook paid $1 billion for 13-person Instagram. Snapchat, a 30-person startup, rejected Facebook and Google bids. Luck and efficiency each contributed to their achievement.
The key to success is not working hard. It’s working smart.
Being busy and productive are different. Busy doesn't always equal productive. Productivity is less about time management and more about energy management. Life's work. It's using less energy to obtain more rewards. I cut my work week from 80 to 40 hours and got more done. I value simplicity.
Here are seven activities I gave up in order to be more productive.
1. Give up working extra hours and boost productivity instead.
When did the five-day, 40-hour work week start? Henry Ford, Ford Motor Company founder, experimented with his workers in 1926.
He decreased their daily hours from 10 to 8, and shortened the work week from 6 days to 5. As a result, he saw his workers’ productivity increase.
According to a 1980 Business Roundtable report, Scheduled Overtime Effect on Construction Projects, the more you work, the less effective and productive you become.
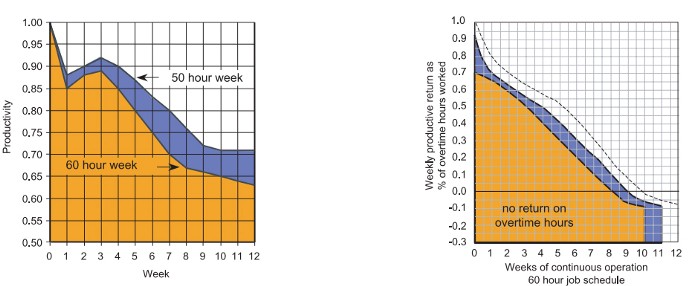
“Where a work schedule of 60 or more hours per week is continued longer than about two months, the cumulative effect of decreased productivity will cause a delay in the completion date beyond that which could have been realized with the same crew size on a 40-hour week.” Source: Calculating Loss of Productivity Due to Overtime Using Published Charts — Fact or Fiction
AlterNet editor Sara Robinson cited US military research showing that losing one hour of sleep per night for a week causes cognitive impairment equivalent to a.10 blood alcohol level. You can get fired for showing up drunk, but an all-nighter is fine.
Irrespective of how well you were able to get on with your day after that most recent night without sleep, it is unlikely that you felt especially upbeat and joyous about the world. Your more-negative-than-usual perspective will have resulted from a generalized low mood, which is a normal consequence of being overtired. More important than just the mood, this mind-set is often accompanied by decreases in willingness to think and act proactively, control impulses, feel positive about yourself, empathize with others, and generally use emotional intelligence. Source: The Secret World of Sleep: The Surprising Science of the Mind at Rest
To be productive, don't overwork and get enough sleep. If you're not productive, lack of sleep may be to blame. James Maas, a sleep researcher and expert, said 7/10 Americans don't get enough sleep.
Did you know?
Leonardo da Vinci slept little at night and frequently took naps.
Napoleon, the French emperor, had no qualms about napping. He splurged every day.
Even though Thomas Edison felt self-conscious about his napping behavior, he regularly engaged in this ritual.
President Franklin D. Roosevelt's wife Eleanor used to take naps before speeches to increase her energy.
The Singing Cowboy, Gene Autry, was known for taking regular naps in his dressing area in between shows.
Every day, President John F. Kennedy took a siesta after eating his lunch in bed.
Every afternoon, oil businessman and philanthropist John D. Rockefeller took a nap in his office.
It was unavoidable for Winston Churchill to take an afternoon snooze. He thought it enabled him to accomplish twice as much each day.
Every afternoon around 3:30, President Lyndon B. Johnson took a nap to divide his day into two segments.
Ronald Reagan, the 40th president, was well known for taking naps as well.
Source: 5 Reasons Why You Should Take a Nap Every Day — Michael Hyatt
Since I started getting 7 to 8 hours of sleep a night, I've been more productive and completed more work than when I worked 16 hours a day. Who knew marketers could use sleep?
2. Refrain from accepting too frequently
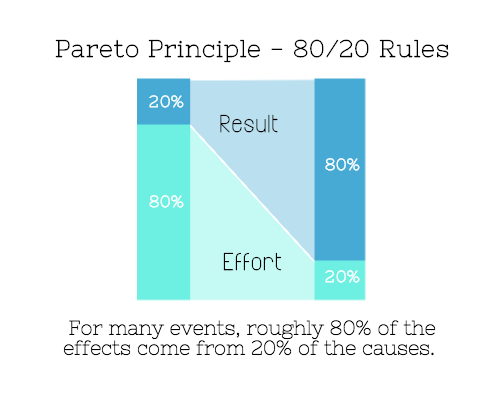
Pareto's principle states that 20% of effort produces 80% of results, but 20% of results takes 80% of effort. Instead of working harder, we should prioritize the initiatives that produce the most outcomes. So we can focus on crucial tasks. Stop accepting unproductive tasks.
“The difference between successful people and very successful people is that very successful people say “no” to almost everything.” — Warren Buffett
What should you accept? Why say no? Consider doing a split test to determine if anything is worth your attention. Track what you do, how long it takes, and the consequences. Then, evaluate your list to discover what worked (or didn't) to optimize future chores.
Most of us say yes more often than we should, out of guilt, overextension, and because it's simpler than no. Nobody likes being awful.
Researchers separated 120 students into two groups for a 2012 Journal of Consumer Research study. One group was educated to say “I can't” while discussing choices, while the other used “I don't”.
The students who told themselves “I can’t eat X” chose to eat the chocolate candy bar 61% of the time. Meanwhile, the students who told themselves “I don’t eat X” chose to eat the chocolate candy bars only 36% of the time. This simple change in terminology significantly improved the odds that each person would make a more healthy food choice.
Next time you need to say no, utilize I don't to encourage saying no to unimportant things.
The 20-second rule is another wonderful way to avoid pursuits with little value. Add a 20-second roadblock to things you shouldn't do or bad habits you want to break. Delete social media apps from your phone so it takes you 20 seconds to find your laptop to access them. You'll be less likely to engage in a draining hobby or habit if you add an inconvenience.
Lower the activation energy for habits you want to adopt and raise it for habits you want to avoid. The more we can lower or even eliminate the activation energy for our desired actions, the more we enhance our ability to jump-start positive change. Source: The Happiness Advantage: The Seven Principles of Positive Psychology That Fuel Success and Performance at Work
3. Stop doing everything yourself and start letting people help you
I once managed a large community and couldn't do it alone. The community took over once I burned out. Members did better than I could have alone. I learned about community and user-generated content.
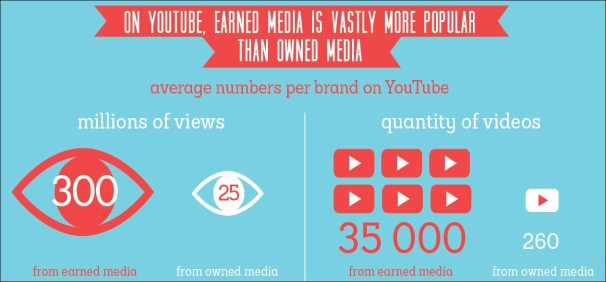
Consumers know what they want better than marketers. Octoly says user-generated videos on YouTube are viewed 10 times more than brand-generated videos. 51% of Americans trust user-generated material more than a brand's official website (16%) or media coverage (22%). (14 percent). Marketers should seek help from the brand community.
Being a successful content marketer isn't about generating the best content, but cultivating a wonderful community.
We should seek aid when needed. We can't do everything. It's best to delegate work so you may focus on the most critical things. Instead of overworking or doing things alone, let others help.
Having friends or coworkers around can boost your productivity even if they can't help.
Just having friends nearby can push you toward productivity. “There’s a concept in ADHD treatment called the ‘body double,’ ” says David Nowell, Ph.D., a clinical neuropsychologist from Worcester, Massachusetts. “Distractable people get more done when there is someone else there, even if he isn’t coaching or assisting them.” If you’re facing a task that is dull or difficult, such as cleaning out your closets or pulling together your receipts for tax time, get a friend to be your body double. Source: Friendfluence: The Surprising Ways Friends Make Us Who We Are
4. Give up striving for perfection
Perfectionism hinders professors' research output. Dr. Simon Sherry, a psychology professor at Dalhousie University, did a study on perfectionism and productivity. Dr. Sherry established a link between perfectionism and productivity.
Perfectionism has its drawbacks.
They work on a task longer than necessary.
They delay and wait for the ideal opportunity. If the time is right in business, you are already past the point.
They pay too much attention to the details and miss the big picture.
Marketers await the right time. They miss out.
The perfect moment is NOW.
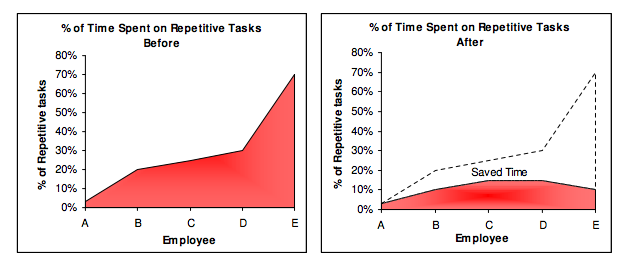
5. Automate monotonous chores instead of continuing to do them.
A team of five workers who spent 3%, 20%, 25%, 30%, and 70% of their time on repetitive tasks reduced their time spent to 3%, 10%, 15%, 15%, and 10% after two months of working to improve their productivity.
Last week, I wrote a 15-minute Python program. I wanted to generate content utilizing Twitter API data and Hootsuite to bulk schedule it. Automation has cut this task from a day to five minutes. Whenever I do something more than five times, I try to automate it.
Automate monotonous chores without coding. Skills and resources are nice, but not required. If you cannot build it, buy it.
People forget time equals money. Manual work is easy and requires little investigation. You can moderate 30 Instagram photographs for your UGC campaign. You need digital asset management software to manage 30,000 photographs and movies from five platforms. Filemobile helps individuals develop more user-generated content. You may buy software to manage rich media and address most internet difficulties.
Hire an expert if you can't find a solution. Spend money to make money, and time is your most precious asset.
Visit GitHub or Google Apps Script library, marketers. You may often find free, easy-to-use open source code.
6. Stop relying on intuition and start supporting your choices with data.
You may optimize your life by optimizing webpages for search engines.
Numerous studies might help you boost your productivity. Did you know individuals are most distracted from midday to 4 p.m.? This is what a Penn State psychology professor found. Even if you can't find data on a particular question, it's easy to run a split test and review your own results.
7. Stop working and spend some time doing absolutely nothing.
Most people don't know that being too focused can be destructive to our work or achievements. The Boston Globe's The Power of Lonely says solo time is excellent for the brain and spirit.
One ongoing Harvard study indicates that people form more lasting and accurate memories if they believe they’re experiencing something alone. Another indicates that a certain amount of solitude can make a person more capable of empathy towards others. And while no one would dispute that too much isolation early in life can be unhealthy, a certain amount of solitude has been shown to help teenagers improve their moods and earn good grades in school. Source: The Power of Lonely
Reflection is vital. We find solutions when we're not looking.
We don't become more productive overnight. It demands effort and practice. Waiting for change doesn't work. Instead, learn about your body and identify ways to optimize your energy and time for a happy existence.

The woman
3 years ago
The best lesson from Sundar Pichai is that success and stress don't mix.
His regular regimen teaches stress management.
In 1995, an Indian graduate visited the US. He obtained a scholarship to Stanford after graduating from IIT with a silver medal. First flight. His ticket cost a year's income. His head was full.
Pichai Sundararajan is his full name. He became Google's CEO and a world leader. Mr. Pichai transformed technology and inspired millions to dream big.
This article reveals his daily schedule.
Mornings
While many of us dread Mondays, Mr. Pichai uses the day to contemplate.
A typical Indian morning. He awakens between 6:30 and 7 a.m. He avoids working out in the mornings.
Mr. Pichai oversees the internet, but he reads a real newspaper every morning.
Pichai mentioned that he usually enjoys a quiet breakfast during which he reads the news to get a good sense of what’s happening in the world. Pichai often has an omelet for breakfast and reads while doing so. The native of Chennai, India, continues to enjoy his daily cup of tea, which he describes as being “very English.”
Pichai starts his day. BuzzFeed's Mat Honan called the CEO Banana Republic dad.
Overthinking in the morning is a bad idea. It's crucial to clear our brains and give ourselves time in the morning before we hit traffic.
Mr. Pichai's morning ritual shows how to stay calm. Wharton Business School found that those who start the day calmly tend to stay that way. It's worth doing regularly.
And he didn't forget his roots.
Afternoons
He has a busy work schedule, as you can imagine. Running one of the world's largest firm takes time, energy, and effort. He prioritizes his work. Monitoring corporate performance and guaranteeing worker efficiency.
Sundar Pichai spends 7-8 hours a day to improve Google. He's noted for changing the company's culture. He wants to boost employee job satisfaction and performance.
His work won him recognition within the company.
Pichai received a 96% approval rating from Glassdoor users in 2017.
Mr. Pichai stresses work satisfaction. Each day is a new canvas for him to find ways to enrich people's job and personal lives.
His work offers countless lessons. According to several profiles and press sources, the Google CEO is a savvy negotiator. Mr. Pichai's success came from his strong personality, work ethic, discipline, simplicity, and hard labor.
Evenings
His evenings are spent with family after a busy day. Sundar Pichai's professional and personal lives are balanced. Sundar Pichai is a night owl who re-energizes about 9 p.m.
However, he claims to be most productive after 10 p.m., and he thinks doing a lot of work at that time is really useful. But he ensures he sleeps for around 7–8 hours every day. He enjoys long walks with his dog and enjoys watching NSDR on YouTube. It helps him in relaxing and sleep better.
His regular routine teaches us what? Work wisely, not hard, discipline, vision, etc. His stress management is key. Leading one of the world's largest firm with 85,000 employees is scary.
The pressure to achieve may ruin a day. Overworked employees are more likely to make mistakes or be angry with coworkers, according to the Family Work Institute. They can't handle daily problems, making the house more stressful than the office.
Walking your dog, having fun with friends, and having hobbies are as vital as your office.