Apple WWDC 2022 Announcements
WWDC 2022 began early Tuesday morning. WWDC brought a ton of new features (which went for just shy of two hours).
With so many announcements, we thought we'd compile them. And now...
WWDC?
WWDC is Apple's developer conference. This includes iOS, macOS, watchOS, and iPadOS (all of its iPads). It's where Apple announces new features for developers to use. It's also where Apple previews new software.
Virtual WWDC runs June 6-10. You can rewatch the stream on Apple's website.
WWDC 2022 news:
Completely everything. Really. iOS 16 first.
iOS 16.
iOS 16 is a major iPhone update. iOS 16 adds the ability to customize the Lock Screen's color/theme. And widgets. It also organizes notifications and pairs Lock Screen with Focus themes. Edit or recall recently sent messages, recover recently deleted messages, and mark conversations as unread. Apple gives us yet another reason to stay in its walled garden with iMessage.
New iOS includes family sharing. Parents can set up a child's account with parental controls to restrict apps, movies, books, and music. iOS 16 lets large families and friend pods share iCloud photos. Up to six people can contribute photos to a separate iCloud library.
Live Text is getting creepier. Users can interact with text in any video frame. Touch and hold an image's subject to remove it from its background and place it in apps like messages. Dictation offers a new on-device voice-and-touch experience. Siri can run app shortcuts without setup in iOS 16. Apple also unveiled a new iOS 16 feature to help people break up with abusive partners who track their locations or read their messages. Safety Check.
Apple Pay Later allows iPhone users to buy products and pay for them later. iOS 16 pushes Mail. Users can schedule emails and cancel delivery before it reaches a recipient's inbox (be quick!). Mail now detects if you forgot an attachment, as Gmail has for years. iOS 16's Maps app gets "Multi-Stop Routing," .
Apple News also gets an iOS 16 update. Apple News adds My Sports. With iOS 16, the Apple Watch's Fitness app is also coming to iOS and the iPhone, using motion-sensing tech to track metrics and performance (as long as an athlete is wearing or carrying the device on their person).
iOS 16 includes accessibility updates like Door Detection.
watchOS9
Many of Apple's software updates are designed to take advantage of the larger screens in recent models, but they also improve health and fitness tracking.
The most obvious reason to upgrade watchOS every year is to get new watch faces from Apple. WatchOS 9 will add four new faces.
Runners' workout metrics improve.
Apple quickly realized that fitness tracking would be the Apple Watch's main feature, even though it's been the killer app for wearables since their debut. For watchOS 9, the Apple Watch will use its accelerometer and gyroscope to track a runner's form, stride length, and ground contact time. It also introduces the ability to specify heart rate zones, distance, and time intervals, with vibrating haptic feedback and voice alerts.
The Apple Watch's Fitness app is coming to iOS and the iPhone, using the smartphone's motion-sensing tech to track metrics and performance (as long as an athlete is wearing or carrying the device on their person).
We'll get sleep tracking, medication reminders, and drug interaction alerts. Your watch can create calendar events. A new Week view shows what meetings or responsibilities stand between you and the weekend.
iPadOS16
WWDC 2022 introduced iPad updates. iPadOS 16 is similar to iOS for the iPhone, but has features for larger screens and tablet accessories. The software update gives it many iPhone-like features.
iPadOS 16's Home app, like iOS 16, will have a new design language. iPad users who want to blame it on the rain finally have a Weather app. iPadOS 16 will have iCloud's Shared Photo Library, Live Text and Visual Look Up upgrades, and FaceTime Handoff, so you can switch between devices during a call.
Apple highlighted iPadOS 16's multitasking at WWDC 2022. iPad's Stage Manager sounds like a community theater app. It's a powerful multitasking tool for tablets and brings them closer to emulating laptops. Apple's iPadOS 16 supports multi-user collaboration. You can share content from Files, Keynote, Numbers, Pages, Notes, Reminders, Safari, and other third-party apps in Apple Messages.
M2-chip
WWDC 2022 revealed Apple's M2 chip. Apple has started the next generation of Apple Silicon for the Mac with M2. Apple says this device improves M1's performance.
M2's second-generation 5nm chip has 25% more transistors than M1's. 100GB/s memory bandwidth (50 per cent more than M1). M2 has 24GB of unified memory, up from 16GB but less than some ultraportable PCs' 32GB. The M2 chip has 10% better multi-core CPU performance than the M2, and it's nearly twice as fast as the latest 10-core PC laptop chip at the same power level (CPU performance is 18 per cent greater than M1).
New MacBooks
Apple introduced the M2-powered MacBook Air. Apple's entry-level laptop has a larger display, a new processor, new colors, and a notch.
M2 also powers the 13-inch MacBook Pro. The 13-inch MacBook Pro has 24GB of unified memory and 50% more memory bandwidth. New MacBook Pro batteries last 20 hours. As I type on the 2021 MacBook Pro, I can only imagine how much power the M2 will add.
macOS 13.0 (or, macOS Ventura)
macOS Ventura will take full advantage of M2 with new features like Stage Manager and Continuity Camera and Handoff for FaceTime. Safari, Mail, Messages, Spotlight, and more get updates in macOS Ventura.
Apple hasn't run out of California landmarks to name its OS after yet. macOS 13 will be called Ventura when it's released in a few months, but it's more than a name change and new wallpapers.
Stage Manager organizes windows
Stage Manager is a new macOS tool that organizes open windows and applications so they're still visible while focusing on a specific task. The main app sits in the middle of the desktop, while other apps and documents are organized and piled up to the side.
Improved Searching
Spotlight is one of macOS's least appreciated features, but with Ventura, it's becoming even more useful. Live Text lets you extract text from Spotlight results without leaving the window, including images from the photo library and the web.
Mail lets you schedule or unsend emails.
We've all sent an email we regret, whether it contained regrettable words or was sent at the wrong time. In macOS Ventura, Mail users can cancel or reschedule a message after sending it. Mail will now intelligently determine if a person was forgotten from a CC list or if a promised attachment wasn't included. Procrastinators can set a reminder to read a message later.
Safari adds tab sharing and password passkeys
Apple is updating Safari to make it more user-friendly... mostly. Users can share a group of tabs with friends or family, a useful feature when researching a topic with too many tabs. Passkeys will replace passwords in Safari's next version. Instead of entering random gibberish when creating a new account, macOS users can use TouchID to create an on-device passkey. Using an iPhone's camera and a QR system, Passkey syncs and works across all Apple devices and Windows computers.
Continuity adds Facetime device switching and iPhone webcam.
With macOS Ventura, iPhone users can transfer a FaceTime call from their phone to their desktop or laptop using Handoff, or vice versa if they started a call at their desk and need to continue it elsewhere. Apple finally admits its laptop and monitor webcams aren't the best. Continuity makes the iPhone a webcam. Apple demonstrated a feature where the wide-angle lens could provide a live stream of the desk below, while the standard zoom lens could focus on the speaker's face. New iPhone laptop mounts are coming.
System Preferences
System Preferences is Now System Settings and Looks Like iOS
Ventura's System Preferences has been renamed System Settings and is much more similar in appearance to iOS and iPadOS. As the iPhone and iPad are gateway devices into Apple's hardware ecosystem, new Mac users should find it easier to adjust.
This post is a summary. Read full article here
More on Technology

Jay Peters
3 years ago
Apple AR/VR heaset
Apple is said to have opted for a standalone AR/VR headset over a more powerful tethered model.
It has had a tumultuous history.
Apple's alleged mixed reality headset appears to be the worst-kept secret in tech, and a fresh story from The Information is jam-packed with details regarding the device's rocky development.
Apple's decision to use a separate headgear is one of the most notable aspects of the story. Apple had yet to determine whether to pursue a more powerful VR headset that would be linked with a base station or a standalone headset. According to The Information, Apple officials chose the standalone product over the version with the base station, which had a processor that later arrived as the M1 Ultra. In 2020, Bloomberg published similar information.
That decision appears to have had a long-term impact on the headset's development. "The device's many processors had already been in development for several years by the time the choice was taken, making it impossible to go back to the drawing board and construct, say, a single chip to handle all the headset's responsibilities," The Information stated. "Other difficulties, such as putting 14 cameras on the headset, have given hardware and algorithm engineers stress."
Jony Ive remained to consult on the project's design even after his official departure from Apple, according to the story. Ive "prefers" a wearable battery, such as that offered by Magic Leap. Other prototypes, according to The Information, placed the battery in the headset's headband, and it's unknown which will be used in the final design.
The headset was purportedly shown to Apple's board of directors last week, indicating that a public unveiling is imminent. However, it is possible that it will not be introduced until later this year, and it may not hit shop shelves until 2023, so we may have to wait a bit to try it.
For further down the line, Apple is working on a pair of AR spectacles that appear like Ray-Ban wayfarer sunglasses, but according to The Information, they're "still several years away from release." (I'm interested to see how they compare to Meta and Ray-Bans' true wayfarer-style glasses.)

Mark Schaefer
3 years ago
20 Fun Uses for ChatGPT
Our RISE community is stoked on ChatGPT. ChatGPT has countless uses.
Early on. Companies are figuring out the legal and ethical implications of AI's content revolution. Using AI for everyday tasks is cool.
So I challenged RISE friends... Let's have fun and share non-obvious uses.
Onward!
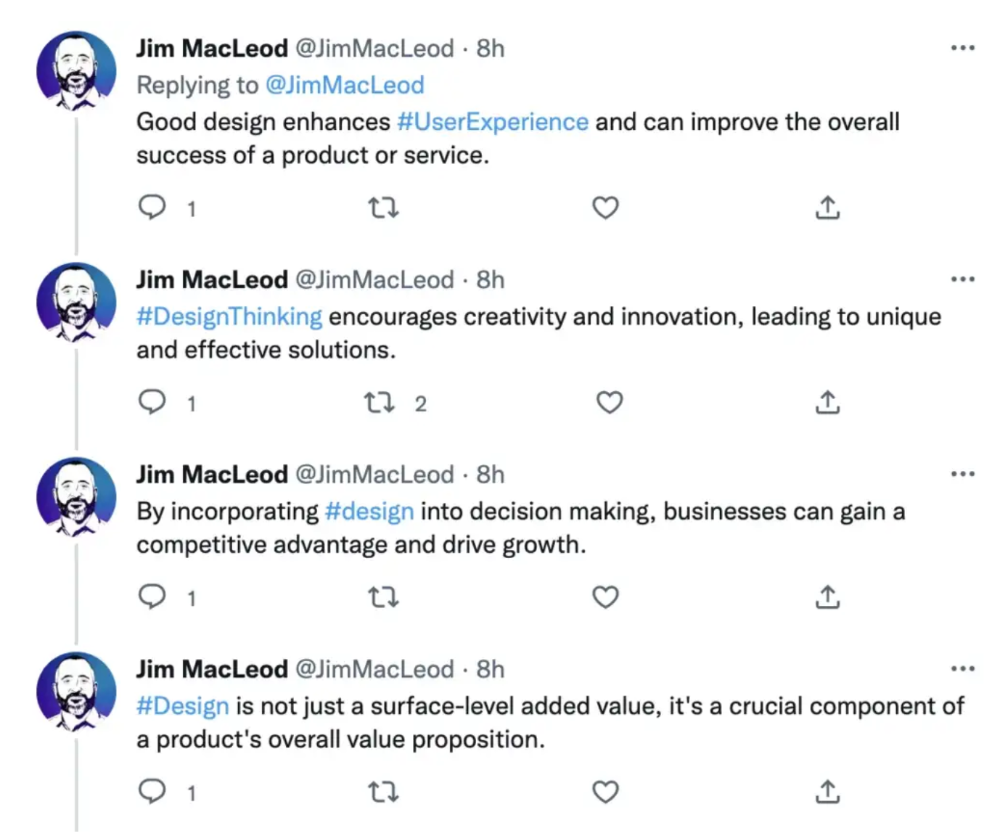
1. Tweet
Jim MacLeod requested a design-themed Twitter thread from ChatGPT.
2. Novelize
Giuseppe Fratoni writes novels.
"This is amazing!" Impotent. I asked about writing, mystery novels, and jazz.
"Develop a mystery novel plot in which a disillusioned homicide detective hunts a serial killer who targets jazz musicians who play Autumn Leaves."
"I have:
Detective James Thompson is a seasoned veteran of the Homicide department, but lately he’s been feeling burnt out and disillusioned. His latest case, the murder of a young jazz pianist who was found brutally killed in his home, only serves to deepen his sense of despair … (much more provided)
3. Question-and-answer sessions
Bliss recommends:
You have a guest speaker and want to ask audience questions.
Pre-generate questions with ChatGPT. "And here's a question from our AI?"
The conference is about Western water scarcity. Water management expert. My AI question was...
Which desalination-related questions should I ask an expert?
ChatGPT said...
How is desalination currently being used around the world, and in what types of locations is it most effective?
What are the potential advantages and disadvantages of using desalination to provide fresh water?
What are some of the key challenges and limitations of desalination technology, and how are they being addressed?
4. Game-making
Richard's a board game expert. He suggests using ChatGPT to plan games. Note: Some people have started getting help solving crossword puzzle clues.
5. Matchmaking
Tanya Thompson thinks it helps dating. ChatGPT:
Here are some flirty first-message ideas for dating apps:
I noticed you from afar. I had to say hi and see if we clicked.
Your profile picture is gorgeous. I'm obsessed with your [Feature] and want to know you better.
I don't usually message first, but I had to. You're [Attractive Quality] and I can't wait to talk.”
Hello. Your profile intimidates me. I'm starstruck by your [Attractiveness]. (Many instances)
5. Solitude/anxiety
ChatGPT excels at one-on-one conversations.
PepperBrooks: "I'm sad and lonely."
ChatGPT: I’m sorry to hear that you’re feeling sad and lonely. It’s natural to feel down sometimes, but it’s important to remember that you’re not alone. There are many people who care about you and want to help you. It can be helpful to talk to someone about your feelings, whether it’s a close friend, family member, or mental health professional.
Sometimes, just expressing your thoughts and emotions to someone else can help to alleviate your sadness and loneliness. It’s also important to take care of yourself and do things that make you happy, such as spending time with loved ones, pursuing a hobby, or exercising. These things can help to improve your mood and make you feel more connected to others. Remember that you are strong and capable, and that you can get through this difficult time.
Daniel Nestle asked ChatGPT to generate journal prompts to help him deal with anxiety.
Write down the things that are causing you anxiety at the moment.
Describe a situation in which you felt anxious and how you coped with it.
Reflect on how your thoughts and beliefs contribute to your anxiety.
Write a letter to your anxiety, expressing your feelings and concerns
Imagine yourself in a calm and peaceful place, and describe it in detail.
(many more items followed)
6. Names
Continued Daniel:
Also, naming ideas.
Me: Name this drink. Japanese gin, unsweetened tonic, lime, Szechuan pepper, grapefruit.
ChatGPT: How about “Sakura Sunrise?” The name incorporates the Japanese gin and the citrus flavors of grapefruit and lime, and the word “sunrise” suggests a fresh and invigorating start to the day. Alternatively, you could go with something like “Peppered Grapefruit Gin Fizz” to emphasize the unique flavor combination of Szechuan pepper and grapefruit.
7. Translation on the go
Monks recommends: ChatGPT is a perfect mobile translation tool. Say you need help in Italy.
ME: Translate to Italian
Where is the nearest gas station?
ChatGPT: “La mia auto sta per esaurire il carburante, mi puoi dire dove si trova la stazione di servizio più vicina?”
8. Fitness
Monks added:
ME: In 3 months, I want to run 5km. Plan out how I can do this.
ChatGPT: Here's a 3-month plan to run 5km.
Start by walking for 15–20 minutes each day to build up your endurance and get your body used to regular exercise.
After a week of walking, begin incorporating short jogs into your routine. Start by jogging for 1–2 minutes at a time, with walking breaks in between. Gradually increase the length of your jogs and reduce the amount of time you spend walking.
Once you can jog for 10 minutes without stopping, start increasing the distance of your runs. Aim to run 1km without stopping and then gradually increase the distance over time.
In addition to your regular runs, incorporate strength training and stretching into your routine to improve your overall fitness and reduce the risk of injury.
(more details continued on)
9. Integrations and coding
10. Teacher lesson plans
Spencer Crandall saved time.
This morning, I wondered who has the hardest job. Teachers.
Many students, little time. ChatGPT could handle lesson planning. I tried it and got this.
Lesson Title: The History and Impact of Artificial Intelligence
Students will understand the history and development of AI and the potential positive and negative impacts on society.
AI timeline AI technologies and applications
Overview:
Introduce the topic of artificial intelligence, and explain that it refers to the development of computer systems and algorithms that can simulate human intelligence and behavior.
Show the timeline of significant events in the history of AI, and discuss the key milestones and developments in the field.
Show examples of AI technologies and applications, and explain how they are used in various industries and fields.
Discuss the potential positive and negative impacts of AI on society, including its potential to improve productivity, efficiency, and safety, as well as its potential to create new challenges and concerns, such as job displacement and ethical issues.
(many more details followed)
11. Find podcast guests.
Joeri Billast suggested:
Who should be on my Web3 podcast?
ChatGPT: Web3 marketing experts, influencers, and thought leaders make great podcast guests. These include Web3 marketers, content creators, business owners, entrepreneurs, and technologists. You could invite Web3 startups and organizations to your podcast.
Please give examples.
ChatGPT: Ideal Web3 marketing podcast guests include:
Tim Berner-Lee, inventor of the World Wide Web
Chris Dixon, general partner at Andreessen Horowitz
Vitalik Buterin, founder of Ethereum
Joe Lubin, founder of ConsenSys
Susan Fowler, author of Whistleblower
(many other suggestions)
12. Comments and reviews on social media
Lisa Monk thinks ChatGPT can help retail staff with social media.
She asked ChatGPT to "review this restaurant"
POSITIVE CUSTOMER REVIEW: I absolutely love this place. We eat out a lot however this place has topped it all. Perfect meals, amazing staff and the timing for it all was great! Special thanks to Sophie B (you rock) From your guests all the way from the Gold Coast, THANK YOU
ChatGPT REPLY: Thank you so much for your kind words and for taking the time to write a review. We are delighted to hear that you had such a great experience at our restaurant. We are thrilled that you enjoyed your meal and the service provided by Sophie. It’s always a pleasure to serve guests visiting from the Gold Coast and we are grateful for your support. We look forward to welcoming you back again soon. Thank you again for your positive review.
CUSTOMER REVIEW: Most average food, there is a nice view, But that’s about it
ChatGPT: Thank you for your review. We apologize if your dining experience was not up to your expectations. We strive to provide top-quality food and service to all of our customers, and we will take your feedback into consideration as we continue to improve. Thank you for letting us know about your experience.
13. Crime-fighting
Zack Seipert said, "I researched some famous unsolved murders, and ChatGPT laid out the crime, suspects, clues, and more." I bet experienced detectives could solve some of these cold cases.
14. Reduce bias
Joanne Taylor struggles to remove biases from her writing. She asked ChatGPT for ideas.
I asked ChatGPT to check a text for racial bias, and it did well.
15. Furnishings
I designed a small, unique table using ChatGPT and MidJourney. I edited ChatGPT's idea for clarity and brevity before entering it in MidJourney.
Results:

16. Serialize a novel
Scott Scowcoft led ChatCPT through iterations of a story text to create serialized novel frames. You can view this here.
17. Interview preparation
I was on a sales podcast. Although this is marketing-related, it's not my forte. I asked ChatGPT for help with a sales interview. Response:
Here are some interview questions about the future of sales and how to answer them.
How will technology affect sales in the future?
Technology will impact sales in the coming years. Automation and AI could be used to handle routine tasks, and data analysis and CRM could become more important. E-commerce and online sales channels are also reshaping the sales landscape.
How will the salesperson's role change?
Future sales roles may change in response to changing customer needs and expectations. Salespeople must be knowledgeable and consultative to help customers navigate complex products and services. Increasing importance of data analysis and CRM tools will require salespeople to understand and use technology effectively.
Future sales professionals will need what skills?
Future salespeople will need many skills. Sales professionals must have strong communication and interpersonal skills, as well as product and service knowledge and the ability to use data analysis and CRM tools effectively. Adapting to changing customer needs and staying current on industry trends will also be important for sales success.
18. Gift ideas
I need Christmas gift ideas for my wife. I asked:
Suggest a gift idea under $200 for a middle-aged woman who loves The Eagles.
A middle-aged woman who loves The Eagles might like a vinyl record of "Hotel California" or "The Long Run." Many music fans enjoy the unique sound and experience of vinyl records.
Pair the record with a high-quality record player for a complete gift. The vinyl record and record player should fit within your $200 budget for an Eagles fan.
19. Explaining complex concepts
I entered: Explain quantum physics to me as if I were 10 years old.
Quantum physics is a branch of science that studies how tiny particles, like atoms and subatomic particles, behave. These particles are so small that they don’t always follow the same rules as the things we can see and touch every day.
For example, sometimes they can be in two places at the same time, or they can be friends with each other even if they are far apart. This might sound strange, but it’s what scientists have learned from studying these tiny particles. Quantum physics helps us understand how the world works at a very small scale, and it can also help us make new technologies, like computers that are much faster than the ones we have today.
20. AP-style editing
Blogs, journals, and books follow AP Style. I asked ChatGPT to "edit using AP Style" and it did a great job.
And then... "Write a catchy headline for a blog post about 16 ChatGPT uses"
Here are some possible blog post titles for 20 creative ChatGPT uses:
“20 Fun and Creative Ways to Use ChatGPT: From Games to Quizzes and More”
“The Ultimate Guide to Using ChatGPT for Entertainment and Creativity”
“20 Reasons to Use ChatGPT: How it Can Enhance Your Gaming, Storytelling, and More”
20 Entertaining Uses for ChatGPT You Never Knew Were Possible”
“Unleash Your Imagination with ChatGPT: 16 Creative and Fun Ways to Use it”
In a previous post, I said ChatGPT will change marketing careers forever. I have never made a statement like that in my life. Even in the early days of the internet, people were cautious.
This technology was just released two weeks ago, and over a million people are already using it. This is the fastest technology adoption in history.
Today's post offers inventive and entertaining ideas, but it's just the beginning. ChatGPT writes code, music, and papers.
Monroe Mayfield
3 years ago
CES 2023: A Third Look At Upcoming Trends
Las Vegas hosted CES 2023. This third and last look at CES 2023 previews upcoming consumer electronics trends that will be crucial for market share.
Definitely start with ICT. Qualcomm CEO Cristiano Amon spoke to CNBC from Las Vegas on China's crackdown and the company's automated driving systems for electric vehicles (EV). The business showed a concept car and its latest Snapdragon processor designs, which offer expanded digital interactions through SalesForce-partnered CRM platforms.
Electrification is reviving Michigan's automobile industry. Michigan Local News reports that $14 billion in EV and battery manufacturing investments will benefit the state. The report also revealed that the Strategic Outreach and Attraction Reserve (SOAR) fund had generated roughly $1 billion for the state's automotive sector.
Ars Technica is great for technology, society, and the future. After CES 2023, Jonathan M. Gitlin published How many electric car chargers are enough? Read about EV charging network issues and infrastructure spending. Politics aside, rapid technological advances enable EV charging network expansion in American cities and abroad.
Finally, the UNEP's The Future of Electric Vehicles and Material Resources: A Foresight Brief. Understanding how lithium-ion batteries will affect EV sales is crucial. Climate change affects EVs in various ways, but electrification and mining trends stand out because more EVs demand more energy-intensive metals and rare earths. Areas & Producers has been publishing my electrification and mining trends articles. Follow me if you wish to write for the publication.
The Weekend Brief (TWB) will routinely cover tech, industrials, and global commodities in global markets, including stock markets. Read more about the future of key areas and critical producers of the global economy in Areas & Producers.
You might also like

CNET
4 years ago
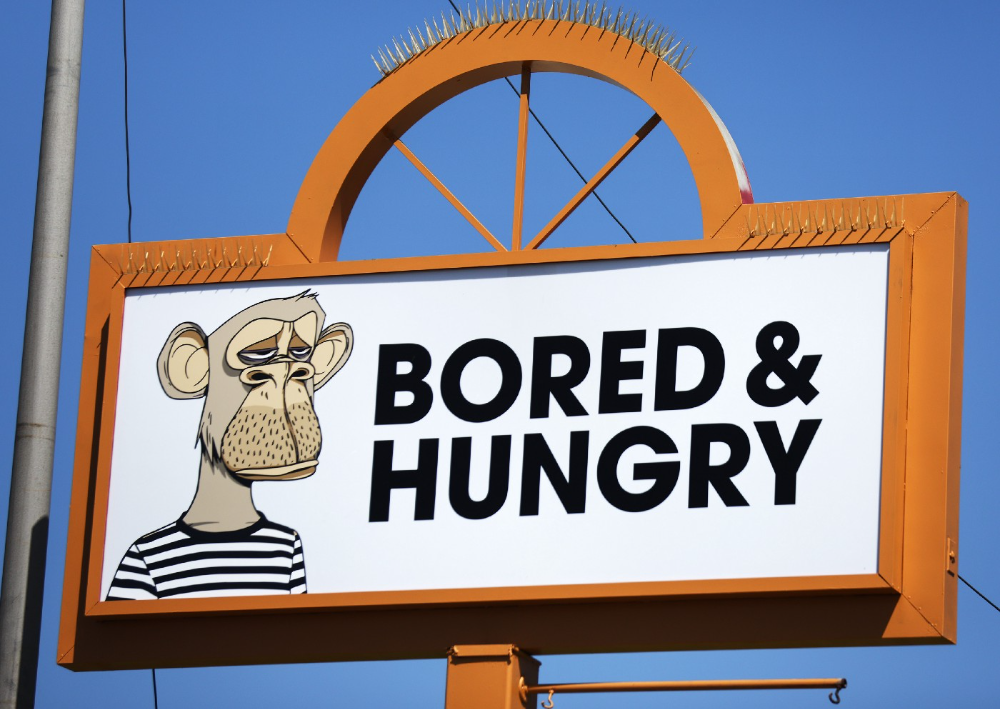
How a $300K Bored Ape Yacht Club NFT was accidentally sold for $3K
The Bored Ape Yacht Club is one of the most prestigious NFT collections in the world. A collection of 10,000 NFTs, each depicting an ape with different traits and visual attributes, Jimmy Fallon, Steph Curry and Post Malone are among their star-studded owners. Right now the price of entry is 52 ether, or $210,000.
Which is why it's so painful to see that someone accidentally sold their Bored Ape NFT for $3,066.
Unusual trades are often a sign of funny business, as in the case of the person who spent $530 million to buy an NFT from themselves. In Saturday's case, the cause was a simple, devastating "fat-finger error." That's when people make a trade online for the wrong thing, or for the wrong amount. Here the owner, real name Max or username maxnaut, meant to list his Bored Ape for 75 ether, or around $300,000. Instead he accidentally listed it for 0.75. One hundredth the intended price.
It was bought instantaneously. The buyer paid an extra $34,000 to speed up the transaction, ensuring no one could snap it up before them. The Bored Ape was then promptly listed for $248,000. The transaction appears to have been done by a bot, which can be coded to immediately buy NFTs listed below a certain price on behalf of their owners in order to take advantage of these exact situations.
"How'd it happen? A lapse of concentration I guess," Max told me. "I list a lot of items every day and just wasn't paying attention properly. I instantly saw the error as my finger clicked the mouse but a bot sent a transaction with over 8 eth [$34,000] of gas fees so it was instantly sniped before I could click cancel, and just like that, $250k was gone."
"And here within the beauty of the Blockchain you can see that it is both honest and unforgiving," he added.
Fat finger trades happen sporadically in traditional finance -- like the Japanese trader who almost bought 57% of Toyota's stock in 2014 -- but most financial institutions will stop those transactions if alerted quickly enough. Since cryptocurrency and NFTs are designed to be decentralized, you essentially have to rely on the goodwill of the buyer to reverse the transaction.
Fat finger errors in cryptocurrency trades have made many a headline over the past few years. Back in 2019, the company behind Tether, a cryptocurrency pegged to the US dollar, nearly doubled its own coin supply when it accidentally created $5 billion-worth of new coins. In March, BlockFi meant to send 700 Gemini Dollars to a set of customers, worth roughly $1 each, but mistakenly sent out millions of dollars worth of bitcoin instead. Last month a company erroneously paid a $24 million fee on a $100,000 transaction.
Similar incidents are increasingly being seen in NFTs, now that many collections have accumulated in market value over the past year. Last month someone tried selling a CryptoPunk NFT for $19 million, but accidentally listed it for $19,000 instead. Back in August, someone fat finger listed their Bored Ape for $26,000, an error that someone else immediately capitalized on. The original owner offered $50,000 to the buyer to return the Bored Ape -- but instead the opportunistic buyer sold it for the then-market price of $150,000.
"The industry is so new, bad things are going to happen whether it's your fault or the tech," Max said. "Once you no longer have control of the outcome, forget and move on."
The Bored Ape Yacht Club launched back in April 2021, with 10,000 NFTs being sold for 0.08 ether each -- about $190 at the time. While NFTs are often associated with individual digital art pieces, collections like the Bored Ape Yacht Club, which allow owners to flaunt their NFTs by using them as profile pictures on social media, are becoming increasingly prevalent. The Bored Ape Yacht Club has since become the second biggest NFT collection in the world, second only to CryptoPunks, which launched in 2017 and is considered the "original" NFT collection.

Nik Nicholas
3 years ago
A simple go-to-market formula

“Poor distribution, not poor goods, is the main reason for failure” — Peter Thiel.
Here's an easy way to conceptualize "go-to-market" for your distribution plan.
One equation captures the concept:
Distribution = Ecosystem Participants + Incentives
Draw your customers' ecosystem. Set aside your goods and consider your consumer's environment. Who do they deal with daily?
First, list each participant. You want an exhaustive list, but here are some broad categories.
In-person media services
Websites
Events\Networks
Financial education and banking
Shops
Staff
Advertisers
Twitter influencers
Draw influence arrows. Who's affected? I'm not just talking about Instagram selfie-posters. Who has access to your consumer and could promote your product if motivated?
The thicker the arrow, the stronger the relationship. Include more "influencers" if needed. Customer ecosystems are complex.
3. Incentivize ecosystem players. “Show me the incentive and I will show you the result.“, says Warren Buffet's business partner Charlie Munger.
Strong distribution strategies encourage others to promote your product to your target market by incentivizing the most prominent players. Incentives can be financial or non-financial.
Financial rewards
Usually, there's money. If you pay Facebook, they'll run your ad. Salespeople close deals for commission. Giving customers bonus credits will encourage referrals.
Most businesses underuse non-financial incentives.
Non-cash incentives
Motivate key influencers without spending money to expand quickly and cheaply. What can you give a client-connector for free?
Here are some ideas:
Are there any other features or services available?
Titles or status? Tinder paid college "ambassadors" for parties to promote its dating service.
Can I get early/free access? Facebook gave a select group of developers "exclusive" early access to their AR platform.
Are you a good host? Pharell performed at YPlan's New York launch party.
Distribution? Apple's iPod earphones are white so others can see them.
Have an interesting story? PR rewards journalists by giving them a compelling story to boost page views.
Prioritize distribution.
More time spent on distribution means more room in your product design and business plan. Once you've identified the key players in your customer's ecosystem, talk to them.
Money isn't your only resource. Creative non-monetary incentives may be more effective and scalable. Give people something useful and easy to deliver.

Amelia Winger-Bearskin
3 years ago
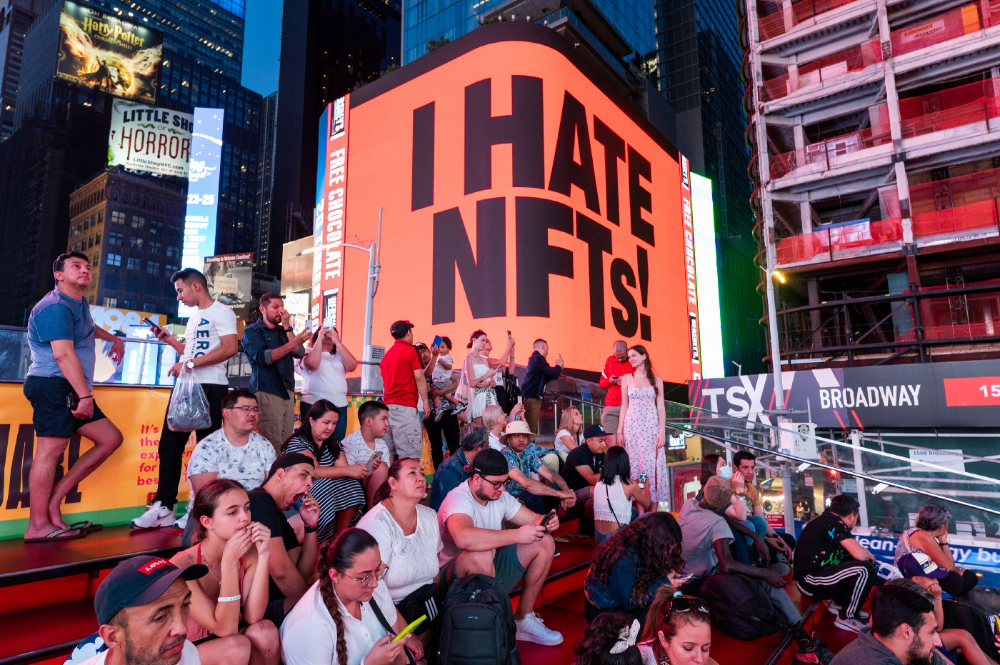
Hate NFTs? I must break some awful news to you...
If you think NFTs are awful, check out the art market.
The fervor around NFTs has subsided in recent months due to the crypto market crash and the media's short attention span. They were all anyone could talk about earlier this spring. Last semester, when passions were high and field luminaries were discussing "slurp juices," I asked my students and students from over 20 other universities what they thought of NFTs.
According to many, NFTs were either tasteless pyramid schemes or a new way for artists to make money. NFTs contributed to the climate crisis and harmed the environment, but so did air travel, fast fashion, and smartphones. Some students complained that NFTs were cheap, tasteless, algorithmically generated schlock, but others asked how this was different from other art.
I'm not sure what I expected, but the intensity of students' reactions surprised me. They had strong, emotional opinions about a technology I'd always considered administrative. NFTs address ownership and accounting, like most crypto/blockchain projects.
Art markets can be irrational, arbitrary, and subject to the same scams and schemes as any market. And maybe a few shenanigans that are unique to the art world.
The Fairness Question
Fairness, a deflating moral currency, was the general sentiment (the less of it in circulation, the more ardently we clamor for it.) These students, almost all of whom are artists, complained to the mismatch between the quality of the work in some notable NFT collections and the excessive amounts these items were fetching on the market. They can sketch a Bored Ape or Lazy Lion in their sleep. Why should they buy ramen with school loans while certain swindlers get rich?
I understand students. Art markets are unjust. They can be irrational, arbitrary, and governed by chance and circumstance, like any market. And art-world shenanigans.
Almost every mainstream critique leveled against NFTs applies just as easily to art markets
Over 50% of artworks in circulation are fake, say experts. Sincere art collectors and institutions are upset by the prevalence of fake goods on the market. Not everyone. Wealthy people and companies use art as investments. They can use cultural institutions like museums and galleries to increase the value of inherited art collections. People sometimes buy artworks and use family ties or connections to museums or other cultural taste-makers to hype the work in their collection, driving up the price and allowing them to sell for a profit. Money launderers can disguise capital flows by using market whims, hype, and fluctuating asset prices.
Almost every mainstream critique leveled against NFTs applies just as easily to art markets.
Art has always been this way. Edward Kienholz's 1989 print series satirized art markets. He stamped 395 identical pieces of paper from $1 to $395. Each piece was initially priced as indicated. Kienholz was joking about a strange feature of art markets: once the last print in a series sells for $395, all previous works are worth at least that much. The entire series is valued at its highest auction price. I don't know what a Kienholz print sells for today (inquire with the gallery), but it's more than $395.
I love Lee Lozano's 1969 "Real Money Piece." Lozano put cash in various denominations in a jar in her apartment and gave it to visitors. She wrote, "Offer guests coffee, diet pepsi, bourbon, half-and-half, ice water, grass, and money." "Offer real money as candy."
Lee Lozano kept track of who she gave money to, how much they took, if any, and how they reacted to the offer of free money without explanation. Diverse reactions. Some found it funny, others found it strange, and others didn't care. Lozano rarely says:
Apr 17 Keith Sonnier refused, later screws lid very tightly back on. Apr 27 Kaltenbach takes all the money out of the jar when I offer it, examines all the money & puts it all back in jar. Says he doesn’t need money now. Apr 28 David Parson refused, laughing. May 1 Warren C. Ingersoll refused. He got very upset about my “attitude towards money.” May 4 Keith Sonnier refused, but said he would take money if he needed it which he might in the near future. May 7 Dick Anderson barely glances at the money when I stick it under his nose and says “Oh no thanks, I intend to earn it on my own.” May 8 Billy Bryant Copley didn’t take any but then it was sort of spoiled because I had told him about this piece on the phone & he had time to think about it he said.
Smart Contracts (smart as in fair, not smart as in Blockchain)
Cornell University's Cheryl Finley has done a lot of research on secondary art markets. I first learned about her research when I met her at the University of Florida's Harn Museum, where she spoke about smart contracts (smart as in fair, not smart as in Blockchain) and new protocols that could help artists who are often left out of the economic benefits of their own work, including women and women of color.

Her talk included findings from her ArtNet op-ed with Lauren van Haaften-Schick, Christian Reeder, and Amy Whitaker.
NFTs allow us to think about and hack on formal contractual relationships outside a system of laws that is currently not set up to service our community.
The ArtNet article The Recent Sale of Amy Sherald's ‘Welfare Queen' Symbolizes the Urgent Need for Resale Royalties and Economic Equity for Artists discussed Sherald's 2012 portrait of a regal woman in a purple dress wearing a sparkling crown and elegant set of pearls against a vibrant red background.
Amy Sherald sold "Welfare Queen" to Princeton professor Imani Perry. Sherald agreed to a payment plan to accommodate Perry's budget.
Amy Sherald rose to fame for her 2016 portrait of Michelle Obama and her full-length portrait of Breonna Taylor, one of the most famous works of the past decade.
As is common, Sherald's rising star drove up the price of her earlier works. Perry's "Welfare Queen" sold for $3.9 million in 2021.
Imani Perry's early investment paid off big-time. Amy Sherald, whose work directly increased the painting's value and who was on an artist's shoestring budget when she agreed to sell "Welfare Queen" in 2012, did not see any of the 2021 auction money. Perry and the auction house got that money.
Sherald sold her Breonna Taylor portrait to the Smithsonian and Louisville's Speed Art Museum to fund a $1 million scholarship. This is a great example of what an artist can do for the community if they can amass wealth through their work.
NFTs haven't solved all of the art market's problems — fakes, money laundering, market manipulation — but they didn't create them. Blockchain and NFTs are credited with making these issues more transparent. More ideas emerge daily about what a smart contract should do for artists.
NFTs are a copyright solution. They allow us to hack formal contractual relationships outside a law system that doesn't serve our community.
Amy Sherald shows the good smart contracts can do (as in, well-considered, self-determined contracts, not necessarily blockchain contracts.) Giving back to our community, deciding where and how our work can be sold or displayed, and ensuring artists share in the equity of our work and the economy our labor creates.