


More on Entrepreneurship/Creators

Sanjay Priyadarshi
3 years ago
A 19-year-old dropped out of college to build a $2,300,000,000 company in 2 years.
His success was unforeseeable.
2014 saw Facebook's $2.3 billion purchase of Oculus VR.
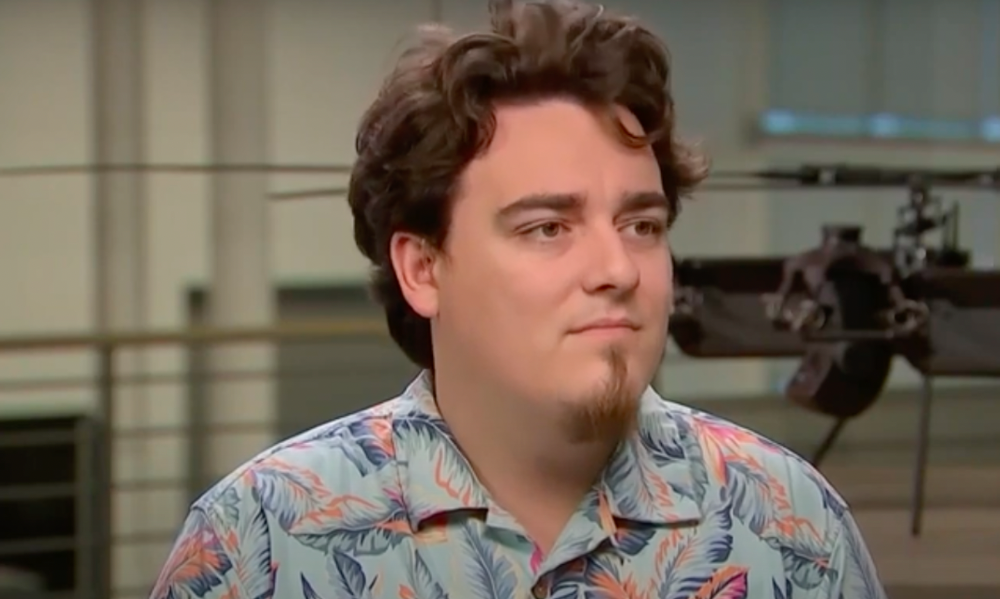
19-year-old Palmer Luckey founded Oculus. He quit journalism school. His parents worried about his college dropout.
Facebook bought Oculus VR in less than 2 years.
Palmer Luckey started Anduril Industries. Palmer has raised $385 million with Anduril.
The Oculus journey began in a trailer
Palmer Luckey, 19, owned the trailer.
Luckey had his trailer customized. The trailer had all six of Luckey's screens. In the trailer's remaining area, Luckey conducted hardware tests.
At 16, he became obsessed with virtual reality. Virtual reality was rare at the time.
Luckey didn't know about VR when he started.
Previously, he liked "portabilizing" mods. Hacking ancient game consoles into handhelds.
In his city, fewer portabilizers actively traded.
Luckey started "ModRetro" for other portabilizers. Luckey was exposed to VR headsets online.
Luckey:
“Man, ModRetro days were the best.”
Palmer Luckey used VR headsets for three years. His design had 50 prototypes.
Luckey used to work at the Long Beach Sailing Center for minimum salary, servicing diesel engines and cleaning boats.
Luckey worked in a USC Institute for Creative Technologies mixed reality lab in July 2011. (ICT).
Luckey cleaned the lab, did reports, and helped other students with VR projects.
Luckey's lab job was dull.
Luckey chose to work in the lab because he wanted to engage with like-minded folks.
By 2012, Luckey had a prototype he hoped to share globally. He made cheaper headsets than others.
Luckey wanted to sell an easy-to-assemble virtual reality kit on Kickstarter.
He realized he needed a corporation to do these sales legally. He started looking for names. "Virtuality," "virtual," and "VR" are all taken.
Hence, Oculus.
If Luckey sold a hundred prototypes, he would be thrilled since it would boost his future possibilities.
John Carmack, legendary game designer
Carmack has liked sci-fi and fantasy since infancy.
Carmack loved imagining intricate gaming worlds.
His interest in programming and computer science grew with age.
He liked graphics. He liked how mismatching 0 and 1 might create new colors and visuals.
Carmack played computer games as a teen. He created Shadowforge in high school.
He founded Id software in 1991. When Carmack created id software, console games were the best-sellers.
Old computer games have weak graphics. John Carmack and id software developed "adaptive tile refresh."
This technique smoothed PC game scrolling. id software launched 3-D, Quake, and Doom using "adaptive tile refresh."
These games made John Carmack a gaming star. Later, he sold Id software to ZeniMax Media.
How Palmer Luckey met Carmack
In 2011, Carmack was thinking a lot about 3-D space and virtual reality.
He was underwhelmed by the greatest HMD on the market. Because of their flimsiness and latency.
His disappointment was partly due to the view (FOV). Best HMD had 40-degree field of view.
Poor. The best VR headset is useless with a 40-degree FOV.
Carmack intended to show the press Doom 3 in VR. He explored VR headsets and internet groups for this reason.
Carmack identified a VR enthusiast in the comments section of "LEEP on the Cheap." "PalmerTech" was the name.
Carmack approached PalmerTech about his prototype. He told Luckey about his VR demos, so he wanted to see his prototype.
Carmack got a Rift prototype. Here's his May 17 tweet.
John Carmack tweeted an evaluation of the Luckey prototype.
Dan Newell, a Valve engineer, and Mick Hocking, a Sony senior director, pre-ordered Oculus Rift prototypes with Carmack's help.
Everyone praised Luckey after Carmack demoed Rift.
Palmer Luckey received a job offer from Sony.
It was a full-time position at Sony Computer Europe.
He would run Sony’s R&D lab.
The salary would be $70k.
Who is Brendan Iribe?
Brendan Iribe started early with Startups. In 2004, he and Mike Antonov founded Scaleform.
Scaleform created high-performance middleware. This package allows 3D Flash games.
In 2011, Iribe sold Scaleform to Autodesk for $36 million.
How Brendan Iribe discovered Palmer Luckey.
Brendan Iribe's friend Laurent Scallie.
Laurent told Iribe about a potential opportunity.
Laurent promised Iribe VR will work this time. Laurent introduced Iribe to Luckey.
Iribe was doubtful after hearing Laurent's statements. He doubted Laurent's VR claims.
But since Laurent took the name John Carmack, Iribe thought he should look at Luckey Innovation. Iribe was hooked on virtual reality after reading Palmer Luckey stories.
He asked Scallie about Palmer Luckey.
Iribe convinced Luckey to start Oculus with him
First meeting between Palmer Luckey and Iribe.
The Iribe team wanted Luckey to feel comfortable.
Iribe sought to convince Luckey that launching a company was easy. Iribe told Luckey anyone could start a business.
Luckey told Iribe's staff he was homeschooled from childhood. Luckey took self-study courses.
Luckey had planned to launch a Kickstarter campaign and sell kits for his prototype. Many companies offered him jobs, nevertheless.
He's considering Sony's offer.
Iribe advised Luckey to stay independent and not join a firm. Iribe asked Luckey how he could raise his child better. No one sees your baby like you do?
Iribe's team pushed Luckey to stay independent and establish a software ecosystem around his device.
After conversing with Iribe, Luckey rejected every job offer and merger option.
Iribe convinced Luckey to provide an SDK for Oculus developers.
After a few months. Brendan Iribe co-founded Oculus with Palmer Luckey. Luckey trusted Iribe and his crew, so he started a corporation with him.
Crowdfunding
Brendan Iribe and Palmer Luckey launched a Kickstarter.
Gabe Newell endorsed Palmer's Kickstarter video.
Gabe Newell wants folks to trust Palmer Luckey since he's doing something fascinating and answering tough questions.
Mark Bolas and David Helgason backed Palmer Luckey's VR Kickstarter video.
Luckey introduced Oculus Rift during the Kickstarter campaign. He introduced virtual reality during press conferences.
Oculus' Kickstarter effort was a success. Palmer Luckey felt he could raise $250,000.
Oculus raised $2.4 million through Kickstarter. Palmer Luckey's virtual reality vision was well-received.
Mark Zuckerberg's Oculus discovery
Brendan Iribe and Palmer Luckey hired the right personnel after a successful Kickstarter campaign.
Oculus needs a lot of money for engineers and hardware. They needed investors' money.
Series A raised $16M.
Next, Andreessen Horowitz partner Brain Cho approached Iribe.
Cho told Iribe that Andreessen Horowitz could invest in Oculus Series B if the company solved motion sickness.
Mark Andreessen was Iribe's dream client.
Marc Andreessen and his partners gave Oculus $75 million.
Andreessen introduced Iribe to Zukerberg. Iribe and Zukerberg discussed the future of games and virtual reality by phone.
Facebook's Oculus demo
Iribe showed Zuckerberg Oculus.
Mark was hooked after using Oculus. The headset impressed him.
The whole Facebook crew who saw the demo said only one thing.
“Holy Crap!”
This surprised them all.
Mark Zuckerberg was impressed by the team's response. Mark Zuckerberg met the Oculus team five days after the demo.
First meeting Palmer Luckey.
Palmer Luckey is one of Mark's biggest supporters and loves Facebook.
Oculus Acquisition
Zuckerberg wanted Oculus.
Brendan Iribe had requested for $4 billion, but Mark wasn't interested.
Facebook bought Oculus for $2.3 billion after months of drama.
After selling his company, how does Palmer view money?
Palmer loves the freedom money gives him. Money frees him from small worries.
Money has allowed him to pursue things he wouldn't have otherwise.
“If I didn’t have money I wouldn’t have a collection of vintage military vehicles…You can have nice hobbies that keep you relaxed when you have money.”
He didn't start Oculus to generate money. His virtual reality passion spanned years.
He didn't have to lie about how virtual reality will transform everything until he needed funding.
The company's success was an unexpected bonus. He was merely passionate about a good cause.
After Oculus' $2.3 billion exit, what changed?
Palmer didn't mind being rich. He did similar things.
After Facebook bought Oculus, he moved to Silicon Valley and lived in a 12-person shared house due to high rents.
Palmer might have afforded a big mansion, but he prefers stability and doing things because he wants to, not because he has to.
“Taco Bell is never tasted so good as when you know you could afford to never eat taco bell again.”
Palmer's leadership shifted.
Palmer changed his leadership after selling Oculus.
When he launched his second company, he couldn't work on his passions.
“When you start a tech company you do it because you want to work on a technology, that is why you are interested in that space in the first place. As the company has grown, he has realized that if he is still doing optical design in the company it’s because he is being negligent about the hiring process.”
Once his startup grows, the founder's responsibilities shift. He must recruit better firm managers.
Recruiting talented people becomes the top priority. The founder must convince others of their influence.
A book that helped me write this:
The History of the Future: Oculus, Facebook, and the Revolution That Swept Virtual Reality — Blake Harris
*This post is a summary. Read the full article here.

Alex Mathers
2 years ago
How to Produce Enough for People to Not Neglect You
Internet's fantastic, right?
We've never had a better way to share our creativity.
I can now draw on my iPad and tweet or Instagram it to thousands. I may get some likes.
With such a great, free tool, you're not alone.
Millions more bright-eyed artists are sharing their work online.
The issue is getting innovative work noticed, not sharing it.
In a world where creators want attention, attention is valuable.
We build for attention.
Attention helps us establish a following, make money, get notoriety, and make a difference.
Most of us require attention to stay sane while creating wonderful things.
I know how hard it is to work hard and receive little views.
How do we receive more attention, more often, in a sea of talent?
Advertising and celebrity endorsements are options. These may work temporarily.
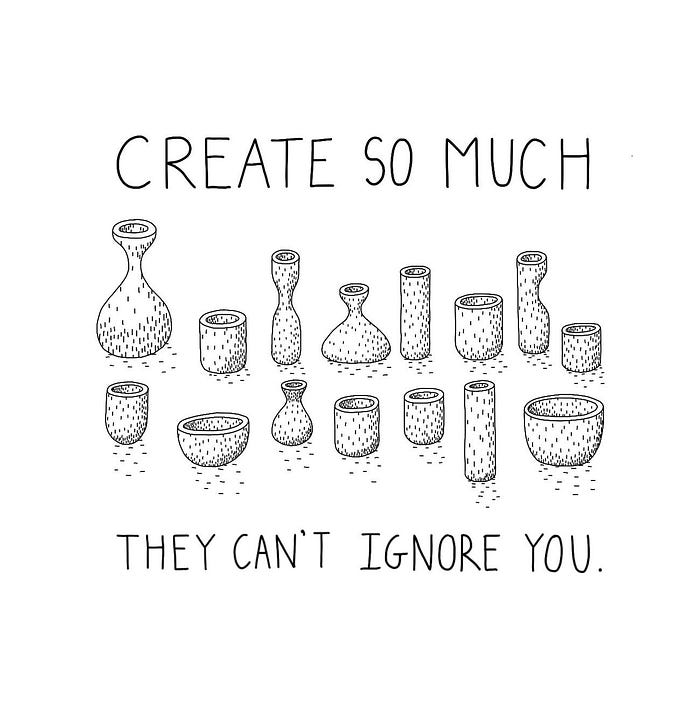
To attract true, organic, and long-term attention, you must create in high quality, high volume, and consistency.
Adapting Steve Martin's Be so amazing, they can't ignore you (with a mention to Dan Norris in his great book Create or Hate for the reminder)
Create a lot.
Eventually, your effort will gain traction.
Traction shows your work's influence.
Traction is when your product sells more. Traction is exponential user growth. Your work is shared more.
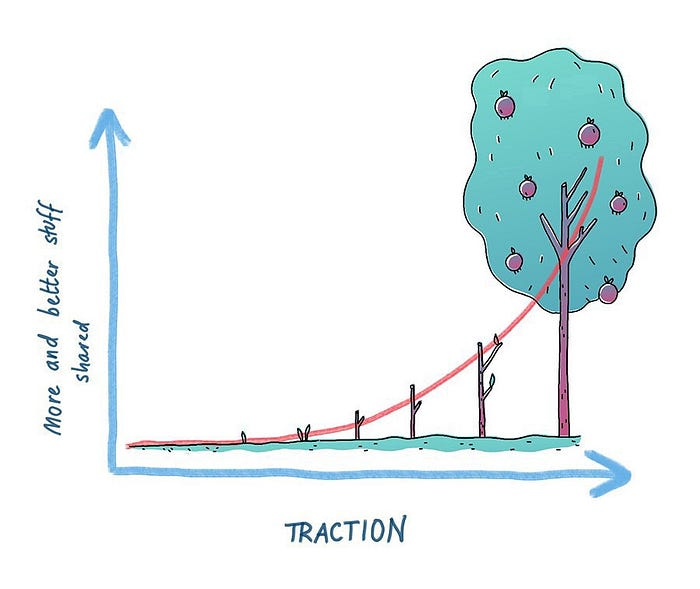
No matter how good your work is, it will always have minimal impact on the world.
Your work can eventually dent or puncture. Daily, people work to dent.
To achieve this tipping point, you must consistently produce exceptional work.
Expect traction after hundreds of outputs.
Dilbert creator Scott Adams says repetition persuades. If you don't stop, you can persuade practically anyone with anything.
Volume lends believability. So make more.
I worked as an illustrator for at least a year and a half without any recognition. After 150 illustrations on iStockphoto, my work started selling.
With 350 illustrations on iStock, I started getting decent client commissions.
Producing often will improve your craft and draw attention.
It's the only way to succeed. More creation means better results and greater attention.
Austin Kleon says you can improve your skill in relative anonymity before you become famous. Before obtaining traction, generate a lot and become excellent.
Most artists, even excellent ones, don't create consistently enough to get traction.
It may hurt. For makers who don't love and flow with their work, it's extremely difficult.
Your work must bring you to life.
To generate so much that others can't ignore you, decide what you'll accomplish every day (or most days).
Commit and be patient.
Prepare for zero-traction.
Anticipating this will help you persevere and create.
My online guru Grant Cardone says: Anything worth doing is worth doing every day.
Do.

Jenn Leach
3 years ago
In November, I made an effort to pitch 10 brands per day. Here's what I discovered.
I pitched 10 brands per workday for a total of 200.
How did I do?
It was difficult.
I've never pitched so much.
What did this challenge teach me?
the superiority of quality over quantity
When you need help, outsource
Don't disregard burnout in order to complete a challenge because it exists.
First, pitching brands for brand deals requires quality. Find firms that align with your brand to expose to your audience.
If you associate with any company, you'll lose audience loyalty. I didn't lose sight of that, but I couldn't resist finishing the task.
Outsourcing.
Delegating work to teammates is effective.
I wish I'd done it.
Three people can pitch 200 companies a month significantly faster than one.
One person does research, one to two do outreach, and one to two do follow-up and negotiating.
Simple.
In 2022, I'll outsource everything.
Burnout.
I felt this, so I slowed down at the end of the month.
Thanksgiving week in November was slow.
I was buying and decorating for Christmas. First time putting up outdoor holiday lights was fun.
Much was happening.
I'm not perfect.
I'm being honest.
The Outcomes
Less than 50 brands pitched.
Result: A deal with 3 brands.
I hoped for 4 brands with reaching out to 200 companies, so three with under 50 is wonderful.
That’s a 6% conversion rate!
Whoo-hoo!
I needed 2%.
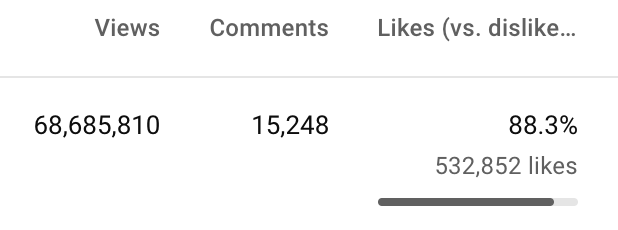
Here's a screenshot from one of the deals I booked.
These companies fit my company well. Each campaign is different, but I've booked $2,450 in brand work with a couple of pending transactions for December and January.
$2,450 in brand work booked!
How did I do? You tell me.
Is this something you’d try yourself?
You might also like

OnChain Wizard
3 years ago
How to make a >800 million dollars in crypto attacking the once 3rd largest stablecoin, Soros style
Everyone is talking about the $UST attack right now, including Janet Yellen. But no one is talking about how much money the attacker made (or how brilliant it was). Lets dig in.
Our story starts in late March, when the Luna Foundation Guard (or LFG) starts buying BTC to help back $UST. LFG started accumulating BTC on 3/22, and by March 26th had a $1bn+ BTC position. This is leg #1 that made this trade (or attack) brilliant.
The second leg comes in the form of the 4pool Frax announcement for $UST on April 1st. This added the second leg needed to help execute the strategy in a capital efficient way (liquidity will be lower and then the attack is on).
We don't know when the attacker borrowed 100k BTC to start the position, other than that it was sold into Kwon's buying (still speculation). LFG bought 15k BTC between March 27th and April 11th, so lets just take the average price between these dates ($42k).
So you have a ~$4.2bn short position built. Over the same time, the attacker builds a $1bn OTC position in $UST. The stage is now set to create a run on the bank and get paid on your BTC short. In anticipation of the 4pool, LFG initially removes $150mm from 3pool liquidity.
The liquidity was pulled on 5/8 and then the attacker uses $350mm of UST to drain curve liquidity (and LFG pulls another $100mm of liquidity).
But this only starts the de-pegging (down to 0.972 at the lows). LFG begins selling $BTC to defend the peg, causing downward pressure on BTC while the run on $UST was just getting started.
With the Curve liquidity drained, the attacker used the remainder of their $1b OTC $UST position ($650mm or so) to start offloading on Binance. As withdrawals from Anchor turned from concern into panic, this caused a real de-peg as people fled for the exits
So LFG is selling $BTC to restore the peg while the attacker is selling $UST on Binance. Eventually the chain gets congested and the CEXs suspend withdrawals of $UST, fueling the bank run panic. $UST de-pegs to 60c at the bottom, while $BTC bleeds out.
The crypto community panics as they wonder how much $BTC will be sold to keep the peg. There are liquidations across the board and LUNA pukes because of its redemption mechanism (the attacker very well could have shorted LUNA as well). BTC fell 25% from $42k on 4/11 to $31.3k
So how much did our attacker make? There aren't details on where they covered obviously, but if they are able to cover (or buy back) the entire position at ~$32k, that means they made $952mm on the short.
On the $350mm of $UST curve dumps I don't think they took much of a loss, lets assume 3% or just $11m. And lets assume that all the Binance dumps were done at 80c, thats another $125mm cost of doing business. For a grand total profit of $815mm (bf borrow cost).
BTC was the perfect playground for the trade, as the liquidity was there to pull it off. While having LFG involved in BTC, and foreseeing they would sell to keep the peg (and prevent LUNA from dying) was the kicker.
Lastly, the liquidity being low on 3pool in advance of 4pool allowed the attacker to drain it with only $350mm, causing the broader panic in both BTC and $UST. Any shorts on LUNA would've added a lot of P&L here as well, with it falling -65% since 5/7.
And for the reply guys, yes I know a lot of this involves some speculation & assumptions. But a lot of money was made here either way, and I thought it would be cool to dive into how they did it.

middlemarch.eth
3 years ago
ERC721R: A new ERC721 contract for random minting so people don’t snipe all the rares!
That is, how to snipe all the rares without using ERC721R!
Introduction: Blessed and Lucky
Mphers was the first mfers derivative, and as a Phunks derivative, I wanted one.
I wanted an alien. And there are only 8 in the 6,969 collection. I got one!
In case it wasn't clear from the tweet, I meant that I was lucky to have figured out how to 100% guarantee I'd get an alien without any extra luck.
Read on to find out how I did it, how you can too, and how developers can avoid it!
How to make rare NFTs without luck.
# How to mint rare NFTs without needing luck
The key to minting a rare NFT is knowing the token's id ahead of time.
For example, once I knew my alien was #4002, I simply refreshed the mint page until #3992 was minted, and then mint 10 mphers.
How did I know #4002 was extraterrestrial? Let's go back.
First, go to the mpher contract's Etherscan page and look up the tokenURI of a previously issued token, token #1:
As you can see, mphers creates metadata URIs by combining the token id and an IPFS hash.
This method gives you the collection's provenance in every URI, and while that URI can be changed, it affects everyone and is public.
Consider a token URI without a provenance hash, like https://mphers.art/api?tokenId=1.
As a collector, you couldn't be sure the devs weren't changing #1's metadata at will.
The API allows you to specify “if #4002 has not been minted, do not show any information about it”, whereas IPFS does not allow this.
It's possible to look up the metadata of any token, whether or not it's been minted.
Simply replace the trailing “1” with your desired id.
Mpher #4002
These files contain all the information about the mpher with the specified id. For my alien, we simply search all metadata files for the string “alien mpher.”
Take a look at the 6,969 meta-data files I'm using OpenSea's IPFS gateway, but you could use ipfs.io or something else.
Use curl to download ten files at once. Downloading thousands of files quickly can lead to duplicates or errors. But with a little tweaking, you should be able to get everything (and dupes are fine for our purposes).
Now that you have everything in one place, grep for aliens:
The numbers are the file names that contain “alien mpher” and thus the aliens' ids.
The entire process takes under ten minutes. This technique works on many NFTs currently minting.
In practice, manually minting at the right time to get the alien is difficult, especially when tokens mint quickly. Then write a bot to poll totalSupply() every second and submit the mint transaction at the exact right time.
You could even look for the token you need in the mempool before it is minted, and get your mint into the same block!
However, in my experience, the “big” approach wins 95% of the time—but not 100%.
“Am I being set up all along?”
Is a question you might ask yourself if you're new to this.
It's disheartening to think you had no chance of minting anything that someone else wanted.
But, did you have no opportunity? You had an equal chance as everyone else!
Take me, for instance: I figured this out using open-source tools and free public information. Anyone can do this, and not understanding how a contract works before minting will lead to much worse issues.
The mpher mint was fair.
While a fair game, “snipe the alien” may not have been everyone's cup of tea.
People may have had more fun playing the “mint lottery” where tokens were distributed at random and no one could gain an advantage over someone simply clicking the “mint” button.
How might we proceed?
Minting For Fashion Hats Punks, I wanted to create a random minting experience without sacrificing fairness. In my opinion, a predictable mint beats an unfair one. Above all, participants must be equal.
Sadly, the most common method of creating a random experience—the post-mint “reveal”—is deeply unfair. It works as follows:
- During the mint, token metadata is unavailable. Instead, tokenURI() returns a blank JSON file for each id.
- An IPFS hash is updated once all tokens are minted.
- You can't tell how the contract owner chose which token ids got which metadata, so it appears random.
Because they alone decide who gets what, the person setting the metadata clearly has a huge unfair advantage over the people minting. Unlike the mpher mint, you have no chance of winning here.
But what if it's a well-known, trusted, doxxed dev team? Are reveals okay here?
No! No one should be trusted with such power. Even if someone isn't consciously trying to cheat, they have unconscious biases. They might also make a mistake and not realize it until it's too late, for example.
You should also not trust yourself. Imagine doing a reveal, thinking you did it correctly (nothing is 100%! ), and getting the rarest NFT. Isn't that a tad odd Do you think you deserve it? An NFT developer like myself would hate to be in this situation.
Reveals are bad*
UNLESS they are done without trust, meaning everyone can verify their fairness without relying on the developers (which you should never do).
An on-chain reveal powered by randomness that is verifiably outside of anyone's control is the most common way to achieve a trustless reveal (e.g., through Chainlink).
Tubby Cats did an excellent job on this reveal, and I highly recommend their contract and launch reflections. Their reveal was also cool because it was progressive—you didn't have to wait until the end of the mint to find out.
In his post-launch reflections, @DefiLlama stated that he made the contract as trustless as possible, removing as much trust as possible from the team.
In my opinion, everyone should know the rules of the game and trust that they will not be changed mid-stream, while trust minimization is critical because smart contracts were designed to reduce trust (and it makes it impossible to hack even if the team is compromised). This was a huge mistake because it limited our flexibility and our ability to correct mistakes.
And @DefiLlama is a superstar developer. Imagine how much stress maximizing trustlessness will cause you!
That leaves me with a bad solution that works in 99 percent of cases and is much easier to implement: random token assignments.
Introducing ERC721R: A fully compliant IERC721 implementation that picks token ids at random.
ERC721R implements the opposite of a reveal: we mint token ids randomly and assign metadata deterministically.
This allows us to reveal all metadata prior to minting while reducing snipe chances.
Then import the contract and use this code:
What is ERC721R and how does it work
First, a disclaimer: ERC721R isn't truly random. In this sense, it creates the same “game” as the mpher situation, where minters compete to exploit the mint. However, ERC721R is a much more difficult game.
To game ERC721R, you need to be able to predict a hash value using these inputs:
This is impossible for a normal person because it requires knowledge of the block timestamp of your mint, which you do not have.
To do this, a miner must set the timestamp to a value in the future, and whatever they do is dependent on the previous block's hash, which expires in about ten seconds when the next block is mined.
This pseudo-randomness is “good enough,” but if big money is involved, it will be gamed. Of course, the system it replaces—predictable minting—can be manipulated.
The token id is chosen in a clever implementation of the Fisher–Yates shuffle algorithm that I copied from CryptoPhunksV2.
Consider first the naive solution: (a 10,000 item collection is assumed):
- Make an array with 0–9999.
- To create a token, pick a random item from the array and use that as the token's id.
- Remove that value from the array and shorten it by one so that every index corresponds to an available token id.
This works, but it uses too much gas because changing an array's length and storing a large array of non-zero values is expensive.
How do we avoid them both? What if we started with a cheap 10,000-zero array? Let's assign an id to each index in that array.
Assume we pick index #6500 at random—#6500 is our token id, and we replace the 0 with a 1.
But what if we chose #6500 again? A 1 would indicate #6500 was taken, but then what? We can't just "roll again" because gas will be unpredictable and high, especially later mints.
This allows us to pick a token id 100% of the time without having to keep a separate list. Here's how it works:
- Make a 10,000 0 array.
- Create a 10,000 uint numAvailableTokens.
- Pick a number between 0 and numAvailableTokens. -1
- Think of #6500—look at index #6500. If it's 0, the next token id is #6500. If not, the value at index #6500 is your next token id (weird!)
- Examine the array's last value, numAvailableTokens — 1. If it's 0, move the value at #6500 to the end of the array (#9999 if it's the first token). If the array's last value is not zero, update index #6500 to store it.
- numAvailableTokens is decreased by 1.
- Repeat 3–6 for the next token id.
So there you go! The array stays the same size, but we can choose an available id reliably. The Solidity code is as follows:
Unfortunately, this algorithm uses more gas than the leading sequential mint solution, ERC721A.
This is most noticeable when minting multiple tokens in one transaction—a 10 token mint on ERC721R costs 5x more than on ERC721A. That said, ERC721A has been optimized much further than ERC721R so there is probably room for improvement.
Conclusion
Listed below are your options:
- ERC721A: Minters pay lower gas but must spend time and energy devising and executing a competitive minting strategy or be comfortable with worse minting results.
- ERC721R: Higher gas, but the easy minting strategy of just clicking the button is optimal in all but the most extreme cases. If miners game ERC721R it’s the worst of both worlds: higher gas and a ton of work to compete.
- ERC721A + standard reveal: Low gas, but not verifiably fair. Please do not do this!
- ERC721A + trustless reveal: The best solution if done correctly, highly-challenging for dev, potential for difficult-to-correct errors.
Did I miss something? Comment or tweet me @dumbnamenumbers.
Check out the code on GitHub to learn more! Pull requests are welcome—I'm sure I've missed many gas-saving opportunities.
Thanks!
Read the original post here
Sam Hickmann
3 years ago
The Jordan 6 Rings Reintroduce Classic Bulls
The Jordan 6 Rings return in Bulls colors, a deviation from previous releases. The signature red color is used on the midsole and heel, as well as the chenille patch and pull tab. The rest of the latter fixture is black, matching the outsole and adjacent Jumpman logos. Finally, white completes the look, from the leather mudguard to the lace unit. Here's a closer look at the Jordan 6 Rings. Sizes should be available soon on Nike.com and select retailers. Also, official photos of the Air Jordan 1 Denim have surfaced.
Jordan 6 Rings
Release Date: 2022
Color: N/A
Mens: $130
Style Code: 322992-126