


DAOs are legal entities in Marshall Islands.
The Pacific island state recognizes decentralized autonomous organizations.
The Republic of the Marshall Islands has recognized decentralized autonomous organizations (DAOs) as legal entities, giving collectively owned and managed blockchain projects global recognition.
The Marshall Islands' amended the Non-Profit Entities Act 2021 that now recognizes DAOs, which are blockchain-based entities governed by self-organizing communities. Incorporating Admiralty LLC, the island country's first DAO, was made possible thanks to the amendement. MIDAO Directory Services Inc., a domestic organization established to assist DAOs in the Marshall Islands, assisted in the incorporation.
The new law currently allows any DAO to register and operate in the Marshall Islands.
“This is a unique moment to lead,” said Bobby Muller, former Marshall Islands chief secretary and co-founder of MIDAO. He believes DAOs will help create “more efficient and less hierarchical” organizations.
A global hub for DAOs, the Marshall Islands hopes to become a global hub for DAO registration, domicile, use cases, and mass adoption. He added:
"This includes low-cost incorporation, a supportive government with internationally recognized courts, and a technologically open environment."
According to the World Bank, the Marshall Islands is an independent island state in the Pacific Ocean near the Equator. To create a blockchain-based cryptocurrency that would be legal tender alongside the US dollar, the island state has been actively exploring use cases for digital assets since at least 2018.
In February 2018, the Marshall Islands approved the creation of a new cryptocurrency, Sovereign (SOV). As expected, the IMF has criticized the plan, citing concerns that a digital sovereign currency would jeopardize the state's financial stability. They have also criticized El Salvador, the first country to recognize Bitcoin (BTC) as legal tender.
Marshall Islands senator David Paul said the DAO legislation does not pose the same issues as a government-backed cryptocurrency. “A sovereign digital currency is financial and raises concerns about money laundering,” . This is more about giving DAOs legal recognition to make their case to regulators, investors, and consumers.
More on Web3 & Crypto

Franz Schrepf
3 years ago
What I Wish I'd Known About Web3 Before Building
Cryptoland rollercoaster

I've lost money in crypto.
Unimportant.
The real issue: I didn’t understand how.
I'm surrounded with winners. To learn more, I created my own NFTs, currency, and DAO.
Web3 is a hilltop castle. Everything is valuable, decentralized, and on-chain.
The castle is Disneyland: beautiful in images, but chaotic with lengthy lines and kids spending too much money on dressed-up animals.
When the throng and businesses are gone, Disneyland still has enchantment.

The Real Story of Web3
NFTs
Scarcity. Scarce NFTs. That's their worth.
Skull. Rare-looking!
Nonsense.
Bored Ape Yacht Club vs. my NFTs?
Marketing.
BAYC is amazing, but not for the reasons people believe. Apecoin and Otherside's art, celebrity following, and innovation? Stunning.
No other endeavor captured the zeitgeist better. Yet how long did you think it took to actually mint the NFTs?
1 hour? Maybe a week for the website?
Minting NFTs is incredibly easy. Kid-friendly. Developers are rare. Think about that next time somebody posts “DevS dO SMt!?”
NFTs will remain popular. These projects are like our Van Goghs and Monets. Still, be wary. It still uses exclusivity and wash selling like the OG art market.
Not all NFTs are art-related.
Soulbound and anonymous NFTs could offer up new use cases. Property rights, privacy-focused ID, open-source project verification. Everything.
NFTs build online trust through ownership.
We just need to evolve from the apes first.
NFTs' superpower is marketing until then.
Crypto currency
What the hell is a token?
99% of people are clueless.
So I invested in both coins and tokens. Same same. Only that they are not.
Coins have their own blockchain and developer/validator community. It's hard.
Creating a token on top of a blockchain? Five minutes.
Most consumers don’t understand the difference, creating an arbitrage opportunity: pretend you’re a serious project without having developers on your payroll.
Few market sites help. Take a look. See any tokens?
There's a hint one click deeper.

Some tokens are legitimate. Some coins are bad investments.
Tokens are utilized for DAO governance and DApp payments. Still, know who's behind a token. They might be 12 years old.
Coins take time and money. The recent LUNA meltdown indicates that currency investing requires research.
DAOs
Decentralized Autonomous Organizations (DAOs) don't work as you assume.
Yes, members can vote.
A productive organization requires more.
I've observed two types of DAOs.
Total decentralization total dysfunction
Centralized just partially. Community-driven.
A core team executes the DAO's strategy and roadmap in successful DAOs. The community owns part of the organization, votes on decisions, and holds the team accountable.
DAOs are public companies.
Amazing.
A shareholder meeting's logistics are staggering. DAOs may hold anonymous, secure voting quickly. No need for intermediaries like banks to chase up every shareholder.
Successful DAOs aren't totally decentralized. Large-scale voting and collaboration have never been easier.
And that’s all that matters.
Scale, speed.
My Web3 learnings
Disneyland is enchanting. Web3 too.
In a few cycles, NFTs may be used to build trust, not clout. Not speculating with coins. DAOs run organizations, not themselves.
Finally, some final thoughts:
NFTs will be a very helpful tool for building trust online. NFTs are successful now because of excellent marketing.
Tokens are not the same as coins. Look into any project before making a purchase. Make sure it isn't run by three 9-year-olds piled on top of one another in a trench coat, at the very least.
Not entirely decentralized, DAOs. We shall see a future where community ownership becomes the rule rather than the exception once we acknowledge this fact.
Crypto Disneyland is a rollercoaster with loops that make you sick.
Always buckle up.
Have fun!

Percy Bolmér
3 years ago
Ethereum No Longer Consumes A Medium-Sized Country's Electricity To Run
The Merge cut Ethereum's energy use by 99.5%.
The Crypto community celebrated on September 15, 2022. This day, Ethereum Merged. The entire blockchain successfully merged with the Beacon chain, and it was so smooth you barely noticed.
Many have waited, dreaded, and longed for this day.
Some investors feared the network would break down, while others envisioned a seamless merging.
Speculators predict a successful Merge will lead investors to Ethereum. This could boost Ethereum's popularity.
What Has Changed Since The Merge
The merging transitions Ethereum mainnet from PoW to PoS.
PoW sends a mathematical riddle to computers worldwide (miners). First miner to solve puzzle updates blockchain and is rewarded.
The puzzles sent are power-intensive to solve, so mining requires a lot of electricity. It's sent to every miner competing to solve it, requiring duplicate computation.
PoS allows investors to stake their coins to validate a new transaction. Instead of validating a whole block, you validate a transaction and get the fees.
You can validate instead of mine. A validator stakes 32 Ethereum. After staking, the validator can validate future blocks.
Once a validator validates a block, it's sent to a randomly selected group of other validators. This group verifies that a validator is not malicious and doesn't validate fake blocks.
This way, only one computer needs to solve or validate the transaction, instead of all miners. The validated block must be approved by a small group of validators, causing duplicate computation.
PoS is more secure because validating fake blocks results in slashing. You lose your bet tokens. If a validator signs a bad block or double-signs conflicting blocks, their ETH is burned.
Theoretically, Ethereum has one block every 12 seconds, so a validator forging a block risks burning 1 Ethereum for 12 seconds of transactions. This makes mistakes expensive and risky.
What Impact Does This Have On Energy Use?
Cryptocurrency is a natural calamity, sucking electricity and eating away at the earth one transaction at a time.
Many don't know the environmental impact of cryptocurrencies, yet it's tremendous.
A single Ethereum transaction used to use 200 kWh and leave a large carbon imprint. This update reduces global energy use by 0.2%.
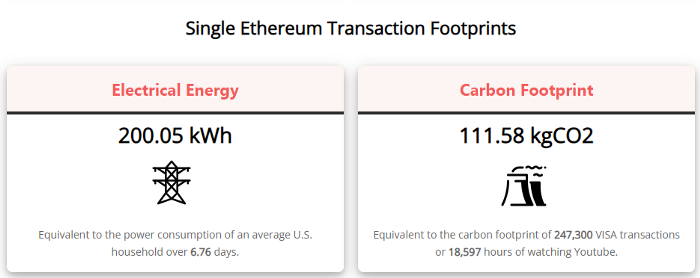
Ethereum will submit a challenge to one validator, and that validator will forward it to randomly selected other validators who accept it.
This reduces the needed computing power.
They expect a 99.5% reduction, therefore a single transaction should cost 1 kWh.
Carbon footprint is 0.58 kgCO2, or 1,235 VISA transactions.
This is a big Ethereum blockchain update.
I love cryptocurrency and Mother Earth.

Faisal Khan
3 years ago
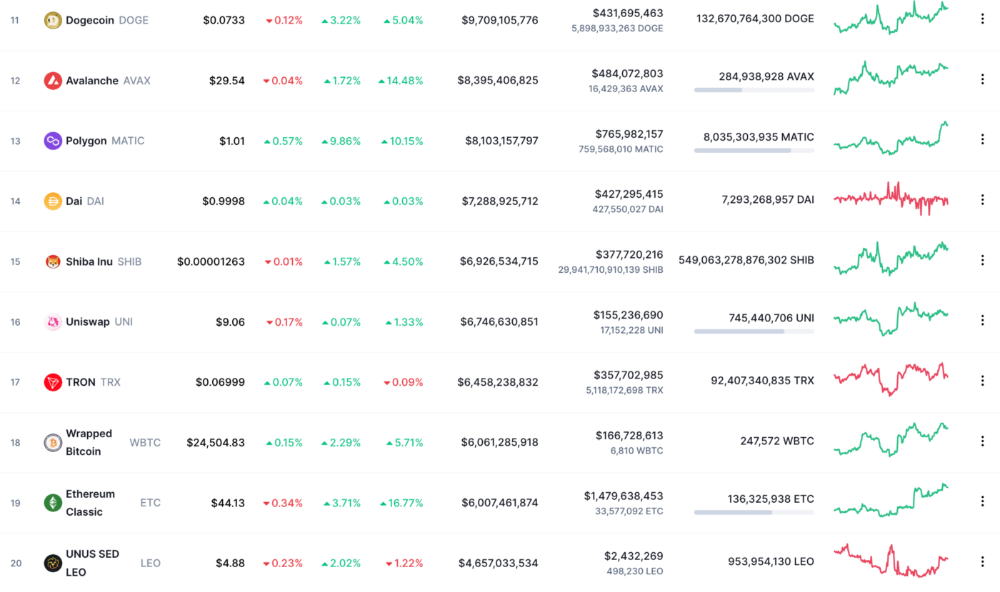
4 typical methods of crypto market manipulation
Market fraud
Due to its decentralized and fragmented character, the crypto market has integrity difficulties.
Cryptocurrencies are an immature sector, therefore market manipulation becomes a bigger issue. Many research have attempted to uncover these abuses. CryptoCompare's newest one highlights some of the industry's most typical scams.
Why are these concerns so common in the crypto market? First, even the largest centralized exchanges remain unregulated due to industry immaturity. A low-liquidity market segment makes an attack more harmful. Finally, market surveillance solutions not implemented reduce transparency.
In CryptoCompare's latest exchange benchmark, 62.4% of assessed exchanges had a market surveillance system, although only 18.1% utilised an external solution. To address market integrity, this measure must improve dramatically. Before discussing the report's malpractices, note that this is not a full list of attacks and hacks.
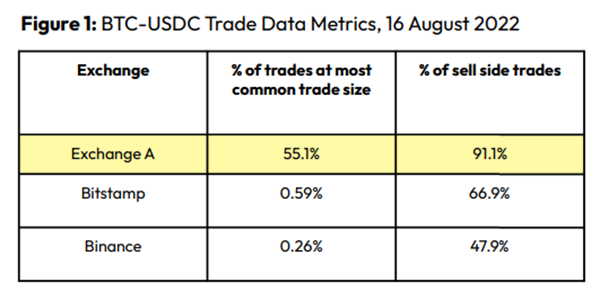
Clean Trading
An investor buys and sells concurrently to increase the asset's price. Centralized and decentralized exchanges show this misconduct. 23 exchanges have a volume-volatility correlation < 0.1 during the previous 100 days, according to CryptoCompares. In August 2022, Exchange A reported $2.5 trillion in artificial and/or erroneous volume, up from $33.8 billion the month before.
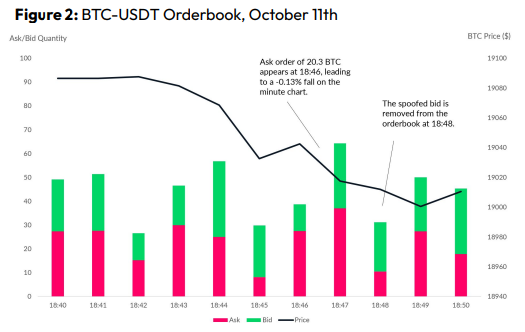
Spoofing
Criminals create and cancel fake orders before they can be filled. Since manipulators can hide in larger trading volumes, larger exchanges have more spoofing. A trader placed a 20.8 BTC ask order at $19,036 when BTC was trading at $19,043. BTC declined 0.13% to $19,018 in a minute. At 18:48, the trader canceled the ask order without filling it.
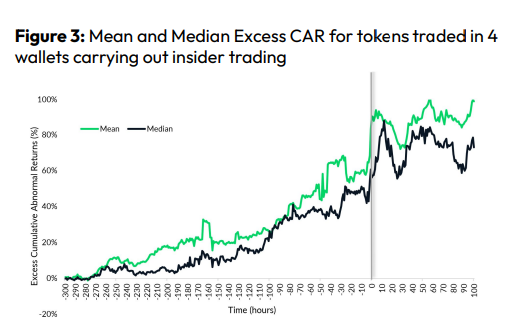
Front-Running
Most cryptocurrency front-running involves inside trading. Traditional stock markets forbid this. Since most digital asset information is public, this is harder. Retailers could utilize bots to front-run.
CryptoCompare found digital wallets of people who traded like insiders on exchange listings. The figure below shows excess cumulative anomalous returns (CAR) before a coin listing on an exchange.
Finally, LAYERING is a sequence of spoofs in which successive orders are put along a ladder of greater (layering offers) or lower (layering bids) values. The paper concludes with recommendations to mitigate market manipulation. Exchange data transparency, market surveillance, and regulatory oversight could reduce manipulative tactics.
You might also like

Eve Arnold
3 years ago
Your Ideal Position As a Part-Time Creator
Inspired by someone I never met
Inspiration is good and bad.
Paul Jarvis inspires me. He's a web person and writer who created his own category by being himself.
Paul said no thank you when everyone else was developing, building, and assuming greater responsibilities. This isn't success. He rewrote the rules. Working for himself, expanding at his own speed, and doing what he loves were his definitions of success.
Play with a problem that you have
The biggest problem can be not recognizing a problem.
Acceptance without question is deception. When you don't push limits, you forget how. You start thinking everything must be as it is.
For example: working. Paul worked a 9-5 agency work with little autonomy. He questioned whether the 9-5 was a way to live, not the way.
Another option existed. So he chipped away at how to live in this new environment.
Don't simply jump
Internet writers tell people considering quitting 9-5 to just quit. To throw in the towel. To do what you like.
The advice is harmful, despite the good intentions. People think quitting is hard. Like courage is the issue. Like handing your boss a resignation letter.
Nope. The tough part comes after. It’s easy to jump. Landing is difficult.
The landing
Paul didn't quit. Intelligent individuals don't. Smart folks focus on landing. They imagine life after 9-5.
Paul had been a web developer for a long time, had solid clients, and was respected. Hence if he pushed the limits and discovered another route, he had the potential to execute.
Working on the side
Society loves polarization. It’s left or right. Either way. Or chaos. It's 9-5 or entrepreneurship.
But like Paul, you can stretch polarization's limits. In-between exists.
You can work a 9-5 and side jobs (as I do). A mix of your favorites. The 9-5's stability and creativity. Fire and routine.
Remember you can't have everything but anything. You can create and work part-time.
My hybrid lifestyle
Not selling books doesn't destroy my world. My globe keeps spinning if my new business fails or if people don't like my Tweets. Unhappy algorithm? Cool. I'm not bothered (okay maybe a little).
The mix gives me the best of both worlds. To create, hone my skill, and grasp big-business basics. I like routine, but I also appreciate spending 4 hours on Saturdays writing.
Some days I adore leaving work at 5 pm and disconnecting. Other days, I adore having a place to write if inspiration strikes during a run or a discussion.
I’m a part-time creator
I’m a part-time creator. No, I'm not trying to quit. I don't work 5 pm - 2 am on the side. No, I'm not at $10,000 MRR.
I work part-time but enjoy my 9-5. My 9-5 has goodies. My side job as well.
It combines both to meet my lifestyle. I'm satisfied.
Join the Part-time Creators Club for free here. I’ll send you tips to enhance your creative game.

Darius Foroux
3 years ago
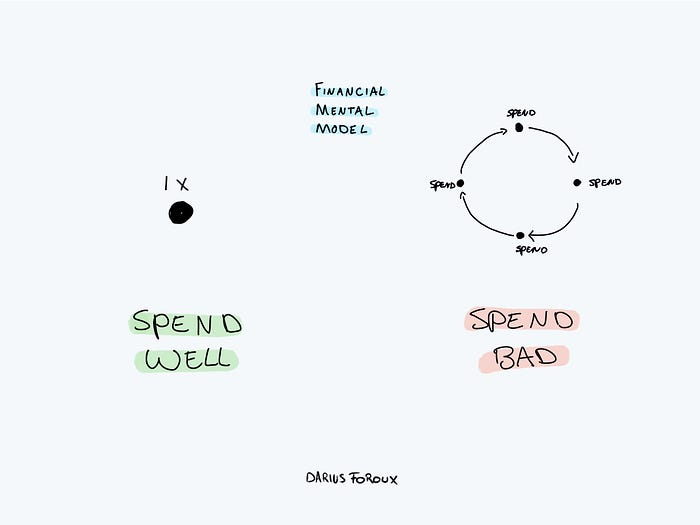
My financial life was changed by a single, straightforward mental model.
Prioritize big-ticket purchases
I've made several spending blunders. I get sick thinking about how much money I spent.
My financial mental model was poor back then.
Stoicism and mindfulness keep me from attaching to those feelings. It still hurts.
Until four or five years ago, I bought a new winter jacket every year.
Ten years ago, I spent twice as much. Now that I have a fantastic, warm winter parka, I don't even consider acquiring another one. No more spending. I'm not looking for jackets either.
Saving time and money by spending well is my thinking paradigm.
The philosophy is expressed in most languages. Cheap is expensive in the Netherlands. This applies beyond shopping.
In this essay, I will offer three examples of how this mental paradigm transformed my financial life.
Publishing books
In 2015, I presented and positioned my first book poorly.
I called the book Huge Life Success and made a funny Canva cover in 30 minutes. This:
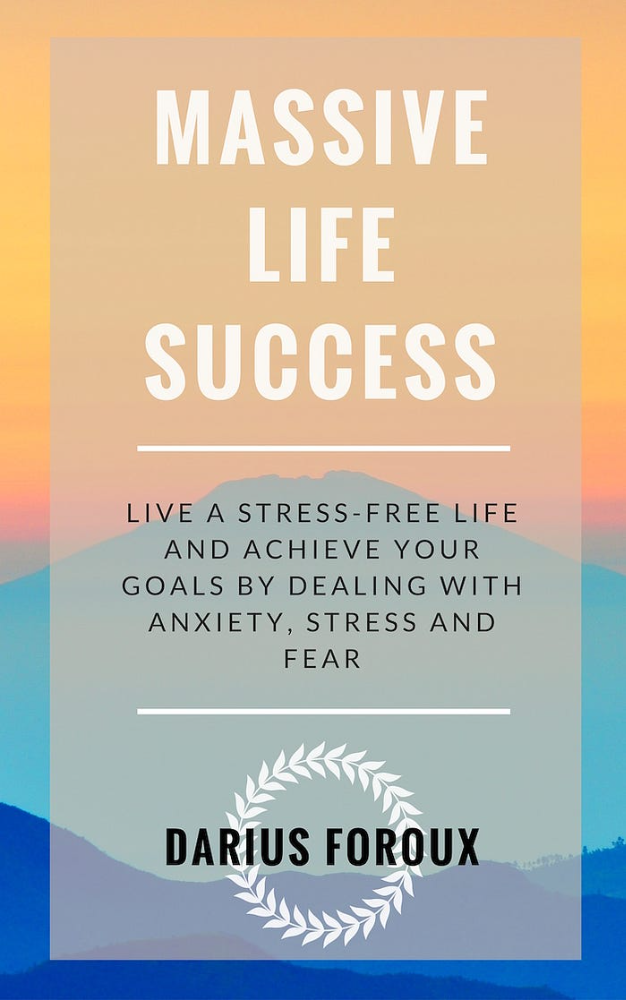
That looks nothing like my present books. No logo or style. The book felt amateurish.
The book started bothering me a few weeks after publication. The advice was good, but it didn't appear professional. I studied the book business extensively.
I created a style for all my designs. Branding. Win Your Inner Wars was reissued a year later.
Title, cover, and description changed. Rearranging the chapters improved readability.
Seven years later, the book sells hundreds of copies a month. That taught me a lot.
Rushing to finish a project is enticing. Send it and move forward.
Avoid rushing everything. Relax. Develop your projects. Perform well. Perform the job well.
My first novel was underfunded and underworked. A bad book arrived. I then invested time and money in writing the greatest book I could.
That book still sells.
Traveling
I hate travel. Airports, flights, trains, and lines irritate me.
But, I enjoy traveling to beautiful areas.
I do it strangely. I make up travel rules. I never go to airports in summer. I hate being near airports on holidays. Unworthy.
No vacation packages for me. Those airline packages with a flight, shuttle, and hotel. I've had enough.
I try to avoid crowds and popular spots. July Paris? Nuts and bolts, please. Christmas in NYC? No, please keep me sane.
I fly business class behind. I accept upgrades upon check-in. I prefer driving. I drove from the Netherlands to southern Spain.
Thankfully, no lines. What if travel costs more? Thus? I enjoy it from the start. I start traveling then.
I rarely travel since I'm so difficult. One great excursion beats several average ones.
Personal effectiveness
New apps, tools, and strategies intrigue most productivity professionals.
No.
I researched years ago. I spent years investigating productivity in university.
I bought books, courses, applications, and tools. It was expensive and time-consuming.
Im finished. Productivity no longer costs me time or money. OK. I worked on it once and now follow my strategy.
I avoid new programs and systems. My stuff works. Why change winners?
Spending wisely saves time and money.
Spending wisely means spending once. Many people ignore productivity. It's understudied. No classes.
Some assume reading a few articles or a book is enough. Productivity is personal. You need a personal system.
Time invested is one-time. You can trust your system for life once you find it.
Concentrate on the expensive choices.
Life's short. Saving money quickly is enticing.
Spend less on groceries today. True. That won't fix your finances.
Adopt a lifestyle that makes you affluent over time. Consider major choices.
Are they causing long-term poverty? Are you richer?
Leasing cars comes to mind. The automobile costs a fortune today. The premium could accomplish a million nice things.
Focusing on important decisions makes life easier. Consider your future. You want to improve next year.

Aaron Dinin, PhD
3 years ago
The Advantages and Disadvantages of Having Investors Sign Your NDA
Startup entrepreneurs assume what risks when pitching?
Last week I signed four NDAs.
Four!
NDA stands for non-disclosure agreement. A legal document given to someone receiving confidential information. By signing, the person pledges not to share the information for a certain time. If they do, they may be in breach of contract and face legal action.
Companies use NDAs to protect trade secrets and confidential internal information from employees and contractors. Appropriate. If you manage a huge, successful firm, you don't want your employees selling their information to your competitors. To be true, business NDAs don't always prevent corporate espionage, but they usually make employees and contractors think twice before sharing.
I understand employee and contractor NDAs, but I wasn't asked to sign one. I counsel entrepreneurs, thus the NDAs I signed last week were from startups that wanted my feedback on their concepts.
I’m not a startup investor. I give startup guidance online. Despite that, four entrepreneurs thought their company ideas were so important they wanted me to sign a generically written legal form they probably acquired from a shady, spam-filled legal templates website before we could chat.
False. One company tried to get me to sign their NDA a few days after our conversation. I gently rejected, but their tenacity encouraged me. I considered sending retroactive NDAs to everyone I've ever talked to about one of my startups in case they establish a successful company based on something I said.
Two of the other three NDAs were from nearly identical companies. Good thing I didn't sign an NDA for the first one, else they may have sued me for talking to the second one as though I control the firms people pitch me.
I wasn't talking to the fourth NDA company. Instead, I received an unsolicited email from someone who wanted comments on their fundraising pitch deck but required me to sign an NDA before sending it.
That's right, before I could read a random Internet stranger's unsolicited pitch deck, I had to sign his NDA, potentially limiting my ability to discuss what was in it.
You should understand. Advisors, mentors, investors, etc. talk to hundreds of businesses each year. They cannot manage all the companies they deal with, thus they cannot risk legal trouble by talking to someone. Well, if I signed NDAs for all the startups I spoke with, half of the 300+ articles I've written on Medium over the past several years could get me sued into the next century because I've undoubtedly addressed topics in my articles that I discussed with them.
The four NDAs I received last week are part of a recent trend of entrepreneurs sending out NDAs before meetings, despite the practical and legal issues. They act like asking someone to sign away their right to talk about all they see and hear in a day is as straightforward as asking for a glass of water.
Given this inflow of NDAs, I wanted to briefly remind entrepreneurs reading this blog about the merits and cons of requesting investors (or others in the startup ecosystem) to sign your NDA.
Benefits of having investors sign your NDA include:
None. Zero. Nothing.
Disadvantages of requesting investor NDAs:
You'll come off as an amateur who has no idea what it takes to launch a successful firm.
Investors won't trust you with their money since you appear to be a complete amateur.
Printing NDAs will be a waste of paper because no genuine entrepreneur will ever sign one.
I apologize for missing any cons. Please leave your remarks.