


More on Technology

Jay Peters
3 years ago
Apple AR/VR heaset
Apple is said to have opted for a standalone AR/VR headset over a more powerful tethered model.
It has had a tumultuous history.
Apple's alleged mixed reality headset appears to be the worst-kept secret in tech, and a fresh story from The Information is jam-packed with details regarding the device's rocky development.
Apple's decision to use a separate headgear is one of the most notable aspects of the story. Apple had yet to determine whether to pursue a more powerful VR headset that would be linked with a base station or a standalone headset. According to The Information, Apple officials chose the standalone product over the version with the base station, which had a processor that later arrived as the M1 Ultra. In 2020, Bloomberg published similar information.
That decision appears to have had a long-term impact on the headset's development. "The device's many processors had already been in development for several years by the time the choice was taken, making it impossible to go back to the drawing board and construct, say, a single chip to handle all the headset's responsibilities," The Information stated. "Other difficulties, such as putting 14 cameras on the headset, have given hardware and algorithm engineers stress."
Jony Ive remained to consult on the project's design even after his official departure from Apple, according to the story. Ive "prefers" a wearable battery, such as that offered by Magic Leap. Other prototypes, according to The Information, placed the battery in the headset's headband, and it's unknown which will be used in the final design.
The headset was purportedly shown to Apple's board of directors last week, indicating that a public unveiling is imminent. However, it is possible that it will not be introduced until later this year, and it may not hit shop shelves until 2023, so we may have to wait a bit to try it.
For further down the line, Apple is working on a pair of AR spectacles that appear like Ray-Ban wayfarer sunglasses, but according to The Information, they're "still several years away from release." (I'm interested to see how they compare to Meta and Ray-Bans' true wayfarer-style glasses.)

caroline sinders
3 years ago
Holographic concerts are the AI of the Future.

A few days ago, I was discussing dall-e with two art and tech pals. One artist acquaintance said she knew a frightened illustrator. Would the ability to create anything with a click derail her career? The artist feared this. My curator friend smiled and said this has always been a dread among artists. When the camera was invented, didn't painters say this? Even in the Instagram era, painting exists.
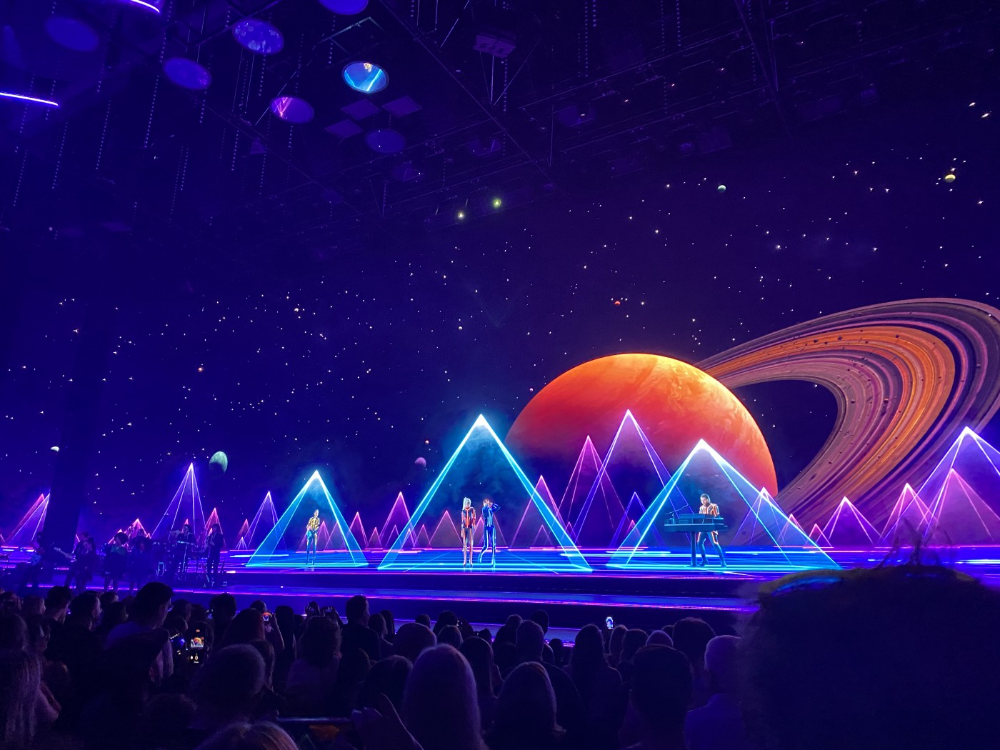
When art and technology collide, there's room for innovation, experimentation, and fear — especially if the technology replicates or replaces art making. What is art's future with dall-e? How does technology affect music, beyond visual art? Recently, I saw "ABBA Voyage," a holographic ABBA concert in London.
"Abba voyage?" my phone asked in early March. A Gen X friend I met through a fashion blogging ring texted me.
"What's abba Voyage?" I asked while opening my front door with keys and coffee.
We're going! Marti, visiting London, took me to a show.
"Absolutely no ABBA songs here." I responded.
My parents didn't play ABBA much, so I don't know much about them. Dad liked Jimi Hendrix, Cream, Deep Purple, and New Orleans jazz. Marti told me ABBA Voyage was a holographic ABBA show with a live band.
The show was fun, extraordinary fun. Nearly everyone on the dance floor wore wigs, ankle-breaking platforms, sequins, and bellbottoms. I saw some millennials and Zoomers among the boomers.
I was intoxicated by the experience.
Automatons date back to the 18th-century mechanical turk. The mechanical turk was a chess automaton operated by a person. The mechanical turk seemed to perform like a human without human intervention, but it required a human in the loop to work properly.
Humans have used non-humans in entertainment for centuries, such as puppets, shadow play, and smoke and mirrors. A show can have animatronic, technological, and non-technological elements, and a live show can blur real and illusion. From medieval puppet shows to mechanical turks to AI filters, bots, and holograms, entertainment has evolved over time.
I'm not a hologram skeptic, but I'm skeptical of technology, especially since I work with it. I love live performances, I love hearing singers breathe, forget lines, and make jokes. Live shows are my favorite because I love watching performers make mistakes or interact with the audience. ABBA Voyage was different.
Marti and I traveled to Manchester after ABBA Voyage to see Liam Gallagher. Similar but different vibe. Similar in that thousands dressed up for the show. ABBA's energy was dizzying. 90s chic replaced sequins in the crowd. Doc Martens, nylon jackets, bucket hats, shaggy hair. The Charlatans and Liam Gallagher opened and closed, respectively. Fireworks. Incredible. People went crazy. Yelling exhausted my voice.
This week in music featured AI-enabled holograms and a decades-old rocker. Both are warm and gooey in our memories.
After seeing both, I'm wondering if we need AI hologram shows. Why? Is it good?
Like everything tech-related, my answer is "maybe." Because context and performance matter. Liam Gallagher and ABBA both had great, different shows.
For a hologram to work, it must be impossible and big. It must be big, showy, and improbable to justify a hologram. It must feel...expensive, like a stadium pop show. According to a quick search, ABBA broke up on bad terms. Reuniting is unlikely. This is also why Prince or Tupac hologram shows work. We can only engage with their legacy through covers or...holograms.
I drove around listening to the radio a few weeks ago. "Dreaming of You" by Selena played. Selena's music defined my childhood. I sang along and turned up the volume (or as loud as my husband would allow me while driving on the highway).
I discovered Selena's music six months after her death, so I never saw her perform live. My babysitter Melissa played me her album after I moved to Houston. Melissa took me to see the Selena movie five times when it came out. I quickly wore out my VHS copy. I constantly sang "Bibi Bibi Bom Bom" and "Como la Flor." I love Selena. A Selena hologram? Yes, probably.
Instagram advertised a cellist's Arthur Russell tribute show. Russell is another deceased artist I love. I almost walked down the aisle to "This is How We Walk on the Moon," but our cellist couldn't find it. Instead, I walked to Magnetic Fields' "The Book of Love." I "discovered" Russell after a friend introduced me to his music a few years ago.
I use these as analogies for the Liam Gallagher and ABBA concerts.
You have no idea how much I'd pay to see a hologram of Selena's 1995 Houston Livestock Show and Rodeo concert. Arthur Russell's hologram is unnecessary. Russell's work was intimate and performance-based. We can't separate his life from his legacy; popular audiences overlooked his genius. He died of AIDS broke. Like Selena, he died prematurely. Given his music and history, another performer would be a better choice than a hologram. He's no Selena. Selena could have rivaled Beyonce.
Pop shows' size works for holograms. Along with ABBA holograms, there was an anime movie and a light show that would put Tron to shame. ABBA created a tourable stadium show. The event was lavish, expensive, and well-planned. Pop, unlike rock, isn't gritty. Liam Gallagher hologram? No longer impossible, it wouldn't work. He's touring. I'm not sure if a rockstar alone should be rendered as a hologram; it was the show that made ABBA a hologram.
Holograms, like AI, are part of the future of entertainment, but not all of it. Because only modern interpretations of Arthur Russell's work reveal his legacy. That's his legacy.
Large-scale arena performers may use holograms in the future, but the experience must be impossible. A teacher once said that the only way to convey emotion in opera is through song, and I feel the same way about holograms, AR, VR, and mixed reality. A story's impossibility must make sense, like in opera. Impossibility and bombastic performance must be present for an immersive element to "work." ABBA was an impossible and improbable experience, which made it magical. It helped the holographic show work.
Marti told me about ABBA Voyage. She said it was a great concert. Marti has worked in music since the 1990s. She's a music expert; she's seen many shows.
Ai isn't a god or sentient, and the ABBA holograms aren't real. The renderings were glassy-eyed, flat, and robotic, like the Polar Express or the Jaws shark. Even today, the uncanny valley is insurmountable. We know it's not real because it's not about reality. It was about a suspended moment and performance feelings.
I knew this was impossible, an 'unreal' experience, but the emotions I felt were real, like watching a movie or tv show. Perhaps this is one of the better uses of AI, like CGI and special effects, like the beauty of entertainment- we were enraptured and entertained for hours. I've been playing ABBA since then.

Mark Schaefer
3 years ago
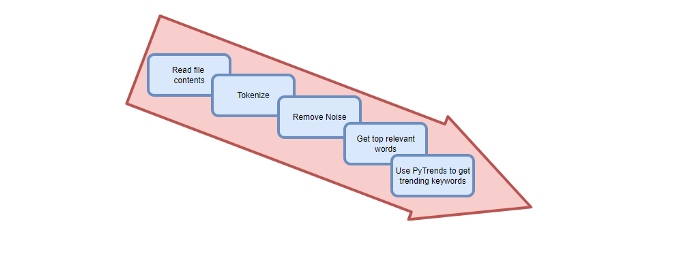
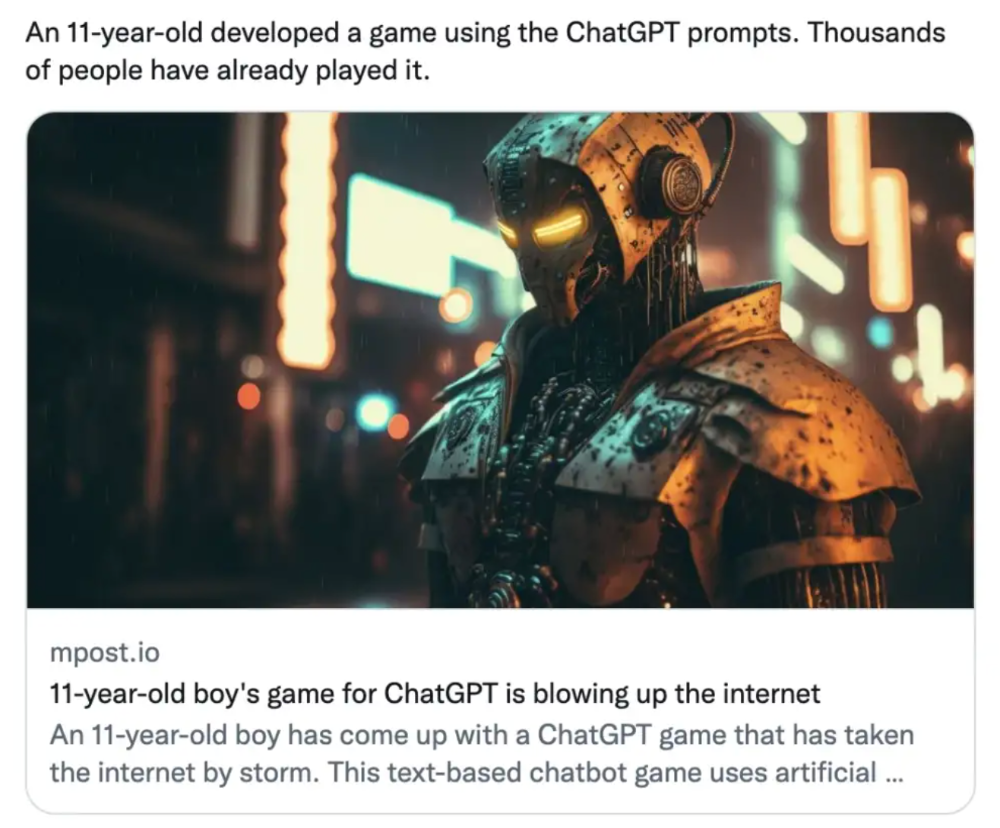
20 Fun Uses for ChatGPT
Our RISE community is stoked on ChatGPT. ChatGPT has countless uses.
Early on. Companies are figuring out the legal and ethical implications of AI's content revolution. Using AI for everyday tasks is cool.
So I challenged RISE friends... Let's have fun and share non-obvious uses.
Onward!
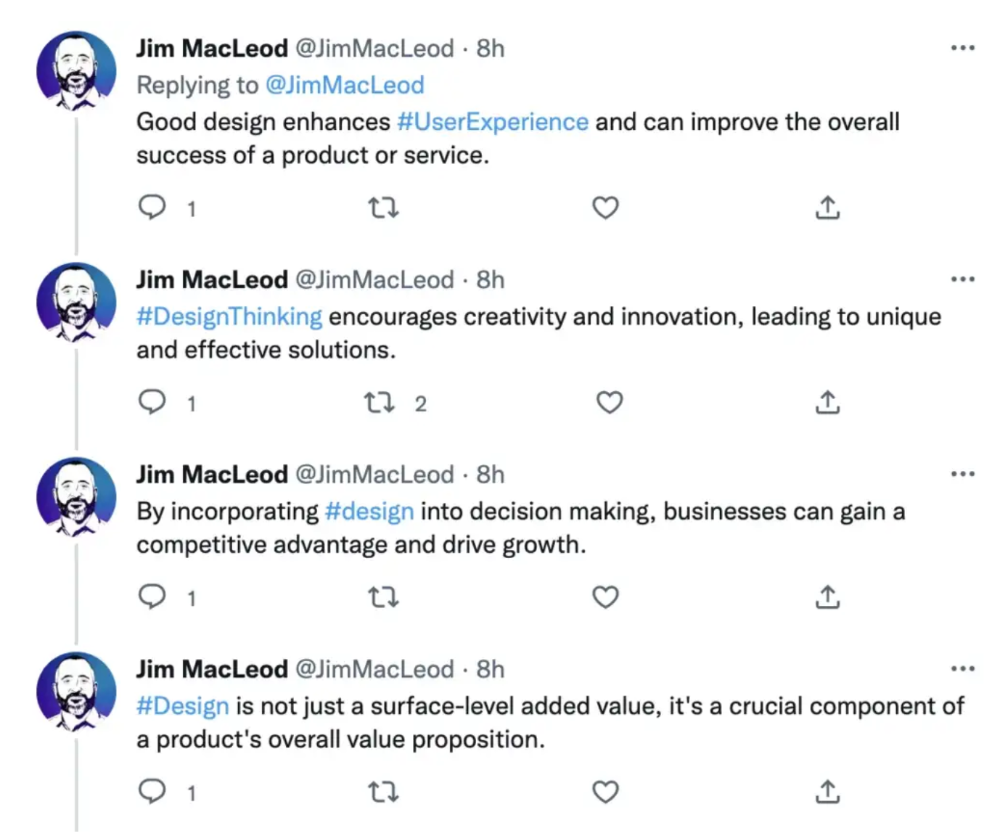
1. Tweet
Jim MacLeod requested a design-themed Twitter thread from ChatGPT.
2. Novelize
Giuseppe Fratoni writes novels.
"This is amazing!" Impotent. I asked about writing, mystery novels, and jazz.
"Develop a mystery novel plot in which a disillusioned homicide detective hunts a serial killer who targets jazz musicians who play Autumn Leaves."
"I have:
Detective James Thompson is a seasoned veteran of the Homicide department, but lately he’s been feeling burnt out and disillusioned. His latest case, the murder of a young jazz pianist who was found brutally killed in his home, only serves to deepen his sense of despair … (much more provided)
3. Question-and-answer sessions
Bliss recommends:
You have a guest speaker and want to ask audience questions.
Pre-generate questions with ChatGPT. "And here's a question from our AI?"
The conference is about Western water scarcity. Water management expert. My AI question was...
Which desalination-related questions should I ask an expert?
ChatGPT said...
How is desalination currently being used around the world, and in what types of locations is it most effective?
What are the potential advantages and disadvantages of using desalination to provide fresh water?
What are some of the key challenges and limitations of desalination technology, and how are they being addressed?
4. Game-making
Richard's a board game expert. He suggests using ChatGPT to plan games. Note: Some people have started getting help solving crossword puzzle clues.
5. Matchmaking
Tanya Thompson thinks it helps dating. ChatGPT:
Here are some flirty first-message ideas for dating apps:
I noticed you from afar. I had to say hi and see if we clicked.
Your profile picture is gorgeous. I'm obsessed with your [Feature] and want to know you better.
I don't usually message first, but I had to. You're [Attractive Quality] and I can't wait to talk.”
Hello. Your profile intimidates me. I'm starstruck by your [Attractiveness]. (Many instances)
5. Solitude/anxiety
ChatGPT excels at one-on-one conversations.
PepperBrooks: "I'm sad and lonely."
ChatGPT: I’m sorry to hear that you’re feeling sad and lonely. It’s natural to feel down sometimes, but it’s important to remember that you’re not alone. There are many people who care about you and want to help you. It can be helpful to talk to someone about your feelings, whether it’s a close friend, family member, or mental health professional.
Sometimes, just expressing your thoughts and emotions to someone else can help to alleviate your sadness and loneliness. It’s also important to take care of yourself and do things that make you happy, such as spending time with loved ones, pursuing a hobby, or exercising. These things can help to improve your mood and make you feel more connected to others. Remember that you are strong and capable, and that you can get through this difficult time.
Daniel Nestle asked ChatGPT to generate journal prompts to help him deal with anxiety.
Write down the things that are causing you anxiety at the moment.
Describe a situation in which you felt anxious and how you coped with it.
Reflect on how your thoughts and beliefs contribute to your anxiety.
Write a letter to your anxiety, expressing your feelings and concerns
Imagine yourself in a calm and peaceful place, and describe it in detail.
(many more items followed)
6. Names
Continued Daniel:
Also, naming ideas.
Me: Name this drink. Japanese gin, unsweetened tonic, lime, Szechuan pepper, grapefruit.
ChatGPT: How about “Sakura Sunrise?” The name incorporates the Japanese gin and the citrus flavors of grapefruit and lime, and the word “sunrise” suggests a fresh and invigorating start to the day. Alternatively, you could go with something like “Peppered Grapefruit Gin Fizz” to emphasize the unique flavor combination of Szechuan pepper and grapefruit.
7. Translation on the go
Monks recommends: ChatGPT is a perfect mobile translation tool. Say you need help in Italy.
ME: Translate to Italian
Where is the nearest gas station?
ChatGPT: “La mia auto sta per esaurire il carburante, mi puoi dire dove si trova la stazione di servizio più vicina?”
8. Fitness
Monks added:
ME: In 3 months, I want to run 5km. Plan out how I can do this.
ChatGPT: Here's a 3-month plan to run 5km.
Start by walking for 15–20 minutes each day to build up your endurance and get your body used to regular exercise.
After a week of walking, begin incorporating short jogs into your routine. Start by jogging for 1–2 minutes at a time, with walking breaks in between. Gradually increase the length of your jogs and reduce the amount of time you spend walking.
Once you can jog for 10 minutes without stopping, start increasing the distance of your runs. Aim to run 1km without stopping and then gradually increase the distance over time.
In addition to your regular runs, incorporate strength training and stretching into your routine to improve your overall fitness and reduce the risk of injury.
(more details continued on)
9. Integrations and coding
10. Teacher lesson plans
Spencer Crandall saved time.
This morning, I wondered who has the hardest job. Teachers.
Many students, little time. ChatGPT could handle lesson planning. I tried it and got this.
Lesson Title: The History and Impact of Artificial Intelligence
Students will understand the history and development of AI and the potential positive and negative impacts on society.
AI timeline AI technologies and applications
Overview:
Introduce the topic of artificial intelligence, and explain that it refers to the development of computer systems and algorithms that can simulate human intelligence and behavior.
Show the timeline of significant events in the history of AI, and discuss the key milestones and developments in the field.
Show examples of AI technologies and applications, and explain how they are used in various industries and fields.
Discuss the potential positive and negative impacts of AI on society, including its potential to improve productivity, efficiency, and safety, as well as its potential to create new challenges and concerns, such as job displacement and ethical issues.
(many more details followed)
11. Find podcast guests.
Joeri Billast suggested:
Who should be on my Web3 podcast?
ChatGPT: Web3 marketing experts, influencers, and thought leaders make great podcast guests. These include Web3 marketers, content creators, business owners, entrepreneurs, and technologists. You could invite Web3 startups and organizations to your podcast.
Please give examples.
ChatGPT: Ideal Web3 marketing podcast guests include:
Tim Berner-Lee, inventor of the World Wide Web
Chris Dixon, general partner at Andreessen Horowitz
Vitalik Buterin, founder of Ethereum
Joe Lubin, founder of ConsenSys
Susan Fowler, author of Whistleblower
(many other suggestions)
12. Comments and reviews on social media
Lisa Monk thinks ChatGPT can help retail staff with social media.
She asked ChatGPT to "review this restaurant"
POSITIVE CUSTOMER REVIEW: I absolutely love this place. We eat out a lot however this place has topped it all. Perfect meals, amazing staff and the timing for it all was great! Special thanks to Sophie B (you rock) From your guests all the way from the Gold Coast, THANK YOU
ChatGPT REPLY: Thank you so much for your kind words and for taking the time to write a review. We are delighted to hear that you had such a great experience at our restaurant. We are thrilled that you enjoyed your meal and the service provided by Sophie. It’s always a pleasure to serve guests visiting from the Gold Coast and we are grateful for your support. We look forward to welcoming you back again soon. Thank you again for your positive review.
CUSTOMER REVIEW: Most average food, there is a nice view, But that’s about it
ChatGPT: Thank you for your review. We apologize if your dining experience was not up to your expectations. We strive to provide top-quality food and service to all of our customers, and we will take your feedback into consideration as we continue to improve. Thank you for letting us know about your experience.
13. Crime-fighting
Zack Seipert said, "I researched some famous unsolved murders, and ChatGPT laid out the crime, suspects, clues, and more." I bet experienced detectives could solve some of these cold cases.
14. Reduce bias
Joanne Taylor struggles to remove biases from her writing. She asked ChatGPT for ideas.
I asked ChatGPT to check a text for racial bias, and it did well.
15. Furnishings
I designed a small, unique table using ChatGPT and MidJourney. I edited ChatGPT's idea for clarity and brevity before entering it in MidJourney.
Results:

16. Serialize a novel
Scott Scowcoft led ChatCPT through iterations of a story text to create serialized novel frames. You can view this here.
17. Interview preparation
I was on a sales podcast. Although this is marketing-related, it's not my forte. I asked ChatGPT for help with a sales interview. Response:
Here are some interview questions about the future of sales and how to answer them.
How will technology affect sales in the future?
Technology will impact sales in the coming years. Automation and AI could be used to handle routine tasks, and data analysis and CRM could become more important. E-commerce and online sales channels are also reshaping the sales landscape.
How will the salesperson's role change?
Future sales roles may change in response to changing customer needs and expectations. Salespeople must be knowledgeable and consultative to help customers navigate complex products and services. Increasing importance of data analysis and CRM tools will require salespeople to understand and use technology effectively.
Future sales professionals will need what skills?
Future salespeople will need many skills. Sales professionals must have strong communication and interpersonal skills, as well as product and service knowledge and the ability to use data analysis and CRM tools effectively. Adapting to changing customer needs and staying current on industry trends will also be important for sales success.
18. Gift ideas
I need Christmas gift ideas for my wife. I asked:
Suggest a gift idea under $200 for a middle-aged woman who loves The Eagles.
A middle-aged woman who loves The Eagles might like a vinyl record of "Hotel California" or "The Long Run." Many music fans enjoy the unique sound and experience of vinyl records.
Pair the record with a high-quality record player for a complete gift. The vinyl record and record player should fit within your $200 budget for an Eagles fan.
19. Explaining complex concepts
I entered: Explain quantum physics to me as if I were 10 years old.
Quantum physics is a branch of science that studies how tiny particles, like atoms and subatomic particles, behave. These particles are so small that they don’t always follow the same rules as the things we can see and touch every day.
For example, sometimes they can be in two places at the same time, or they can be friends with each other even if they are far apart. This might sound strange, but it’s what scientists have learned from studying these tiny particles. Quantum physics helps us understand how the world works at a very small scale, and it can also help us make new technologies, like computers that are much faster than the ones we have today.
20. AP-style editing
Blogs, journals, and books follow AP Style. I asked ChatGPT to "edit using AP Style" and it did a great job.
And then... "Write a catchy headline for a blog post about 16 ChatGPT uses"
Here are some possible blog post titles for 20 creative ChatGPT uses:
“20 Fun and Creative Ways to Use ChatGPT: From Games to Quizzes and More”
“The Ultimate Guide to Using ChatGPT for Entertainment and Creativity”
“20 Reasons to Use ChatGPT: How it Can Enhance Your Gaming, Storytelling, and More”
20 Entertaining Uses for ChatGPT You Never Knew Were Possible”
“Unleash Your Imagination with ChatGPT: 16 Creative and Fun Ways to Use it”
In a previous post, I said ChatGPT will change marketing careers forever. I have never made a statement like that in my life. Even in the early days of the internet, people were cautious.
This technology was just released two weeks ago, and over a million people are already using it. This is the fastest technology adoption in history.
Today's post offers inventive and entertaining ideas, but it's just the beginning. ChatGPT writes code, music, and papers.
You might also like

Logan Rane
3 years ago
I questioned Chat-GPT for advice on the top nonfiction books. Here's What It Suggests
You have to use it.

Chat-GPT is a revolution.
All social media outlets are discussing it. How it will impact the future and different things.
True.
I've been using Chat-GPT for a few days, and it's a rare revolution. It's amazing and will only improve.
I asked Chat-GPT about the best non-fiction books. It advised this, albeit results rely on interests.
The Immortal Life of Henrietta Lacks
by Rebecca Skloot
Science, Biography
A impoverished tobacco farmer dies of cervical cancer in The Immortal Life of Henrietta Lacks. Her cell strand helped scientists treat polio and other ailments.
Rebecca Skloot discovers about Henrietta, her family, how the medical business exploited black Americans, and how her cells can live forever in a fascinating and surprising research.
You ought to read it.
if you want to discover more about the past of medicine.
if you want to discover more about American history.
Bad Blood: Secrets and Lies in a Silicon Valley Startup
by John Carreyrou
Tech, Bio
Bad Blood tells the terrifying story of how a Silicon Valley tech startup's blood-testing device placed millions of lives at risk.
John Carreyrou, a Pulitzer Prize-winning journalist, wrote this book.
Theranos and its wunderkind CEO, Elizabeth Holmes, climbed to popularity swiftly and then plummeted.
You ought to read it.
if you are a start-up employee.
specialists in medicine.
The Power of Now: A Guide to Spiritual Enlightenment
by Eckhart Tolle
Self-improvement, Spirituality
The Power of Now shows how to stop suffering and attain inner peace by focusing on the now and ignoring your mind.
The book also helps you get rid of your ego, which tries to control your ideas and actions.
If you do this, you may embrace the present, reduce discomfort, strengthen relationships, and live a better life.
You ought to read it.
if you're looking for serenity and illumination.
If you believe that you are ruining your life, stop.
if you're not happy.
The 7 Habits of Highly Effective People
by Stephen R. Covey
Profession, Success
The 7 Habits of Highly Effective People is an iconic self-help book.
This vital book offers practical guidance for personal and professional success.
This non-fiction book is one of the most popular ever.
You ought to read it.
if you want to reach your full potential.
if you want to discover how to achieve all your objectives.
if you are just beginning your journey toward personal improvement.
Sapiens: A Brief History of Humankind
by Yuval Noah Harari
Science, History
Sapiens explains how our species has evolved from our earliest ancestors to the technology age.
How did we, a species of hairless apes without tails, come to control the whole planet?
It describes the shifts that propelled Homo sapiens to the top.
You ought to read it.
if you're interested in discovering our species' past.
if you want to discover more about the origins of human society and culture.

Aaron Dinin, PhD
3 years ago
The Advantages and Disadvantages of Having Investors Sign Your NDA
Startup entrepreneurs assume what risks when pitching?

Last week I signed four NDAs.
Four!
NDA stands for non-disclosure agreement. A legal document given to someone receiving confidential information. By signing, the person pledges not to share the information for a certain time. If they do, they may be in breach of contract and face legal action.
Companies use NDAs to protect trade secrets and confidential internal information from employees and contractors. Appropriate. If you manage a huge, successful firm, you don't want your employees selling their information to your competitors. To be true, business NDAs don't always prevent corporate espionage, but they usually make employees and contractors think twice before sharing.
I understand employee and contractor NDAs, but I wasn't asked to sign one. I counsel entrepreneurs, thus the NDAs I signed last week were from startups that wanted my feedback on their concepts.
I’m not a startup investor. I give startup guidance online. Despite that, four entrepreneurs thought their company ideas were so important they wanted me to sign a generically written legal form they probably acquired from a shady, spam-filled legal templates website before we could chat.
False. One company tried to get me to sign their NDA a few days after our conversation. I gently rejected, but their tenacity encouraged me. I considered sending retroactive NDAs to everyone I've ever talked to about one of my startups in case they establish a successful company based on something I said.
Two of the other three NDAs were from nearly identical companies. Good thing I didn't sign an NDA for the first one, else they may have sued me for talking to the second one as though I control the firms people pitch me.
I wasn't talking to the fourth NDA company. Instead, I received an unsolicited email from someone who wanted comments on their fundraising pitch deck but required me to sign an NDA before sending it.
That's right, before I could read a random Internet stranger's unsolicited pitch deck, I had to sign his NDA, potentially limiting my ability to discuss what was in it.
You should understand. Advisors, mentors, investors, etc. talk to hundreds of businesses each year. They cannot manage all the companies they deal with, thus they cannot risk legal trouble by talking to someone. Well, if I signed NDAs for all the startups I spoke with, half of the 300+ articles I've written on Medium over the past several years could get me sued into the next century because I've undoubtedly addressed topics in my articles that I discussed with them.
The four NDAs I received last week are part of a recent trend of entrepreneurs sending out NDAs before meetings, despite the practical and legal issues. They act like asking someone to sign away their right to talk about all they see and hear in a day is as straightforward as asking for a glass of water.
Given this inflow of NDAs, I wanted to briefly remind entrepreneurs reading this blog about the merits and cons of requesting investors (or others in the startup ecosystem) to sign your NDA.
Benefits of having investors sign your NDA include:
None. Zero. Nothing.
Disadvantages of requesting investor NDAs:
You'll come off as an amateur who has no idea what it takes to launch a successful firm.
Investors won't trust you with their money since you appear to be a complete amateur.
Printing NDAs will be a waste of paper because no genuine entrepreneur will ever sign one.
I apologize for missing any cons. Please leave your remarks.

Frederick M. Hess
3 years ago
The Lessons of the Last Two Decades for Education Reform
My colleague Ilana Ovental and I examined pandemic media coverage of education at the end of last year. That analysis examined coverage changes. We tracked K-12 topic attention over the previous two decades using Lexis Nexis. See the results here.
I was struck by how cleanly the past two decades can be divided up into three (or three and a half) eras of school reform—a framing that can help us comprehend where we are and how we got here. In a time when epidemic, political unrest, frenetic news cycles, and culture war can make six months seem like a lifetime, it's worth pausing for context.
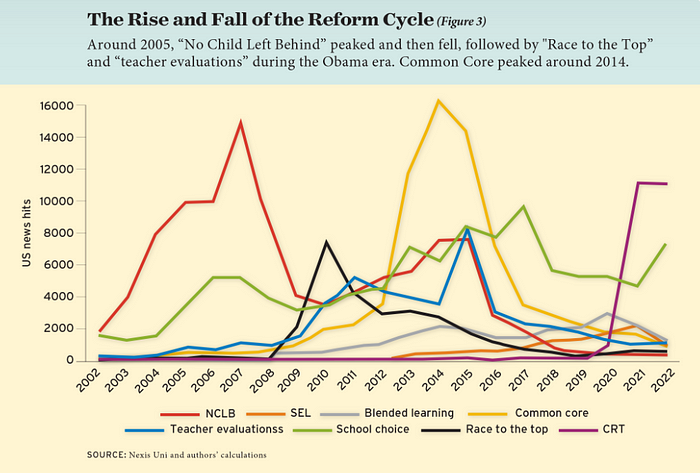
If you look at the peaks in the above graph, the 21st century looks to be divided into periods. The decade-long rise and fall of No Child Left Behind began during the Bush administration. In a few years, NCLB became the dominant K-12 framework. Advocates and financiers discussed achievement gaps and measured success with AYP.
NCLB collapsed under the weight of rigorous testing, high-stakes accountability, and a race to the bottom by the Obama years. Obama's Race to the Top garnered attention, but its most controversial component, the Common Core State Standards, rose quickly.
Academic standards replaced assessment and accountability. New math, fiction, and standards were hotly debated. Reformers and funders chanted worldwide benchmarking and systems interoperability.
We went from federally driven testing and accountability to government encouraged/subsidized/mandated (pick your verb) reading and math standardization. Last year, Checker Finn and I wrote The End of School Reform? The 2010s populist wave thwarted these objectives. The Tea Party, Occupy Wall Street, Black Lives Matter, and Trump/MAGA all attacked established institutions.
Consequently, once the Common Core fell, no alternative program emerged. Instead, school choice—the policy most aligned with populist suspicion of institutional power—reached a half-peak. This was less a case of choice erupting to prominence than of continuous growth in a vacuum. Even with Betsy DeVos' determined, controversial efforts, school choice received only half the media attention that NCLB and Common Core did at their heights.
Recently, culture clash-fueled attention to race-based curriculum and pedagogy has exploded (all playing out under the banner of critical race theory). This third, culture war-driven wave may not last as long as the other waves.
Even though I don't understand it, the move from slow-building policy debate to fast cultural confrontation over two decades is notable. I don't know if it's cyclical or permanent, or if it's about schooling, media, public discourse, or all three.
One final thought: After doing this work for decades, I've noticed how smoothly advocacy groups, associations, and other activists adapt to the zeitgeist. In 2007, mission statements focused on accomplishment disparities. Five years later, they promoted standardization. Language has changed again.
Part of this is unavoidable and healthy. Chasing currents can also make companies look unprincipled, promote scepticism, and keep them spinning the wheel. Bearing in mind that these tides ebb and flow may give educators, leaders, and activists more confidence to hold onto their values and pause when they feel compelled to follow the crowd.