


Clean API Call With React Hooks
| Photo by Juanjo Jaramillo on Unsplash |
Calling APIs is the most common thing to do in any modern web application. When it comes to talking with an API then most of the time we need to do a lot of repetitive things like getting data from an API call, handling the success or error case, and so on.
When calling tens of hundreds of API calls we always have to do those tedious tasks. We can handle those things efficiently by putting a higher level of abstraction over those barebone API calls, whereas in some small applications, sometimes we don’t even care.
The problem comes when we start adding new features on top of the existing features without handling the API calls in an efficient and reusable manner. In that case for all of those API calls related repetitions, we end up with a lot of repetitive code across the whole application.
In React, we have different approaches for calling an API. Nowadays mostly we use React hooks. With React hooks, it’s possible to handle API calls in a very clean and consistent way throughout the application in spite of whatever the application size is. So let’s see how we can make a clean and reusable API calling layer using React hooks for a simple web application.
I’m using a code sandbox for this blog which you can get here.
import "./styles.css";
import React, { useEffect, useState } from "react";
import axios from "axios";
export default function App() {
const [posts, setPosts] = useState(null);
const [error, setError] = useState("");
const [loading, setLoading] = useState(false);
useEffect(() => {
handlePosts();
}, []);
const handlePosts = async () => {
setLoading(true);
try {
const result = await axios.get(
"https://jsonplaceholder.typicode.com/posts"
);
setPosts(result.data);
} catch (err) {
setError(err.message || "Unexpected Error!");
} finally {
setLoading(false);
}
};
return (
<div className="App">
<div>
<h1>Posts</h1>
{loading && <p>Posts are loading!</p>}
{error && <p>{error}</p>}
<ul>
{posts?.map((post) => (
<li key={post.id}>{post.title}</li>
))}
</ul>
</div>
</div>
);
}
I know the example above isn’t the best code but at least it’s working and it’s valid code. I will try to improve that later. For now, we can just focus on the bare minimum things for calling an API.
Here, you can try to get posts data from JsonPlaceholer. Those are the most common steps we follow for calling an API like requesting data, handling loading, success, and error cases.
If we try to call another API from the same component then how that would gonna look? Let’s see.
500: Internal Server Error
Now it’s going insane! For calling two simple APIs we’ve done a lot of duplication. On a top-level view, the component is doing nothing but just making two GET requests and handling the success and error cases. For each request, it’s maintaining three states which will periodically increase later if we’ve more calls.
Let’s refactor to make the code more reusable with fewer repetitions.
Step 1: Create a Hook for the Redundant API Request Codes
Most of the repetitions we have done so far are about requesting data, handing the async things, handling errors, success, and loading states. How about encapsulating those things inside a hook?
The only unique things we are doing inside handleComments and handlePosts are calling different endpoints. The rest of the things are pretty much the same. So we can create a hook that will handle the redundant works for us and from outside we’ll let it know which API to call.
500: Internal Server Error
Here, this request function is identical to what we were doing on the handlePosts and handleComments. The only difference is, it’s calling an async function apiFunc which we will provide as a parameter with this hook. This apiFunc is the only independent thing among any of the API calls we need.
With hooks in action, let’s change our old codes in App component, like this:
500: Internal Server Error
How about the current code? Isn’t it beautiful without any repetitions and duplicate API call handling things?
Let’s continue our journey from the current code. We can make App component more elegant. Now it knows a lot of details about the underlying library for the API call. It shouldn’t know that. So, here’s the next step…
Step 2: One Component Should Take Just One Responsibility
Our App component knows too much about the API calling mechanism. Its responsibility should just request the data. How the data will be requested under the hood, it shouldn’t care about that.
We will extract the API client-related codes from the App component. Also, we will group all the API request-related codes based on the API resource. Now, this is our API client:
import axios from "axios";

const apiClient = axios.create({
  // Later read this URL from an environment variable
  baseURL: "https://jsonplaceholder.typicode.com"
});

export default apiClient;
All API calls for comments resource will be in the following file:
import client from "./client";

const getComments = () => client.get("/comments");

export default {
  getComments
};
All API calls for posts resource are placed in the following file:
import client from "./client";

const getPosts = () => client.get("/posts");

export default {
  getPosts
};
Finally, the App component looks like the following:
import "./styles.css";
import React, { useEffect } from "react";
import commentsApi from "./api/comments";
import postsApi from "./api/posts";
import useApi from "./hooks/useApi";

export default function App() {
  const getPostsApi = useApi(postsApi.getPosts);
  const getCommentsApi = useApi(commentsApi.getComments);

  useEffect(() => {
    getPostsApi.request();
    getCommentsApi.request();
  }, []);

  return (
    <div className="App">
      {/* Post List */}
      <div>
        <h1>Posts</h1>
        {getPostsApi.loading && <p>Posts are loading!</p>}
        {getPostsApi.error && <p>{getPostsApi.error}</p>}
        <ul>
          {getPostsApi.data?.map((post) => (
            <li key={post.id}>{post.title}</li>
          ))}
        </ul>
      </div>
      {/* Comment List */}
      <div>
        <h1>Comments</h1>
        {getCommentsApi.loading && <p>Comments are loading!</p>}
        {getCommentsApi.error && <p>{getCommentsApi.error}</p>}
        <ul>
          {getCommentsApi.data?.map((comment) => (
            <li key={comment.id}>{comment.name}</li>
          ))}
        </ul>
      </div>
    </div>
  );
}
Now it doesn’t know anything about how the APIs get called. Tomorrow if we want to change the API calling library from axios to fetch or anything else, our App component code will not get affected. We can just change the codes form client.js This is the beauty of abstraction.
Apart from the abstraction of API calls, Appcomponent isn’t right the place to show the list of the posts and comments. It’s a high-level component. It shouldn’t handle such low-level data interpolation things.
So we should move this data display-related things to another low-level component. Here I placed those directly in the App component just for the demonstration purpose and not to distract with component composition-related things.
Final Thoughts
The React library gives the flexibility for using any kind of third-party library based on the application’s needs. As it doesn’t have any predefined architecture so different teams/developers adopted different approaches to developing applications with React. There’s nothing good or bad. We choose the development practice based on our needs/choices. One thing that is there beyond any choices is writing clean and maintainable codes.
More on Web3 & Crypto

Vivek Singh
4 years ago
A Warm Welcome to Web3 and the Future of the Internet
Let's take a look back at the internet's history and see where we're going — and why.
Tim Berners Lee had a problem. He was at CERN, the world's largest particle physics factory, at the time. The institute's stated goal was to study the simplest particles with the most sophisticated scientific instruments. The institute completed the LEP Tunnel in 1988, a 27 kilometer ring. This was Europe's largest civil engineering project (to study smaller particles — electrons).
The problem Tim Berners Lee found was information loss, not particle physics. CERN employed a thousand people in 1989. Due to team size and complexity, people often struggled to recall past project information. While these obstacles could be overcome, high turnover was nearly impossible. Berners Lee addressed the issue in a proposal titled ‘Information Management'.
When a typical stay is two years, data is constantly lost. The introduction of new people takes a lot of time from them and others before they understand what is going on. An emergency situation may require a detective investigation to recover technical details of past projects. Often, the data is recorded but cannot be found. — Information Management: A Proposal
He had an idea. Create an information management system that allowed users to access data in a decentralized manner using a new technology called ‘hypertext'.
To quote Berners Lee, his proposal was “vague but exciting...”. The paper eventually evolved into the internet we know today. Here are three popular W3C standards used by billions of people today:
(credit: CERN)
HTML (Hypertext Markup)
A web formatting language.
URI (Unique Resource Identifier)
Each web resource has its own “address”. Known as ‘a URL'.
HTTP (Hypertext Transfer Protocol)
Retrieves linked resources from across the web.
These technologies underpin all computer work. They were the seeds of our quest to reorganize information, a task as fruitful as particle physics.
Tim Berners-Lee would probably think the three decades from 1989 to 2018 were eventful. He'd be amazed by the billions, the inspiring, the novel. Unlocking innovation at CERN through ‘Information Management'.
The fictional character would probably need a drink, walk, and a few deep breaths to fully grasp the internet's impact. He'd be surprised to see a few big names in the mix.
Then he'd say, "Something's wrong here."
We should review the web's history before going there. Was it a success after Berners Lee made it public? Web1 and Web2: What is it about what we are doing now that so many believe we need a new one, web3?
Per Outlier Ventures' Jamie Burke:
Web 1.0 was read-only.
Web 2.0 was the writable
Web 3.0 is a direct-write web.
Let's explore.
Web1: The Read-Only Web
Web1 was the digital age. We put our books, research, and lives ‘online'. The web made information retrieval easier than any filing cabinet ever. Massive amounts of data were stored online. Encyclopedias, medical records, and entire libraries were put away into floppy disks and hard drives.
In 2015, the web had around 305,500,000,000 pages of content (280 million copies of Atlas Shrugged).
Initially, one didn't expect to contribute much to this database. Web1 was an online version of the real world, but not yet a new way of using the invention.
One gets the impression that the web has been underutilized by historians if all we can say about it is that it has become a giant global fax machine. — Daniel Cohen, The Web's Second Decade (2004)
That doesn't mean developers weren't building. The web was being advanced by great minds. Web2 was born as technology advanced.
Web2: Read-Write Web
Remember when you clicked something on a website and the whole page refreshed? Is it too early to call the mid-2000s ‘the good old days'?
Browsers improved gradually, then suddenly. AJAX calls augmented CGI scripts, and applications began sending data back and forth without disrupting the entire web page. One button to ‘digg' a post (see below). Web experiences blossomed.
In 2006, Digg was the most active ‘Web 2.0' site. (Photo: Ethereum Foundation Taylor Gerring)
Interaction was the focus of new applications. Posting, upvoting, hearting, pinning, tweeting, liking, commenting, and clapping became a lexicon of their own. It exploded in 2004. Easy ways to ‘write' on the internet grew, and continue to grow.
Facebook became a Web2 icon, where users created trillions of rows of data. Google and Amazon moved from Web1 to Web2 by better understanding users and building products and services that met their needs.
Business models based on Software-as-a-Service and then managing consumer data within them for a fee have exploded.
Web2 Emerging Issues
Unbelievably, an intriguing dilemma arose. When creating this read-write web, a non-trivial question skirted underneath the covers. Who owns it all?
You have no control over [Web 2] online SaaS. People didn't realize this because SaaS was so new. People have realized this is the real issue in recent years.
Even if these organizations have good intentions, their incentive is not on the users' side.
“You are not their customer, therefore you are their product,” they say. With Laura Shin, Vitalik Buterin, Unchained
A good plot line emerges. Many amazing, world-changing software products quietly lost users' data control.
For example: Facebook owns much of your social graph data. Even if you hate Facebook, you can't leave without giving up that data. There is no ‘export' or ‘exit'. The platform owns ownership.
While many companies can pull data on you, you cannot do so.
On the surface, this isn't an issue. These companies use my data better than I do! A complex group of stakeholders, each with their own goals. One is maximizing shareholder value for public companies. Tim Berners-Lee (and others) dislike the incentives created.
“Show me the incentive and I will show you the outcome.” — Berkshire Hathaway's CEO
It's easy to see what the read-write web has allowed in retrospect. We've been given the keys to create content instead of just consume it. On Facebook and Twitter, anyone with a laptop and internet can participate. But the engagement isn't ours. Platforms own themselves.
Web3: The ‘Unmediated’ Read-Write Web
Tim Berners Lee proposed a decade ago that ‘linked data' could solve the internet's data problem.
However, until recently, the same principles that allowed the Web of documents to thrive were not applied to data...
The Web of Data also allows for new domain-specific applications. Unlike Web 2.0 mashups, Linked Data applications work with an unbound global data space. As new data sources appear on the Web, they can provide more complete answers.
At around the same time as linked data research began, Satoshi Nakamoto created Bitcoin. After ten years, it appears that Berners Lee's ideas ‘link' spiritually with cryptocurrencies.
What should Web 3 do?
Here are some quick predictions for the web's future.
Users' data:
Users own information and provide it to corporations, businesses, or services that will benefit them.
Defying censorship:
No government, company, or institution should control your access to information (1, 2, 3)
Connect users and platforms:
Create symbiotic rather than competitive relationships between users and platform creators.
Open networks:
“First, the cryptonetwork-participant contract is enforced in open source code. Their voices and exits are used to keep them in check.” Dixon, Chris (4)
Global interactivity:
Transacting value, information, or assets with anyone with internet access, anywhere, at low cost
Self-determination:
Giving you the ability to own, see, and understand your entire digital identity.
Not pull, push:
‘Push' your data to trusted sources instead of ‘pulling' it from others.
Where Does This Leave Us?
Change incentives, change the world. Nick Babalola
People believe web3 can help build a better, fairer system. This is not the same as equal pay or outcomes, but more equal opportunity.
It should be noted that some of these advantages have been discussed previously. Will the changes work? Will they make a difference? These unanswered questions are technical, economic, political, and philosophical. Unintended consequences are likely.
We hope Web3 is a more democratic web. And we think incentives help the user. If there’s one thing that’s on our side, it’s that open has always beaten closed, given a long enough timescale.
We are at the start.

Jonathan Vanian
4 years ago
What is Terra? Your guide to the hot cryptocurrency
With cryptocurrencies like Bitcoin, Ether, and Dogecoin gyrating in value over the past few months, many people are looking at so-called stablecoins like Terra to invest in because of their more predictable prices.
Terraform Labs, which oversees the Terra cryptocurrency project, has benefited from its rising popularity. The company said recently that investors like Arrington Capital, Lightspeed Venture Partners, and Pantera Capital have pledged $150 million to help it incubate various crypto projects that are connected to Terra.
Terraform Labs and its partners have built apps that operate on the company’s blockchain technology that helps keep a permanent and shared record of the firm’s crypto-related financial transactions.
Here’s what you need to know about Terra and the company behind it.
What is Terra?
Terra is a blockchain project developed by Terraform Labs that powers the startup’s cryptocurrencies and financial apps. These cryptocurrencies include the Terra U.S. Dollar, or UST, that is pegged to the U.S. dollar through an algorithm.
Terra is a stablecoin that is intended to reduce the volatility endemic to cryptocurrencies like Bitcoin. Some stablecoins, like Tether, are pegged to more conventional currencies, like the U.S. dollar, through cash and cash equivalents as opposed to an algorithm and associated reserve token.
To mint new UST tokens, a percentage of another digital token and reserve asset, Luna, is “burned.” If the demand for UST rises with more people using the currency, more Luna will be automatically burned and diverted to a community pool. That balancing act is supposed to help stabilize the price, to a degree.
“Luna directly benefits from the economic growth of the Terra economy, and it suffers from contractions of the Terra coin,” Terraform Labs CEO Do Kwon said.
Each time someone buys something—like an ice cream—using UST, that transaction generates a fee, similar to a credit card transaction. That fee is then distributed to people who own Luna tokens, similar to a stock dividend.
Who leads Terra?
The South Korean firm Terraform Labs was founded in 2018 by Daniel Shin and Kwon, who is now the company’s CEO. Kwon is a 29-year-old former Microsoft employee; Shin now heads the Chai online payment service, a Terra partner. Kwon said many Koreans have used the Chai service to buy goods like movie tickets using Terra cryptocurrency.
Terraform Labs does not make money from transactions using its crypto and instead relies on outside funding to operate, Kwon said. It has raised $57 million in funding from investors like HashKey Digital Asset Group, Divergence Digital Currency Fund, and Huobi Capital, according to deal-tracking service PitchBook. The amount raised is in addition to the latest $150 million funding commitment announced on July 16.
What are Terra’s plans?
Terraform Labs plans to use Terra’s blockchain and its associated cryptocurrencies—including one pegged to the Korean won—to create a digital financial system independent of major banks and fintech-app makers. So far, its main source of growth has been in Korea, where people have bought goods at stores, like coffee, using the Chai payment app that’s built on Terra’s blockchain. Kwon said the company’s associated Mirror trading app is experiencing growth in China and Thailand.
Meanwhile, Kwon said Terraform Labs would use its latest $150 million in funding to invest in groups that build financial apps on Terra’s blockchain. He likened the scouting and investing in other groups as akin to a “Y Combinator demo day type of situation,” a reference to the popular startup pitch event organized by early-stage investor Y Combinator.
The combination of all these Terra-specific financial apps shows that Terraform Labs is “almost creating a kind of bank,” said Ryan Watkins, a senior research analyst at cryptocurrency consultancy Messari.
In addition to cryptocurrencies, Terraform Labs has a number of other projects including the Anchor app, a high-yield savings account for holders of the group’s digital coins. Meanwhile, people can use the firm’s associated Mirror app to create synthetic financial assets that mimic more conventional ones, like “tokenized” representations of corporate stocks. These synthetic assets are supposed to be helpful to people like “a small retail trader in Thailand” who can more easily buy shares and “get some exposure to the upside” of stocks that they otherwise wouldn’t have been able to obtain, Kwon said. But some critics have said the U.S. Securities and Exchange Commission may eventually crack down on synthetic stocks, which are currently unregulated.
What do critics say?
Terra still has a long way to go to catch up to bigger cryptocurrency projects like Ethereum.
Most financial transactions involving Terra-related cryptocurrencies have originated in Korea, where its founders are based. Although Terra is becoming more popular in Korea thanks to rising interest in its partner Chai, it’s too early to say whether Terra-related currencies will gain traction in other countries.
Terra’s blockchain runs on a “limited number of nodes,” said Messari’s Watkins, referring to the computers that help keep the system running. That helps reduce latency that may otherwise slow processing of financial transactions, he said.
But the tradeoff is that Terra is less “decentralized” than other blockchain platforms like Ethereum, which is powered by thousands of interconnected computing nodes worldwide. That could make Terra less appealing to some blockchain purists.

The Verge
3 years ago
Bored Ape Yacht Club creator raises $450 million at a $4 billion valuation.
Yuga Labs, owner of three of the biggest NFT brands on the market, announced today a $450 million funding round. The money will be used to create a media empire based on NFTs, starting with games and a metaverse project.
The team's Otherside metaverse project is an MMORPG meant to connect the larger NFT universe. They want to create “an interoperable world” that is “gamified” and “completely decentralized,” says Wylie Aronow, aka Gordon Goner, co-founder of Bored Ape Yacht Club. “We think the real Ready Player One experience will be player run.”
Just a few weeks ago, Yuga Labs announced the acquisition of CryptoPunks and Meebits from Larva Labs. The deal brought together three of the most valuable NFT collections, giving Yuga Labs more IP to work with when developing games and metaverses. Last week, ApeCoin was launched as a cryptocurrency that will be governed independently and used in Yuga Labs properties.
Otherside will be developed by “a few different game studios,” says Yuga Labs CEO Nicole Muniz. The company plans to create development tools that allow NFTs from other projects to work inside their world. “We're welcoming everyone into a walled garden.”
However, Yuga Labs believes that other companies are approaching metaverse projects incorrectly, allowing the startup to stand out. People won't bond spending time in a virtual space with nothing going on, says Yuga Labs co-founder Greg Solano, aka Gargamel. Instead, he says, people bond when forced to work together.
In order to avoid getting smacked, Solano advises making friends. “We don't think a Zoom chat and walking around saying ‘hi' creates a deep social experience.” Yuga Labs refused to provide a release date for Otherside. Later this year, a play-to-win game is planned.
The funding round was led by Andreessen Horowitz, a major investor in the Web3 space. It previously backed OpenSea and Coinbase. Animoca Brands, Coinbase, and MoonPay are among those who have invested. Andreessen Horowitz general partner Chris Lyons will join Yuga Labs' board. The Financial Times broke the story last month.
"META IS A DOMINANT DIGITAL EXPERIENCE PROVIDER IN A DYSTOPIAN FUTURE."
This emerging [Web3] ecosystem is important to me, as it is to companies like Meta,” Chris Dixon, head of Andreessen Horowitz's crypto arm, tells The Verge. “In a dystopian future, Meta is the dominant digital experience provider, and it controls all the money and power.” (Andreessen Horowitz co-founder Marc Andreessen sits on Meta's board and invested early in Facebook.)
Yuga Labs has been profitable so far. According to a leaked pitch deck, the company made $137 million last year, primarily from its NFT brands, with a 95% profit margin. (Yuga Labs declined to comment on deck figures.)
But the company has built little so far. According to OpenSea data, it has only released one game for a limited time. That means Yuga Labs gets hundreds of millions of dollars to build a gaming company from scratch, based on a hugely lucrative art project.
Investors fund Yuga Labs based on its success. That's what they did, says Dixon, “they created a culture phenomenon”. But ultimately, the company is betting on the same thing that so many others are: that a metaverse project will be the next big thing. Now they must construct it.
You might also like

Tim Denning
3 years ago
In this recession, according to Mark Cuban, you need to outwork everyone
Here’s why that’s baloney

Mark Cuban popularized entrepreneurship.
Shark Tank (which made Mark famous) made starting a business glamorous to attract more entrepreneurs. First off
This isn't an anti-billionaire rant.
Mark Cuban has done excellent. He's a smart, principled businessman. I enjoy his Web3 work. But Mark's work and productivity theories are absurd.
You don't need to outwork everyone in this recession to live well.
You won't be able to outwork me.
Yuck! Mark's words made me gag.
Why do boys think working is a football game where the winner wins a Super Bowl trophy? To outwork you.
Hard work doesn't equal intelligence.
Highly clever professionals spend 4 hours a day in a flow state, then go home to relax with family.
If you don't put forth the effort, someone else will.
- Mark.
He'll burn out. He's delusional and doesn't understand productivity. Boredom or disconnection spark our best thoughts.
TikTok outlaws boredom.
In a spare minute, we check our phones because we can't stand stillness.
All this work p*rn makes things worse. When is it okay to feel again? Because I can’t feel anything when I’m drowning in work and haven’t had a holiday in 2 years.
Your rivals are actively attempting to undermine you.
Ohhh please Mark…seriously.
This isn't a Tom Hanks war film. Relax. Not everyone is a rival. Only yourself is your competitor. To survive the recession, be better than a year ago.
If you get rich, great. If not, there's more to life than Lambos and angel investments.
Some want to relax and enjoy life. No competition. We witness people with lives trying to endure the recession and record-high prices.
This fictitious rival worsens life and work.

If you are truly talented, you will motivate others to work more diligently and effectively.
No Mark. Soz.
If you're a good leader, you won't brag about working hard and treating others like cogs. Treat them like humans. You'll have EQ.
Silly statements like this are caused by an out-of-control ego. No longer watch Shark Tank.
Ego over humanity.
Good leaders will urge people to keep together during the recession. Good leaders support those who are laid off and need a reference.
Not harder, quicker, better. That created my mental health problems 10 years ago.
Truth: we want to work less.
The promotion of entrepreneurship is ludicrous.
Marvel superheroes. Seriously, relax Max.
I used to write about entrepreneurship, then I quit. Many WeWork Adam Neumanns. Carelessness.
I now utilize the side hustle title when writing about online company or entrepreneurship. Humanizes.
Stop glorifying. Thinking we'll all be Elon Musks who send rockets to Mars is delusional. Most of us won't create companies employing hundreds.
OK.
The true epidemic is glorification. fewer selfies Little birdy needs less bank account screenshots. Less Uber talk.
We're exhausted.
Fun, ego-free business can transform the world. Take a relax pill.
Work as if someone were attempting to take everything from you.
I've seen people lose everything.
Myself included. My 20s startup failed. I was almost bankrupt. I thought I'd never recover. Nope.
Best thing ever.
Losing everything reveals your true self. Unintelligent entrepreneur egos perish instantly. Regaining humility revitalizes relationships.
Money's significance shifts. Stop chasing it like a puppy with a bone.
Fearing loss is unfounded.
Here is a more effective approach than outworking nobody.
(You'll thrive in the recession and become wealthy.)
Smarter work
Overworking is donkey work.
You don't want to be a career-long overworker. Instead than wasting time, write down what you do. List tasks and processes.
Keep doing/outsource the list. Step-by-step each task. Continuously systematize.
Then recruit a digital employee like Zapier or a virtual assistant in the same country.
Intelligent, not difficult.
If your big break could burn in hell, diversify like it will.
People err by focusing on one chance.
Chances can vanish. All-in risky. Instead of working like a Mark Cuban groupie, diversify your income.
If you're employed, your customer is your employer.
Sell the same abilities twice and add 2-3 contract clients. Reduce your hours at your main job and take on more clients.
Leave brand loyalty behind
Mark desires his employees' worship.
That's stupid. When times are bad, layoffs multiply. The problem is the false belief that companies care. No. A business maximizes profit and pays you the least.
To care or overpay is anti-capitalist (that run the world). Be honest.
I was a banker. Then the bat virus hit and jobs disappeared faster than I urinate after a night of drinking.
Start being disloyal now since your company will cheerfully replace you with a better applicant. Meet recruiters and hiring managers on LinkedIn. Whenever something goes wrong at work, act.
Loyalty to self and family. Nobody.
Outwork this instead
Mark doesn't suggest outworking inflation instead of people.
Inflation erodes your time on earth. If you ignore inflation, you'll work harder for less pay every minute.
Financial literacy beats inflation.
Get a side job and earn money online
So you can stop outworking everyone.
Internet leverages time. Same effort today yields exponential results later. There are still whole places not online.
Instead of working forever, generate money online.
Final Words
Overworking is stupid. Don't listen to wealthy football jocks.
Work isn't everything. Prioritize diversification, internet income streams, boredom, and financial knowledge throughout the recession.
That’s how to get wealthy rather than burnout-rich.

Scrum Ventures
3 years ago
Trends from the Winter 2022 Demo Day at Y Combinators

Y Combinators Winter 2022 Demo Day continues the trend of more startups engaging in accelerator Demo Days. Our team evaluated almost 400 projects in Y Combinator's ninth year.
After Winter 2021 Demo Day, we noticed a hurry pushing shorter rounds, inflated valuations, and larger batches.
Despite the batch size, this event's behavior showed a return to normalcy. Our observations show that investors evaluate and fund businesses more carefully. Unlike previous years, more YC businesses gave investors with data rooms and thorough pitch decks in addition to valuation data before Demo Day.
Demo Day pitches were virtual and fast-paced, limiting unplanned meetings. Investors had more time and information to do their due research before meeting founders. Our staff has more time to study diverse areas and engage with interesting entrepreneurs and founders.
This was one of the most regionally diversified YC cohorts to date. This year's Winter Demo Day startups showed some interesting tendencies.
Trends and Industries to Watch Before Demo Day
Demo day events at any accelerator show how investment competition is influencing startups. As startups swiftly become scale-ups and big success stories in fintech, e-commerce, healthcare, and other competitive industries, entrepreneurs and early-stage investors feel pressure to scale quickly and turn a notion into actual innovation.
Too much eagerness can lead founders to focus on market growth and team experience instead of solid concepts, technical expertise, and market validation. Last year, YC Winter Demo Day funding cycles ended too quickly and valuations were unrealistically high.
Scrum Ventures observed a longer funding cycle this year compared to last year's Demo Day. While that seems promising, many factors could be contributing to change, including:
Market patterns are changing and the economy is becoming worse.
the industries that investors are thinking about.
Individual differences between each event batch and the particular businesses and entrepreneurs taking part
The Winter 2022 Batch's Trends
Each year, we also wish to examine trends among early-stage firms and YC event participants. More international startups than ever were anticipated to present at Demo Day.
Less than 50% of demo day startups were from the U.S. For the S21 batch, firms from outside the US were most likely in Latin America or Europe, however this year's batch saw a large surge in startups situated in Asia and Africa.
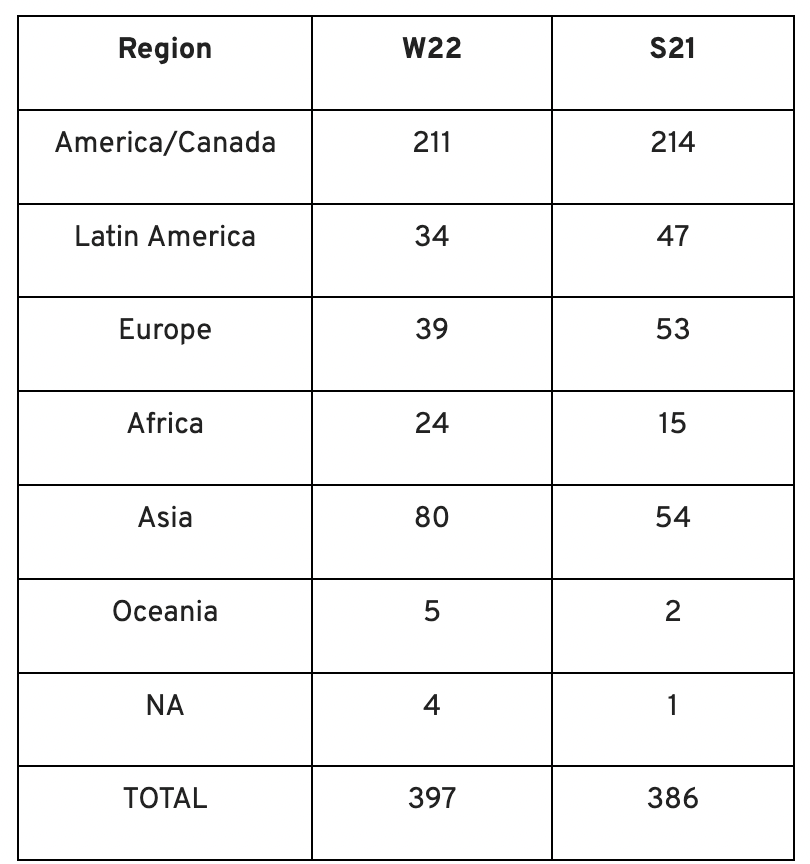
YC Startup Directory
163 out of 399 startups were B2B software and services companies. Financial, healthcare, and consumer startups were common.
Our team doesn't plan to attend every pitch or speak with every startup's founders or team members. Let's look at cleantech, Web3, and health and wellness startup trends.
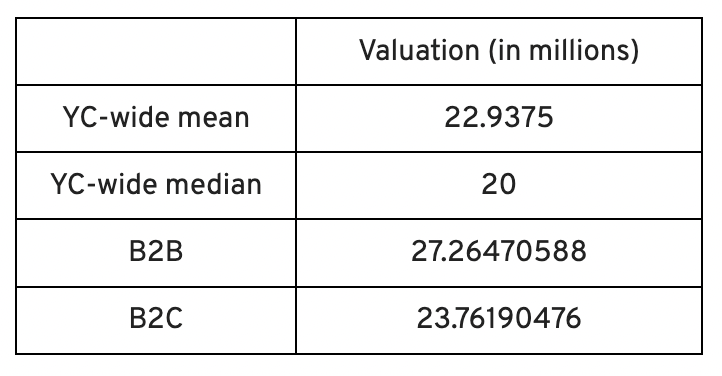
Our Opinions Following Conversations with 87 Startups at Demo Day
In the lead-up to Demo Day, we spoke with 87 of the 125 startups going. Compared to B2C enterprises, B2B startups had higher average valuations. A few outliers with high valuations pushed B2B and B2C means above the YC-wide mean and median.
Many of these startups develop business and technology solutions we've previously covered. We've seen API, EdTech, creative platforms, and cybersecurity remain strong and increase each year.
While these persistent tendencies influenced the startups Scrum Ventures looked at and the founders we interacted with on Demo Day, new trends required more research and preparation. Let's examine cleantech, Web3, and health and wellness startups.
Hardware and software that is green
Cleantech enterprises demand varying amounts of funding for hardware and software. Although the same overarching trend is fueling the growth of firms in this category, each subgroup has its own strategy and technique for investigation and identifying successful investments.
Many cleantech startups we spoke to during the YC event are focused on helping industrial operations decrease or recycle carbon emissions.
Carbon Crusher: Creating carbon negative roads
Phase Biolabs: Turning carbon emissions into carbon negative products and carbon neutral e-fuels
Seabound: Capturing carbon dioxide emissions from ships
Fleetzero: Creating electric cargo ships
Impossible Mining: Sustainable seabed mining
Beyond Aero: Creating zero-emission private aircraft
Verdn: Helping businesses automatically embed environmental pledges for product and service offerings, boost customer engagement
AeonCharge: Allowing electric vehicle (EV) drivers to more easily locate and pay for EV charging stations
Phoenix Hydrogen: Offering a hydrogen marketplace and a connected hydrogen hub platform to connect supply and demand for hydrogen fuel and simplify hub planning and partner program expansion
Aklimate: Allowing businesses to measure and reduce their supply chain’s environmental impact
Pina Earth: Certifying and tracking the progress of businesses’ forestry projects
AirMyne: Developing machines that can reverse emissions by removing carbon dioxide from the air
Unravel Carbon: Software for enterprises to track and reduce their carbon emissions
Web3: NFTs, the metaverse, and cryptocurrency
Web3 technologies handle a wide range of business issues. This category includes companies employing blockchain technology to disrupt entertainment, finance, cybersecurity, and software development.
Many of these startups overlap with YC's FinTech trend. Despite this, B2C and B2B enterprises were evenly represented in Web3. We examined:
Stablegains: Offering consistent interest on cash balance from the decentralized finance (DeFi) market
LiquiFi: Simplifying token management with automated vesting contracts, tax reporting, and scheduling. For companies, investors, and finance & accounting
NFTScoring: An NFT trading platform
CypherD Wallet: A multichain wallet for crypto and NFTs with a non-custodial crypto debit card that instantly converts coins to USD
Remi Labs: Allowing businesses to more easily create NFT collections that serve as access to products, memberships, events, and more
Cashmere: A crypto wallet for Web3 startups to collaboratively manage funds
Chaingrep: An API that makes blockchain data human-readable and tokens searchable
Courtyard: A platform for securely storing physical assets and creating 3D representations as NFTs
Arda: “Banking as a Service for DeFi,” an API that FinTech companies can use to embed DeFi products into their platforms
earnJARVIS: A premium cryptocurrency management platform, allowing users to create long-term portfolios
Mysterious: Creating community-specific experiences for Web3 Discords
Winter: An embeddable widget that allows businesses to sell NFTs to users purchasing with a credit card or bank transaction
SimpleHash: An API for NFT data that provides compatibility across blockchains, standardized metadata, accurate transaction info, and simple integration
Lifecast: Tools that address motion sickness issues for 3D VR video
Gym Class: Virtual reality (VR) multiplayer basketball video game
WorldQL: An asset API that allows NFT creators to specify multiple in-game interpretations of their assets, increasing their value
Bonsai Desk: A software development kit (SDK) for 3D analytics
Campfire: Supporting virtual social experiences for remote teams
Unai: A virtual headset and Visual World experience
Vimmerse: Allowing creators to more easily create immersive 3D experiences
Fitness and health
Scrum Ventures encountered fewer health and wellness startup founders than Web3 and Cleantech. The types of challenges these organizations solve are still diverse. Several of these companies are part of a push toward customization in healthcare, an area of biotech set for growth for companies with strong portfolios and experienced leadership.
Here are several startups we considered:
Syrona Health: Personalized healthcare for women in the workplace
Anja Health: Personalized umbilical cord blood banking and stem cell preservation
Alfie: A weight loss program focused on men’s health that coordinates medical care, coaching, and “community-based competition” to help users lose an average of 15% body weight
Ankr Health: An artificial intelligence (AI)-enabled telehealth platform that provides personalized side effect education for cancer patients and data collection for their care teams
Koko — A personalized sleep program to improve at-home sleep analysis and training
Condition-specific telehealth platforms and programs:
Reviving Mind: Chronic care management covered by insurance and supporting holistic, community-oriented health care
Equipt Health: At-home delivery of prescription medical equipment to help manage chronic conditions like obstructive sleep apnea
LunaJoy: Holistic women’s healthcare management for mental health therapy, counseling, and medication
12 Startups from YC's Winter 2022 Demo Day to Watch
Bobidi: 10x faster AI model improvement
Artificial intelligence (AI) models have become a significant tool for firms to improve how well and rapidly they process data. Bobidi helps AI-reliant firms evaluate their models, boosting data insights in less time and reducing data analysis expenditures. The business has created a gamified community that offers a bug bounty for AI, incentivizing community members to test and find weaknesses in clients' AI models.
Magna: DeFi investment management and token vesting
Magna delivers rapid, secure token vesting so consumers may turn DeFi investments into primitives. Carta for Web3 allows enterprises to effortlessly distribute tokens to staff or investors. The Magna team hopes to allow corporations use locked tokens as collateral for loans, facilitate secondary liquidity so investors can sell shares on a public exchange, and power additional DeFi applications.
Perl Street: Funding for infrastructure
This Fintech firm intends to help hardware entrepreneurs get financing by [democratizing] structured finance, unleashing billions for sustainable infrastructure and next-generation hardware solutions. This network has helped hardware entrepreneurs achieve more than $140 million in finance, helping companies working on energy storage devices, EVs, and creating power infrastructure.
CypherD: Multichain cryptocurrency wallet
CypherD seeks to provide a multichain crypto wallet so general customers can explore Web3 products without knowledge hurdles. The startup's beta app lets consumers access crypto from EVM blockchains. The founders have crypto, financial, and startup experience.
Unravel Carbon: Enterprise carbon tracking and offsetting
Unravel Carbon's AI-powered decarbonization technology tracks companies' carbon emissions. Singapore-based startup focuses on Asia. The software can use any company's financial data to trace the supply chain and calculate carbon tracking, which is used to make regulatory disclosures and suggest carbon offsets.
LunaJoy: Precision mental health for women
LunaJoy helped women obtain mental health support throughout life. The platform combines data science to create a tailored experience, allowing women to access psychotherapy, medication management, genetic testing, and health coaching.
Posh: Automated EV battery recycling
Posh attempts to solve one of the EV industry's largest logistical difficulties. Millions of EV batteries will need to be decommissioned in the next decade, and their precious metals and residual capacity will go unused for some time. Posh offers automated, scalable lithium battery disassembly, making EV battery recycling more viable.
Unai: VR headset with 5x higher resolution
Unai stands apart from metaverse companies. Its VR headgear has five times the resolution of existing options and emphasizes human expression and interaction in a remote world. Maxim Perumal's method of latency reduction powers current VR headsets.
Palitronica: Physical infrastructure cybersecurity
Palitronica blends cutting-edge hardware and software to produce networked electronic systems that support crucial physical and supply chain infrastructure. The startup's objective is to build solutions that defend national security and key infrastructure from cybersecurity threats.
Reality Defender: Deepfake detection
Reality Defender alerts firms to bogus users and changed audio, video, and image files. Reality Deference's API and web app score material in real time to prevent fraud, improve content moderation, and detect deception.
Micro Meat: Infrastructure for the manufacture of cell-cultured meat
MicroMeat promotes sustainable meat production. The company has created technologies to scale up bioreactor-grown meat muscle tissue from animal cells. Their goal is to scale up cultured meat manufacturing so cultivated meat products can be brought to market feasibly and swiftly, boosting worldwide meat consumption.
Fleetzero: Electric cargo ships
This startup's battery technology will make cargo ships more sustainable and profitable. Fleetzero's electric cargo ships have five times larger profit margins than fossil fuel ships. Fleetzeros' founder has marine engineering, ship operations, and enterprise sales and business experience.

Jennifer Tieu
3 years ago
Why I Love Azuki
Azuki Banner (www.azuki.com)
Disclaimer: This is my personal viewpoint. I'm not on the Azuki team. Please keep in mind that I am merely a fan, community member, and holder. Please do your own research and pardon my grammar. Thanks!
Azuki has changed my view of NFTs.
When I first entered the NFT world, I had no idea what to expect. I liked the idea. So I invested in some projects, fought for whitelists, and discovered some cool NFTs projects (shout-out to CATC). I lost more money than I earned at one point, but I hadn't invested excessively (only put in what you can afford to lose). Despite my losses, I kept looking. I almost waited for the “ah-ha” moment. A NFT project that changed my perspective on NFTs. What makes an NFT project more than a work of art?
Answer: Azuki.
The Art
The Azuki art drew me in as an anime fan. It looked like something out of an anime, and I'd never seen it before in NFT.
The project was still new. The first two animated teasers were released with little fanfare, but I was impressed with their quality. You can find them on Instagram or in their earlier Tweets.
The teasers hinted that this project could be big and that the team could deliver. It was amazing to see Shao cut the Azuki posters with her katana. Especially at the end when she sheaths her sword and the music cues. Then the live action video of the young boy arranging the Azuki posters seemed movie-like. I felt like I was entering the Azuki story, brand, and dope theme.
The team did not disappoint with the Azuki NFTs. The level of detail in the art is stunning. There were Azukis of all genders, skin and hair types, and more. These 10,000 Azukis have so much representation that almost anyone can find something that resonates. Rather than me rambling on, I suggest you visit the Azuki gallery
The Team
If the art is meant to draw you in and be the project's face, the team makes it more. The NFT would be a JPEG without a good team leader. Not that community isn't important, but no community would rally around a bad team.
Because I've been rugged before, I'm very focused on the team when considering a project. While many project teams are anonymous, I try to find ones that are doxxed (public) or at least appear to be established. Unlike Azuki, where most of the Azuki team is anonymous, Steamboy is public. He is (or was) Overwatch's character art director and co-creator of Azuki. I felt reassured and could trust the project after seeing someone from a major game series on the team.
Then I tried to learn as much as I could about the team. Following everyone on Twitter, reading their tweets, and listening to recorded AMAs. I was impressed by the team's professionalism and dedication to their vision for Azuki, led by ZZZAGABOND.
I believe the phrase “actions speak louder than words” applies to Azuki. I can think of a few examples of what the Azuki team has done, but my favorite is ERC721A.
With ERC721A, Azuki has created a new algorithm that allows minting multiple NFTs for essentially the same cost as minting one NFT.
I was ecstatic when the dev team announced it. This fascinates me as a self-taught developer. Azuki released a product that saves people money, improves the NFT space, and is open source. It showed their love for Azuki and the NFT community.
The Community
Community, community, community. It's almost a chant in the NFT space now. A community, like a team, can make or break a project. We are the project's consumers, shareholders, core, and lifeblood. The team builds the house, and we fill it. We stay for the community.
When I first entered the Azuki Discord, I was surprised by the calm atmosphere. There was no news about the project. No release date, no whitelisting requirements. No grinding or spamming either. People just wanted to hangout, get to know each other, and talk. It was nice. So the team could pick genuine people for their mintlist (aka whitelist).
But nothing fundamental has changed since the release. It has remained an authentic, fun, and helpful community. I'm constantly logging into Discord to chat with others or follow conversations. I see the community's openness to newcomers. Everyone respects each other (barring a few bad apples) and the variety of people passing through is fascinating. This human connection and interaction is what I enjoy about this place. Being a part of a group that supports a cause.
Finally, I want to thank the amazing Azuki mod team and the kissaten channel for their contributions.
The Brand
So, what sets Azuki apart from other projects? They are shaping a brand or identity. The Azuki website, I believe, best captures their vision. (This is me gushing over the site.)
If you go to the website, turn on the dope playlist in the bottom left. The playlist features a mix of Asian and non-Asian hip-hop and rap artists, with some lo-fi thrown in. The songs on the playlist change, but I think you get the vibe Azuki embodies just by turning on the music.
The Garden is our next stop where we are introduced to Azuki.
A brand.
We're creating a new brand together.
A metaverse brand. By the people.
A collection of 10,000 avatars that grant Garden membership. It starts with exclusive streetwear collabs, NFT drops, live events, and more. Azuki allows for a new media genre that the world has yet to discover. Let's build together an Azuki, your metaverse identity.
The Garden is a magical internet corner where art, community, and culture collide. The boundaries between the physical and digital worlds are blurring.
Try a Red Bean.
The text begins with Azuki's intention in the space. It's a community-made metaverse brand. Then it goes into more detail about Azuki's plans. Initiation of a story or journey. "Would you like to take the red bean and jump down the rabbit hole with us?" I love the Matrix red pill or blue pill play they used. (Azuki in Japanese means red bean.)
Morpheus, the rebel leader, offers Neo the choice of a red or blue pill in The Matrix. “You take the blue pill... After the story, you go back to bed and believe whatever you want. Your red pill... Let me show you how deep the rabbit hole goes.” Aware that the red pill will free him from the enslaving control of the machine-generated dream world and allow him to escape into the real world, he takes it. However, living the “truth of reality” is harsher and more difficult.
It's intriguing and draws you in. Taking the red bean causes what? Where am I going? I think they did well in piqueing a newcomer's interest.
Not convinced by the Garden? Read the Manifesto. It reinforces Azuki's role.
Here comes a new wave…
And surfing here is different.
Breaking down barriers.
Building open communities.
Creating magic internet money with our friends.
To those who don’t get it, we tell them: gm.
They’ll come around eventually.
Here’s to the ones with the courage to jump down a peculiar rabbit hole.
One that pulls you away from a world that’s created by many and owned by few…
To a world that’s created by more and owned by all.
From The Garden come the human beans that sprout into your family.
We rise together.
We build together.
We grow together.
Ready to take the red bean?
Not to mention the Mindmap, it sets Azuki apart from other projects and overused Roadmaps. I like how the team recognizes that the NFT space is not linear. So many of us are still trying to figure it out. It is Azuki's vision to adapt to changing environments while maintaining their values. I admire their commitment to long-term growth.
Conclusion
To be honest, I have no idea what the future holds. Azuki is still new and could fail. But I'm a long-term Azuki fan. I don't care about quick gains. The future looks bright for Azuki. I believe in the team's output. I love being an Azuki.
Thank you! IKUZO!
Full post here