


More on Technology

Sukhad Anand
3 years ago
How Do Discord's Trillions Of Messages Get Indexed?
They depend heavily on open source..

Discord users send billions of messages daily. Users wish to search these messages. How do we index these to search by message keywords?
Let’s find out.
Discord utilizes Elasticsearch. Elasticsearch is a free, open search engine for textual, numerical, geographical, structured, and unstructured data. Apache Lucene powers Elasticsearch.
How does elastic search store data? It stores it as numerous key-value pairs in JSON documents.
How does elastic search index? Elastic search's index is inverted. An inverted index lists every unique word in every page and where it appears.
4. Elasticsearch indexes documents and generates an inverted index to make data searchable in near real-time. The index API adds or updates JSON documents in a given index.
Let's examine how discord uses Elastic Search. Elasticsearch prefers bulk indexing. Discord couldn't index real-time messages. You can't search posted messages. You want outdated messages.
6. Let's check what bulk indexing requires.
1. A temporary queue for incoming communications.
2. Indexer workers that index messages into elastic search.
Discord's queue is Celery. The queue is open-source. Elastic search won't run on a single server. It's clustered. Where should a message go? Where?
8. A shard allocator decides where to put the message. Nevertheless. Shattered? A shard combines elastic search and index on. So, these two form a shard which is used as a unit by discord. The elastic search itself has some shards. But this is different, so don’t get confused.
Now, the final part is service discovery — to discover the elastic search clusters and the hosts within that cluster. This, they do with the help of etcd another open source tool.
A great thing to notice here is that discord relies heavily on open source systems and their base implementations which is very different from a lot of other products.

Nitin Sharma
3 years ago
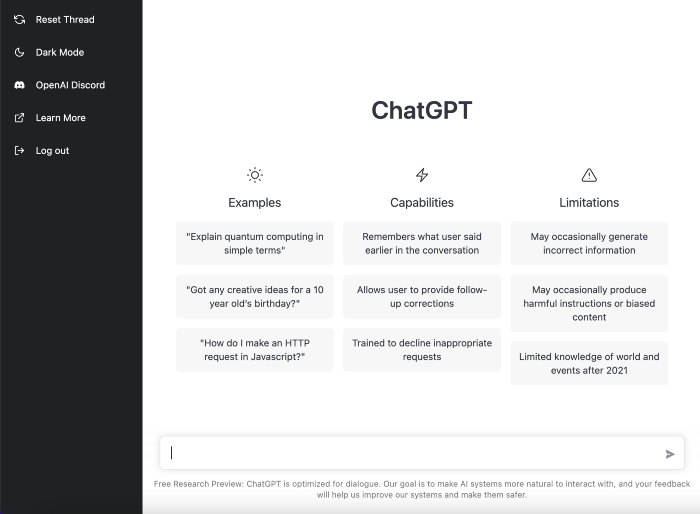
The result of my side-hustle blog post with ChatGPT is remarkable.
It's free now.

Most content writers—including me—write about side hustles because they do well.
I wrote several articles on a profitable programming side hustle.
Later, I learnt about AI content-generating platforms like Jasper.ai and Copy.ai, which I thought were terrible because they required subscriptions and had bad content. Even I dislike automatic online posting.
Since ChatGPT is becoming more popular, I tried it. It's free now.
Note: I wasn’t compensated to write this piece by this tool. In other words, I don’t receive any payment from their founders. There is no affiliate link, and right now it is free to use. Also, ChatGPT can do a lot more than what I ever did.
Begin.
OpenAI account registration requires visiting the website (if you don’t have one). Just write anything into the chatbot and get a response.
First, I wrote about the top 10 2023 side businesses.
This came in seconds.
2023 is shaping up to be a year of growth and opportunity for entrepreneurs and side hustlers. With the rise of remote work and the growing gig economy, there are many income streams to consider launching in the coming year. Here are the top 10 income streams to launch in 2023:
Virtual Assistant — The demand for virtual assistants is on the rise as more businesses move online. As a virtual assistant, you can offer administrative, technical, or creative services to clients remotely.
Online Tutoring — If you have expertise in a particular subject, consider becoming an online tutor. There are many platforms that connect tutors with students looking for help with their studies.
Freelance Writing — If you have a knack for writing, consider becoming a freelance writer. You can offer your services to businesses, bloggers, and individuals looking for content for their websites or social media platforms.
Graphic Design — If you have a talent for design, consider starting a graphic design side hustle. You can create logos, banners, and other visual content for businesses and individuals.
Social Media Management — Many businesses are looking for help with managing their social media accounts. As a social media manager, you can help businesses create and execute social media strategies to reach their target audience.
Dropshipping — Dropshipping is a business model where you sell products without actually holding any inventory. You can partner with suppliers and ship the products directly to the customer on behalf of the business.
Pet Sitting — If you love animals, consider starting a pet-sitting side hustle. You can offer your services to pet owners who need someone to take care of their pets while they are away.
Home Cleaning — With busy schedules, many people are looking for help with cleaning their homes. As a home cleaning service provider, you can offer your services to help keep homes tidy and organized.
Event Planning — If you have a talent for organization and planning, consider starting an event planning side hustle. You can offer your services to help plan and execute events for businesses and individuals.
Online Teaching — With the rise of online education, there is a growing demand for online teachers. If you have expertise in a particular subject, consider becoming an online teacher and offer your services to students looking for personalized instruction.
In conclusion, 2023 is shaping up to be a great year for launching new income streams. Whether you are looking to start a virtual assistant business, become an online tutor, or offer home cleaning services, there are many opportunities to turn your skills and expertise into a profitable side hustle.
Better than most online side hustle posts, right?
Write about the top 10 programming side hustles to start in 2023.
I got this.
If you are a programmer looking to start a side hustle, 2023 is the perfect time to launch your own business. With the growing demand for software and app development, there are many opportunities for programmers to turn their skills into a profitable side hustle. Here are the top 10 programming side hustles to start in 2023:
App Development — With the rise of smartphones and tablets, there is a growing demand for app development. You can offer your services to businesses and individuals looking to create custom apps for their needs.
Website Development — Many businesses and individuals are looking for help with creating and maintaining their websites. As a website developer, you can offer your services to help design, build, and manage websites for your clients.
Software Development — If you have expertise in a particular programming language, consider starting a software development side hustle. You can offer your services to businesses and individuals looking to create custom software solutions for their needs.
Game Development — The gaming industry is thriving, and there is a growing demand for game development. If you have experience in game development, you can offer your services to businesses and individuals looking to create custom games.
Data Analysis — With the rise of big data, there is a growing demand for data analysts. As a data analyst, you can offer your services to businesses and individuals looking to make sense of their data and gain insights from it.
Machine Learning — Machine learning is a rapidly growing field, and there is a growing demand for machine learning experts. If you have experience in machine learning, you can offer your services to businesses and individuals looking to develop custom machine learning solutions.
Cloud Computing — With the rise of cloud computing, there is a growing demand for cloud experts. If you have experience in cloud computing, you can offer your services to businesses and individuals looking to migrate their applications and data to the cloud.
Blockchain Development — Blockchain technology is gaining popularity, and there is a growing demand for blockchain developers. If you have experience in blockchain development, you can offer your services to businesses and individuals looking to develop custom blockchain solutions.
Artificial Intelligence — Artificial intelligence is a rapidly growing field, and there is a growing demand for AI experts. If you have experience in artificial intelligence, you can offer your services to businesses and individuals looking to develop custom AI solutions.
Virtual Reality — Virtual reality is an exciting and emerging technology, and there is a growing demand for VR developers. If you have experience in VR development, you can offer your services to businesses and individuals looking to create custom VR experiences.
In conclusion, 2023 is a great time to start a programming side hustle. Whether you are interested in app development, website development, or machine learning, there are many opportunities for programmers to turn their skills into a profitable business.
These two blogs show that AI can simplify blog authoring.
I asked some tough programming questions, and most were suitable.
The content may occasionally not be what we want, but it will almost always be very helpful to you.
Enjoy.

Jano le Roux
3 years ago
Apple Quietly Introduces A Revolutionary Savings Account That Kills Banks
Would you abandon your bank for Apple?
Banks are struggling.
not as a result of inflation
not due to the economic downturn.
not due to the conflict in Ukraine.
But because they’re underestimating Apple.
Slowly but surely, Apple is looking more like a bank.
An easy new savings account like Apple
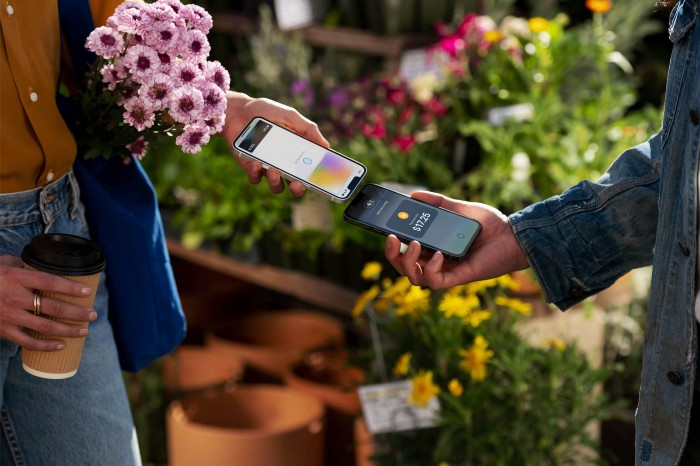
Apple has a new savings account.
Apple says Apple Card users may set up and manage savings straight in Wallet.
No more charges
Colorfully high yields
With no minimum balance
No minimal down payments
Most consumer-facing banks will have to match Apple's offer or suffer disruption.
Users may set it up from their iPhones without traveling to a bank or filling out paperwork.
It’s built into the iPhone in your pocket.
So now more waiting for slow approval processes.
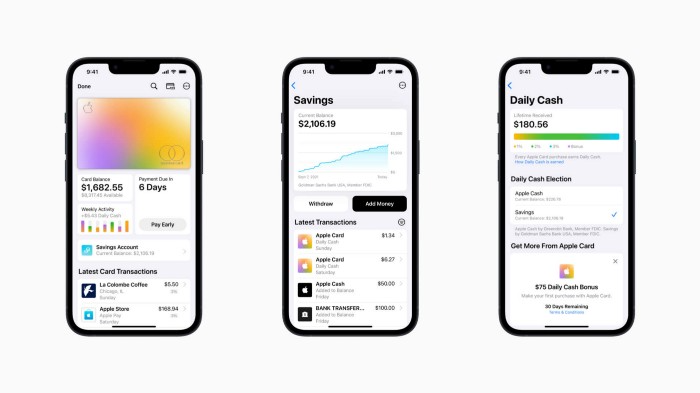
Once the savings account is set up, Apple will automatically transfer all future Daily Cash into it. Users may also add these cash to an Apple Cash card in their Apple Wallet app and adjust where Daily Cash is paid at any time.

Apple Pay and Apple Wallet VP Jennifer Bailey:
Savings enables Apple Card users to grow their Daily Cash rewards over time, while also saving for the future.
Bailey says Savings adds value to Apple Card's Daily Cash benefit and offers another easy-to-use tool to help people lead healthier financial lives.
Transfer money from a linked bank account or Apple Cash to a Savings account. Users can withdraw monies to a connected bank account or Apple Cash card without costs.
Once set up, Apple Card customers can track their earnings via Wallet's Savings dashboard. This dashboard shows their account balance and interest.
This product targets younger people as the easiest way to start a savings account on the iPhone.
Why would a Gen Z account holder travel to the bank if their iPhone could be their bank?
Using this concept, Apple will transform the way we think about banking by 2030.
Two other nightmares keep bankers awake at night
Apple revealed two new features in early 2022 that banks and payment gateways hated.
Tap to Pay with Apple
Late Apple Pay
They startled the industry.
Tap To Pay converts iPhones into mobile POS card readers. Apple Pay Later is pushing the BNPL business in a consumer-friendly direction, hopefully ending dodgy lending practices.
Tap to Pay with Apple
iPhone POS
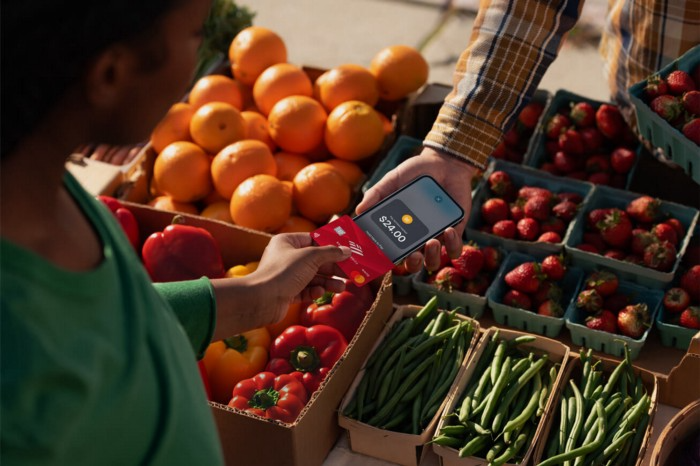
Millions of US merchants, from tiny shops to huge establishments, will be able to accept Apple Pay, contactless credit and debit cards, and other digital wallets with a tap.
No hardware or payment terminal is needed.
Revolutionary!
Stripe has previously launched this feature.
Tap to Pay on iPhone will provide companies with a secure, private, and quick option to take contactless payments and unleash new checkout experiences, said Bailey.
Apple's solution is ingenious. Brilliant!
Bailey says that payment platforms, app developers, and payment networks are making it easier than ever for businesses of all sizes to accept contactless payments and thrive.
I admire that Apple is offering this up to third-party services instead of closing off other functionalities.
Slow POS terminals, farewell.
Late Apple Pay
Pay Apple later.

Apple Pay Later enables US consumers split Apple Pay purchases into four equal payments over six weeks with no interest or fees.
The Apple ecosystem integration makes this BNPL scheme unique. Nonstick. No dumb forms.
Frictionless.
Just double-tap the button.
Apple Pay Later was designed with users' financial well-being in mind. Apple makes it easy to use, track, and pay back Apple Pay Later from Wallet.
Apple Pay Later can be signed up in Wallet or when using Apple Pay. Apple Pay Later can be used online or in an app that takes Apple Pay and leverages the Mastercard network.
Apple Pay Order Tracking helps consumers access detailed receipts and order tracking in Wallet for Apple Pay purchases at participating stores.
Bad BNPL suppliers, goodbye.
Most bankers will be caught in Apple's eye playing mini golf in high-rise offices.
The big problem:
Banks still think about features and big numbers just like other smartphone makers did not too long ago.
Apple thinks about effortlessness, seamlessness, and frictionlessness that just work through integrated hardware and software.
Let me know what you think Apple’s next power moves in the banking industry could be.
You might also like

Frederick M. Hess
2 years ago
The Lessons of the Last Two Decades for Education Reform
My colleague Ilana Ovental and I examined pandemic media coverage of education at the end of last year. That analysis examined coverage changes. We tracked K-12 topic attention over the previous two decades using Lexis Nexis. See the results here.
I was struck by how cleanly the past two decades can be divided up into three (or three and a half) eras of school reform—a framing that can help us comprehend where we are and how we got here. In a time when epidemic, political unrest, frenetic news cycles, and culture war can make six months seem like a lifetime, it's worth pausing for context.
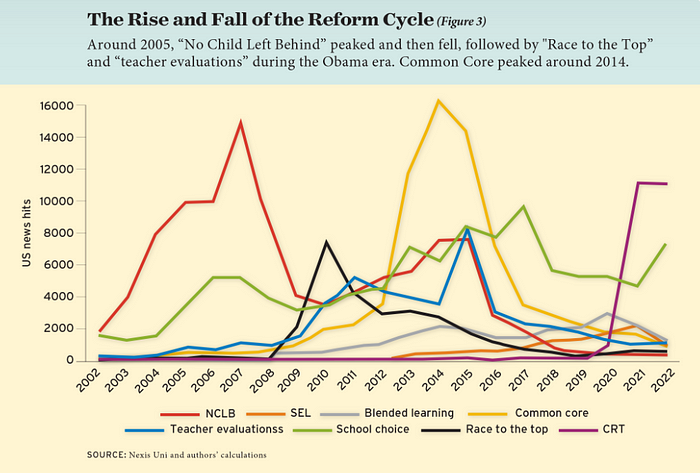
If you look at the peaks in the above graph, the 21st century looks to be divided into periods. The decade-long rise and fall of No Child Left Behind began during the Bush administration. In a few years, NCLB became the dominant K-12 framework. Advocates and financiers discussed achievement gaps and measured success with AYP.
NCLB collapsed under the weight of rigorous testing, high-stakes accountability, and a race to the bottom by the Obama years. Obama's Race to the Top garnered attention, but its most controversial component, the Common Core State Standards, rose quickly.
Academic standards replaced assessment and accountability. New math, fiction, and standards were hotly debated. Reformers and funders chanted worldwide benchmarking and systems interoperability.
We went from federally driven testing and accountability to government encouraged/subsidized/mandated (pick your verb) reading and math standardization. Last year, Checker Finn and I wrote The End of School Reform? The 2010s populist wave thwarted these objectives. The Tea Party, Occupy Wall Street, Black Lives Matter, and Trump/MAGA all attacked established institutions.
Consequently, once the Common Core fell, no alternative program emerged. Instead, school choice—the policy most aligned with populist suspicion of institutional power—reached a half-peak. This was less a case of choice erupting to prominence than of continuous growth in a vacuum. Even with Betsy DeVos' determined, controversial efforts, school choice received only half the media attention that NCLB and Common Core did at their heights.
Recently, culture clash-fueled attention to race-based curriculum and pedagogy has exploded (all playing out under the banner of critical race theory). This third, culture war-driven wave may not last as long as the other waves.
Even though I don't understand it, the move from slow-building policy debate to fast cultural confrontation over two decades is notable. I don't know if it's cyclical or permanent, or if it's about schooling, media, public discourse, or all three.
One final thought: After doing this work for decades, I've noticed how smoothly advocacy groups, associations, and other activists adapt to the zeitgeist. In 2007, mission statements focused on accomplishment disparities. Five years later, they promoted standardization. Language has changed again.
Part of this is unavoidable and healthy. Chasing currents can also make companies look unprincipled, promote scepticism, and keep them spinning the wheel. Bearing in mind that these tides ebb and flow may give educators, leaders, and activists more confidence to hold onto their values and pause when they feel compelled to follow the crowd.

Andy Raskin
3 years ago
I've Never Seen a Sales Deck This Good

It’s Zuora’s, and it’s brilliant. Here’s why.
My friend Tim got a sales position at a Series-C software company that garnered $60 million from A-list investors. He's one of the best salespeople I know, yet he emailed me after starting to struggle.
Tim has a few modest clients. “Big companies ignore my pitch”. Tim said.
I love helping teams write the strategic story that drives sales, marketing, and fundraising. Tim and I had lunch at Amber India on Market Street to evaluate his deck.
After a feast, I asked Tim when prospects tune out.
He said, “several slides in”.
Intent on maximizing dining ROI, Tim went back to the buffet for seconds. When he returned, I pulled out my laptop and launched into a Powerpoint presentation.
“What’s this?” Tim asked.
“This,” I said, “is the greatest sales deck I have ever seen.”
Five Essentials of a Great Sales Narrative
I showed Tim a sales slide from IPO-bound Zuora, which sells a SaaS platform for subscription billing. Zuora supports recurring payments (e.g. enterprise software).
Ex-Zuora salesman gave me the deck, saying it helped him close his largest business. (I don't know anyone who works at Zuora.) After reading this, a few Zuora employees contacted me.)
Tim abandoned his naan in a pool of goat curry and took notes while we discussed the Zuora deck.
We remarked how well the deck led prospects through five elements:
(The ex-Zuora salesperson begged me not to release the Zuora deck publicly.) All of the images below originate from Zuora's website and SlideShare channel.)
#1. Name a Significant Change in the World
Don't start a sales presentation with mentioning your product, headquarters, investors, clients, or yourself.
Name the world shift that raises enormous stakes and urgency for your prospect.
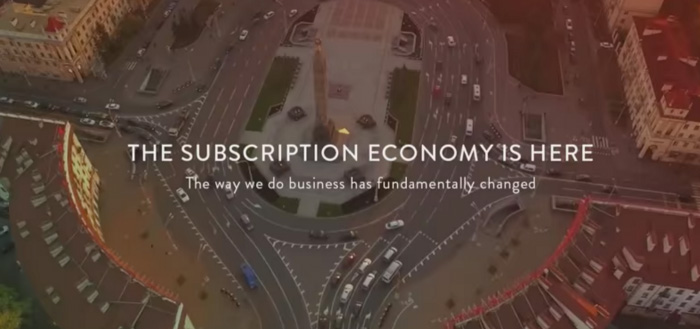
Every Zuora sales deck begins with this slide:
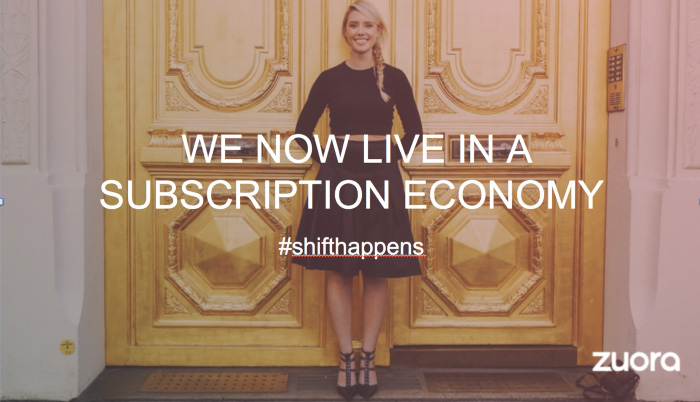
Zuora coined the term subscription economy to describe a new market where purchasers prefer regular service payments over outright purchases. Zuora then shows a slide with the change's history.
Most pitch recommendation advises starting with the problem. When you claim a problem, you put prospects on the defensive. They may be unaware of or uncomfortable admitting the situation.
When you highlight a global trend, prospects open up about how it affects them, worries them, and where they see opportunity. You capture their interest. Robert McKee says:
…what attracts human attention is change. …if the temperature around you changes, if the phone rings — that gets your attention. The way in which a story begins is a starting event that creates a moment of change.
#2. Show There’ll Be Winners and Losers
Loss aversion affects all prospects. They avoid a loss by sticking with the status quo rather than risking a gain by changing.
To fight loss aversion, show how the change will create winners and losers. You must show both
that if the prospect can adjust to the modification you mentioned, the outcome will probably be quite favorable; and
That failing to do so is likely to have an unacceptable negative impact on the prospect's future
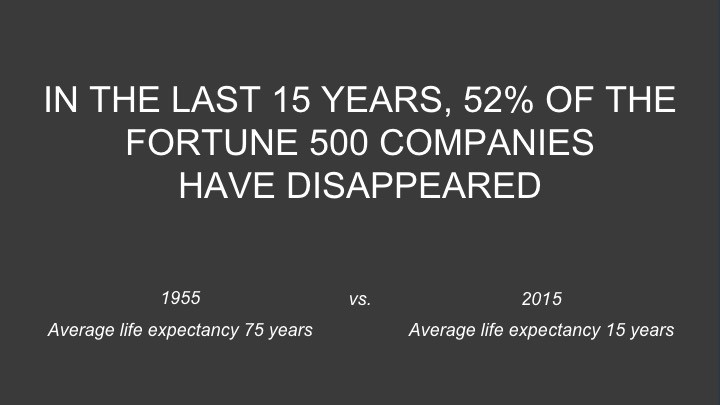
Zuora shows a mass extinction among Fortune 500 firms.
…and then showing how the “winners” have shifted from product ownership to subscription services. Those include upstarts…
…as well as rejuvenated incumbents:
To illustrate, Zuora asks:
Winners utilize Zuora's subscription service models.
#3. Tease the Promised Land
It's tempting to get into product or service details now. Resist that urge.
Prospects won't understand why product/service details are crucial if you introduce them too soon, therefore they'll tune out.
Instead, providing a teaser image of the happily-ever-after your product/service will assist the prospect reach.
Your Promised Land should be appealing and hard to achieve without support. Otherwise, why does your company exist?
Zuora shows this Promised Land slide after explaining that the subscription economy will have winners and losers.
Not your product or service, but a new future state.
(I asked my friend Tim to describe his Promised Land, and he answered, "You’ll have the most innovative platform for ____." Nope: the Promised Land isn't possessing your technology, but living with it.)
Your Promised Land helps prospects market your solution to coworkers after your sales meeting. Your coworkers will wonder what you do without you. Your prospects are more likely to provide a persuasive answer with a captivating Promised Land.
#4. Present Features as “Mystic Gifts” for Overcoming Difficulties on the Road to the Promised Land
Successful sales decks follow the same format as epic films and fairy tales. Obi Wan gives Luke a lightsaber to help him destroy the Empire. You're Gandalf, helping Frodo destroy the ring. Your prospect is Cinderella, and you're her fairy godmother.
Position your product or service's skills as mystical gifts to aid your main character (prospect) achieve the Promised Land.
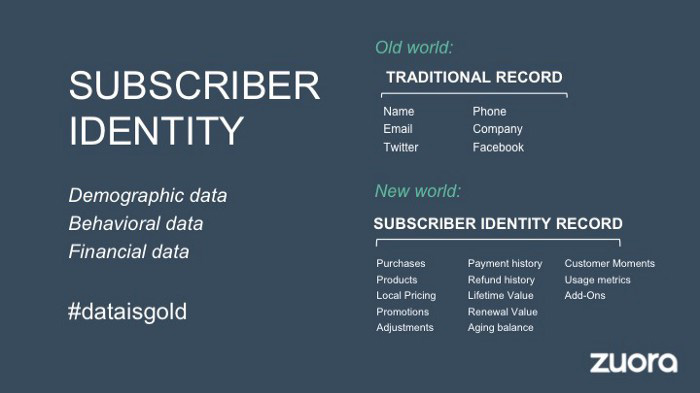
Zuora's client record slide is shown above. Without context, even the most technical prospect would be bored.
Positioned in the context of shifting from an “old” to a “new world”, it's the foundation for a compelling conversation with prospects—technical and otherwise—about why traditional solutions can't reach the Promised Land.
#5. Show Proof That You Can Make the Story True.
In this sense, you're promising possibilities that if they follow you, they'll reach the Promised Land.
The journey to the Promised Land is by definition rocky, so prospects are right to be cautious. The final part of the pitch is proof that you can make the story come true.
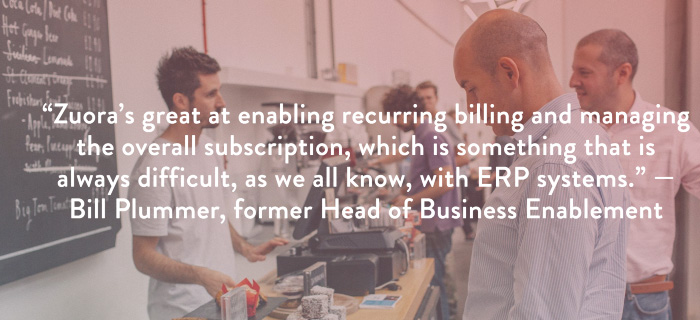
The most convincing proof is a success story about how you assisted someone comparable to the prospect. Zuora's sales people use a deck of customer success stories, but this one gets the essence.
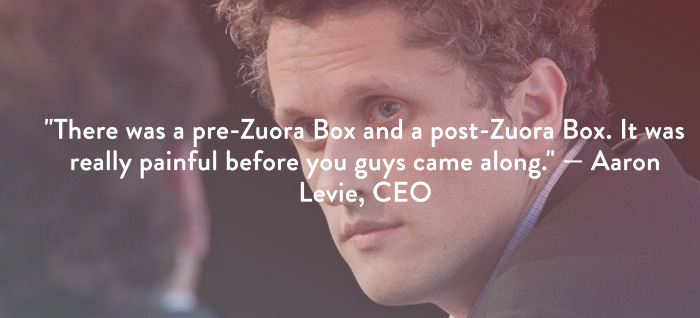
I particularly appreciate this one from an NCR exec (a Zuora customer), which relates more strongly to Zuora's Promised Land:
Not enough successful customers? Product demos are the next best evidence, but features should always be presented in the context of helping a prospect achieve the Promised Land.
The best sales narrative is one that is told by everyone.
Success rarely comes from a fantastic deck alone. To be effective, salespeople need an organization-wide story about change, Promised Land, and Magic Gifts.
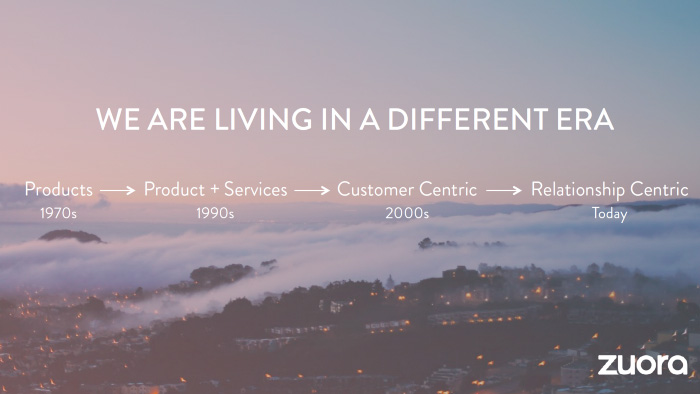
Zuora exemplifies this. If you hear a Zuora executive, including CEO Tien Tzuo, talk, you'll likely hear about the subscription economy and its winners and losers. This is the theme of the company's marketing communications, campaigns, and vision statement.
According to the ex-Zuora salesperson, company-wide story alignment made him successful.
The Zuora marketing folks ran campaigns and branding around this shift to the subscription economy, and [CEO] Tien [Tzuo] talked it up all the time. All of that was like air cover for my in-person sales ground attack. By the time I arrived, prospects were already convinced they had to act. It was the closest thing I’ve ever experienced to sales nirvana.
The largest deal ever
Tim contacted me three weeks after our lunch to tell me that prospects at large organizations were responding well to his new deck, which we modeled on Zuora's framework. First, prospects revealed their obstacles more quickly. The new pitch engages CFOs and other top gatekeepers better, he said.
A week later, Tim emailed that he'd signed his company's biggest agreement.
Next week, we’re headed back to Amber India to celebrate.

Asher Umerie
3 years ago
What is Bionic Reading?
Senses help us navigate a complicated world. They shape our worldview - how we hear, smell, feel, and taste. People claim a sixth sense, an intuitive capacity that extends perception.
Our brain is a half-pool of grey and white matter that stores data from our senses. Brains provide us context, so zombies' obsession makes sense.
Bionic reading uses the brain's visual information and context to simplify text comprehension.
Stay with me.
What is Bionic Reading?
Bionic reading is a software application established by Swiss typographic designer Renato Casutt. The term honors the brain (bio) and technology's collaboration to better text comprehension.
The image above shows two similar paragraphs with bionic reading.
Notice anything yet?
This Twitter user did.
I did too...
Image text describes bionic reading-
New method to aid reading by using artificial fixation points. The reader focuses on the highlighted starting letters, and the brain completes the word.
How is Bionic Reading possible?
Do you remember seeing social media posts asking you to stare at a black dot for 30 seconds (or more)? You blink and see an after-image on your wall.
Our brains are skilled at identifying patterns and'seeing' familiar objects, therefore optical illusions are conceivable.
Brain and sight collaborate well. Text comprehension proves it.
Considering evolutionary patterns, humans' understanding skills may be cosmic luck.
Scientists don't know why people can read and write, but they do know what reading does to the brain.
One portion of your brain recognizes words, while another analyzes their meaning. Fixation, saccade, and linguistic transparency/opacity aid.
Let's explain some terms.
-
Fixation is how the eyes move when reading. It's where you look. If the eyes fixate less, a reader can read quicker. [Eye fixation is a physiological process](Eye fixation is a naturally occurring physiological process) impacted by the reader's vocabulary, vision span, and text familiarity.
-
Saccade - Pause and look around. That's a saccade. Rapid eye movements that alter the place of fixation, as reading text or looking around a room. They can happen willingly (when you choose) or instinctively, even when your eyes are fixed.
-
Linguistic transparency and opacity analyze how well a composite word or phrase may be deduced from its constituents.
The Bionic reading website compares these tools.
Text highlights lead the eye. Fixation, saccade, and opacity can transfer visual stimuli to text, changing typeface.
## Final Thoughts on Bionic Reading
I'm excited about how this could influence my long-term assimilation and productivity.
This technology is still in development, with prototypes working on only a few apps. Like any new tech, it will be criticized.
I'll be watching Bionic Reading closely. Comment on it!