


More on Technology

Mark Schaefer
3 years ago
20 Fun Uses for ChatGPT
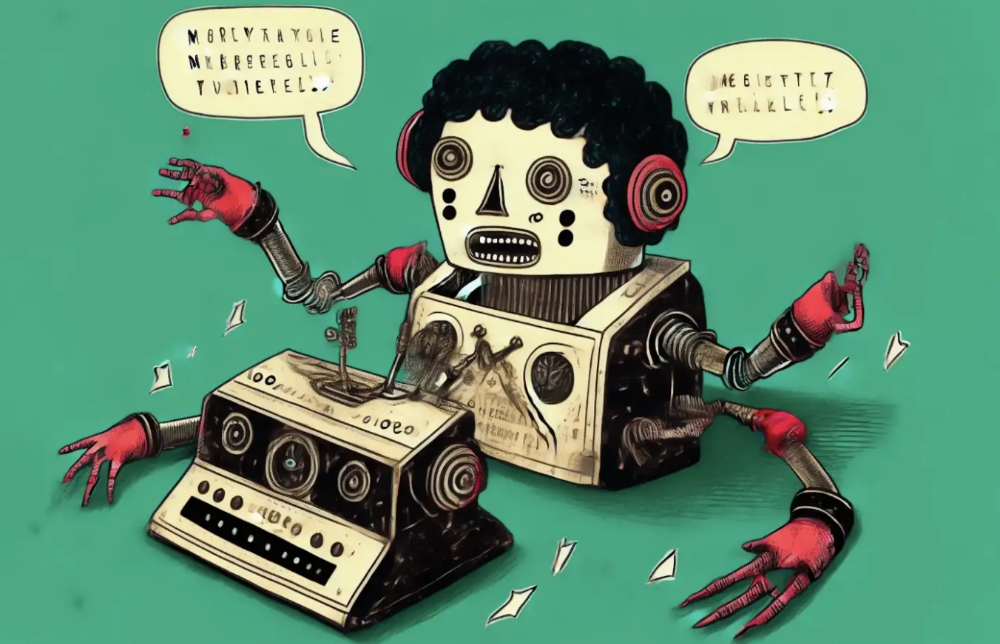
Our RISE community is stoked on ChatGPT. ChatGPT has countless uses.
Early on. Companies are figuring out the legal and ethical implications of AI's content revolution. Using AI for everyday tasks is cool.
So I challenged RISE friends... Let's have fun and share non-obvious uses.
Onward!
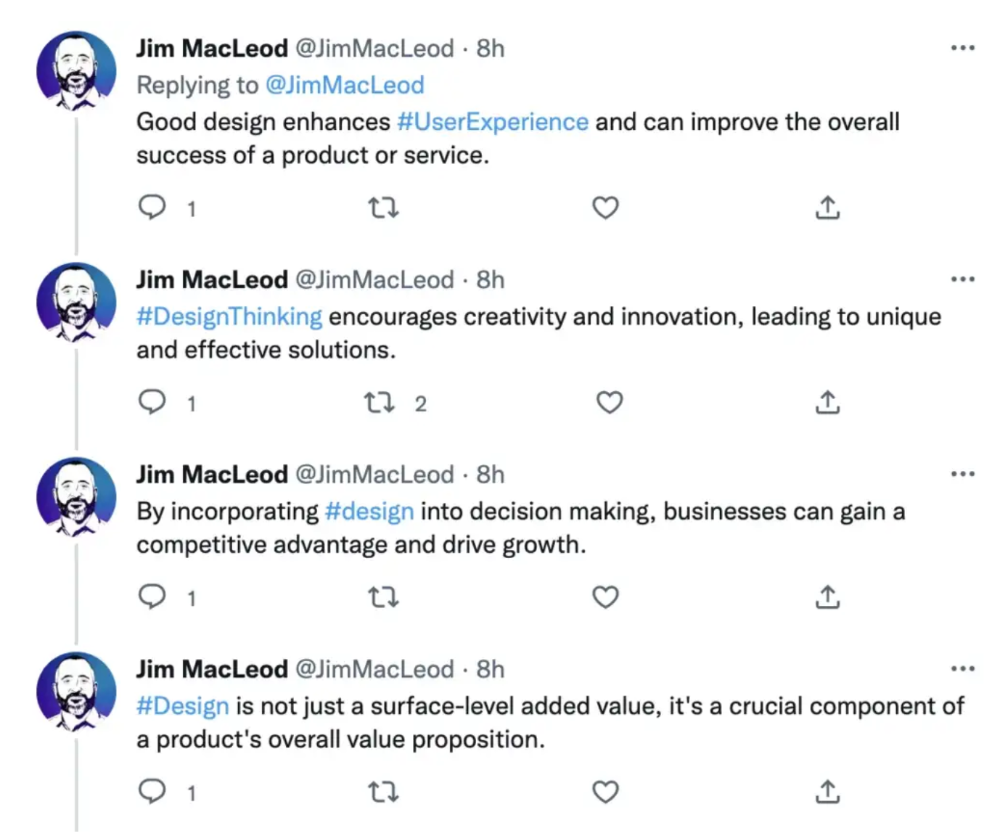
1. Tweet
Jim MacLeod requested a design-themed Twitter thread from ChatGPT.
2. Novelize
Giuseppe Fratoni writes novels.
"This is amazing!" Impotent. I asked about writing, mystery novels, and jazz.
"Develop a mystery novel plot in which a disillusioned homicide detective hunts a serial killer who targets jazz musicians who play Autumn Leaves."
"I have:
Detective James Thompson is a seasoned veteran of the Homicide department, but lately he’s been feeling burnt out and disillusioned. His latest case, the murder of a young jazz pianist who was found brutally killed in his home, only serves to deepen his sense of despair … (much more provided)
3. Question-and-answer sessions
Bliss recommends:
You have a guest speaker and want to ask audience questions.
Pre-generate questions with ChatGPT. "And here's a question from our AI?"
The conference is about Western water scarcity. Water management expert. My AI question was...
Which desalination-related questions should I ask an expert?
ChatGPT said...
How is desalination currently being used around the world, and in what types of locations is it most effective?
What are the potential advantages and disadvantages of using desalination to provide fresh water?
What are some of the key challenges and limitations of desalination technology, and how are they being addressed?
4. Game-making
Richard's a board game expert. He suggests using ChatGPT to plan games. Note: Some people have started getting help solving crossword puzzle clues.
5. Matchmaking
Tanya Thompson thinks it helps dating. ChatGPT:
Here are some flirty first-message ideas for dating apps:
I noticed you from afar. I had to say hi and see if we clicked.
Your profile picture is gorgeous. I'm obsessed with your [Feature] and want to know you better.
I don't usually message first, but I had to. You're [Attractive Quality] and I can't wait to talk.”
Hello. Your profile intimidates me. I'm starstruck by your [Attractiveness]. (Many instances)
5. Solitude/anxiety
ChatGPT excels at one-on-one conversations.
PepperBrooks: "I'm sad and lonely."
ChatGPT: I’m sorry to hear that you’re feeling sad and lonely. It’s natural to feel down sometimes, but it’s important to remember that you’re not alone. There are many people who care about you and want to help you. It can be helpful to talk to someone about your feelings, whether it’s a close friend, family member, or mental health professional.
Sometimes, just expressing your thoughts and emotions to someone else can help to alleviate your sadness and loneliness. It’s also important to take care of yourself and do things that make you happy, such as spending time with loved ones, pursuing a hobby, or exercising. These things can help to improve your mood and make you feel more connected to others. Remember that you are strong and capable, and that you can get through this difficult time.
Daniel Nestle asked ChatGPT to generate journal prompts to help him deal with anxiety.
Write down the things that are causing you anxiety at the moment.
Describe a situation in which you felt anxious and how you coped with it.
Reflect on how your thoughts and beliefs contribute to your anxiety.
Write a letter to your anxiety, expressing your feelings and concerns
Imagine yourself in a calm and peaceful place, and describe it in detail.
(many more items followed)
6. Names
Continued Daniel:
Also, naming ideas.
Me: Name this drink. Japanese gin, unsweetened tonic, lime, Szechuan pepper, grapefruit.
ChatGPT: How about “Sakura Sunrise?” The name incorporates the Japanese gin and the citrus flavors of grapefruit and lime, and the word “sunrise” suggests a fresh and invigorating start to the day. Alternatively, you could go with something like “Peppered Grapefruit Gin Fizz” to emphasize the unique flavor combination of Szechuan pepper and grapefruit.
7. Translation on the go
Monks recommends: ChatGPT is a perfect mobile translation tool. Say you need help in Italy.
ME: Translate to Italian
Where is the nearest gas station?
ChatGPT: “La mia auto sta per esaurire il carburante, mi puoi dire dove si trova la stazione di servizio più vicina?”
8. Fitness
Monks added:
ME: In 3 months, I want to run 5km. Plan out how I can do this.
ChatGPT: Here's a 3-month plan to run 5km.
Start by walking for 15–20 minutes each day to build up your endurance and get your body used to regular exercise.
After a week of walking, begin incorporating short jogs into your routine. Start by jogging for 1–2 minutes at a time, with walking breaks in between. Gradually increase the length of your jogs and reduce the amount of time you spend walking.
Once you can jog for 10 minutes without stopping, start increasing the distance of your runs. Aim to run 1km without stopping and then gradually increase the distance over time.
In addition to your regular runs, incorporate strength training and stretching into your routine to improve your overall fitness and reduce the risk of injury.
(more details continued on)
9. Integrations and coding
10. Teacher lesson plans
Spencer Crandall saved time.
This morning, I wondered who has the hardest job. Teachers.
Many students, little time. ChatGPT could handle lesson planning. I tried it and got this.
Lesson Title: The History and Impact of Artificial Intelligence
Students will understand the history and development of AI and the potential positive and negative impacts on society.
AI timeline AI technologies and applications
Overview:
Introduce the topic of artificial intelligence, and explain that it refers to the development of computer systems and algorithms that can simulate human intelligence and behavior.
Show the timeline of significant events in the history of AI, and discuss the key milestones and developments in the field.
Show examples of AI technologies and applications, and explain how they are used in various industries and fields.
Discuss the potential positive and negative impacts of AI on society, including its potential to improve productivity, efficiency, and safety, as well as its potential to create new challenges and concerns, such as job displacement and ethical issues.
(many more details followed)
11. Find podcast guests.
Joeri Billast suggested:
Who should be on my Web3 podcast?
ChatGPT: Web3 marketing experts, influencers, and thought leaders make great podcast guests. These include Web3 marketers, content creators, business owners, entrepreneurs, and technologists. You could invite Web3 startups and organizations to your podcast.
Please give examples.
ChatGPT: Ideal Web3 marketing podcast guests include:
Tim Berner-Lee, inventor of the World Wide Web
Chris Dixon, general partner at Andreessen Horowitz
Vitalik Buterin, founder of Ethereum
Joe Lubin, founder of ConsenSys
Susan Fowler, author of Whistleblower
(many other suggestions)
12. Comments and reviews on social media
Lisa Monk thinks ChatGPT can help retail staff with social media.
She asked ChatGPT to "review this restaurant"
POSITIVE CUSTOMER REVIEW: I absolutely love this place. We eat out a lot however this place has topped it all. Perfect meals, amazing staff and the timing for it all was great! Special thanks to Sophie B (you rock) From your guests all the way from the Gold Coast, THANK YOU
ChatGPT REPLY: Thank you so much for your kind words and for taking the time to write a review. We are delighted to hear that you had such a great experience at our restaurant. We are thrilled that you enjoyed your meal and the service provided by Sophie. It’s always a pleasure to serve guests visiting from the Gold Coast and we are grateful for your support. We look forward to welcoming you back again soon. Thank you again for your positive review.
CUSTOMER REVIEW: Most average food, there is a nice view, But that’s about it
ChatGPT: Thank you for your review. We apologize if your dining experience was not up to your expectations. We strive to provide top-quality food and service to all of our customers, and we will take your feedback into consideration as we continue to improve. Thank you for letting us know about your experience.
13. Crime-fighting
Zack Seipert said, "I researched some famous unsolved murders, and ChatGPT laid out the crime, suspects, clues, and more." I bet experienced detectives could solve some of these cold cases.
14. Reduce bias
Joanne Taylor struggles to remove biases from her writing. She asked ChatGPT for ideas.
I asked ChatGPT to check a text for racial bias, and it did well.
15. Furnishings
I designed a small, unique table using ChatGPT and MidJourney. I edited ChatGPT's idea for clarity and brevity before entering it in MidJourney.
Results:

16. Serialize a novel
Scott Scowcoft led ChatCPT through iterations of a story text to create serialized novel frames. You can view this here.
17. Interview preparation
I was on a sales podcast. Although this is marketing-related, it's not my forte. I asked ChatGPT for help with a sales interview. Response:
Here are some interview questions about the future of sales and how to answer them.
How will technology affect sales in the future?
Technology will impact sales in the coming years. Automation and AI could be used to handle routine tasks, and data analysis and CRM could become more important. E-commerce and online sales channels are also reshaping the sales landscape.
How will the salesperson's role change?
Future sales roles may change in response to changing customer needs and expectations. Salespeople must be knowledgeable and consultative to help customers navigate complex products and services. Increasing importance of data analysis and CRM tools will require salespeople to understand and use technology effectively.
Future sales professionals will need what skills?
Future salespeople will need many skills. Sales professionals must have strong communication and interpersonal skills, as well as product and service knowledge and the ability to use data analysis and CRM tools effectively. Adapting to changing customer needs and staying current on industry trends will also be important for sales success.
18. Gift ideas
I need Christmas gift ideas for my wife. I asked:
Suggest a gift idea under $200 for a middle-aged woman who loves The Eagles.
A middle-aged woman who loves The Eagles might like a vinyl record of "Hotel California" or "The Long Run." Many music fans enjoy the unique sound and experience of vinyl records.
Pair the record with a high-quality record player for a complete gift. The vinyl record and record player should fit within your $200 budget for an Eagles fan.
19. Explaining complex concepts
I entered: Explain quantum physics to me as if I were 10 years old.
Quantum physics is a branch of science that studies how tiny particles, like atoms and subatomic particles, behave. These particles are so small that they don’t always follow the same rules as the things we can see and touch every day.
For example, sometimes they can be in two places at the same time, or they can be friends with each other even if they are far apart. This might sound strange, but it’s what scientists have learned from studying these tiny particles. Quantum physics helps us understand how the world works at a very small scale, and it can also help us make new technologies, like computers that are much faster than the ones we have today.
20. AP-style editing
Blogs, journals, and books follow AP Style. I asked ChatGPT to "edit using AP Style" and it did a great job.
And then... "Write a catchy headline for a blog post about 16 ChatGPT uses"
Here are some possible blog post titles for 20 creative ChatGPT uses:
“20 Fun and Creative Ways to Use ChatGPT: From Games to Quizzes and More”
“The Ultimate Guide to Using ChatGPT for Entertainment and Creativity”
“20 Reasons to Use ChatGPT: How it Can Enhance Your Gaming, Storytelling, and More”
20 Entertaining Uses for ChatGPT You Never Knew Were Possible”
“Unleash Your Imagination with ChatGPT: 16 Creative and Fun Ways to Use it”
In a previous post, I said ChatGPT will change marketing careers forever. I have never made a statement like that in my life. Even in the early days of the internet, people were cautious.
This technology was just released two weeks ago, and over a million people are already using it. This is the fastest technology adoption in history.
Today's post offers inventive and entertaining ideas, but it's just the beginning. ChatGPT writes code, music, and papers.

Duane Michael
3 years ago
Don't Fall Behind: 7 Subjects You Must Understand to Keep Up with Technology
As technology develops, you should stay up to date

You don't want to fall behind, do you? This post covers 7 tech-related things you should know.
You'll learn how to operate your computer (and other electronic devices) like an expert and how to leverage the Internet and social media to create your brand and business. Read on to stay relevant in today's tech-driven environment.
You must learn how to code.
Future-language is coding. It's how we and computers talk. Learn coding to keep ahead.
Try Codecademy or Code School. There are also numerous free courses like Coursera or Udacity, but they take a long time and aren't necessarily self-paced, so it can be challenging to find the time.
Artificial intelligence (AI) will transform all jobs.
Our skillsets must adapt with technology. AI is a must-know topic. AI will revolutionize every employment due to advances in machine learning.
Here are seven AI subjects you must know.
What is artificial intelligence?
How does artificial intelligence work?
What are some examples of AI applications?
How can I use artificial intelligence in my day-to-day life?
What jobs have a high chance of being replaced by artificial intelligence and how can I prepare for this?
Can machines replace humans? What would happen if they did?
How can we manage the social impact of artificial intelligence and automation on human society and individual people?
Blockchain Is Changing the Future
Few of us know how Bitcoin and blockchain technology function or what impact they will have on our lives. Blockchain offers safe, transparent, tamper-proof transactions.
It may alter everything from business to voting. Seven must-know blockchain topics:
Describe blockchain.
How does the blockchain function?
What advantages does blockchain offer?
What possible uses for blockchain are there?
What are the dangers of blockchain technology?
What are my options for using blockchain technology?
What does blockchain technology's future hold?
Cryptocurrencies are here to stay
Cryptocurrencies employ cryptography to safeguard transactions and manage unit creation. Decentralized cryptocurrencies aren't controlled by governments or financial institutions.

Bitcoin, the first cryptocurrency, was launched in 2009. Cryptocurrencies can be bought and sold on decentralized exchanges.
Bitcoin is here to stay.
Bitcoin isn't a fad, despite what some say. Since 2009, Bitcoin's popularity has grown. Bitcoin is worth learning about now. Since 2009, Bitcoin has developed steadily.
With other cryptocurrencies emerging, many people are wondering if Bitcoin still has a bright future. Curiosity is natural. Millions of individuals hope their Bitcoin investments will pay off since they're popular now.
Thankfully, they will. Bitcoin is still running strong a decade after its birth. Here's why.
The Internet of Things (IoT) is no longer just a trendy term.
IoT consists of internet-connected physical items. These items can share data. IoT is young but developing fast.
20 billion IoT-connected devices are expected by 2023. So much data! All IT teams must keep up with quickly expanding technologies. Four must-know IoT topics:
Recognize the fundamentals: Priorities first! Before diving into more technical lingo, you should have a fundamental understanding of what an IoT system is. Before exploring how something works, it's crucial to understand what you're working with.
Recognize Security: Security does not stand still, even as technology advances at a dizzying pace. As IT professionals, it is our duty to be aware of the ways in which our systems are susceptible to intrusion and to ensure that the necessary precautions are taken to protect them.
Be able to discuss cloud computing: The cloud has seen various modifications over the past several years once again. The use of cloud computing is also continually changing. Knowing what kind of cloud computing your firm or clients utilize will enable you to make the appropriate recommendations.
Bring Your Own Device (BYOD)/Mobile Device Management (MDM) is a topic worth discussing (MDM). The ability of BYOD and MDM rules to lower expenses while boosting productivity among employees who use these services responsibly is a major factor in their continued growth in popularity.
IoT Security is key
As more gadgets connect, they must be secure. IoT security includes securing devices and encrypting data. Seven IoT security must-knows:
fundamental security ideas
Authorization and identification
Cryptography
electronic certificates
electronic signatures
Private key encryption
Public key encryption
Final Thoughts
With so much going on in the globe, it can be hard to stay up with technology. We've produced a list of seven tech must-knows.

Tom Smykowski
3 years ago
CSS Scroll-linked Animations Will Transform The Web's User Experience
We may never tap again in ten years.
I discussed styling websites and web apps on smartwatches in my earlier article on W3C standardization.
The Parallax Chronicles
Section containing examples and flying objects
Another intriguing Working Draft I found applies to all devices, including smartphones.
These pages may have something intriguing. Take your time. Return after scrolling:
What connects these three pages?
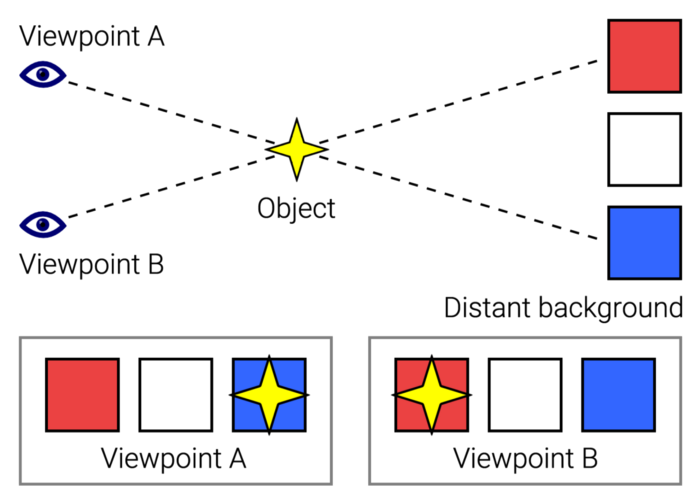
JustinWick at English Wikipedia • CC-BY-SA-3.0
Scroll-linked animation, commonly called parallax, is the effect.
WordPress theme developers' quick setup and low-code tools made the effect popular around 2014.
Parallax: Why Designers Love It
The chapter that your designer shouldn't read
Online video playback required searching, scrolling, and clicking ten years ago. Scroll and click four years ago.
Some video sites let you swipe to autoplay the next video from an endless list.
UI designers create scrollable pages and apps to accommodate the behavioral change.
Web interactivity used to be mouse-based. Clicking a button opened a help drawer, and hovering animated it.
However, a large page with more material requires fewer buttons and less interactiveness.
Designers choose scroll-based effects. Design and frontend developers must fight the trend but prepare for the worst.
How to Create Parallax
The component that you might want to show the designer
JavaScript-based effects track page scrolling and apply animations.
Javascript libraries like lax.js simplify it.
Using it needs a lot of human mathematical and physical computations.
Your asset library must also be prepared to display your website on a laptop, television, smartphone, tablet, foldable smartphone, and possibly even a microwave.
Overall, scroll-based animations can be solved better.
CSS Scroll-linked Animations
CSS makes sense since it's presentational. A Working Draft has been laying the groundwork for the next generation of interactiveness.
The new CSS property scroll-timeline powers the feature, which MDN describes well.
Before testing it, you should realize it is poorly supported:
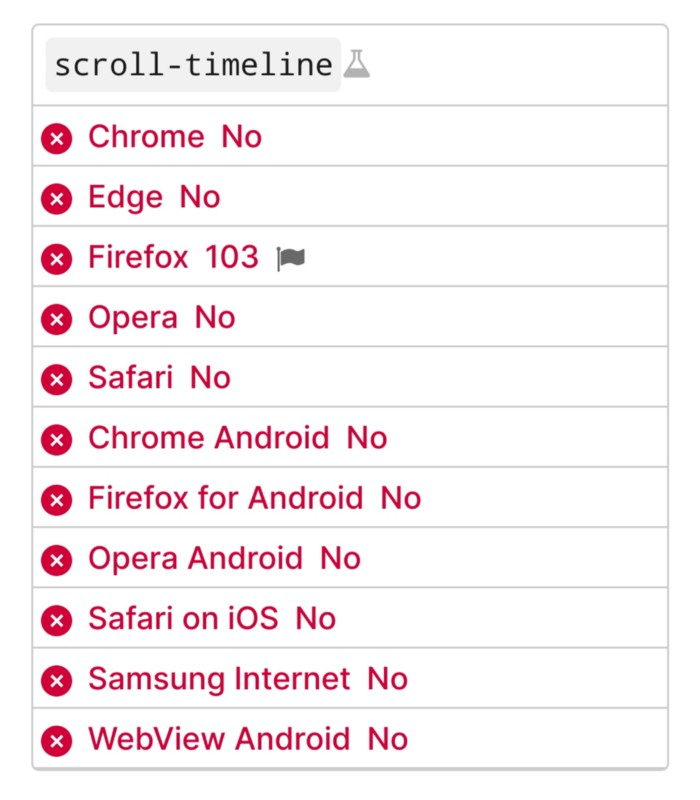
Firefox 103 currently supports it.
There is also a polyfill, with some demo examples to explore.
Summary
Web design was a protracted process. Started with pages with static backdrop images and scrollable text. Artists and designers may use the scroll-based animation CSS API to completely revamp our web experience.
It's a promising frontier. This post may attract a future scrollable web designer.
Ps. I have created flashcards for HTML, Javascript etc. Check them out!
You might also like
Isobel Asher Hamilton
3 years ago
$181 million in bitcoin buried in a dump. $11 million to get them back
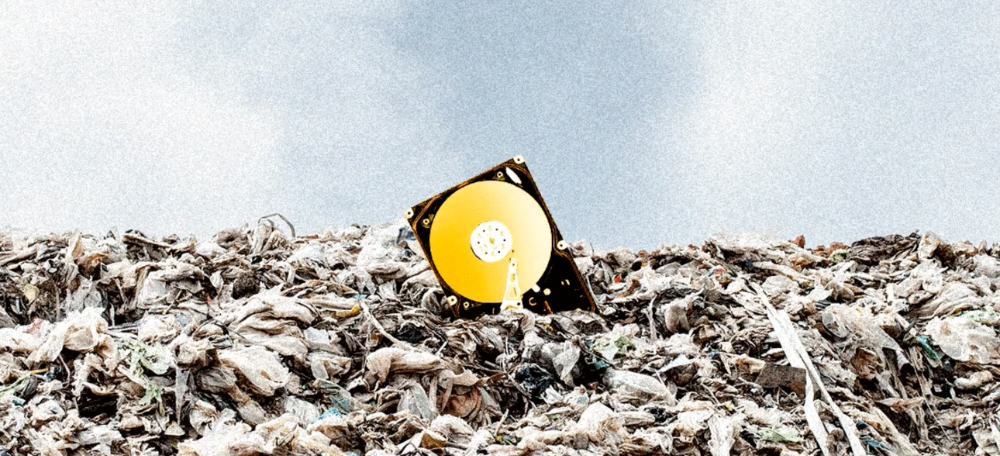
James Howells lost 8,000 bitcoins. He has $11 million to get them back.
His life altered when he threw out an iPhone-sized hard drive.
Howells, from the city of Newport in southern Wales, had two identical laptop hard drives squirreled away in a drawer in 2013. One was blank; the other had 8,000 bitcoins, currently worth around $181 million.
He wanted to toss out the blank one, but the drive containing the Bitcoin went to the dump.
He's determined to reclaim his 2009 stash.
Howells, 36, wants to arrange a high-tech treasure hunt for bitcoins. He can't enter the landfill.

Newport's city council has rebuffed Howells' requests to dig for his hard drive for almost a decade, stating it would be expensive and environmentally destructive.
I got an early look at his $11 million idea to search 110,000 tons of trash. He expects submitting it to the council would convince it to let him recover the hard disk.
110,000 tons of trash, 1 hard drive
Finding a hard disk among heaps of trash may seem Herculean.
Former IT worker Howells claims it's possible with human sorters, robot dogs, and an AI-powered computer taught to find hard drives on a conveyor belt.
His idea has two versions, depending on how much of the landfill he can search.
His most elaborate solution would take three years and cost $11 million to sort 100,000 metric tons of waste. Scaled-down version costs $6 million and takes 18 months.
He's created a team of eight professionals in AI-powered sorting, landfill excavation, garbage management, and data extraction, including one who recovered Columbia's black box data.
The specialists and their companies would be paid a bonus if they successfully recovered the bitcoin stash.
Howells: "We're trying to commercialize this project."
Howells claimed rubbish would be dug up by machines and sorted near the landfill.
Human pickers and a Max-AI machine would sort it. The machine resembles a scanner on a conveyor belt.
Remi Le Grand of Max-AI told us it will train AI to recognize Howells-like hard drives. A robot arm would select candidates.
Howells has added security charges to his scheme because he fears people would steal the hard drive.
He's budgeted for 24-hour CCTV cameras and two robotic "Spot" canines from Boston Dynamics that would patrol at night and look for his hard drive by day.
Howells said his crew met in May at the Celtic Manor Resort outside Newport for a pitch rehearsal.
Richard Hammond's narrative swings from banal to epic.
Richard Hammond filmed the meeting and created a YouTube documentary on Howells.
Hammond said of Howells' squad, "They're committed and believe in him and the idea."
Hammond: "It goes from banal to gigantic." "If I were in his position, I wouldn't have the strength to answer the door."
Howells said trash would be cleaned and repurposed after excavation. Reburying the rest.
"We won't pollute," he declared. "We aim to make everything better."
After the project is finished, he hopes to develop a solar or wind farm on the dump site. The council is unlikely to accept his vision soon.
A council representative told us, "Mr. Howells can't convince us of anything." "His suggestions constitute a significant ecological danger, which we can't tolerate and are forbidden by our permit."
Will the recovered hard drive work?
The "platter" is a glass or metal disc that holds the hard drive's data. Howells estimates 80% to 90% of the data will be recoverable if the platter isn't damaged.
Phil Bridge, a data-recovery expert who consulted Howells, confirmed these numbers.
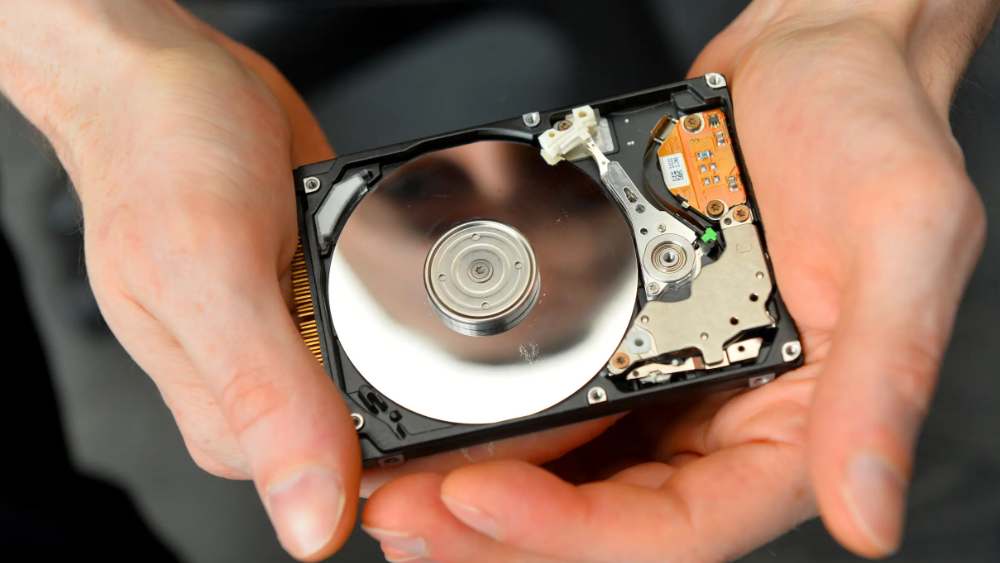
If the platter is broken, Bridge adds, data recovery is unlikely.
Bridge says he was intrigued by the proposal. "It's an intriguing case," he added. Helping him get it back and proving everyone incorrect would be a great success story.
Who'd pay?
Swiss and German venture investors Hanspeter Jaberg and Karl Wendeborn told us they would fund the project if Howells received council permission.
Jaberg: "It's a needle in a haystack and a high-risk investment."
Howells said he had no contract with potential backers but had discussed the proposal in Zoom meetings. "Until Newport City Council gives me something in writing, I can't commit," he added.
Suppose he finds the bitcoins.
Howells said he would keep 30% of the data, worth $54 million, if he could retrieve it.
A third would go to the recovery team, 30% to investors, and the remainder to local purposes, including gifting £50 ($61) in bitcoin to each of Newport's 150,000 citizens.
Howells said he opted to spend extra money on "professional firms" to help convince the council.
What if the council doesn't approve?
If Howells can't win the council's support, he'll sue, claiming its actions constitute a "illegal embargo" on the hard drive. "I've avoided that path because I didn't want to cause complications," he stated. I wanted to cooperate with Newport's council.
Howells never met with the council face-to-face. He mentioned he had a 20-minute Zoom meeting in May 2021 but thought his new business strategy would help.
He met with Jessica Morden on June 24. Morden's office confirmed meeting.
After telling the council about his proposal, he can only wait. "I've never been happier," he said. This is our most professional operation, with the best employees.
The "crypto proponent" buys bitcoin every month and sells it for cash.
Howells tries not to think about what he'd do with his part of the money if the hard disk is found functional. "Otherwise, you'll go mad," he added.
This post is a summary. Read the full article here.

Isaac Benson
3 years ago
What's the difference between Proof-of-Time and Proof-of-History?

Blockchain validates transactions with consensus algorithms. Bitcoin and Ethereum use Proof-of-Work, while Polkadot and Cardano use Proof-of-Stake.
Other consensus protocols are used to verify transactions besides these two. This post focuses on Proof-of-Time (PoT), used by Analog, and Proof-of-History (PoH), used by Solana as a hybrid consensus protocol.
PoT and PoH may seem similar to users, but they are actually very different protocols.
Proof-of-Time (PoT)
Analog developed Proof-of-Time (PoT) based on Delegated Proof-of-Stake (DPoS). Users select "delegates" to validate the next block in DPoS. PoT uses a ranking system, and validators stake an equal amount of tokens. Validators also "self-select" themselves via a verifiable random function."
The ranking system gives network validators a performance score, with trustworthy validators with a long history getting higher scores. System also considers validator's fixed stake. PoT's ledger is called "Timechain."
Voting on delegates borrows from DPoS, but there are changes. PoT's first voting stage has validators (or "time electors" putting forward a block to be included in the ledger).
Validators are chosen randomly based on their ranking score and fixed stake. One validator is chosen at a time using a Verifiable Delay Function (VDF).
Validators use a verifiable delay function to determine if they'll propose a Timechain block. If chosen, they validate the transaction and generate a VDF proof before submitting both to other Timechain nodes.
This leads to the second process, where the transaction is passed through 1,000 validators selected using the same method. Each validator checks the transaction to ensure it's valid.
If the transaction passes, validators accept the block, and if over 2/3 accept it, it's added to the Timechain.
Proof-of-History (PoH)
Proof-of-History is a consensus algorithm that proves when a transaction occurred. PoH uses a VDF to verify transactions, like Proof-of-Time. Similar to Proof-of-Work, VDFs use a lot of computing power to calculate but little to verify transactions, similar to (PoW).
This shows users and validators how long a transaction took to verify.
PoH uses VDFs to verify event intervals. This process uses cryptography to prevent determining output from input.
The outputs of one transaction are used as inputs for the next. Timestamps record the inputs' order. This checks if data was created before an event.
PoT vs. PoH
PoT and PoH differ in that:
PoT uses VDFs to select validators (or time electors), while PoH measures time between events.
PoH uses a VDF to validate transactions, while PoT uses a ranking system.
PoT's VDF-elected validators verify transactions proposed by a previous validator. PoH uses a VDF to validate transactions and data.
Conclusion
Both Proof-of-Time (PoT) and Proof-of-History (PoH) validate blockchain transactions differently. PoT uses a ranking system to randomly select validators to verify transactions.
PoH uses a Verifiable Delay Function to validate transactions, verify how much time has passed between two events, and allow validators to quickly verify a transaction without malicious actors knowing the input.

Chris
2 years ago
What the World's Most Intelligent Investor Recently Said About Crypto
Cryptoshit. This thing is crazy to buy.
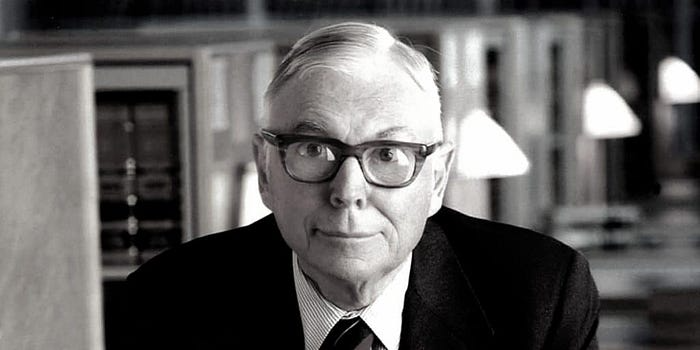
Charlie Munger is revered and powerful in finance.
Munger, vice chairman of Berkshire Hathaway, is noted for his wit, no-nonsense attitude to investment, and ability to spot promising firms and markets.
Munger's crypto views have upset some despite his reputation as a straight shooter.
“There’s only one correct answer for intelligent people, just totally avoid all the people that are promoting it.” — Charlie Munger
The Munger Interview on CNBC (4:48 secs)
This Monday, CNBC co-anchor Rebecca Quick interviewed Munger and brought up his 2007 statement, "I'm not allowed to have an opinion on this subject until I can present the arguments against my viewpoint better than the folks who are supporting it."
Great investing and life advice!
If you can't explain the opposing reasons, you're not informed enough to have an opinion.
In today's world, it's important to grasp both sides of a debate before supporting one.
Rebecca inquired:
Does your Wall Street Journal article on banning cryptocurrency apply? If so, would you like to present the counterarguments?
Mungers reply:
I don't see any viable counterarguments. I think my opponents are idiots, hence there is no sensible argument against my position.
Consider his words.
Do you believe Munger has studied both sides?
He said, "I assume my opponents are idiots, thus there is no sensible argument against my position."
This is worrisome, especially from a guy who once encouraged studying both sides before forming an opinion.
Munger said:
National currencies have benefitted humanity more than almost anything else.
Hang on, I think we located the perpetrator.
Munger thinks crypto will replace currencies.
False.
I doubt he studied cryptocurrencies because the name is deceptive.
He misread a headline as a Dollar destroyer.
Cryptocurrencies are speculations.
Like Tesla, Amazon, Apple, Google, Microsoft, etc.
Crypto won't replace dollars.
In the interview with CNBC, Munger continued:
“I’m not proud of my country for allowing this crap, what I call the cryptoshit. It’s worthless, it’s no good, it’s crazy, it’ll do nothing but harm, it’s anti-social to allow it.” — Charlie Munger
Not entirely inaccurate.
Daily cryptos are established solely to pump and dump regular investors.
Let's get into Munger's crypto aversion.
Rat poison is bitcoin.
Munger famously dubbed Bitcoin rat poison and a speculative bubble that would implode.
Partially.
But the bubble broke. Since 2021, the market has fallen.
Scam currencies and NFTs are being eliminated, which I like.
Whoa.
Why does Munger doubt crypto?
Mungers thinks cryptocurrencies has no intrinsic value.
He worries about crypto fraud and money laundering.
Both are valid issues.
Yet grouping crypto is intellectually dishonest.
Ethereum, Bitcoin, Solana, Chainlink, Flow, and Dogecoin have different purposes and values (not saying they’re all good investments).
Fraudsters who hurt innocents will be punished.
Therefore, complaining is useless.
Why not stop it? Repair rather than complain.
Regrettably, individuals today don't offer solutions.
Blind Areas for Mungers
As with everyone, Mungers' bitcoin views may be impacted by his biases and experiences.
OK.
But Munger has always advocated classic value investing and may be wary of investing in an asset outside his expertise.
Mungers' banking and insurance investments may influence his bitcoin views.
Could a coworker or acquaintance have told him crypto is bad and goes against traditional finance?
Right?
Takeaways
Do you respect Charlie Mungers?
Yes and no, like any investor or individual.
To understand Mungers' bitcoin beliefs, you must be critical.
Mungers is a successful investor, but his views about bitcoin should be considered alongside other viewpoints.
Munger’s success as an investor has made him an influencer in the space.
Influence gives power.
He controls people's thoughts.
Munger's ok. He will always be heard.
I'll do so cautiously.