


Nikhil Vemu
Nikhil Vemu
3 years ago
7 Mac Apps That Are Exorbitantly Priced But Totally Worth It

Wish you more bang for your buck
By ‘Cost a Bomb’ I didn’t mean to exaggerate. It’s an idiom that means ‘To be very expensive’. In fact, no app on the planet costs a bomb lol.
So, to the point.
Chronicle
(Freemium. For Pro, $24.99 | Available on Setapp)
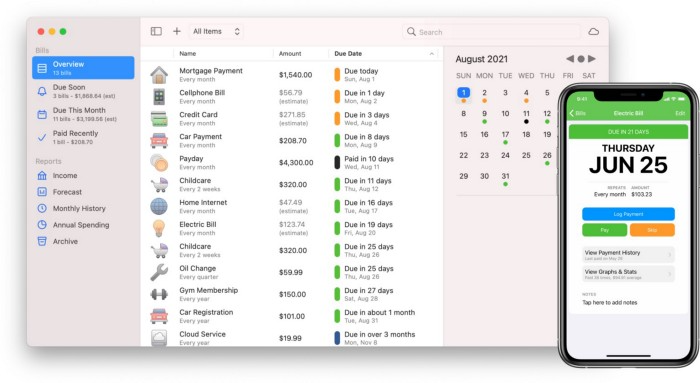
You probably have trouble keeping track of dozens of bills and subscriptions each month.
Try Chronicle.
Easy-to-use app
Add payment due dates and receive reminders,
Save payment documentation,
Analyze your spending by season, year, and month.
Observe expenditure trends and create new budgets.
Best of all, Chronicle features an integrated browser for fast payment and logging.
iOS and macOS sync.
SoundSource
($39 for lifetime)
Background Music, a free macOS program, was featured in #6 of this post last month.
It controls per-app volume, stereo balance, and audio over its max level.
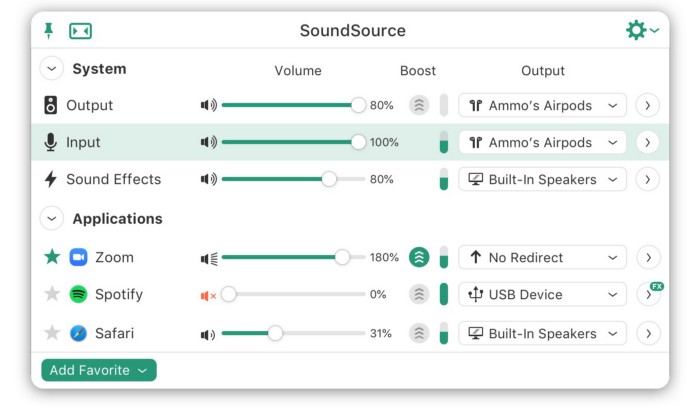
Background Music is fully supported. Additionally,
Connect various speakers to various apps (Wow! ),
change the audio sample rate for each app,
To facilitate access, add a floating SoundSource window.
Use its blocks in Shortcuts app,
On the menu bar, include meters for output/input devices and running programs.
PixelSnap
($39 for lifetime | Available on Setapp)
This software is heaven for UI designers.
It aids you.
quickly calculate screen distances (in pixels) ,

Drag an area around an object to determine its borders,

Measure the distances between the additional guides,

screenshots should be pixel-perfect.
What’s more.
You can
Adapt your tolerance for items with poor contrast and shadows.
Use your Touch Bar to perform important tasks, if you have one.
Mate Translation
($3.99 a month / $29.99 a year | Available on Setapp)
Mate Translate resembles a roided-up version of BarTranslate, which I wrote about in #1 of this piece last month.
If you translate often, utilize Mate Translate on macOS and Safari.
I'm really vocal about it.
It stays on the menu bar, and is accessible with a click or ⌥+shift+T hotkey.
It lets you
Translate in 103 different languages,
To translate text, double-click or right-click on it.
Totally translate websites. Additionally, Netflix subtitles,
Listen to their pronunciation to see how close it is to human.
iPhone and Mac sync Mate-ing history.
Swish
($16 for lifetime | Available on Setapp)
Swish is awesome!
Swipe, squeeze, tap, and hold movements organize chaotic desktop windows. Swish operates with mouse and trackpad.
Some gestures:
• Pinch Once: Close an app
• Pinch Twice: Quit an app
• Swipe down once: Minimise an app
• Pinch Out: Enter fullscreen mode
• Tap, Hold, & Swipe: Arrange apps in grids
 and many more...

After getting acquainted to the movements, your multitasking will improve.
Unite
($24.99 for lifetime | Available on Setapp)
It turns webapps into macOS apps. The end.
Unite's functionality is a million times better.

Provide extensive customization (incl. its icon, light and dark modes)
make menu bar applications,
Get badges for web notifications and automatically refresh websites,
Replace any dock icon in the window with it (Wow!) by selecting that portion of the window.

Use PiP (Picture-in-Picture) on video sites that support it.
Delete advertising,
Throughout macOS, use floating windows
and many more…
I feel $24.99 one-off for this tool is a great deal, considering all these features. What do you think?
CleanShot X
(Basic: $29 one-off. Pro: $8/month | Available on Setapp)
CleanShot X can achieve things the macOS screenshot tool cannot. Complete screenshot toolkit.
CleanShot X, like Pixel Snap 2 (#3), is fantastic.
Allows
Scroll to capture a long page,
screen recording,
With webcam on,
• With mic and system audio,
• Highlighting mouse clicks and hotkeys.
Maintain floating screenshots for reference
While capturing, conceal desktop icons and notifications.
Recognize text in screenshots (OCR),
You may upload and share screenshots using the built-in cloud.
These are just 6 in 50+ features, and you’re already saying Wow!
Nikhil Vemu
3 years ago
7 Mac Tips You Never Knew You Needed
Unleash the power of the Option key ⌥

#1 Open a link in the Private tab first.
Previously, if I needed to open a Safari link in a private window, I would:
copied the URL with the right click command,
choose File > New Private Window to open a private window, and
clicked return after pasting the URL.
I've found a more straightforward way.
Right-clicking a link shows this, right?

Hold option (⌥) for:

Click Open Link in New Private Window while holding.
Finished!
#2. Instead of searching for specific characters, try this
You may use unicode for business or school. Most people Google them when they need them.
That is lengthy!
You can type some special characters just by pressing ⌥ and a key.
For instance
• ⌥+2 -> ™ (Trademark)
• ⌥+0 -> ° (Degree)
• ⌥+G -> © (Copyright)
• ⌥+= -> ≠ (Not equal to)
• ⌥+< -> ≤ (Less than or equal to)
• ⌥+> -> ≥ (Greater then or equal to)
• ⌥+/ -> ÷ (Different symbol for division)
#3 Activate Do Not Disturb silently.
Do Not Disturb when sharing my screen is awkward for me (because people may think Im trying to hide some secret notifications).
Here's another method.
Hold ⌥ and click on Time (at the extreme right on the menu-bar).

Now, DND is activated (secretly!). To turn it off, do it again.
Note: This works only for DND focus.#4. Resize a window starting from its center
Although this is rarely useful, it is still a hidden trick.
When you resize a window, the opposite edge or corner is used as the pivot, right?
However, if you want to resize it with its center as the pivot, hold while doing so.
#5. Yes, Cut-Paste is available on Macs as well (though it is slightly different).
I call it copy-move rather than cut-paste. This is how it works.
Carry it out.
Choose a file (by clicking on it), then copy it (⌘+C).
Go to a new location on your Mac. Do you use ⌘+V to paste it? However, to move it, press ⌘+⌥+V.
This removes the file from its original location and copies it here. And it works exactly like cut-and-paste on Windows.
#6. Instantly expand all folders
Set your Mac's folders to List view.
Assume you have one folder with multiple subfolders, each of which contains multiple files. And you wanted to look at every single file that was over there.
How would you do?
You're used to clicking the ⌄ glyph near the folder and each subfolder to expand them all, right? Instead, hold down ⌥ while clicking ⌄ on the parent folder.
This is what happens next.
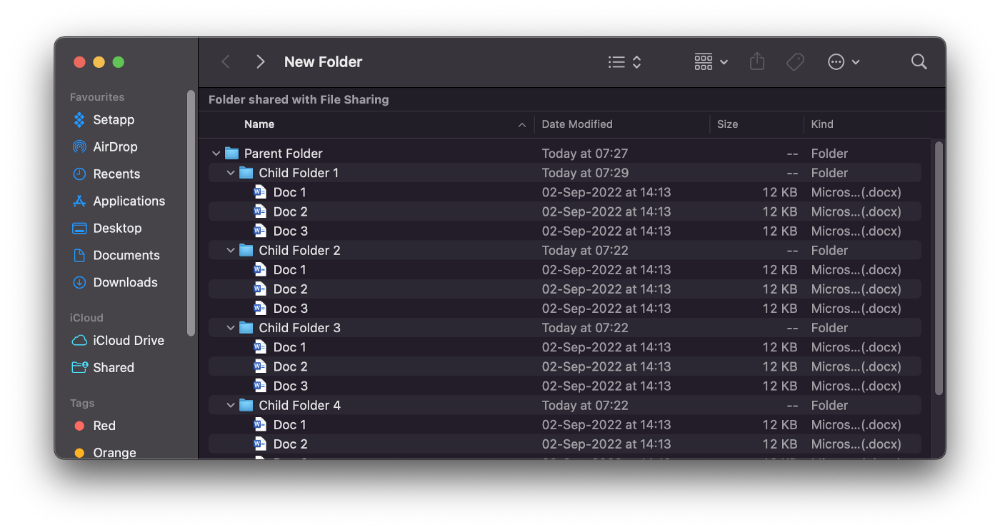
Everything expands.
View/Copy a file's path as an added bonus
If you want to see the path of a file in Finder, select it and hold ⌥, and you'll see it at the bottom for a moment.
To copy its path, right-click on the folder and hold down ⌥ to see this
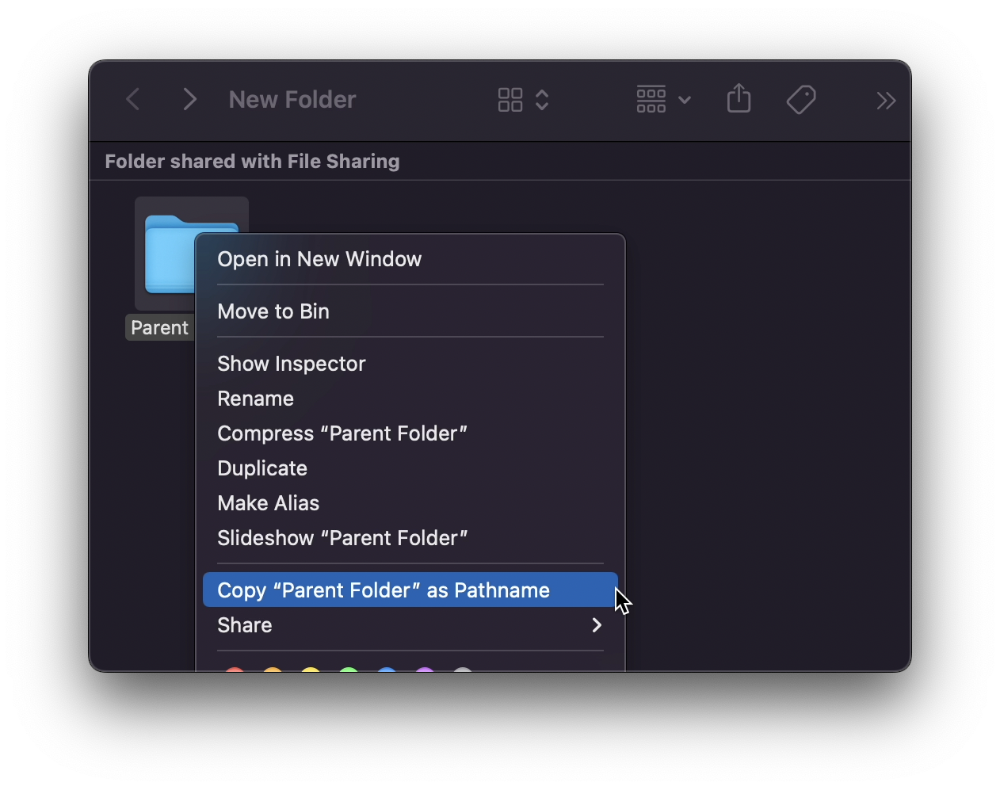
Click on Copy <"folder name"> as Pathname to do it.
#7 "Save As"
I was irritated by the lack of "Save As" in Pages when I first got a Mac (after 15 years of being a Windows guy).
It was necessary for me to save the file as a new file, in a different location, with a different name, or both.
Unfortunately, I couldn't do it on a Mac.
However, I recently discovered that it appears when you hold ⌥ when in the File menu.
Yay!