


17 Google Secrets 99 Percent of People Don't Know
What can't Google do?
Seriously, nothing! Google rocks.
Google is a major player in online tools and services. We use it for everything, from research to entertainment.
Did I say entertain yourself?
Yes, with so many features and options, it can be difficult to fully utilize Google.
#1. Drive Google Mad
You can make Google's homepage dance if you want to be silly.
Just type “Google Gravity” into Google.com. Then select I'm lucky.
See the page unstick before your eyes!
#2 Play With Google Image
Google isn't just for work.
Then have fun with it!
You can play games right in your search results. When you need a break, google “Solitaire” or “Tic Tac Toe”.
#3. Do a Barrel Roll
Need a little more excitement in your life? Want to see Google dance?
Type “Do a barrel roll” into the Google search bar.
Then relax and watch your screen do a 360.
#4 No Internet? No issue!
This is a fun trick to use when you have no internet.
If your browser shows a “No Internet” page, simply press Space.
Boom!
We have dinosaurs! Now use arrow keys to save your pixelated T-Rex from extinction.
#5 Google Can Help
Play this Google coin flip game to see if you're lucky.
Enter “Flip a coin” into the search engine.
You'll see a coin flipping animation. If you get heads or tails, click it.
#6. Think with Google
My favorite Google find so far is the “Think with Google” website.
Think with Google is a website that offers marketing insights, research, and case studies.
I highly recommend it to entrepreneurs, small business owners, and anyone interested in online marketing.
#7. Google Can Read Images!
This is a cool Google trick that few know about.
You can search for images by keyword or upload your own by clicking the camera icon on Google Images.
Google will then show you all of its similar images.
Caution: You should be fine with your uploaded images being public.
#8. Modify the Google Logo!
Clicking on the “I'm Feeling Lucky” button on Google.com takes you to a random Google Doodle.
Each year, Google creates a Doodle to commemorate holidays, anniversaries, and other occasions.
#9. What is my IP?
Simply type “What is my IP” into Google to find out.
Your IP address will appear on the results page.
#10. Send a Self-Destructing Email With Gmail,
Create a new message in Gmail. Find an icon that resembles a lock and a clock near the SEND button. That's where the Confidential Mode is.
By clicking it, you can set an expiration date for your email. Expiring emails are automatically deleted from both your and the recipient's inbox.
#11. Blink, Google Blink!
This is a unique Google trick.
Type “blink HTML” into Google. The words “blink HTML” will appear and then disappear.
The text is displayed for a split second before being deleted.
To make this work, Google reads the HTML code and executes the “blink” command.
#12. The Answer To Everything
This is for all Douglas Adams fans.
The answer to life, the universe, and everything is 42, according to Google.
An allusion to Douglas Adams' Hitchhiker's Guide to the Galaxy, in which Ford Prefect seeks to understand life, the universe, and everything.
#13. Google in 1998
It's a blast!
Type “Google in 1998” into Google. "I'm feeling lucky"
You'll be taken to an old-school Google homepage.
It's a nostalgic trip for long-time Google users.
#14. Scholarships and Internships
Google can help you find college funding!
Type “scholarships” or “internships” into Google.
The number of results will surprise you.
#15. OK, Google. Dice!
To roll a die, simply type “Roll a die” into Google.
On the results page is a virtual dice that you can click to roll.
#16. Google has secret codes!
Hit the nine squares on the right side of your Google homepage to go to My Account. Then Personal Info.
You can add your favorite language to the “General preferences for the web” tab.
#17. Google Terminal
You can feel like a true hacker.
Just type “Google Terminal” into Google.com. "I'm feeling lucky"
Voila~!
You'll be taken to an old-school computer terminal-style page.
You can then type commands to see what happens.
Have you tried any of these activities? Tell me in the comments.
Read full article here
More on Productivity

Asher Umerie
3 years ago
What is Bionic Reading?
Senses help us navigate a complicated world. They shape our worldview - how we hear, smell, feel, and taste. People claim a sixth sense, an intuitive capacity that extends perception.
Our brain is a half-pool of grey and white matter that stores data from our senses. Brains provide us context, so zombies' obsession makes sense.
Bionic reading uses the brain's visual information and context to simplify text comprehension.
Stay with me.
What is Bionic Reading?
Bionic reading is a software application established by Swiss typographic designer Renato Casutt. The term honors the brain (bio) and technology's collaboration to better text comprehension.
The image above shows two similar paragraphs with bionic reading.
Notice anything yet?
This Twitter user did.
I did too...
Image text describes bionic reading-
New method to aid reading by using artificial fixation points. The reader focuses on the highlighted starting letters, and the brain completes the word.
How is Bionic Reading possible?
Do you remember seeing social media posts asking you to stare at a black dot for 30 seconds (or more)? You blink and see an after-image on your wall.
Our brains are skilled at identifying patterns and'seeing' familiar objects, therefore optical illusions are conceivable.
Brain and sight collaborate well. Text comprehension proves it.
Considering evolutionary patterns, humans' understanding skills may be cosmic luck.
Scientists don't know why people can read and write, but they do know what reading does to the brain.
One portion of your brain recognizes words, while another analyzes their meaning. Fixation, saccade, and linguistic transparency/opacity aid.
Let's explain some terms.
-
Fixation is how the eyes move when reading. It's where you look. If the eyes fixate less, a reader can read quicker. [Eye fixation is a physiological process](Eye fixation is a naturally occurring physiological process) impacted by the reader's vocabulary, vision span, and text familiarity.
-
Saccade - Pause and look around. That's a saccade. Rapid eye movements that alter the place of fixation, as reading text or looking around a room. They can happen willingly (when you choose) or instinctively, even when your eyes are fixed.
-
Linguistic transparency and opacity analyze how well a composite word or phrase may be deduced from its constituents.
The Bionic reading website compares these tools.
Text highlights lead the eye. Fixation, saccade, and opacity can transfer visual stimuli to text, changing typeface.
## Final Thoughts on Bionic Reading
I'm excited about how this could influence my long-term assimilation and productivity.
This technology is still in development, with prototypes working on only a few apps. Like any new tech, it will be criticized.
I'll be watching Bionic Reading closely. Comment on it!

The woman
3 years ago
I received a $2k bribe to replace another developer in an interview
I can't believe they’d even think it works!
Developers are usually interviewed before being hired, right? Every organization wants candidates who meet their needs. But they also want to avoid fraud.
There are cheaters in every field. Only two come to mind for the hiring process:
Lying on a resume.
Cheating on an online test.
Recently, I observed another one. One of my coworkers invited me to replace another developer during an online interview! I was astonished, but it’s not new.
The specifics
My ex-colleague recently texted me. No one from your former office will ever approach you after a year unless they need something.
Which was the case. My coworker said his wife needed help as a programmer. I was glad someone asked for my help, but I'm still a junior programmer.
Then he informed me his wife was selected for a fantastic job interview. He said he could help her with the online test, but he needed someone to help with the online interview.
Okay, I guess. Preparing for an online interview is beneficial. But then he said she didn't need to be ready. She needed someone to take her place.
I told him it wouldn't work. Every remote online interview I've ever seen required an open camera.
What followed surprised me. She'd ask to turn off the camera, he said.
I asked why.
He told me if an applicant is unwell, the interviewer may consider an off-camera interview. His wife will say she's sick and prefers no camera.
The plan left me speechless. I declined politely. He insisted and promised $2k if she got the job.
I felt insulted and told him if he persisted, I'd inform his office. I was furious. Later, I apologized and told him to stop.
I'm not sure what they did after that
I'm not sure if they found someone or listened to me. They probably didn't. How would she do the job if she even got it?
It's an internship, he said. With great pay, though. What should an intern do?
I suggested she do the interview alone. Even if she failed, she'd gain confidence and valuable experience.
Conclusion
Many interviewees cheat. My profession is vital to me, thus I'd rather improve my abilities and apply honestly. It's part of my identity.
Am I truthful? Most professionals are not. They fabricate their CVs. Often.
When you support interview cheating, you encourage more cheating! When someone cheats, another qualified candidate may not obtain the job.
One day, that could be you or me.

Deon Ashleigh
3 years ago
You can dominate your daily productivity with these 9 little-known Google Calendar tips.
Calendars are great unpaid employees.
After using Notion to organize my next three months' goals, my days were a mess.
I grew very chaotic afterward. I was overwhelmed, unsure of what to do, and wasting time attempting to plan the day after it had started.
Imagine if our skeletons were on the outside. Doesn’t work.
The goals were too big; I needed to break them into smaller chunks. But how?
Enters Google Calendar
RescueTime’s recommendations took me seven hours to make a daily planner. This epic narrative begins with a sheet of paper and concludes with a daily calendar that helps me focus and achieve more goals. Ain’t nobody got time for “what’s next?” all day.
Onward!
Return to the Paleolithic Era
Plan in writing.
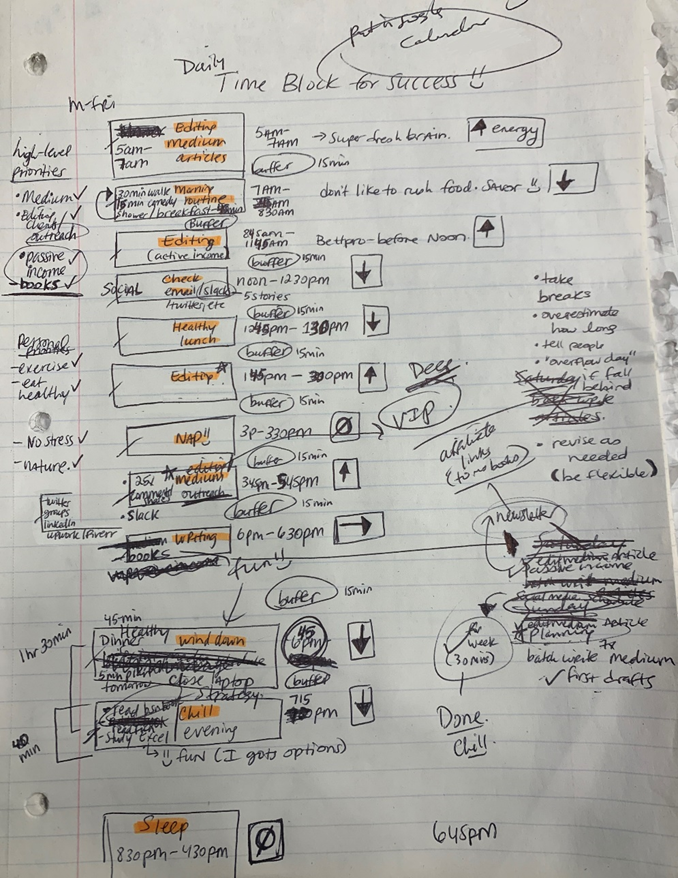
Not on the list, but it helped me plan my day. Physical writing boosts creativity and recall.
Find My Heart
i.e. prioritize
RescueTime suggested I prioritize before planning. Personal and business goals were proposed.
My top priorities are to exercise, eat healthily, spend time in nature, and avoid stress.
Priorities include writing and publishing Medium articles, conducting more freelance editing and Medium outreach, and writing/editing sci-fi books.
These eight things will help me feel accomplished every day.
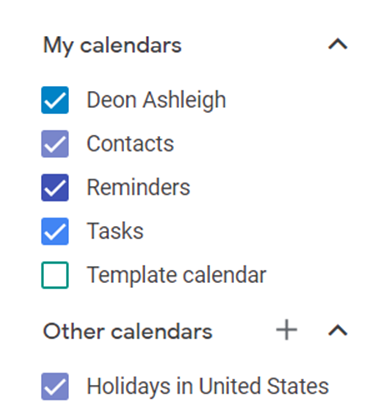
Make a baby calendar.
Create daily calendar templates.
Make family, pleasure, etc. calendars.
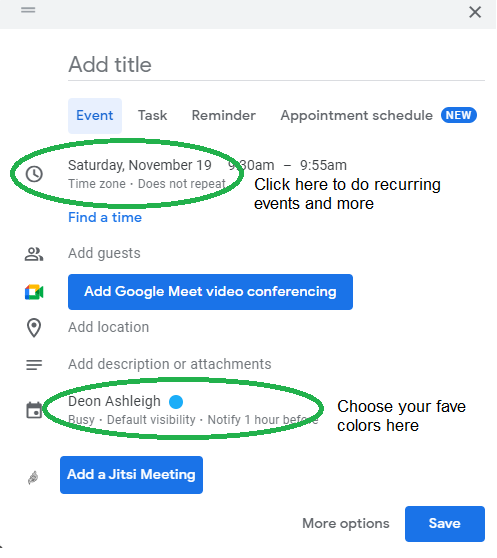
Google Calendar instructions:
Other calendars
Press the “+” button
Create a new calendar
Create recurring events for each day
My calendar, without the template:
Empty, so I can fill it with vital tasks.
With the template:
My daily skeleton corresponds with my priorities. I've been overwhelmed for years because I lack daily, weekly, monthly, and yearly structure.
Google Calendars helps me reach my goals and focus my energy.
Get your colored pencils ready
Time-block color-coding.
Color labeling lets me quickly see what's happening. Maybe you are too.
Google Calendar instructions:
Determine which colors correspond to each time block.
When establishing new events, select a color.
Save
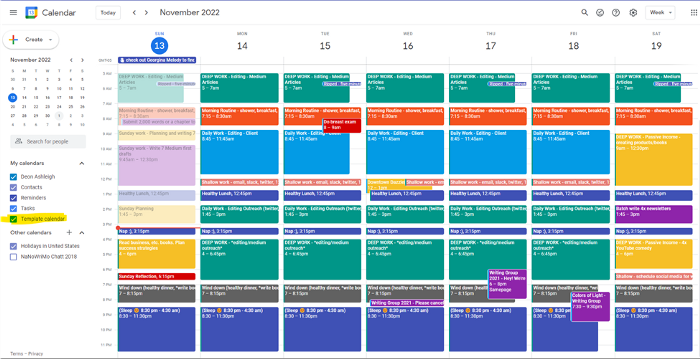
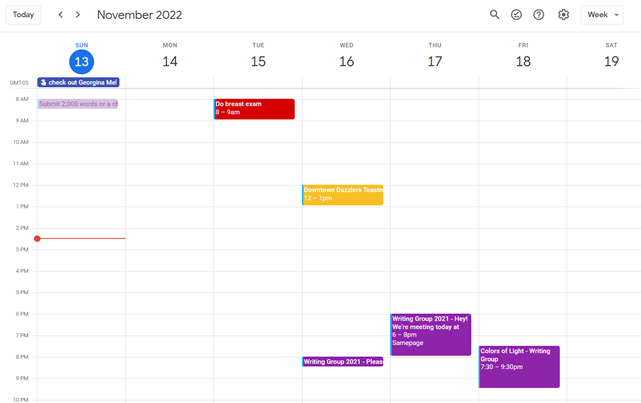
My calendar is color-coded as follows:
Yellow — passive income or other future-related activities
Red — important activities, like my monthly breast exam
Flamingo — shallow work, like emails, Twitter, etc.
Blue — all my favorite activities, like walking, watching comedy, napping, and sleeping. Oh, and eating.
Green — money-related events required for this adulting thing
Purple — writing-related stuff
Associating a time block with a color helps me stay focused. Less distractions mean faster work.
Open My Email
aka receive a daily email from Google Calendar.
Google Calendar sends a daily email feed of your calendars. I sent myself the template calendar in this email.
Google Calendar instructions:
Access settings
Select the calendar that you want to send (left side)
Go down the page to see more alerts
Under the daily agenda area, click Email.

Get in Touch With Your Red Bull Wings — Naturally
aka audit your energy levels.
My daily planner has arrows. These indicate how much energy each activity requires or how much I have.
Rightward arrow denotes medium energy.
I do my Medium and professional editing in the morning because it's energy-intensive.
Niharikaa Sodhi recommends morning Medium editing.
I’m a morning person. As long as I go to bed at a reasonable time, 5 a.m. is super wild GO-TIME. It’s like the world was just born, and I marvel at its wonderfulness.
Freelance editing lets me do what I want. An afternoon snooze will help me finish on time.
Ditch Schedule View
aka focus on the weekly view.
RescueTime advocated utilizing the weekly view of Google Calendar, so I switched.
When you launch the phone app or desktop calendar, a red line shows where you are in the day.
I'll follow the red line's instructions. My digital supervisor is easy to follow.
In the image above, it's almost 3 p.m., therefore the red line implies it's time to snooze.
I won't forget this block ;).
Reduce the Lighting
aka dim previous days.
This is another Google Calendar feature I didn't know about. Once the allotted time passes, the time block dims. This keeps me present.
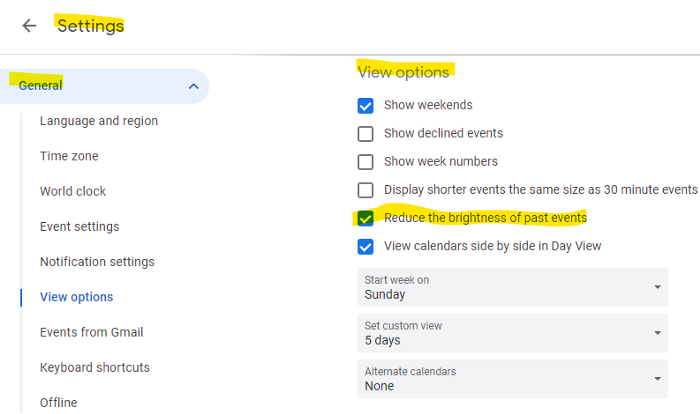
Google Calendar instructions:
Access settings
remaining general
To view choices, click.
Check Diminish the glare of the past.
Bonus
Two additional RescueTimes hacks:
Maintain a space between tasks
I left 15 minutes between each time block to transition smoothly. This relates to my goal of less stress. If I set strict start and end times, I'll be stressed.
With a buffer, I can breathe, stroll around, and start the following time block fresh.
Find a time is related to the buffer.
This option allows you conclude small meetings five minutes early and longer ones ten. Before the next meeting, relax or go wild.
Decide on a backup day.
This productivity technique is amazing.
Spend this excess day catching up on work. It helps reduce tension and clutter.
That's all I can say about Google Calendar's functionality.
You might also like

Crypto Zen Monk
2 years ago
How to DYOR in the world of cryptocurrency
RESEARCH
We must create separate ideas and handle our own risks to be better investors. DYOR is crucial.
The only thing unsustainable is your cluelessness.
DYOR: Why
On social media, there is a lot of false information and divergent viewpoints. All of these facts might be accurate, but they might not be appropriate for your portfolio and investment preferences.
You become a more knowledgeable investor thanks to DYOR.
DYOR improves your portfolio's risk management.
My DYOR resources are below.

Messari: Major Blockchains' Activities
New York-based Messari provides cryptocurrency open data libraries.
Major blockchains offer 24-hour on-chain volume. https://messari.io/screener/most-active-chains-DB01F96B
What to do
Invest in stable cryptocurrencies. Sort Messari by Real Volume (24H) or Reported Market Cap.
Coingecko: Research on Ecosystems
Top 10 Ecosystems by Coingecko are good.
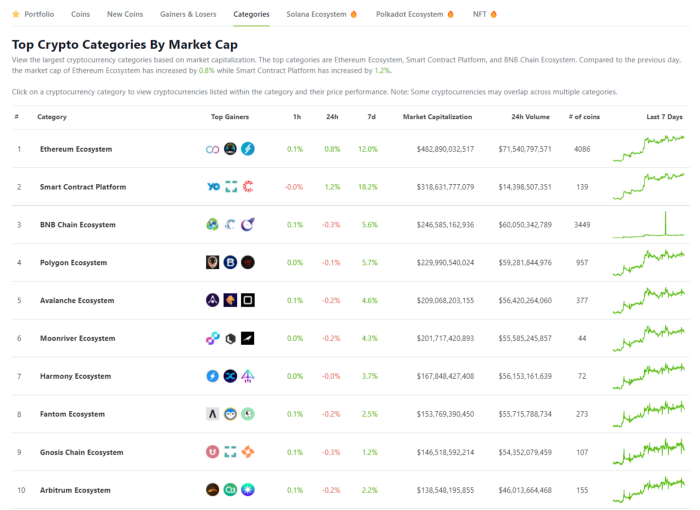
What to do
Invest in quality.
Leading ten Ecosystems by Market Cap
There are a lot of coins in the ecosystem (second last column of above chart)
CoinGecko's Market Cap Crypto Categories Market capitalization-based cryptocurrency categories. Ethereum Ecosystem www.coingecko.com
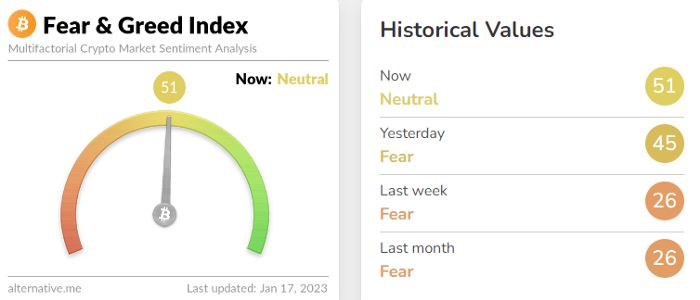
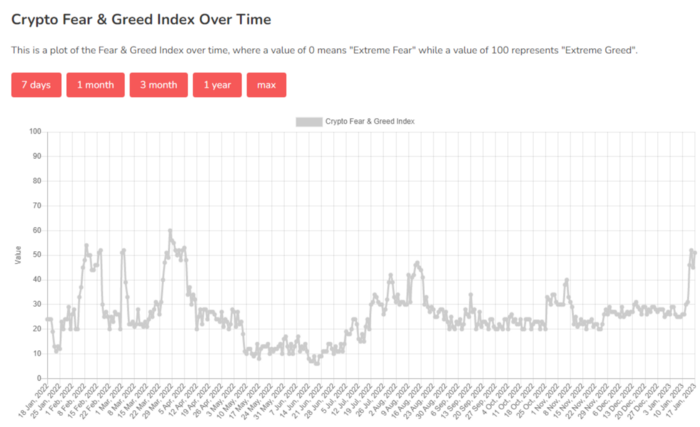
Fear & Greed Index for Bitcoin (FGI)
The Bitcoin market sentiment index ranges from 0 (extreme dread) to 100. (extreme greed).
How to Apply
See market sentiment:
Extreme fright = opportunity to buy
Extreme greed creates sales opportunity (market due for correction).
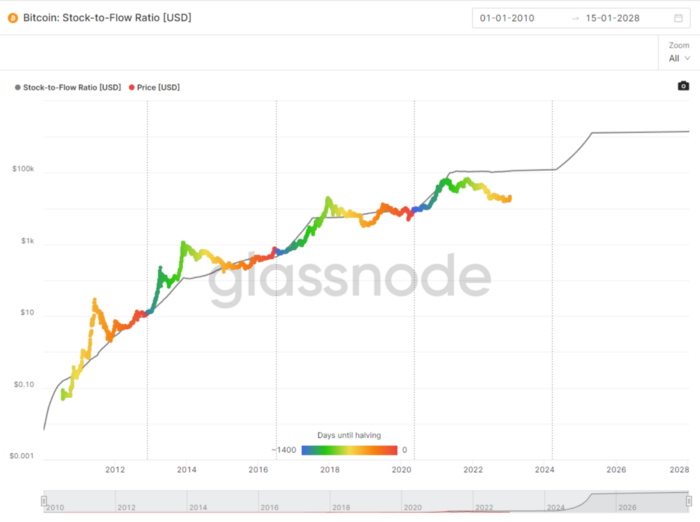
Glassnode
Glassnode gives facts, information, and confidence to make better Bitcoin, Ethereum, and cryptocurrency investments and trades.
Explore free and paid metrics.
Stock to Flow Ratio: Application
The popular Stock to Flow Ratio concept believes scarcity drives value. Stock to flow is the ratio of circulating Bitcoin supply to fresh production (i.e. newly mined bitcoins). The S/F Ratio has historically predicted Bitcoin prices. PlanB invented this metric.
Utilization: Ethereum Hash Rate
Ethereum miners produce an estimated number of hashes per second.
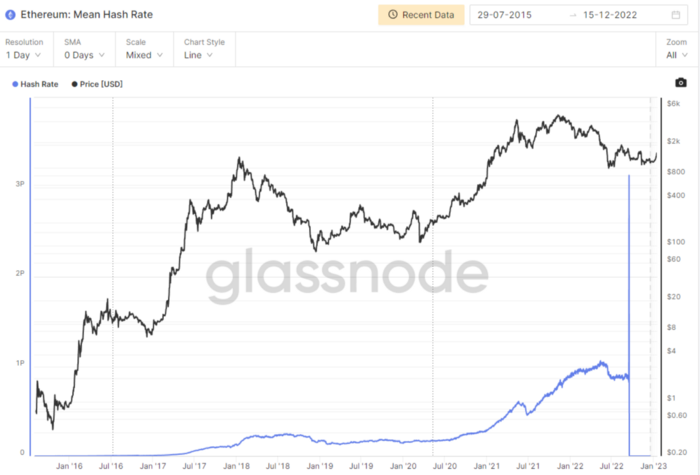
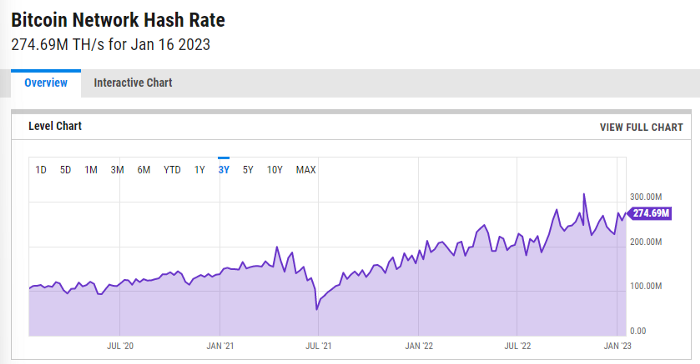
ycharts: Hash rate of the Bitcoin network
TradingView
TradingView is your go-to tool for investment analysis, watch lists, technical analysis, and recommendations from other traders/investors.
Research for a cryptocurrency project
Two key questions every successful project must ask: Q1: What is this project trying to solve? Is it a big problem or minor? Q2: How does this project make money?
Each cryptocurrency:
Check out the white paper.
check out the project's internet presence on github, twitter, and medium.
the transparency of it
Verify the team structure and founders. Verify their LinkedIn profile, academic history, and other qualifications. Search for their names with scam.
Where to purchase and use cryptocurrencies Is it traded on trustworthy exchanges?
From CoinGecko and CoinMarketCap, we may learn about market cap, circulations, and other important data.
The project must solve a problem. Solving a problem is the goal of the founders.
Avoid projects that resemble multi-level marketing or ponzi schemes.
Your use of social media
Use social media carefully or ignore it: Twitter, TradingView, and YouTube
Someone said this before and there are some truth to it. Social media bullish => short.
Your Behavior
Investigate. Spend time. You decide. Worth it!
Only you have the best interest in your financial future.

Micah Daigle
3 years ago
Facebook is going away. Here are two explanations for why it hasn't been replaced yet.
And tips for anyone trying.

We see the same story every few years.
BREAKING NEWS: [Platform X] launched a social network. With Facebook's reputation down, the new startup bets millions will switch.
Despite the excitement surrounding each new platform (Diaspora, Ello, Path, MeWe, Minds, Vero, etc.), no major exodus occurred.
Snapchat and TikTok attracted teens with fresh experiences (ephemeral messaging and rapid-fire videos). These features aren't Facebook, even if Facebook replicated them.
Facebook's core is simple: you publish items (typically text/images) and your friends (generally people you know IRL) can discuss them.
It's cool. Sometimes I don't want to, but sh*t. I like it.
Because, well, I like many folks I've met. I enjoy keeping in touch with them and their banter.
I dislike Facebook's corporation. I've been cautiously optimistic whenever a Facebook-killer surfaced.
None succeeded.
Why? Two causes, I think:
People couldn't switch quickly enough, which is reason #1
Your buddies make a social network social.
Facebook started in self-contained communities (college campuses) then grew outward. But a new platform can't.
If we're expected to leave Facebook, we want to know that most of our friends will too.
Most Facebook-killers had bottlenecks. You have to waitlist or jump through hoops (e.g. setting up a server).
Same outcome. Upload. Chirp.
After a week or two of silence, individuals returned to Facebook.
Reason #2: The fundamental experience was different.
Even when many of our friends joined in the first few weeks, it wasn't the same.
There were missing features or a different UX.
Want to reply with a meme? No photos in comments yet. (Trying!)
Want to tag a friend? Nope, sorry. 2019!
Want your friends to see your post? You must post to all your friends' servers. Good luck!
It's difficult to introduce a platform with 100% of the same features as one that's been there for 20 years, yet customers want a core experience.
If you can't, they'll depart.
The causes that led to the causes
Having worked on software teams for 14+ years, I'm not surprised by these challenges. They are a natural development of a few tech sector meta-problems:
Lean startup methodology
Silicon Valley worships lean startup. It's a way of developing software that involves testing a stripped-down version with a limited number of people before selecting what to build.
Billion people use Facebook's functions. They aren't tested. It must work right away*
*This may seem weird to software people, but it's how non-software works! You can't sell a car without wheels.
2. Creativity
Startup entrepreneurs build new things, not copies. I understand. Reinventing the wheel is boring.
We know what works. Different experiences raise adoption friction. Once millions have transferred, more features (and a friendlier UX) can be implemented.
3. Cost scaling
True. Building a product that can sustain hundreds of millions of users in weeks is expensive and complex.
Your lifeboats must have the same capacity as the ship you're evacuating. It's required.
4. Pure ideologies
People who work on Facebook-alternatives are (understandably) critical of Facebook.
They build an open-source, fully-distributed, data-portable, interface-customizable, offline-capable, censorship-proof platform.
Prioritizing these aims can prevent replicating the straightforward experience users expect. Github, not Facebook, is for techies only.
What about the business plan, though?
Facebook-killer attempts have followed three models.
Utilize VC funding to increase your user base, then monetize them later. (If you do this, you won't kill Facebook; instead, Facebook will become you.)
Users must pay to utilize it. (This causes a huge bottleneck and slows the required quick expansion, preventing it from seeming like a true social network.)
Make it a volunteer-run, open-source endeavor that is free. (This typically denotes that something is cumbersome, difficult to operate, and is only for techies.)
Wikipedia is a fourth way.
Wikipedia is one of the most popular websites and a charity. No ads. Donations support them.
A Facebook-killer managed by a good team may gather millions (from affluent contributors and the crowd) for their initial phase of development. Then it might sustain on regular donations, ethical transactions (e.g. fees on commerce, business sites, etc.), and government grants/subsidies (since it would essentially be a public utility).
When you're not aiming to make investors rich, it's remarkable how little money you need.
If you want to build a Facebook competitor, follow these tips:
Drop the lean startup philosophy. Wait until you have a finished product before launching. Build it, thoroughly test it for bugs, and then release it.
Delay innovating. Wait till millions of people have switched before introducing your great new features. Make it nearly identical for now.
Spend money climbing. Make sure that guests can arrive as soon as they are invited. Never keep them waiting. Make things easy for them.
Make it accessible to all. Even if doing so renders it less philosophically pure, it shouldn't require technical expertise to utilize.
Constitute a nonprofit. Additionally, develop community ownership structures. Profit maximization is not the only strategy for preserving valued assets.
Last thoughts
Nobody has killed Facebook, but Facebook is killing itself.
The startup is burying the newsfeed to become a TikTok clone. Meta itself seems to be ditching the platform for the metaverse.
I wish I was happy, but I'm not. I miss (understandably) removed friends' postings and remarks. It could be a ghost town in a few years. My dance moves aren't TikTok-worthy.
Who will lead? It's time to develop a social network for the people.
Greetings if you're working on it. I'm not a company founder, but I like to help hard-working folks.

Daniel Vassallo
3 years ago
Why I quit a $500K job at Amazon to work for myself
I quit my 8-year Amazon job last week. I wasn't motivated to do another year despite promotions, pay, recognition, and praise.
In AWS, I built developer tools. I could have worked in that field forever.
I became an Amazon developer. Within 3.5 years, I was promoted twice to senior engineer and would have been promoted to principal engineer if I stayed. The company said I had great potential.
Over time, I became a reputed expert and leader within the company. I was respected.
First year I made $75K, last year $511K. If I stayed another two years, I could have made $1M.
Despite Amazon's reputation, my work–life balance was good. I no longer needed to prove myself and could do everything in 40 hours a week. My team worked from home once a week, and I rarely opened my laptop nights or weekends.
My coworkers were great. I had three generous, empathetic managers. I’m very grateful to everyone I worked with.
Everything was going well and getting better. My motivation to go to work each morning was declining despite my career and income growth.
Another promotion, pay raise, or big project wouldn't have boosted my motivation. Motivation was also waning. It was my freedom.
Demotivation
My motivation was high in the beginning. I worked with someone on an internal tool with little scrutiny. I had more freedom to choose how and what to work on than in recent years. Me and another person improved it, talked to users, released updates, and tested it. Whatever we wanted, we did. We did our best and were mostly self-directed.
In recent years, things have changed. My department's most important project had many stakeholders and complex goals. What I could do depended on my ability to convince others it was the best way to achieve our goals.
Amazon was always someone else's terms. The terms started out simple (keep fixing it), but became more complex over time (maximize all goals; satisfy all stakeholders). Working in a large organization imposed restrictions on how to do the work, what to do, what goals to set, and what business to pursue. This situation forced me to do things I didn't want to do.
Finding New Motivation
What would I do forever? Not something I did until I reached a milestone (an exit), but something I'd do until I'm 80. What could I do for the next 45 years that would make me excited to wake up and pay my bills? Is that too unambitious? Nope. Because I'm motivated by two things.
One is an external carrot or stick. I'm not forced to file my taxes every April, but I do because I don't want to go to jail. Or I may not like something but do it anyway because I need to pay the bills or want a nice car. Extrinsic motivation
One is internal. When there's no carrot or stick, this motivates me. This fuels hobbies. I wanted a job that was intrinsically motivated.
Is this too low-key? Extrinsic motivation isn't sustainable. Getting promoted felt good for a week, then it was over. When I hit $100K, I admired my W2 for a few days, but then it wore off. Same thing happened at $200K, $300K, $400K, and $500K. Earning $1M or $10M wouldn't change anything. I feel the same about every material reward or possession. Getting them feels good at first, but quickly fades.
Things I've done since I was a kid, when no one forced me to, don't wear off. Coding, selling my creations, charting my own path, and being honest. Why not always use my strengths and motivation? I'm lucky to live in a time when I can work independently in my field without large investments. So that’s what I’m doing.
What’s Next?
I'm going all-in on independence and will make a living from scratch. I won't do only what I like, but on my terms. My goal is to cover my family's expenses before my savings run out while doing something I enjoy. What more could I want from my work?
You can now follow me on Twitter as I continue to document my journey.
This post is a summary. Read full article here