


More on Productivity

Jano le Roux
3 years ago
My Top 11 Tools For Building A Modern Startup, With A Free Plan
The best free tools are probably unknown to you.
Modern startups are easy to build.
Start with free tools.
Let’s go.
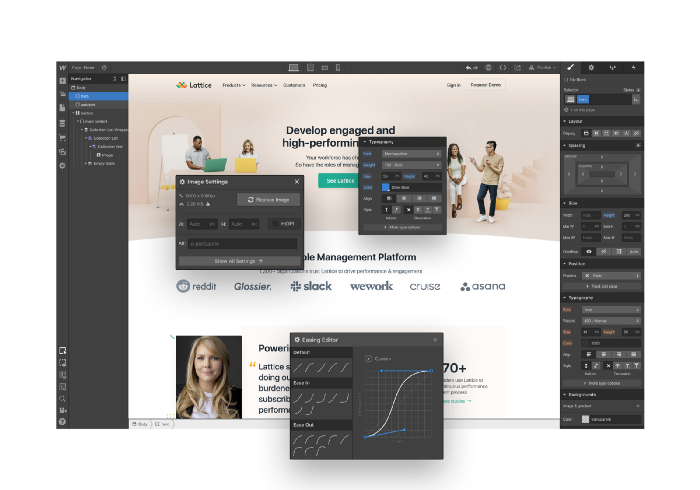
Web development — Webflow
Code-free HTML, CSS, and JS.
Webflow isn't like Squarespace, Wix, or Shopify.
It's a super-fast no-code tool for professionals to construct complex, highly-responsive websites and landing pages.
Webflow can help you add animations like those on Apple's website to your own site.
I made the jump from WordPress a few years ago and it changed my life.
No damn plugins. No damn errors. No damn updates.
The best, you can get started on Webflow for free.
Data tracking — Airtable
Spreadsheet wings.
Airtable combines spreadsheet flexibility with database power without code.
Airtable is modern.
Airtable has modularity.
Scaling Airtable is simple.
Airtable, one of the most adaptable solutions on this list, is perfect for client data management.
Clients choose customized service packages. Airtable consolidates data so you can automate procedures like invoice management and focus on your strengths.
Airtable connects with so many tools that rarely creates headaches. Airtable scales when you do.
Airtable's flexibility makes it a potential backend database.
Design — Figma
Better, faster, easier user interface design.
Figma rocks!
It’s fast.
It's free.
It's adaptable
First, design in Figma.
Iterate.
Export development assets.
Figma lets you add more team members as your company grows to work on each iteration simultaneously.
Figma is web-based, so you don't need a powerful PC or Mac to start.
Task management — Trello
Unclock jobs.
Tacky and terrifying task management products abound. Trello isn’t.
Those that follow Marie Kondo will appreciate Trello.
Everything is clean.
Nothing is complicated.
Everything has a place.
Compared to other task management solutions, Trello is limited. And that’s good. Too many buttons lead to too many decisions lead to too many hours wasted.
Trello is a must for teamwork.
Domain email — Zoho
Free domain email hosting.
Professional email is essential for startups. People relied on monthly payments for too long. Nope.
Zoho offers 5 free professional emails.
It doesn't have Google's UI, but it works.
VPN — Proton VPN
Fast Swiss VPN protects your data and privacy.
Proton VPN is secure.
Proton doesn't record any data.
Proton is based in Switzerland.
Swiss privacy regulation is among the most strict in the world, therefore user data are protected. Switzerland isn't a 14 eye country.
Journalists and activists trust Proton to secure their identities while accessing and sharing information authoritarian governments don't want them to access.
Web host — Netlify
Free fast web hosting.
Netlify is a scalable platform that combines your favorite tools and APIs to develop high-performance sites, stores, and apps through GitHub.
Serverless functions and environment variables preserve API keys.
Netlify's free tier is unmissable.
100GB of free monthly bandwidth.
Free 125k serverless operations per website each month.
Database — MongoDB
Create a fast, scalable database.
MongoDB is for small and large databases. It's a fast and inexpensive database.
Free for the first million reads.
Then, for each million reads, you must pay $0.10.
MongoDB's free plan has:
Encryption from end to end
Continual authentication
field-level client-side encryption
If you have a large database, you can easily connect MongoDB to Webflow to bypass CMS limits.
Automation — Zapier
Time-saving tip: automate repetitive chores.
Zapier simplifies life.
Zapier syncs and connects your favorite apps to do impossibly awesome things.
If your online store is connected to Zapier, a customer's purchase can trigger a number of automated actions, such as:
The customer is being added to an email chain.
Put the information in your Airtable.
Send a pre-programmed postcard to the customer.
Alexa, set the color of your smart lights to purple.
Zapier scales when you do.
Email & SMS marketing — Omnisend
Email and SMS marketing campaigns.
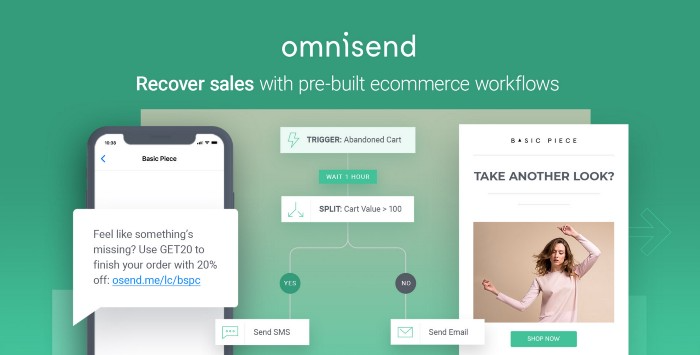
This is an excellent Mailchimp option for magical emails. Omnisend's processes simplify email automation.
I love the interface's cleanliness.
Omnisend's free tier includes web push notifications.
Send up to:
500 emails per month
60 maximum SMSs
500 Web Push Maximum
Forms and surveys — Tally
Create flexible forms that people enjoy.
Typeform is clean but restricting. Sometimes you need to add many questions. Tally's needed sometimes.
Tally is flexible and cheaper than Typeform.
99% of Tally's features are free and unrestricted, including:
Unlimited forms
Countless submissions
Collect payments
File upload
Tally lets you examine what individuals contributed to forms before submitting them to see where they get stuck.
Airtable and Zapier connectors automate things further. If you pay, you can apply custom CSS to fit your brand.
See.
Free tools are the greatest.
Let's use them to launch a startup.

Maria Stepanova
3 years ago
How Elon Musk Picks Things Up Quicker Than Anyone Else
Adopt Elon Musk's learning strategy to succeed.

Medium writers rank first and second when you Google “Elon Musk's learning approach”.
My article idea seems unoriginal. Lol
Musk is brilliant.
No doubt here.
His name connotes success and intelligence.
He knows rocket science, engineering, AI, and solar power.
Musk is a Unicorn, but his skills aren't special.
How does he manage it?
Elon Musk has two learning rules that anyone may use.
You can apply these rules and become anyone you want.
You can become a rocket scientist or a surgeon. If you want, of course.
The learning process is key.
Make sure you are creating a Tree of Knowledge according to Rule #1.
Musk told Reddit how he learns:
“It is important to view knowledge as sort of a semantic tree — make sure you understand the fundamental principles, i.e. the trunk and big branches, before you get into the leaves/details or there is nothing for them to hang onto.”
Musk understands the essential ideas and mental models of each of his business sectors.
He starts with the tree's trunk, making sure he learns the basics before going on to branches and leaves.
We often act otherwise. We memorize small details without understanding how they relate to the whole. Our minds are stuffed with useless data.
Cramming isn't learning.
Start with the basics to learn faster. Before diving into minutiae, grasp the big picture.

Rule #2: You can't connect what you can't remember.
Elon Musk transformed industries this way. As his expertise grew, he connected branches and leaves from different trees.
Musk read two books a day as a child. He didn't specialize like most people. He gained from his multidisciplinary education. It helped him stand out and develop billion-dollar firms.
He gained skills in several domains and began connecting them. World-class performances resulted.
Most of us never learn the basics and only collect knowledge. We never really comprehend information, thus it's hard to apply it.
Learn the basics initially to maximize your chances of success. Then start learning.
Learn across fields and connect them.
This method enabled Elon Musk to enter and revolutionize a century-old industry.

Darshak Rana
4 years ago
17 Google Secrets 99 Percent of People Don't Know
What can't Google do?
Seriously, nothing! Google rocks.
Google is a major player in online tools and services. We use it for everything, from research to entertainment.
Did I say entertain yourself?
Yes, with so many features and options, it can be difficult to fully utilize Google.
#1. Drive Google Mad
You can make Google's homepage dance if you want to be silly.
Just type “Google Gravity” into Google.com. Then select I'm lucky.
See the page unstick before your eyes!
#2 Play With Google Image
Google isn't just for work.
Then have fun with it!
You can play games right in your search results. When you need a break, google “Solitaire” or “Tic Tac Toe”.
#3. Do a Barrel Roll
Need a little more excitement in your life? Want to see Google dance?
Type “Do a barrel roll” into the Google search bar.
Then relax and watch your screen do a 360.
#4 No Internet? No issue!
This is a fun trick to use when you have no internet.
If your browser shows a “No Internet” page, simply press Space.
Boom!
We have dinosaurs! Now use arrow keys to save your pixelated T-Rex from extinction.
#5 Google Can Help
Play this Google coin flip game to see if you're lucky.
Enter “Flip a coin” into the search engine.
You'll see a coin flipping animation. If you get heads or tails, click it.
#6. Think with Google
My favorite Google find so far is the “Think with Google” website.
Think with Google is a website that offers marketing insights, research, and case studies.
I highly recommend it to entrepreneurs, small business owners, and anyone interested in online marketing.
#7. Google Can Read Images!
This is a cool Google trick that few know about.
You can search for images by keyword or upload your own by clicking the camera icon on Google Images.
Google will then show you all of its similar images.
Caution: You should be fine with your uploaded images being public.
#8. Modify the Google Logo!
Clicking on the “I'm Feeling Lucky” button on Google.com takes you to a random Google Doodle.
Each year, Google creates a Doodle to commemorate holidays, anniversaries, and other occasions.
#9. What is my IP?
Simply type “What is my IP” into Google to find out.
Your IP address will appear on the results page.
#10. Send a Self-Destructing Email With Gmail,
Create a new message in Gmail. Find an icon that resembles a lock and a clock near the SEND button. That's where the Confidential Mode is.
By clicking it, you can set an expiration date for your email. Expiring emails are automatically deleted from both your and the recipient's inbox.
#11. Blink, Google Blink!
This is a unique Google trick.
Type “blink HTML” into Google. The words “blink HTML” will appear and then disappear.
The text is displayed for a split second before being deleted.
To make this work, Google reads the HTML code and executes the “blink” command.
#12. The Answer To Everything
This is for all Douglas Adams fans.
The answer to life, the universe, and everything is 42, according to Google.
An allusion to Douglas Adams' Hitchhiker's Guide to the Galaxy, in which Ford Prefect seeks to understand life, the universe, and everything.
#13. Google in 1998
It's a blast!
Type “Google in 1998” into Google. "I'm feeling lucky"
You'll be taken to an old-school Google homepage.
It's a nostalgic trip for long-time Google users.
#14. Scholarships and Internships
Google can help you find college funding!
Type “scholarships” or “internships” into Google.
The number of results will surprise you.
#15. OK, Google. Dice!
To roll a die, simply type “Roll a die” into Google.
On the results page is a virtual dice that you can click to roll.
#16. Google has secret codes!
Hit the nine squares on the right side of your Google homepage to go to My Account. Then Personal Info.
You can add your favorite language to the “General preferences for the web” tab.
#17. Google Terminal
You can feel like a true hacker.
Just type “Google Terminal” into Google.com. "I'm feeling lucky"
Voila~!
You'll be taken to an old-school computer terminal-style page.
You can then type commands to see what happens.
Have you tried any of these activities? Tell me in the comments.
Read full article here
You might also like

Gareth Willey
3 years ago
I've had these five apps on my phone for a long time.
TOP APPS
Who survives spring cleaning?

Relax. Notion is off-limits. This topic is popular.
(I wrote about it 2 years ago, before everyone else did.) So).
These apps are probably new to you. I hope you find a new phone app after reading this.
Outdooractive
ViewRanger is Google Maps for outdoor enthusiasts.
This app has been so important to me as a freedom-loving long-distance walker and hiker.
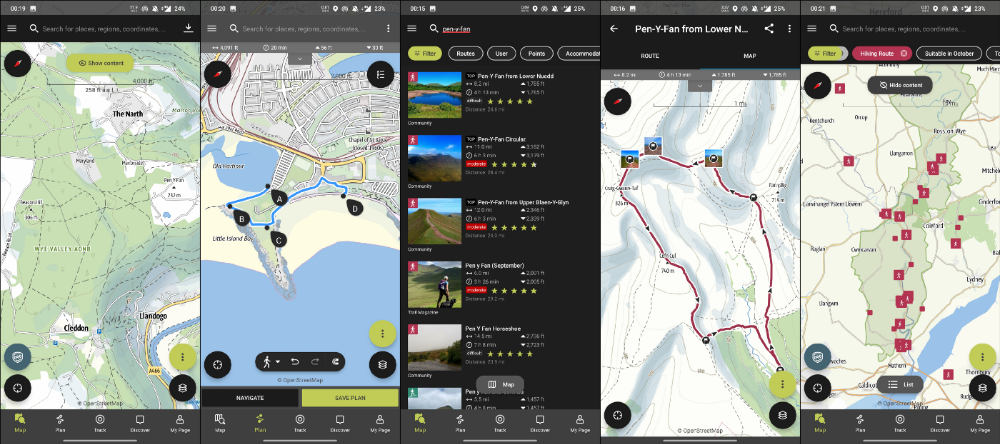
This app shows nearby trails and right-of-ways on top of an Open Street Map.
Helpful detail and data. Any route's distance,
You can download and follow tons of routes planned by app users.
This has helped me find new routes and places a fellow explorer has tried.
Free with non-intrusive ads. Years passed before I subscribed. Pro costs £2.23/month.
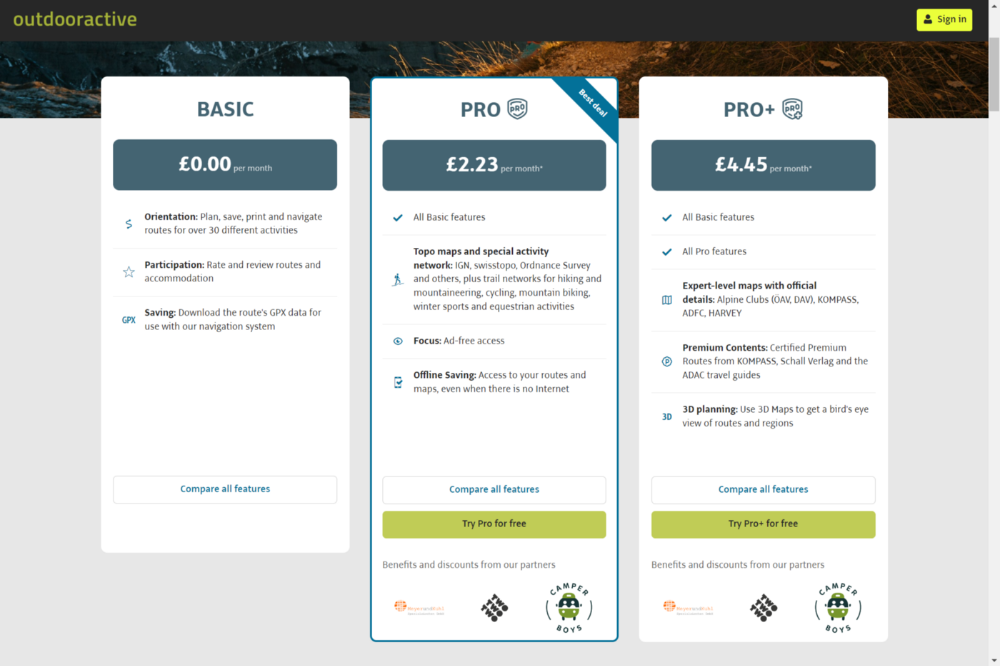
This app is for outdoor lovers.
Google Files
New phones come with bloatware. These rushed apps are frustrating.
We must replace these apps. 2017 was Google's year.
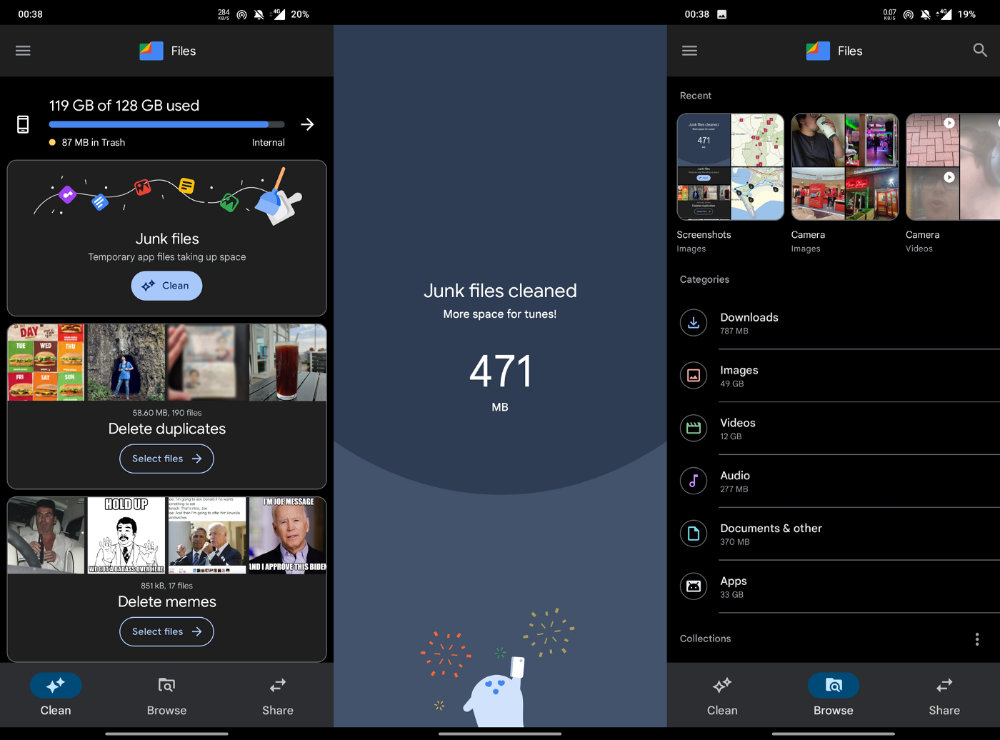
Files is a file manager. It's quick, innovative, and clean. They've given people what they want.
It's easy to organize files, clear space, and clear cache.
I recommend Gallery by Google as a gallery app alternative. It's quick and easy.
Trainline
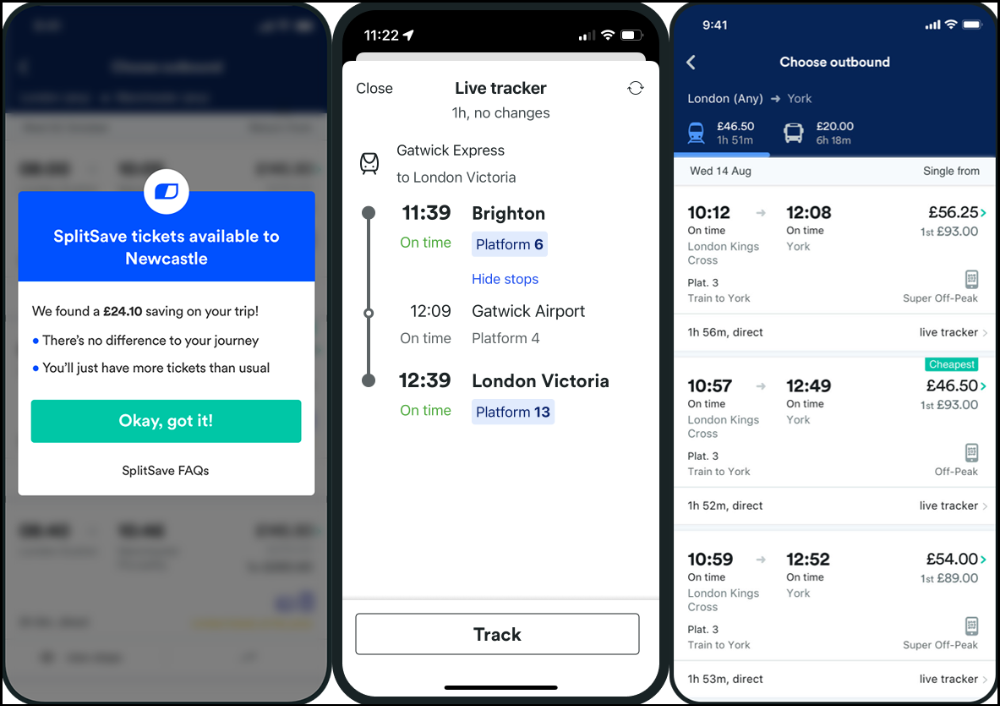
App for trains, buses, and coaches.
I've used this app for years. It did the basics well when I first used it.
Since then, it's improved. It's constantly adding features to make traveling easier and less stressful.
Split-ticketing helps me save hundreds a year on train fares. This app is only available in the UK and Europe.
This service doesn't link to a third-party site. Their app handles everything.
Not all train and coach companies use this app. All the big names are there, though.
Here's more on the app.
Battlefield: Mobile
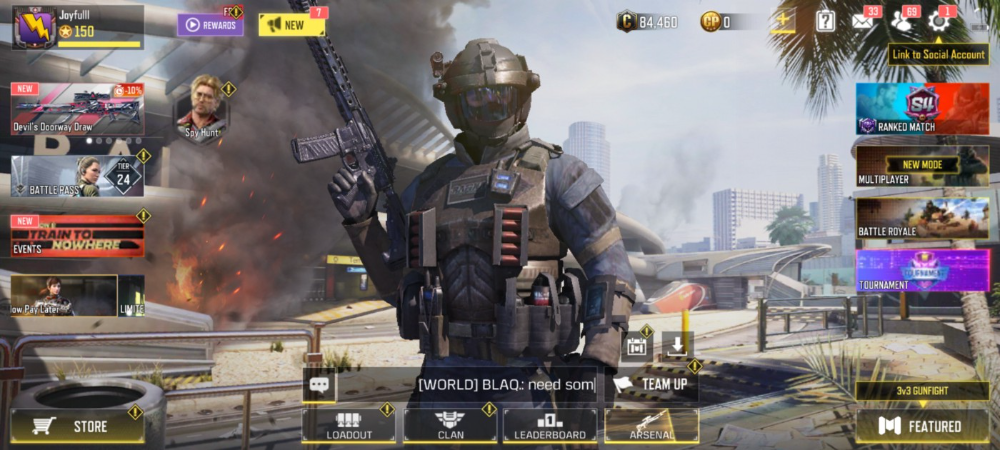
Play Store has 478,000 games. Few can turn my phone into a console.
Call of Duty Mobile and Asphalt 8/9 are examples.
Asphalt's loot boxes and ads make it unplayable. Call of Duty opens with a few ads. Close them to play without hassle.
This game uses all your phone's features to provide a high-quality, seamless experience. If my internet connection is good, I never experience lag or glitches.
The gameplay is energizing and intense, just like on consoles. Sometimes I'm too involved. I've thrown my phone in anger. I'm totally absorbed.
Customizability is my favorite. Since phones have limited screen space, we should only have the buttons we need, placed conveniently.
Size, opacity, and position are modifiable. Adjust audio, graphics, and textures. It's customizable.
This game has been on my phone for three years. It began well and has gotten better. When I think the creators can't do more, they do.
If you play, read my tips for winning a Battle Royale.
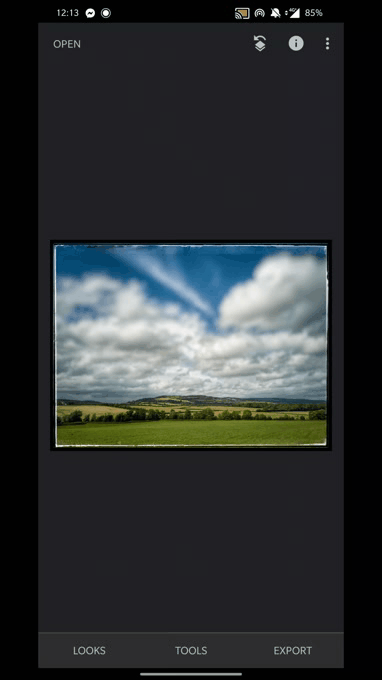
Lightroom
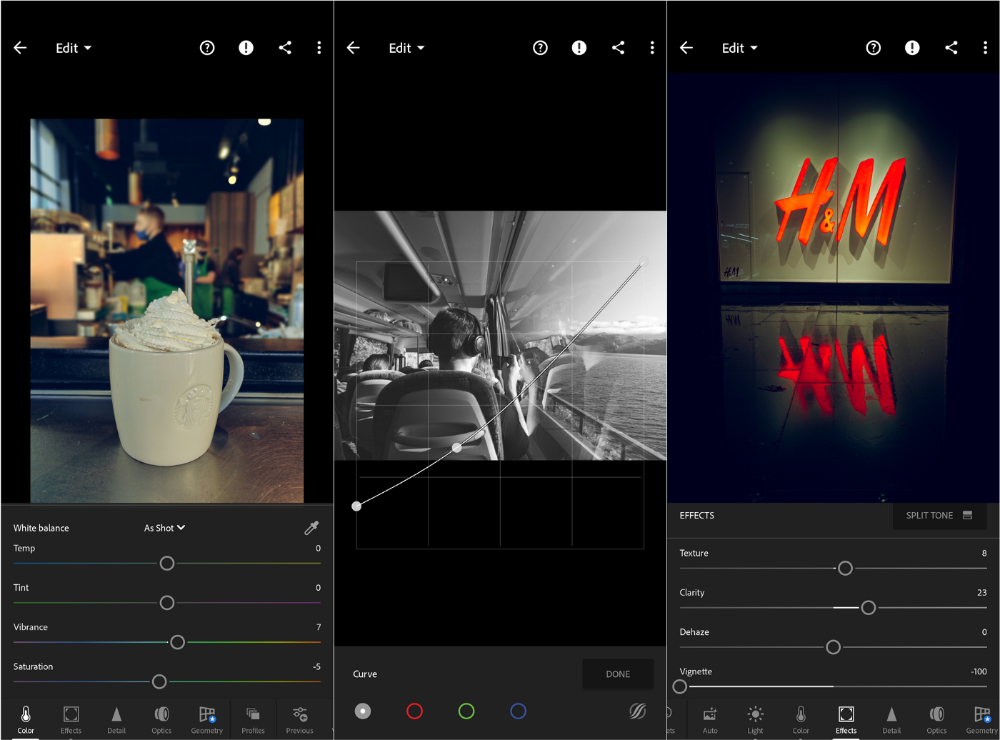
As a photographer, I believe your best camera is on you. The phone.
2017 was a big year for this app. I've tried many photo-editing apps since then. This always wins.
The app is dull. I've never seen better photo editing on a phone.
Adjusting settings and sliders doesn't damage or compress photos. It's detailed.
This is important for phone photos, which are lower quality than professional ones.
Some tools are behind a £4.49/month paywall. Adobe must charge a subscription fee instead of selling licenses. (I'm still bitter about Creative Cloud's price)
Snapseed is my pick. Lightroom is where I do basic editing before moving to Snapseed. Snapseed review:
These apps are great. They cover basic and complex editing needs while traveling.
Final Reflections
I hope you downloaded one of these. Share your favorite apps. These apps are scarce.

Woo
3 years ago
How To Launch A Business Without Any Risk
> Say Hello To The Lean-Hedge Model
People think starting a business requires significant debt and investment. Like Shark Tank, you need a world-changing idea. I'm not saying to avoid investors or brilliant ideas.
Investing is essential to build a genuinely profitable company. Think Apple or Starbucks.
Entrepreneurship is risky because many people go bankrupt from debt. As starters, we shouldn't do it. Instead, use lean-hedge.
Simply defined, you construct a cash-flow business to hedge against long-term investment-heavy business expenses.
What the “fx!$rench-toast” is the lean-hedge model?
When you start a business, your money should move down, down, down, then up when it becomes profitable.
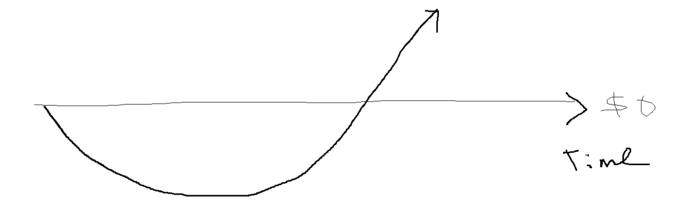
Many people don't survive the business's initial losses and debt. What if, we created a cash-flow business BEFORE we started our Starbucks to hedge against its initial expenses?

Lean-hedge has two sections. Start a cash-flow business. A cash-flow business takes minimal investment and usually involves sweat and time.
Let’s take a look at some examples:
A Translation company
Personal portfolio website (you make a site then you do cold e-mail marketing)
FREELANCE (UpWork, Fiverr).
Educational business.
Infomarketing. (You design a knowledge-based product. You sell the info).
Online fitness/diet/health coaching ($50-$300/month, calls, training plan)
Amazon e-book publishing. (Medium writers do this)
YouTube, cash-flow channel
A web development agency (I'm a dev, but if you're not, a graphic design agency, etc.) (Sell your time.)
Digital Marketing
Online paralegal (A million lawyers work in the U.S).
Some dropshipping (Organic Tik Tok dropshipping, where you create content to drive traffic to your shopify store instead of spend money on ads).
(Disclaimer: My first two cash-flow enterprises, which were language teaching, failed terribly. My translation firm is now booming because B2B e-mail marketing is easy.)
Crossover occurs. Your long-term business starts earning more money than your cash flow business.
My cash-flow business (freelancing, translation) makes $7k+/month.
I’ve decided to start a slightly more investment-heavy digital marketing agency
Here are the anticipated business's time- and money-intensive investments:
($$$) Top Front-End designer's Figma/UI-UX design (in negotiation)
(Time): A little copywriting (I will do this myself)
($$) Creating an animated webpage with HTML (in negotiation)
Backend Development (Duration) (I'll carry out this myself using Laravel.)
Logo Design ($$)
Logo Intro Video for $
Video Intro (I’ll edit this myself with Premiere Pro)
etc.
Then evaluate product, place, price, and promotion. Consider promotion and pricing.
The lean-hedge model's point is:
Don't gamble. Avoid debt. First create a cash-flow project, then grow it steadily.
Check read my previous posts on “Nightmare Mode” (which teaches you how to make work as interesting as video games) and Why most people can't escape a 9-5 to learn how to develop a cash-flow business.

Sammy Abdullah
3 years ago
SaaS payback period data
It's ok and even desired to be unprofitable if you're gaining revenue at a reasonable cost and have 100%+ net dollar retention, meaning you never lose customers and expand them. To estimate the acceptable cost of new SaaS revenue, we compare new revenue to operating loss and payback period. If you pay back the customer acquisition cost in 1.5 years and never lose them (100%+ NDR), you're doing well.
To evaluate payback period, we compared new revenue to net operating loss for the last 73 SaaS companies to IPO since October 2017. (55 out of 73). Here's the data. 1/(new revenue/operating loss) equals payback period. New revenue/operating loss equals cost of new revenue.
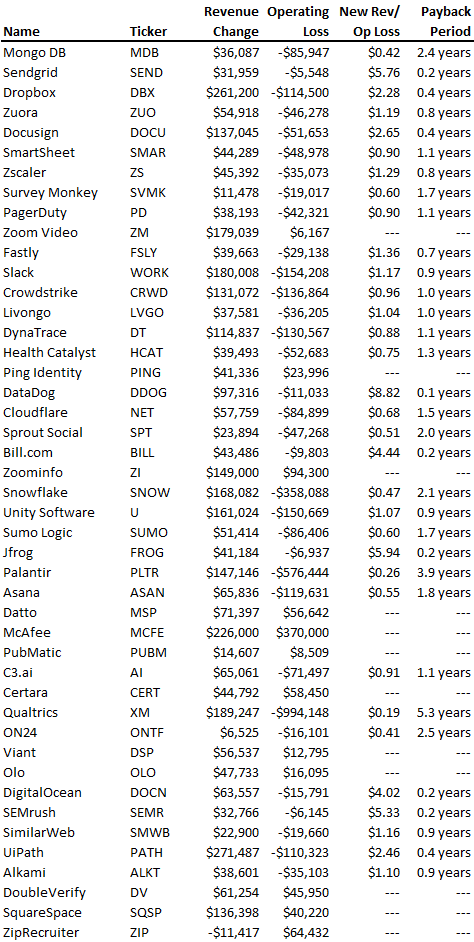
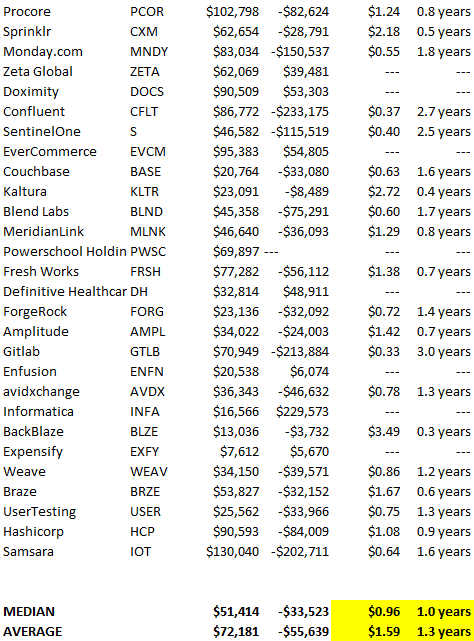
Payback averages a year. 55 SaaS companies that weren't profitable at IPO got a 1-year payback. Outstanding. If you pay for a customer in a year and never lose them (100%+ NDR), you're establishing a valuable business. The average was 1.3 years, which is within the 1.5-year range.
New revenue costs $0.96 on average. These SaaS companies lost $0.96 every $1 of new revenue last year. Again, impressive. Average new revenue per operating loss was $1.59.
Loss-in-operations definition. Operating loss revenue COGS S&M R&D G&A (technical point: be sure to use the absolute value of operating loss). It's wrong to only consider S&M costs and ignore other business costs. Operating loss and new revenue are measured over one year to eliminate seasonality.
Operating losses are desirable if you never lose a customer and have a quick payback period, especially when SaaS enterprises are valued on ARR. The payback period should be under 1.5 years, the cost of new income < $1, and net dollar retention 100%.