


More on Productivity

Cammi Pham
3 years ago
7 Scientifically Proven Things You Must Stop Doing To Be More Productive
Smarter work yields better results.

17-year-old me worked and studied 20 hours a day. During school breaks, I did coursework and ran a nonprofit at night. Long hours earned me national campaigns, A-list opportunities, and a great career. As I aged, my thoughts changed. Working harder isn't necessarily the key to success.
In some cases, doing less work might lead to better outcomes.
Consider a hard-working small business owner. He can't beat his corporate rivals by working hard. Time's limited. An entrepreneur can work 24 hours a day, 7 days a week, but a rival can invest more money, create a staff, and put in more man hours. Why have small startups done what larger companies couldn't? Facebook paid $1 billion for 13-person Instagram. Snapchat, a 30-person startup, rejected Facebook and Google bids. Luck and efficiency each contributed to their achievement.
The key to success is not working hard. It’s working smart.
Being busy and productive are different. Busy doesn't always equal productive. Productivity is less about time management and more about energy management. Life's work. It's using less energy to obtain more rewards. I cut my work week from 80 to 40 hours and got more done. I value simplicity.
Here are seven activities I gave up in order to be more productive.
1. Give up working extra hours and boost productivity instead.
When did the five-day, 40-hour work week start? Henry Ford, Ford Motor Company founder, experimented with his workers in 1926.
He decreased their daily hours from 10 to 8, and shortened the work week from 6 days to 5. As a result, he saw his workers’ productivity increase.
According to a 1980 Business Roundtable report, Scheduled Overtime Effect on Construction Projects, the more you work, the less effective and productive you become.
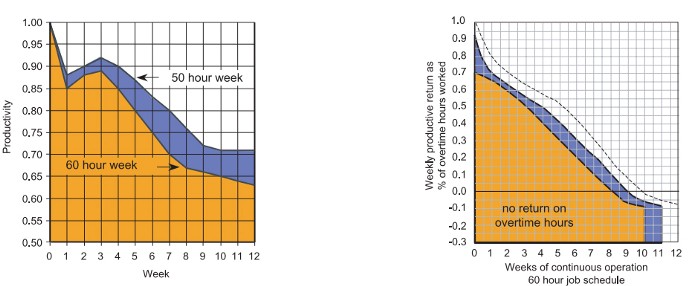
“Where a work schedule of 60 or more hours per week is continued longer than about two months, the cumulative effect of decreased productivity will cause a delay in the completion date beyond that which could have been realized with the same crew size on a 40-hour week.” Source: Calculating Loss of Productivity Due to Overtime Using Published Charts — Fact or Fiction
AlterNet editor Sara Robinson cited US military research showing that losing one hour of sleep per night for a week causes cognitive impairment equivalent to a.10 blood alcohol level. You can get fired for showing up drunk, but an all-nighter is fine.
Irrespective of how well you were able to get on with your day after that most recent night without sleep, it is unlikely that you felt especially upbeat and joyous about the world. Your more-negative-than-usual perspective will have resulted from a generalized low mood, which is a normal consequence of being overtired. More important than just the mood, this mind-set is often accompanied by decreases in willingness to think and act proactively, control impulses, feel positive about yourself, empathize with others, and generally use emotional intelligence. Source: The Secret World of Sleep: The Surprising Science of the Mind at Rest
To be productive, don't overwork and get enough sleep. If you're not productive, lack of sleep may be to blame. James Maas, a sleep researcher and expert, said 7/10 Americans don't get enough sleep.
Did you know?
Leonardo da Vinci slept little at night and frequently took naps.
Napoleon, the French emperor, had no qualms about napping. He splurged every day.
Even though Thomas Edison felt self-conscious about his napping behavior, he regularly engaged in this ritual.
President Franklin D. Roosevelt's wife Eleanor used to take naps before speeches to increase her energy.
The Singing Cowboy, Gene Autry, was known for taking regular naps in his dressing area in between shows.
Every day, President John F. Kennedy took a siesta after eating his lunch in bed.
Every afternoon, oil businessman and philanthropist John D. Rockefeller took a nap in his office.
It was unavoidable for Winston Churchill to take an afternoon snooze. He thought it enabled him to accomplish twice as much each day.
Every afternoon around 3:30, President Lyndon B. Johnson took a nap to divide his day into two segments.
Ronald Reagan, the 40th president, was well known for taking naps as well.
Source: 5 Reasons Why You Should Take a Nap Every Day — Michael Hyatt
Since I started getting 7 to 8 hours of sleep a night, I've been more productive and completed more work than when I worked 16 hours a day. Who knew marketers could use sleep?
2. Refrain from accepting too frequently
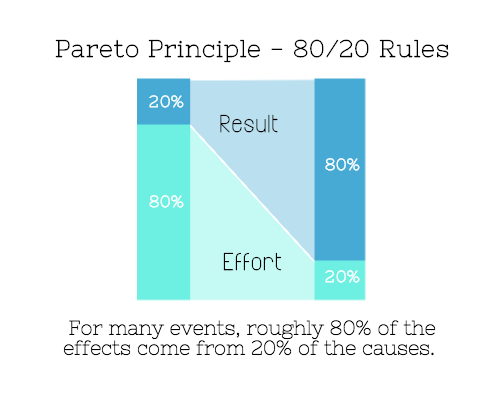
Pareto's principle states that 20% of effort produces 80% of results, but 20% of results takes 80% of effort. Instead of working harder, we should prioritize the initiatives that produce the most outcomes. So we can focus on crucial tasks. Stop accepting unproductive tasks.
“The difference between successful people and very successful people is that very successful people say “no” to almost everything.” — Warren Buffett
What should you accept? Why say no? Consider doing a split test to determine if anything is worth your attention. Track what you do, how long it takes, and the consequences. Then, evaluate your list to discover what worked (or didn't) to optimize future chores.
Most of us say yes more often than we should, out of guilt, overextension, and because it's simpler than no. Nobody likes being awful.
Researchers separated 120 students into two groups for a 2012 Journal of Consumer Research study. One group was educated to say “I can't” while discussing choices, while the other used “I don't”.
The students who told themselves “I can’t eat X” chose to eat the chocolate candy bar 61% of the time. Meanwhile, the students who told themselves “I don’t eat X” chose to eat the chocolate candy bars only 36% of the time. This simple change in terminology significantly improved the odds that each person would make a more healthy food choice.
Next time you need to say no, utilize I don't to encourage saying no to unimportant things.
The 20-second rule is another wonderful way to avoid pursuits with little value. Add a 20-second roadblock to things you shouldn't do or bad habits you want to break. Delete social media apps from your phone so it takes you 20 seconds to find your laptop to access them. You'll be less likely to engage in a draining hobby or habit if you add an inconvenience.
Lower the activation energy for habits you want to adopt and raise it for habits you want to avoid. The more we can lower or even eliminate the activation energy for our desired actions, the more we enhance our ability to jump-start positive change. Source: The Happiness Advantage: The Seven Principles of Positive Psychology That Fuel Success and Performance at Work
3. Stop doing everything yourself and start letting people help you
I once managed a large community and couldn't do it alone. The community took over once I burned out. Members did better than I could have alone. I learned about community and user-generated content.
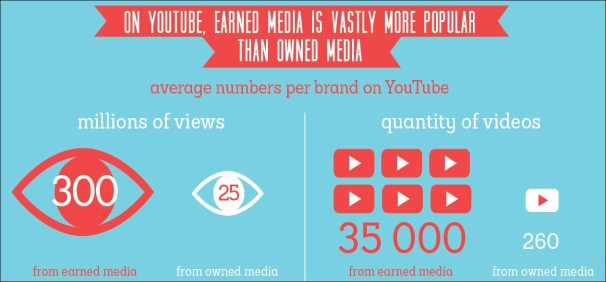
Consumers know what they want better than marketers. Octoly says user-generated videos on YouTube are viewed 10 times more than brand-generated videos. 51% of Americans trust user-generated material more than a brand's official website (16%) or media coverage (22%). (14 percent). Marketers should seek help from the brand community.
Being a successful content marketer isn't about generating the best content, but cultivating a wonderful community.
We should seek aid when needed. We can't do everything. It's best to delegate work so you may focus on the most critical things. Instead of overworking or doing things alone, let others help.
Having friends or coworkers around can boost your productivity even if they can't help.
Just having friends nearby can push you toward productivity. “There’s a concept in ADHD treatment called the ‘body double,’ ” says David Nowell, Ph.D., a clinical neuropsychologist from Worcester, Massachusetts. “Distractable people get more done when there is someone else there, even if he isn’t coaching or assisting them.” If you’re facing a task that is dull or difficult, such as cleaning out your closets or pulling together your receipts for tax time, get a friend to be your body double. Source: Friendfluence: The Surprising Ways Friends Make Us Who We Are
4. Give up striving for perfection
Perfectionism hinders professors' research output. Dr. Simon Sherry, a psychology professor at Dalhousie University, did a study on perfectionism and productivity. Dr. Sherry established a link between perfectionism and productivity.
Perfectionism has its drawbacks.
They work on a task longer than necessary.
They delay and wait for the ideal opportunity. If the time is right in business, you are already past the point.
They pay too much attention to the details and miss the big picture.
Marketers await the right time. They miss out.
The perfect moment is NOW.
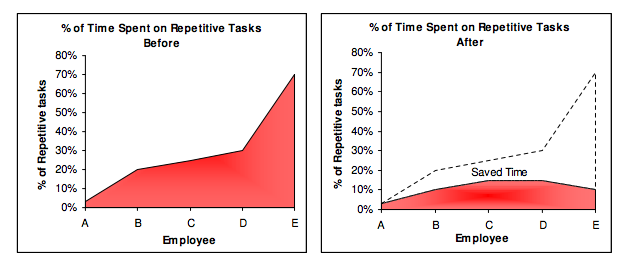
5. Automate monotonous chores instead of continuing to do them.
A team of five workers who spent 3%, 20%, 25%, 30%, and 70% of their time on repetitive tasks reduced their time spent to 3%, 10%, 15%, 15%, and 10% after two months of working to improve their productivity.
Last week, I wrote a 15-minute Python program. I wanted to generate content utilizing Twitter API data and Hootsuite to bulk schedule it. Automation has cut this task from a day to five minutes. Whenever I do something more than five times, I try to automate it.
Automate monotonous chores without coding. Skills and resources are nice, but not required. If you cannot build it, buy it.
People forget time equals money. Manual work is easy and requires little investigation. You can moderate 30 Instagram photographs for your UGC campaign. You need digital asset management software to manage 30,000 photographs and movies from five platforms. Filemobile helps individuals develop more user-generated content. You may buy software to manage rich media and address most internet difficulties.
Hire an expert if you can't find a solution. Spend money to make money, and time is your most precious asset.
Visit GitHub or Google Apps Script library, marketers. You may often find free, easy-to-use open source code.
6. Stop relying on intuition and start supporting your choices with data.
You may optimize your life by optimizing webpages for search engines.
Numerous studies might help you boost your productivity. Did you know individuals are most distracted from midday to 4 p.m.? This is what a Penn State psychology professor found. Even if you can't find data on a particular question, it's easy to run a split test and review your own results.
7. Stop working and spend some time doing absolutely nothing.
Most people don't know that being too focused can be destructive to our work or achievements. The Boston Globe's The Power of Lonely says solo time is excellent for the brain and spirit.
One ongoing Harvard study indicates that people form more lasting and accurate memories if they believe they’re experiencing something alone. Another indicates that a certain amount of solitude can make a person more capable of empathy towards others. And while no one would dispute that too much isolation early in life can be unhealthy, a certain amount of solitude has been shown to help teenagers improve their moods and earn good grades in school. Source: The Power of Lonely
Reflection is vital. We find solutions when we're not looking.
We don't become more productive overnight. It demands effort and practice. Waiting for change doesn't work. Instead, learn about your body and identify ways to optimize your energy and time for a happy existence.

Mickey Mellen
3 years ago
Shifting from Obsidian to Tana?
I relocated my notes database from Roam Research to Obsidian earlier this year expecting to stay there for a long. Obsidian is a terrific tool, and I explained my move in that post.
Moving everything to Tana faster than intended. Tana? Why?
Tana is just another note-taking app, but it does it differently. Three note-taking apps existed before Tana:
simple note-taking programs like Apple Notes and Google Keep.
Roam Research and Obsidian are two graph-style applications that assisted connect your notes.
You can create effective tables and charts with data-focused tools like Notion and Airtable.
Tana is the first great software I've encountered that combines graph and data notes. Google Keep will certainly remain my rapid notes app of preference. This Shu Omi video gives a good overview:
Tana handles everything I did in Obsidian with books, people, and blog entries, plus more. I can find book quotes, log my workouts, and connect my thoughts more easily. It should make writing blog entries notes easier, so we'll see.
Tana is now invite-only, but if you're interested, visit their site and sign up. As Shu noted in the video above, the product hasn't been published yet but seems quite polished.
Whether I stay with Tana or not, I'm excited to see where these apps are going and how they can benefit us all.

Recep İnanç
3 years ago
Effective Technical Book Reading Techniques
Technical books aren't like novels. We need a new approach to technical texts. I've spent years looking for a decent reading method. I tried numerous ways before finding one that worked. This post explains how I read technical books efficiently.
What Do I Mean When I Say Effective?
Effectiveness depends on the book. Effective implies I know where to find answers after reading a reference book. Effective implies I learned the book's knowledge after reading it.
I use reference books as tools in my toolkit. I won't carry all my tools; I'll merely need them. Non-reference books teach me techniques. I never have to make an effort to use them since I always have them.
Reference books I like:
Design Patterns: Elements of Reusable Object-Oriented Software
Refactoring: Improving the Design of Existing Code
You can also check My Top Takeaways from Refactoring here.
Non-reference books I like:
The Approach
Technical books might be overwhelming to read in one sitting. Especially when you have no idea what is coming next as you read. When you don't know how deep the rabbit hole goes, you feel lost as you read. This is my years-long method for overcoming this difficulty.
Whether you follow the step-by-step guide or not, remember these:
Understand the terminology. Make sure you get the meaning of any terms you come across more than once. The likelihood that a term will be significant increases as you encounter it more frequently.
Know when to stop. I've always believed that in order to truly comprehend something, I must delve as deeply as possible into it. That, however, is not usually very effective. There are moments when you have to draw the line and start putting theory into practice (if applicable).
Look over your notes. When reading technical books or documents, taking notes is a crucial habit to develop. Additionally, you must regularly examine your notes if you want to get the most out of them. This will assist you in internalizing the lessons you acquired from the book. And you'll see that the urge to review reduces with time.
Let's talk about how I read a technical book step by step.
0. Read the Foreword/Preface
These sections are crucial in technical books. They answer Who should read it, What each chapter discusses, and sometimes How to Read? This is helpful before reading the book. Who could know the ideal way to read the book better than the author, right?
1. Scanning
I scan the chapter. Fast scanning is needed.
I review the headings.
I scan the pictures quickly.
I assess the chapter's length to determine whether I might divide it into more manageable sections.
2. Skimming
Skimming is faster than reading but slower than scanning.
I focus more on the captions and subtitles for the photographs.
I read each paragraph's opening and closing sentences.
I examined the code samples.
I attempt to grasp each section's basic points without getting bogged down in the specifics.
Throughout the entire reading period, I make an effort to make mental notes of what may require additional attention and what may not. Because I don't want to spend time taking physical notes, kindly notice that I am using the term "mental" here. It is much simpler to recall. You may think that this is more significant than typing or writing “Pay attention to X.”
I move on quickly. This is something I considered crucial because, when trying to skim, it is simple to start reading the entire thing.
3. Complete reading
Previous steps pay off.
I finished reading the chapter.
I concentrate on the passages that I mentally underlined when skimming.
I put the book away and make my own notes. It is typically more difficult than it seems for me. But it's important to speak in your own words. You must choose the right words to adequately summarize what you have read. How do those words make you feel? Additionally, you must be able to summarize your notes while you are taking them. Sometimes as I'm writing my notes, I realize I have no words to convey what I'm thinking or, even worse, I start to doubt what I'm writing down. This is a good indication that I haven't internalized that idea thoroughly enough.
I jot my inquiries down. Normally, I read on while compiling my questions in the hopes that I will learn the answers as I read. I'll explore those issues more if I wasn't able to find the answers to my inquiries while reading the book.
Bonus!
Best part: If you take lovely notes like I do, you can publish them as a blog post with a few tweaks.
Conclusion
This is my learning journey. I wanted to show you. This post may help someone with a similar learning style. You can alter the principles above for any technical material.
You might also like

Al Anany
3 years ago
Because of this covert investment that Bezos made, Amazon became what it is today.
He kept it under wraps for years until he legally couldn’t.
His shirt is incomplete. I can’t stop thinking about this…
Actually, ignore the article. Look at it. JUST LOOK at it… It’s quite disturbing, isn’t it?
Ughh…
Me: “Hey, what up?” Friend: “All good, watching lord of the rings on amazon prime video.” Me: “Oh, do you know how Amazon grew and became famous?” Friend: “Geek alert…Can I just watch in peace?” Me: “But… Bezos?” Friend: “Let it go, just let it go…”
I can question you, the reader, and start answering instantly without his consent. This far.
Reader, how did Amazon succeed? You'll say, Of course, it was an internet bookstore, then it sold everything.
Mistaken. They moved from zero to one because of this. How did they get from one to thousand? AWS-some. Understand? It's geeky and lame. If not, I'll explain my geekiness.
Over an extended period of time, Amazon was not profitable.
Business basics. You want customers if you own a bakery, right?
Well, 100 clients per day order $5 cheesecakes (because cheesecakes are awesome.)
$5 x 100 consumers x 30 days Equals $15,000 monthly revenue. You proudly work here.
Now you have to pay the barista (unless ChatGPT is doing it haha? Nope..)
The barista is requesting $5000 a month.
Each cheesecake costs the cheesecake maker $2.5 ($2.5 × 100 x 30 = $7500).
The monthly cost of running your bakery, including power, is about $5000.
Assume no extra charges. Your operating costs are $17,500.
Just $15,000? You have income but no profit. You might make money selling coffee with your cheesecake next month.
Is losing money bad? You're broke. Losing money. It's bad for financial statements.
It's almost a business ultimatum. Most startups fail. Amazon took nine years.
I'm reading Amazon Unbound: Jeff Bezos and the Creation of a Global Empire to comprehend how a company has a $1 trillion market cap.
Many things made Amazon big. The book claims that Bezos and Amazon kept a specific product secret for a long period.
Clouds above the bald head.
In 2006, Bezos started a cloud computing initiative. They believed many firms like Snapchat would pay for reliable servers.
In 2006, cloud computing was not what it is today. I'll simplify. 2006 had no iPhone.
Bezos invested in Amazon Web Services (AWS) without disclosing its revenue. That's permitted till a certain degree.
Google and Microsoft would realize Amazon is heavily investing in this market and worry.
Bezos anticipated high demand for this product. Microsoft built its cloud in 2010, and Google in 2008.
If you managed Google or Microsoft, you wouldn't know how much Amazon makes from their cloud computing service. It's enough. Yet, Amazon is an internet store, so they'll focus on that.
All but Bezos were wrong.
Time to come clean now.
They revealed AWS revenue in 2015. Two things were apparent:
Bezos made the proper decision to bet on the cloud and keep it a secret.
In this race, Amazon is in the lead.

They continued. Let me list some AWS users today.
Netflix
Airbnb
Twitch
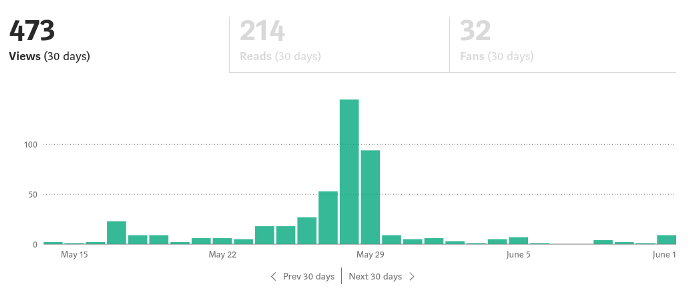
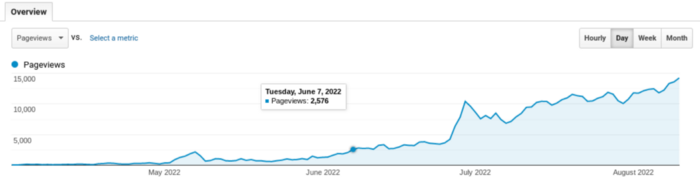
More. Amazon was unprofitable for nine years, remember? This article's main graph.
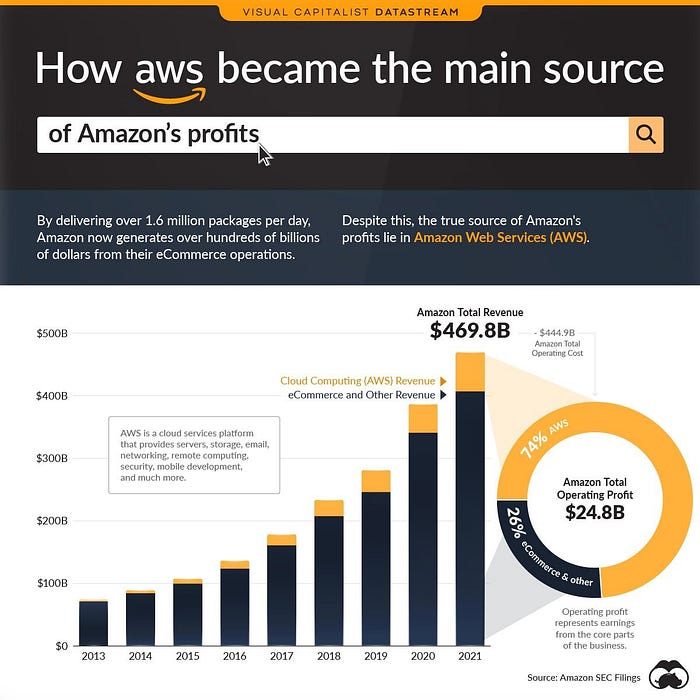
AWS accounted for 74% of Amazon's profit in 2021. This 74% might not exist if they hadn't invested in AWS.
Bring this with you home.
Amazon predated AWS. Yet, it helped the giant reach $1 trillion. Bezos' secrecy? Perhaps, until a time machine is invented (they might host the time machine software on AWS, though.)
Without AWS, Amazon would have been profitable but unimpressive. They may have invested in anything else that would have returned more (like crypto? No? Ok.)
Bezos has business flaws. His success. His failures include:
introducing the Fire Phone and suffering a $170 million loss.
Amazon's failure in China In 2011, Amazon had a about 15% market share in China. 2019 saw a decrease of about 1%.
not offering a higher price to persuade the creator of Netflix to sell the company to him. He offered a rather reasonable $15 million in his proposal. But what if he had offered $30 million instead (Amazon had over $100 million in revenue at the time)? He might have owned Netflix, which has a $156 billion market valuation (and saved billions rather than invest in Amazon Prime Video).
Some he could control. Some were uncontrollable. Nonetheless, every action he made in the foregoing circumstances led him to invest in AWS.

Alexandra Walker-Jones
3 years ago
These are the 15 foods you should eat daily and why.
Research on preventing disease, extending life, and caring for your body from the inside out
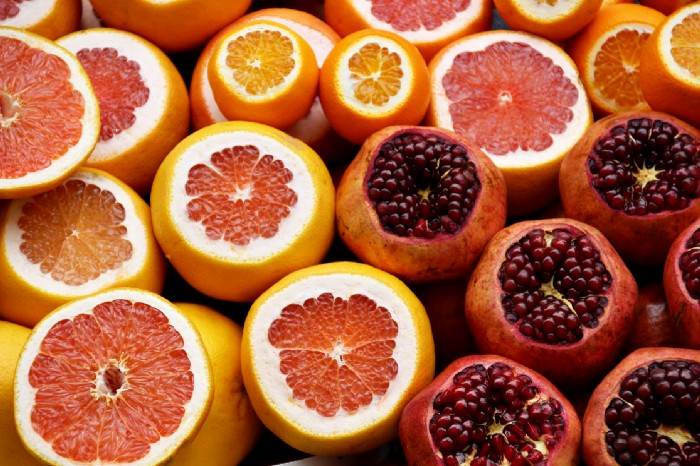
Grapefruit and pomegranates aren't on the list, so ignore that. Mostly, I enjoyed the visual, but those fruits are healthful, too.
15 (or 17 if you consider the photo) different foods a day sounds like a lot. If you're not used to it — it is.
These lists don't aim for perfection. Instead, use this article and the science below to eat more of these foods. If you can eat 5 foods one day and 5 the next, you're doing well. This list should be customized to your requirements and preferences.
“Every time you eat or drink, you are either feeding disease or fighting it” -Heather Morgan.
The 15 Foods That You Should Consume Daily and Why:
1. Dark/Red Berries
(blueberries, blackberries, acai, goji, cherries, strawberries, raspberries)
The 2010 Global Burden of Disease Study is the greatest definitive analysis of death and disease risk factors in history. They found the primary cause of both death, disability, and disease inside the United States was diet.
Not eating enough fruit, and specifically berries, was one of the best predictors of disease (1).
What's special about berries? It's their color! Berries have the most antioxidants of any fruit, second only to spices. The American Cancer Society found that those who ate the most berries were less likely to die of cardiovascular disease.
2. Beans
Soybeans, black beans, kidney beans, lentils, split peas, chickpeas.
Beans are one of the most important predictors of survival in older people, according to global research (2).
For every 20 grams (2 tablespoons) of beans consumed daily, the risk of death is reduced by 8%.
Soybeans and soy foods are high in phytoestrogen, which reduces breast and prostate cancer risks. Phytoestrogen blocks the receptors' access to true estrogen, mitigating the effects of weight gain, dairy (high in estrogen), and hormonal fluctuations (3).
3. Nuts
(almonds, walnuts, pecans, pistachios, Brazil nuts, cashews, hazelnuts, macadamia nuts)
Eating a handful of nuts every day reduces the risk of chronic diseases like heart disease and diabetes. Nuts also reduce oxidation, blood sugar, and LDL (bad) cholesterol, improving arterial function (4).
Despite their high-fat content, studies have linked daily nut consumption to a slimmer waistline and a lower risk of obesity (5).
4. Flaxseed
(milled flaxseed)
2013 research found that ground flaxseed had one of the strongest anti-hypertensive effects of any food. A few tablespoons (added to a smoothie or baked goods) lowered blood pressure and stroke risk 23 times more than daily aerobic exercise (6).
Flax shouldn't replace exercise, but its nutritional punch is worth adding to your diet.
5. Other seeds
(chia seeds, hemp seeds, pumpkin seeds, sesame seeds, fennel seeds)
Seeds are high in fiber and omega-3 fats and can be added to most dishes without being noticed.
When eaten with or after a meal, chia seeds moderate blood sugar and reduce inflammatory chemicals in the blood (7). Overall, a great daily addition.
6. Dates
Dates are one of the world's highest sugar foods, with 80% sugar by weight. Pure cake frosting is 60%, maple syrup is 66%, and cotton-candy jelly beans are 70%.
Despite their high sugar content, dates have a low glycemic index, meaning they don't affect blood sugar levels dramatically. They also improve triglyceride and antioxidant stress levels (8).
Dates are a great source of energy and contain high levels of dietary fiber and polyphenols, making 3-10 dates a great way to fight disease, support gut health with prebiotics, and satisfy a sweet tooth (9).
7. Cruciferous Veggies
(broccoli, Brussel sprouts, horseradish, kale, cauliflower, cabbage, boy choy, arugula, radishes, turnip greens)
Cruciferous vegetables contain an active ingredient that makes them disease-fighting powerhouses. Sulforaphane protects our brain, eyesight, against free radicals and environmental hazards, and treats and prevents cancer (10).
Unless you eat raw cruciferous vegetables daily, you won't get enough sulforaphane (and thus, its protective nutritional benefits). Cooking destroys the enzyme needed to create this super-compound.
If you chop broccoli, cauliflower, or turnip greens and let them sit for 45 minutes before cooking them, the enzyme will have had enough time to work its sulforaphane magic, allowing the vegetables to retain the same nutritional value as if eaten raw. Crazy, right? For more on this, see What Chopping Your Vegetables Has to Do with Fighting Cancer.
8. Whole grains
(barley, brown rice, quinoa, oats, millet, popcorn, whole-wheat pasta, wild rice)
Whole-grains are one of the healthiest ways to consume your daily carbs and help maintain healthy gut flora.
This happens when fibre is broken down in the colon and starts a chain reaction, releasing beneficial substances into the bloodstream and reducing the risk of Type 2 Diabetes and inflammation (11).
9. Spices
(turmeric, cumin, cinnamon, ginger, saffron, cloves, cardamom, chili powder, nutmeg, coriander)
7% of a person's cells will have DNA damage. This damage is caused by tiny breaks in our DNA caused by factors like free-radical exposure.
Free radicals cause mutations that damage lipids, proteins, and DNA, increasing the risk of disease and cancer. Free radicals are unavoidable because they result from cellular metabolism, but they can be avoided by consuming anti-oxidant and detoxifying foods.
Including spices and herbs like rosemary or ginger in our diet may cut DNA damage by 25%. Yes, this damage can be improved through diet. Turmeric worked better at a lower dose (just a pinch, daily). For maximum free-radical fighting (and anti-inflammatory) effectiveness, use 1.5 tablespoons of similar spices (12).
10. Leafy greens
(spinach, collard greens, lettuce, other salad greens, swiss chard)
Studies show that people who eat more leafy greens perform better on cognitive tests and slow brain aging by a year or two (13).
As we age, blood flow to the brain drops due to a decrease in nitric oxide, which prevents blood vessels from dilatation. Daily consumption of nitrate-rich vegetables like spinach and swiss chard may prevent dementia and Alzheimer's.
11. Fermented foods
(sauerkraut, tempeh, kombucha, plant-based kefir)
Miso, kimchi, and sauerkraut contain probiotics that support gut microbiome.
Probiotics balance the good and bad bacteria in our bodies and offer other benefits. Fermenting fruits and vegetables increases their antioxidant and vitamin content, preventing disease in multiple ways (14).
12. Sea vegetables
(seaweed, nori, dulse flakes)
A population study found that eating one sheet of nori seaweed per day may cut breast cancer risk by more than half (15).
Seaweed and sea vegetables may help moderate estrogen levels in the metabolism, reducing cancer and disease risk.
Sea vegetables make up 30% of the world's edible plants and contain unique phytonutrients. A teaspoon of these super sea-foods on your dinner will help fight disease from the inside out.
13. Water
I'm less concerned about whether you consider water food than whether you drink enough. If this list were ranked by what single item led to the best health outcomes, water would be first.
Research shows that people who drink 5 or more glasses of water per day have a 50% lower risk of dying from heart disease than those who drink 2 or less (16).
Drinking enough water boosts energy, improves skin, mental health, and digestion, and reduces the risk of various health issues, including obesity.
14. Tea
All tea consumption is linked to a lower risk of stroke, heart disease, and early death, with green tea leading for antioxidant content and immediate health benefits.
Green tea leaves may also be able to interfere with each stage of cancer formation, from the growth of the first mutated cell to the spread and progression of cancer in the body. Green tea is a quick and easy way to support your long-term and short-term health (17).
15. Supplemental B12 vitamin
B12, or cobalamin, is a vitamin responsible for cell metabolism. Not getting enough B12 can have serious consequences.
Historically, eating vegetables from untreated soil helped humans maintain their vitamin B12 levels. Due to modern sanitization, our farming soil lacks B12.
B12 is often cited as a problem only for vegetarians and vegans (as animals we eat are given B12 supplements before slaughter), but recent studies have found that plant-based eaters have lower B12 deficiency rates than any other diet (18).
Article Sources:

Sarah Bird
3 years ago
Memes Help This YouTube Channel Earn Over $12k Per Month
Take a look at a YouTube channel making anything up to over $12k a month from making very simple videos.
And the best part? Its replicable by anyone. Basic videos can be generated for free without design abilities.
Join me as I deconstruct the channel to estimate how much they make, how they do it, and how you can too.
What Do They Do Exactly?
Happy Land posts memes with a simple caption they wrote. So, it's new. The videos are a slideshow of meme photos with stock music.
The site posts 12 times a day.
8-10-minute videos show 10 second images. Thus, each video needs 48-60 memes.
Memes are video titles (e.g. times a boyfriend was hilarious, back to school fails, funny restaurant signs).
Some stats about the channel:
Founded on October 30, 2020
873 videos were added.
81.8k subscribers
67,244,196 views of the video
What Value Are They Adding?
Everyone can find free memes online. This channel collects similar memes into a single video so you don't have to scroll or click for more. It’s right there, you just keep watching and more will come.
By theming it, the audience is prepared for the video's content.
If you want hilarious animal memes or restaurant signs, choose the video and you'll get up to 60 memes without having to look for them. Genius!
How much money do they make?
According to www.socialblade.com, the channel earns $800-12.8k (image shown in my home currency of GBP).
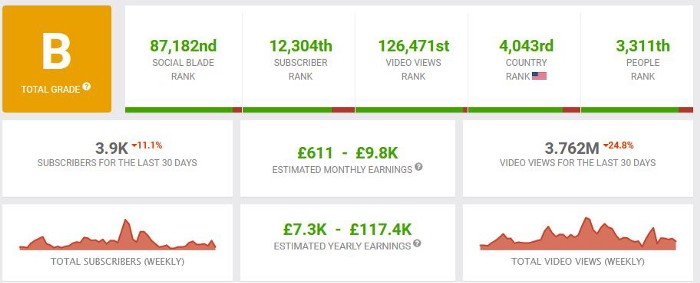
That's a crazy estimate, but it highlights the unbelievable potential of a channel that presents memes.
This channel thrives on quantity, thus putting out videos is necessary to keep the flow continuing and capture its audience's attention.
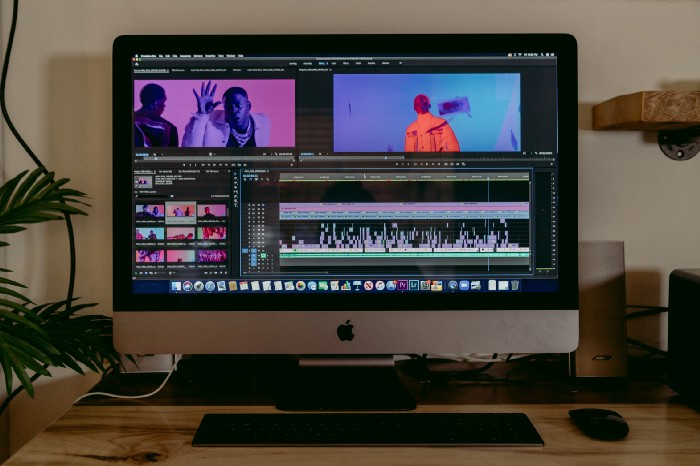
How Are the Videos Made?
Straightforward. Memes are added to a presentation without editing (so you could make this in PowerPoint or Keynote).
Each slide should include a unique image and caption. Set 10 seconds per slide.
Add music and post the video.
Finding enough memes for the material and theming is difficult, but if you enjoy memes, this is a fun job.
This case study should have shown you that you don't need expensive software or design expertise to make entertaining videos. Why not try fresh, easy-to-do ideas and see where they lead?