


More on Productivity

Simon Egersand
3 years ago
Working from home for more than two years has taught me a lot.
Since the pandemic, I've worked from home. It’s been +2 years (wow, time flies!) now, and during this time I’ve learned a lot. My 4 remote work lessons.
I work in a remote distributed team. This team setting shaped my experience and teachings.
Isolation ("I miss my coworkers")
The most obvious point. I miss going out with my coworkers for coffee, weekend chats, or just company while I work. I miss being able to go to someone's desk and ask for help. On a remote world, I must organize a meeting, share my screen, and avoid talking over each other in Zoom - sigh!
Social interaction is more vital for my health than I believed.
Online socializing stinks
My company used to come together every Friday to play Exploding Kittens, have food and beer, and bond over non-work things.
Different today. Every Friday afternoon is for fun, but it's not the same. People with screen weariness miss meetings, which makes sense. Sometimes you're too busy on Slack to enjoy yourself.
We laugh in meetings, but it's not the same as face-to-face.
Digital social activities can't replace real-world ones
Improved Work-Life Balance, if You Let It
At the outset of the pandemic, I recognized I needed to take better care of myself to survive. After not leaving my apartment for a few days and feeling miserable, I decided to walk before work every day. This turned into a passion for exercise, and today I run or go to the gym before work. I use my commute time for healthful activities.
Working from home makes it easier to keep working after hours. I sometimes forget the time and find myself writing coding at dinnertime. I said, "One more test." This is a disadvantage, therefore I keep my office schedule.
Spend your commute time properly and keep to your office schedule.
Remote Pair Programming Is Hard
As a software developer, I regularly write code. My team sometimes uses pair programming to write code collaboratively. One person writes code while another watches, comments, and asks questions. I won't list them all here.
Internet pairing is difficult. My team struggles with this. Even with Tuple, it's challenging. I lose attention when I get a notification or check my computer.
I miss a pen and paper to rapidly sketch down my thoughts for a colleague or a whiteboard for spirited talks with others. Best answers are found through experience.
Real-life pair programming beats the best remote pair programming tools.
Lessons Learned
Here are 4 lessons I've learned working remotely for 2 years.
-
Socializing is more vital to my health than I anticipated.
-
Digital social activities can't replace in-person ones.
-
Spend your commute time properly and keep your office schedule.
-
Real-life pair programming beats the best remote tools.
Conclusion
Our era is fascinating. Remote labor has existed for years, but software companies have just recently had to adapt. Companies who don't offer remote work will lose talent, in my opinion.
We're still figuring out the finest software development approaches, programming language features, and communication methods since the 1960s. I can't wait to see what advancements assist us go into remote work.
I'll certainly work remotely in the next years, so I'm interested to see what I've learnt from this post then.
This post is a summary of this one.

wordsmithwriter
3 years ago
2023 Will Be the Year of Evernote and Craft Notetaking Apps.
Note-taking is a vital skill. But it's mostly learned.

Recently, innovative note-taking apps have flooded the market.
In the next few years, Evernote and Craft will be important digital note-taking companies.
Evernote is a 2008 note-taking program. It can capture ideas, track tasks, and organize information on numerous platforms.
It's one of the only note-taking app that lets users input text, audio, photos, and videos. It's great for collecting research notes, brainstorming, and remaining organized.
Craft is a popular note-taking app.
Craft is a more concentrated note-taking application than Evernote. It organizes notes into subjects, tags, and relationships, making it ideal for technical or research notes.
Craft's search engine makes it easy to find what you need.
Both Evernote and Craft are likely to be the major players in digital note-taking in the years to come.
Their concentration on gathering and organizing information lets users generate notes quickly and simply. Multimedia elements and a strong search engine make them the note-taking apps of the future.
Evernote and Craft are great note-taking tools for staying organized and tracking ideas and projects.
With their focus on acquiring and organizing information, they'll dominate digital note-taking in 2023.
Pros
Concentrate on gathering and compiling information
special features including a strong search engine and multimedia components
Possibility of subject, tag, and relationship structuring
enables users to incorporate multimedia elements
Excellent tool for maintaining organization, arranging research notes, and brainstorming
Cons
Software may be difficult for folks who are not tech-savvy to utilize.
Limited assistance for hardware running an outdated operating system
Subscriptions could be pricey.
Data loss risk because of security issues
Evernote and Craft both have downsides.
The risk of data loss as a result of security flaws and software defects comes first.
Additionally, their subscription fees could be high, and they might restrict support for hardware that isn't running the newest operating systems.
Finally, folks who need to be tech-savvy may find the software difficult.
Evernote versus. Productivity Titans Evernote will make Notion more useful. medium.com

Maria Stepanova
3 years ago
How Elon Musk Picks Things Up Quicker Than Anyone Else
Adopt Elon Musk's learning strategy to succeed.

Medium writers rank first and second when you Google “Elon Musk's learning approach”.
My article idea seems unoriginal. Lol
Musk is brilliant.
No doubt here.
His name connotes success and intelligence.
He knows rocket science, engineering, AI, and solar power.
Musk is a Unicorn, but his skills aren't special.
How does he manage it?
Elon Musk has two learning rules that anyone may use.
You can apply these rules and become anyone you want.
You can become a rocket scientist or a surgeon. If you want, of course.
The learning process is key.
Make sure you are creating a Tree of Knowledge according to Rule #1.
Musk told Reddit how he learns:
“It is important to view knowledge as sort of a semantic tree — make sure you understand the fundamental principles, i.e. the trunk and big branches, before you get into the leaves/details or there is nothing for them to hang onto.”
Musk understands the essential ideas and mental models of each of his business sectors.
He starts with the tree's trunk, making sure he learns the basics before going on to branches and leaves.
We often act otherwise. We memorize small details without understanding how they relate to the whole. Our minds are stuffed with useless data.
Cramming isn't learning.
Start with the basics to learn faster. Before diving into minutiae, grasp the big picture.

Rule #2: You can't connect what you can't remember.
Elon Musk transformed industries this way. As his expertise grew, he connected branches and leaves from different trees.
Musk read two books a day as a child. He didn't specialize like most people. He gained from his multidisciplinary education. It helped him stand out and develop billion-dollar firms.
He gained skills in several domains and began connecting them. World-class performances resulted.
Most of us never learn the basics and only collect knowledge. We never really comprehend information, thus it's hard to apply it.
Learn the basics initially to maximize your chances of success. Then start learning.
Learn across fields and connect them.
This method enabled Elon Musk to enter and revolutionize a century-old industry.
You might also like

Stephen Moore
3 years ago
A Meta-Reversal: Zuckerberg's $71 Billion Loss
The company's epidemic gains are gone.

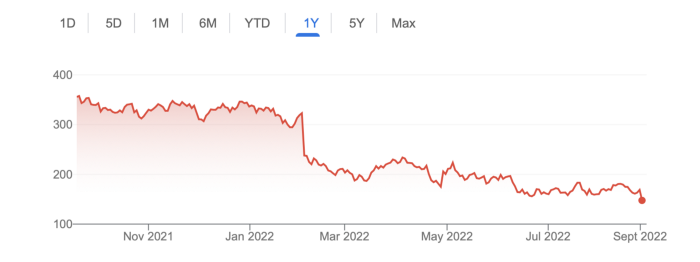
Mark Zuckerberg was in line behind Jeff Bezos and Bill Gates less than two years ago. His wealth soared to $142 billion. Facebook's shares reached $382 in September 2021.
What comes next is either the start of something truly innovative or the beginning of an epic rise and fall story.
In order to start over (and avoid Facebook's PR issues), he renamed the firm Meta. Along with the new logo, he announced a turn into unexplored territory, the Metaverse, as the next chapter for the internet after mobile. Or, Zuckerberg believed Facebook's death was near, so he decided to build a bigger, better, cooler ship. Then we saw his vision (read: dystopian nightmare) in a polished demo that showed Zuckerberg in a luxury home and on a spaceship with aliens. Initially, it looked entertaining. A problem was obvious, though. He might claim this was the future and show us using the Metaverse for business, play, and more, but when I took off my headset, I'd realize none of it was genuine.
The stock price is almost as low as January 2019, when Facebook was dealing with the aftermath of the Cambridge Analytica crisis.
Irony surrounded the technology's aim. Zuckerberg says the Metaverse connects people. Despite some potential uses, this is another step away from physical touch with people. Metaverse worlds can cause melancholy, addiction, and mental illness. But forget all the cool stuff you can't afford. (It may be too expensive online, too.)
Metaverse activity slowed for a while. In early February 2022, we got an earnings call update. Not good. Reality Labs lost $10 billion on Oculus and Zuckerberg's Metaverse. Zuckerberg expects losses to rise. Meta's value dropped 20% in 11 minutes after markets closed.
It was a sign of things to come.
The corporation has failed to create interest in Metaverse, and there is evidence the public has lost interest. Meta still relies on Facebook's ad revenue machine, which is also struggling. In July, the company announced a decrease in revenue and missed practically all its forecasts, ending a decade of exceptional growth and relentless revenue. They blamed a dismal advertising demand climate, and Apple's monitoring changes smashed Meta's ad model. Throw in whistleblowers, leaked data revealing the firm knows Instagram negatively affects teens' mental health, the current Capital Hill probe, and the fact TikTok is eating its breakfast, lunch, and dinner, and 2022 might be the corporation's worst year ever.
After a rocky start, tech saw unprecedented growth during the pandemic. It was a tech bubble and then some.
The gains reversed after the dust settled and stock markets adjusted. Meta's year-to-date decline is 60%. Apple Inc is down 14%, Amazon is down 26%, and Alphabet Inc is down 29%. At the time of writing, Facebook's stock price is almost as low as January 2019, when the Cambridge Analytica scandal broke. Zuckerberg owns 350 million Meta shares. This drop costs him $71 billion.
The company's problems are growing, and solutions won't be easy.
Facebook's period of unabated expansion and exorbitant ad revenue is ended, and the company's impact is dwindling as it continues to be the program that only your parents use. Because of the decreased ad spending and stagnant user growth, Zuckerberg will have less time to create his vision for the Metaverse because of the declining stock value and decreasing ad spending.
Instagram is progressively dying in its attempt to resemble TikTok, alienating its user base and further driving users away from Meta-products.
And now that the corporation has shifted its focus to the Metaverse, it is clear that, in its eagerness to improve its image, it fired the launch gun too early. You're fighting a lost battle when you announce an idea and then claim it won't happen for 10-15 years. When the idea is still years away from becoming a reality, the public is already starting to lose interest.
So, as I questioned earlier, is it the beginning of a technological revolution that will take this firm to stratospheric growth and success, or are we witnessing the end of Meta and Zuckerberg himself?

Rachel Greenberg
3 years ago
6 Causes Your Sales Pitch Is Unintentionally Repulsing Customers
Skip this if you don't want to discover why your lively, no-brainer pitch isn't making $10k a month.

You don't want to be repulsive as an entrepreneur or anyone else. Making friends, influencing people, and converting strangers into customers will be difficult if your words evoke disgust, distrust, or disrespect. You may be one of many entrepreneurs who do this obliviously and involuntarily.
I've had to master selling my skills to recruiters (to land 6-figure jobs on Wall Street), selling companies to buyers in M&A transactions, and selling my own companies' products to strangers-turned-customers. I probably committed every cardinal sin of sales repulsion before realizing it was me or my poor salesmanship strategy.
If you're launching a new business, frustrated by low conversion rates, or just curious if you're repelling customers, read on to identify (and avoid) the 6 fatal errors that can kill any sales pitch.
1. The first indication
So many people fumble before they even speak because they assume their role is to convince the buyer. In other words, they expect to pressure, arm-twist, and combat objections until they convert the buyer. Actuality, the approach stinks of disgust, and emotionally-aware buyers would feel "gross" immediately.
Instead of trying to persuade a customer to buy, ask questions that will lead them to do so on their own. When a customer discovers your product or service on their own, they need less outside persuasion. Why not position your offer in a way that leads customers to sell themselves on it?
2. A flawless performance
Are you memorizing a sales script, tweaking video testimonials, and expunging historical blemishes before hitting "publish" on your new campaign? If so, you may be hurting your conversion rate.
Perfection may be a step too far and cause prospects to mistrust your sincerity. Become a great conversationalist to boost your sales. Seriously. Being charismatic is hard without being genuine and showing a little vulnerability.
People like vulnerability, even if it dents your perfect facade. Show the customer's stuttering testimonial. Open up about your or your company's past mistakes (and how you've since improved). Make your sales pitch a two-way conversation. Let the customer talk about themselves to build rapport. Real people sell, not canned scripts and movie-trailer testimonials.
If marketing or sales calls feel like a performance, you may be doing something wrong or leaving money on the table.
3. Your greatest phobia
Three minutes into prospect talks, I'd start sweating. I was talking 100 miles per hour, covering as many bases as possible to avoid the ones I feared. I knew my then-offering was inadequate and my firm had fears I hadn't addressed. So I word-vomited facts, features, and everything else to avoid the customer's concerns.
Do my prospects know I'm insecure? Maybe not, but it added an unnecessary and unhelpful layer of paranoia that kept me stressed, rushed, and on edge instead of connecting with the prospect. Skirting around a company, product, or service's flaws or objections is a poor, temporary, lazy (and cowardly) decision.
How can you project confidence and trust if you're afraid? Before you make another sales call, face your shortcomings, weak points, and objections. Your company won't be everyone's cup of tea, but you should have answers to every question or objection. You should be your business's top spokesperson and defender.
4. The unintentional apologies
Have you ever begged for a sale? I'm going to say no, however you may be unknowingly emitting sorry, inferior, insecure energy.
Young founders, first-time entrepreneurs, and those with severe imposter syndrome may elevate their target customer. This is common when trying to get first customers for obvious reasons.
Since you're truly new at this, you naturally lack experience.
You don't have the self-confidence boost of thousands or hundreds of closed deals or satisfied client results to remind you that your good or service is worthwhile.
Getting those initial few clients seems like the most difficult task, as if doing so will decide the fate of your company as a whole (it probably won't, and you shouldn't actually place that much emphasis on any one transaction).
Customers can smell fear, insecurity, and anxiety just like they can smell B.S. If you believe your product or service improves clients' lives, selling it should feel like a benevolent act of service, not a sleazy money-grab. If you're a sincere entrepreneur, prospects will believe your proposition; if you're apprehensive, they'll notice.
Approach every sale as if you're fine with or without it. This has improved my salesmanship, marketing skills, and mental health. When you put pressure on yourself to close a sale or convince a difficult prospect "or else" (your company will fail, your rent will be late, your electricity will be cut), you emit desperation and lower the quality of your pitch. There's no point.
5. The endless promises
We've all read a million times how to answer or disprove prospects' arguments and add extra incentives to speed or secure the close. Some objections shouldn't be refuted. What if I told you not to offer certain incentives, bonuses, and promises? What if I told you to walk away from some prospects, even if it means losing your sales goal?
If you market to enough people, make enough sales calls, or grow enough companies, you'll encounter prospects who can't be satisfied. These prospects have endless questions, concerns, and requests for more, more, more that you'll never satisfy. These people are a distraction, a resource drain, and a test of your ability to cut losses before they erode your sanity and profit margin.
To appease or convert these insatiably needy, greedy Nellies into customers, you may agree with or acquiesce to every request and demand — even if you can't follow through. Once you overpromise and answer every hole they poke, their trust in you may wane quickly.
Telling a prospect what you can't do takes courage and integrity. If you're honest, upfront, and willing to admit when a product or service isn't right for the customer, you'll gain respect and positive customer experiences. Sometimes honesty is the most refreshing pitch and the deal-closer.
6. No matter what
Have you ever said, "I'll do anything to close this sale"? If so, you've probably already been disqualified. If a prospective customer haggles over a price, requests a discount, or continues to wear you down after you've made three concessions too many, you have a metal hook in your mouth, not them, and it may not end well. Why?
If you're so willing to cut a deal that you cut prices, comp services, extend payment plans, waive fees, etc., you betray your own confidence that your product or service was worth the stated price. They wonder if anyone is paying those prices, if you've ever had a customer (who wasn't a blood relative), and if you're legitimate or worth your rates.
Once a prospect senses that you'll do whatever it takes to get them to buy, their suspicions rise and they wonder why.
Why are you cutting pricing if something is wrong with you or your service?
Why are you so desperate for their sale?
Why aren't more customers waiting in line to pay your pricing, and if they aren't, what on earth are they doing there?
That's what a prospect thinks when you reveal your lack of conviction, desperation, and willingness to give up control. Some prospects will exploit it to drain you dry, while others will be too frightened to buy from you even if you paid them.
Walking down a two-way street. Be casual.
If we track each act of repulsion to an uneasiness, fear, misperception, or impulse, it's evident that these sales and marketing disasters were forced communications. Stiff, imbalanced, divisive, combative, bravado-filled, and desperate. They were unnatural and accepted a power struggle between two sparring, suspicious, unequal warriors, rather than a harmonious oneness of two natural, but opposite parties shaking hands.
Sales should be natural, harmonious. Sales should feel good for both parties, not like one party is having their arm twisted.
You may be doing sales wrong if it feels repulsive, icky, or degrading. If you're thinking cringe-worthy thoughts about yourself, your product, service, or sales pitch, imagine what you're projecting to prospects. Don't make it unpleasant, repulsive, or cringeworthy.

Frederick M. Hess
3 years ago
The Lessons of the Last Two Decades for Education Reform
My colleague Ilana Ovental and I examined pandemic media coverage of education at the end of last year. That analysis examined coverage changes. We tracked K-12 topic attention over the previous two decades using Lexis Nexis. See the results here.
I was struck by how cleanly the past two decades can be divided up into three (or three and a half) eras of school reform—a framing that can help us comprehend where we are and how we got here. In a time when epidemic, political unrest, frenetic news cycles, and culture war can make six months seem like a lifetime, it's worth pausing for context.
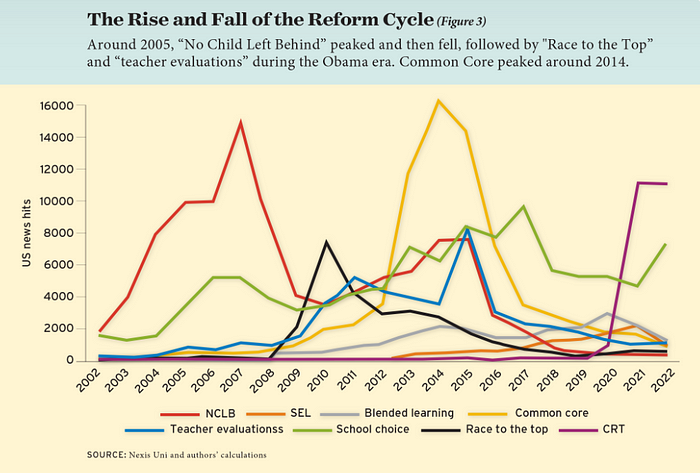
If you look at the peaks in the above graph, the 21st century looks to be divided into periods. The decade-long rise and fall of No Child Left Behind began during the Bush administration. In a few years, NCLB became the dominant K-12 framework. Advocates and financiers discussed achievement gaps and measured success with AYP.
NCLB collapsed under the weight of rigorous testing, high-stakes accountability, and a race to the bottom by the Obama years. Obama's Race to the Top garnered attention, but its most controversial component, the Common Core State Standards, rose quickly.
Academic standards replaced assessment and accountability. New math, fiction, and standards were hotly debated. Reformers and funders chanted worldwide benchmarking and systems interoperability.
We went from federally driven testing and accountability to government encouraged/subsidized/mandated (pick your verb) reading and math standardization. Last year, Checker Finn and I wrote The End of School Reform? The 2010s populist wave thwarted these objectives. The Tea Party, Occupy Wall Street, Black Lives Matter, and Trump/MAGA all attacked established institutions.
Consequently, once the Common Core fell, no alternative program emerged. Instead, school choice—the policy most aligned with populist suspicion of institutional power—reached a half-peak. This was less a case of choice erupting to prominence than of continuous growth in a vacuum. Even with Betsy DeVos' determined, controversial efforts, school choice received only half the media attention that NCLB and Common Core did at their heights.
Recently, culture clash-fueled attention to race-based curriculum and pedagogy has exploded (all playing out under the banner of critical race theory). This third, culture war-driven wave may not last as long as the other waves.
Even though I don't understand it, the move from slow-building policy debate to fast cultural confrontation over two decades is notable. I don't know if it's cyclical or permanent, or if it's about schooling, media, public discourse, or all three.
One final thought: After doing this work for decades, I've noticed how smoothly advocacy groups, associations, and other activists adapt to the zeitgeist. In 2007, mission statements focused on accomplishment disparities. Five years later, they promoted standardization. Language has changed again.
Part of this is unavoidable and healthy. Chasing currents can also make companies look unprincipled, promote scepticism, and keep them spinning the wheel. Bearing in mind that these tides ebb and flow may give educators, leaders, and activists more confidence to hold onto their values and pause when they feel compelled to follow the crowd.