


What is Bionic Reading?
Senses help us navigate a complicated world. They shape our worldview - how we hear, smell, feel, and taste. People claim a sixth sense, an intuitive capacity that extends perception.
Our brain is a half-pool of grey and white matter that stores data from our senses. Brains provide us context, so zombies' obsession makes sense.
Bionic reading uses the brain's visual information and context to simplify text comprehension.
Stay with me.
What is Bionic Reading?
Bionic reading is a software application established by Swiss typographic designer Renato Casutt. The term honors the brain (bio) and technology's collaboration to better text comprehension.
The image above shows two similar paragraphs with bionic reading.
Notice anything yet?
This Twitter user did.
I did too...
Image text describes bionic reading-
New method to aid reading by using artificial fixation points. The reader focuses on the highlighted starting letters, and the brain completes the word.
How is Bionic Reading possible?
Do you remember seeing social media posts asking you to stare at a black dot for 30 seconds (or more)? You blink and see an after-image on your wall.
Our brains are skilled at identifying patterns and'seeing' familiar objects, therefore optical illusions are conceivable.
Brain and sight collaborate well. Text comprehension proves it.
Considering evolutionary patterns, humans' understanding skills may be cosmic luck.
Scientists don't know why people can read and write, but they do know what reading does to the brain.
One portion of your brain recognizes words, while another analyzes their meaning. Fixation, saccade, and linguistic transparency/opacity aid.
Let's explain some terms.
-
Fixation is how the eyes move when reading. It's where you look. If the eyes fixate less, a reader can read quicker. [Eye fixation is a physiological process](Eye fixation is a naturally occurring physiological process) impacted by the reader's vocabulary, vision span, and text familiarity.
-
Saccade - Pause and look around. That's a saccade. Rapid eye movements that alter the place of fixation, as reading text or looking around a room. They can happen willingly (when you choose) or instinctively, even when your eyes are fixed.
-
Linguistic transparency and opacity analyze how well a composite word or phrase may be deduced from its constituents.
The Bionic reading website compares these tools.
Text highlights lead the eye. Fixation, saccade, and opacity can transfer visual stimuli to text, changing typeface.
## Final Thoughts on Bionic Reading
I'm excited about how this could influence my long-term assimilation and productivity.
This technology is still in development, with prototypes working on only a few apps. Like any new tech, it will be criticized.
I'll be watching Bionic Reading closely. Comment on it!
More on Productivity

Leonardo Castorina
3 years ago
How to Use Obsidian to Boost Research Productivity
Tools for managing your PhD projects, reading lists, notes, and inspiration.
As a researcher, you have to know everything. But knowledge is useless if it cannot be accessed quickly. An easy-to-use method of archiving information makes taking notes effortless and enjoyable.
As a PhD student in Artificial Intelligence, I use Obsidian (https://obsidian.md) to manage my knowledge.
The article has three parts:
- What is a note, how to organize notes, tags, folders, and links? This section is tool-agnostic, so you can use most of these ideas with any note-taking app.
- Instructions for using Obsidian, managing notes, reading lists, and useful plugins. This section demonstrates how I use Obsidian, my preferred knowledge management tool.
- Workflows: How to use Zotero to take notes from papers, manage multiple projects' notes, create MOCs with Dataview, and more. This section explains how to use Obsidian to solve common scientific problems and manage/maintain your knowledge effectively.
This list is not perfect or complete, but it is my current solution to problems I've encountered during my PhD. Please leave additional comments or contact me if you have any feedback. I'll try to update this article.
Throughout the article, I'll refer to your digital library as your "Obsidian Vault" or "Zettelkasten".
Other useful resources are listed at the end of the article.
1. Philosophy: Taking and organizing notes
Carl Sagan: “To make an apple pie from scratch, you must first create the universe.”
Before diving into Obsidian, let's establish a Personal Knowledge Management System and a Zettelkasten. You can skip to Section 2 if you already know these terms.
Niklas Luhmann, a prolific sociologist who wrote 400 papers and 70 books, inspired this section and much of Zettelkasten. Zettelkasten means “slip box” (or library in this article). His Zettlekasten had around 90000 physical notes, which can be found here.
There are now many tools available to help with this process. Obsidian's website has a good introduction section: https://publish.obsidian.md/hub/
Notes
We'll start with "What is a note?" Although it may seem trivial, the answer depends on the topic or your note-taking style. The idea is that a note is as “atomic” (i.e. You should read the note and get the idea right away.
The resolution of your notes depends on their detail. Deep Learning, for example, could be a general description of Neural Networks, with a few notes on the various architectures (eg. Recurrent Neural Networks, Convolutional Neural Networks etc..).
Limiting length and detail is a good rule of thumb. If you need more detail in a specific section of this note, break it up into smaller notes. Deep Learning now has three notes:
- Deep Learning
- Recurrent Neural Networks
- Convolutional Neural Networks
Repeat this step as needed until you achieve the desired granularity. You might want to put these notes in a “Neural Networks” folder because they are all about the same thing. But there's a better way:
#Tags and [[Links]] over /Folders/
The main issue with folders is that they are not flexible and assume that all notes in the folder belong to a single category. This makes it difficult to make connections between topics.
Deep Learning has been used to predict protein structure (AlphaFold) and classify images (ImageNet). Imagine a folder structure like this:
- /Proteins/
- Protein Folding
- /Deep Learning/
- /Proteins/
Your notes about Protein Folding and Convolutional Neural Networks will be separate, and you won't be able to find them in the same folder.
This can be solved in several ways. The most common one is to use tags rather than folders. A note can be grouped with multiple topics this way. Obsidian tags can also be nested (have subtags).
You can also link two notes together. You can build your “Knowledge Graph” in Obsidian and other note-taking apps like Obsidian.
My Knowledge Graph. Green: Biology, Red: Machine Learning, Yellow: Autoencoders, Blue: Graphs, Brown: Tags.
My Knowledge Graph and the note “Backrpropagation” and its links.
Backpropagation note and all its links
Why use Folders?
Folders help organize your vault as it grows. The main suggestion is to have few folders that "weakly" collect groups of notes or better yet, notes from different sources.
Among my Zettelkasten folders are:
My Zettelkasten's 5 folders
They usually gather data from various sources:
MOC: Map of Contents for the Zettelkasten.
Projects: Contains one note for each side-project of my PhD where I log my progress and ideas. Notes are linked to these.
Bio and ML: These two are the main content of my Zettelkasten and could theoretically be combined.
Papers: All my scientific paper notes go here. A bibliography links the notes. Zotero .bib file
Books: I make a note for each book I read, which I then split into multiple notes.
Keeping images separate from other files can help keep your main folders clean.
I will elaborate on these in the Workflow Section.
My general recommendation is to use tags and links instead of folders.
Maps of Content (MOC)
Making Tables of Contents is a good solution (MOCs).
These are notes that "signposts" your Zettelkasten library, directing you to the right type of notes. It can link to other notes based on common tags. This is usually done with a title, then your notes related to that title. As an example:
An example of a Machine Learning MOC generated with Dataview.
As shown above, my Machine Learning MOC begins with the basics. Then it's on to Variational Auto-Encoders. Not only does this save time, but it also saves scrolling through the tag search section.
So I keep MOCs at the top of my library so I can quickly find information and see my library. These MOCs are generated automatically using an Obsidian Plugin called Dataview (https://github.com/blacksmithgu/obsidian-dataview).
Ideally, MOCs could be expanded to include more information about the notes, their status, and what's left to do. In the absence of this, Dataview does a fantastic job at creating a good structure for your notes.
In the absence of this, Dataview does a fantastic job at creating a good structure for your notes.
2. Tools: Knowing Obsidian
Obsidian is my preferred tool because it is free, all notes are stored in Markdown format, and each panel can be dragged and dropped. You can get it here: https://obsidian.md/
Obsidian interface.
Obsidian is highly customizable, so here is my preferred interface:
The theme is customized from https://github.com/colineckert/obsidian-things
Alternatively, each panel can be collapsed, moved, or removed as desired. To open a panel later, click on the vertical "..." (bottom left of the note panel).
My interface is organized as follows:
How my Obsidian Interface is organized.
Folders/Search:
This is where I keep all relevant folders. I usually use the MOC note to navigate, but sometimes I use the search button to find a note.
Tags:
I use nested tags and look into each one to find specific notes to link.
cMenu:
Easy-to-use menu plugin cMenu (https://github.com/chetachiezikeuzor/cMenu-Plugin)
Global Graph:
The global graph shows all your notes (linked and unlinked). Linked notes will appear closer together. Zoom in to read each note's title. It's a bit overwhelming at first, but as your library grows, you get used to the positions and start thinking of new connections between notes.
Local Graph:
Your current note will be shown in relation to other linked notes in your library. When needed, you can quickly jump to another link and back to the current note.
Links:
Finally, an outline panel and the plugin Obsidian Power Search (https://github.com/aviral-batra/obsidian-power-search) allow me to search my vault by highlighting text.
Start using the tool and worry about panel positioning later. I encourage you to find the best use-case for your library.
Plugins
An additional benefit of using Obsidian is the large plugin library. I use several (Calendar, Citations, Dataview, Templater, Admonition):
Obsidian Calendar Plugin: https://github.com/liamcain
It organizes your notes on a calendar. This is ideal for meeting notes or keeping a journal.
Calendar addon from hans/obsidian-citation-plugin
Obsidian Citation Plugin: https://github.com/hans/
Allows you to cite papers from a.bib file. You can also customize your notes (eg. Title, Authors, Abstract etc..)
Plugin citation from hans/obsidian-citation-plugin
Obsidian Dataview: https://github.com/blacksmithgu/
A powerful plugin that allows you to query your library as a database and generate content automatically. See the MOC section for an example.
Allows you to create notes with specific templates like dates, tags, and headings.
Templater. Obsidian Admonition: https://github.com/valentine195/obsidian-admonition
Blocks allow you to organize your notes.
Plugin warning. Obsidian Admonition (valentine195)
There are many more, but this list should get you started.
3. Workflows: Cool stuff
Here are a few of my workflows for using obsidian for scientific research. This is a list of resources I've found useful for my use-cases. I'll outline and describe them briefly so you can skim them quickly.
3.1 Using Templates to Structure Notes
3.2 Free Note Syncing (Laptop, Phone, Tablet)
3.3 Zotero/Mendeley/JabRef -> Obsidian — Managing Reading Lists
3.4 Projects and Lab Books
3.5 Private Encrypted Diary
3.1 Using Templates to Structure Notes
Plugins: Templater and Dataview (optional).
To take effective notes, you must first make adding new notes as easy as possible. Templates can save you time and give your notes a consistent structure. As an example:
An example of a note using a template.
### [[YOUR MOC]]
# Note Title of your note
**Tags**::
**Links**::
The top line links to your knowledge base's Map of Content (MOC) (see previous sections). After the title, I add tags (and a link between the note and the tag) and links to related notes.
To quickly identify all notes that need to be expanded, I add the tag “#todo”. In the “TODO:” section, I list the tasks within the note.
The rest are notes on the topic.
Templater can help you create these templates. For new books, I use the following template:
### [[Books MOC]]
# Title
**Author**::
**Date::
**Tags::
**Links::
A book template example.
Using a simple query, I can hook Dataview to it.
dataview
table author as Author, date as “Date Finished”, tags as “Tags”, grade as “Grade”
from “4. Books”
SORT grade DESCENDING
using Dataview to query templates.
3.2 Free Note Syncing (Laptop, Phone, Tablet)
No plugins used.
One of my favorite features of Obsidian is the library's self-contained and portable format. Your folder contains everything (plugins included).
Ordinary folders and documents are available as well. There is also a “.obsidian” folder. This contains all your plugins and settings, so you can use it on other devices.
So you can use Google Drive, iCloud, or Dropbox for free as long as you sync your folder (note: your folder should be in your Cloud Folder).
For my iOS and macOS work, I prefer iCloud. You can also use the paid service Obsidian Sync.
3.3 Obsidian — Managing Reading Lists and Notes in Zotero/Mendeley/JabRef
Plugins: Quotes (required).
3.3 Zotero/Mendeley/JabRef -> Obsidian — Taking Notes and Managing Reading Lists of Scientific Papers
My preferred reference manager is Zotero, but this workflow should work with any reference manager that produces a .bib file. This file is exported to my cloud folder so I can access it from any platform.
My Zotero library is tagged as follows:
My reference manager's tags
For readings, I usually search for the tags “!!!” and “To-Read” and select a paper. Annotate the paper next (either on PDF using GoodNotes or on physical paper).
Then I make a paper page using a template in the Citations plugin settings:
An example of my citations template.
Create a new note, open the command list with CMD/CTRL + P, and find the Citations “Insert literature note content in the current pane” to see this lovely view.
Citation generated by the article https://doi.org/10.1101/2022.01.24.22269144
You can then convert your notes to digital. I found that transcribing helped me retain information better.
3.4 Projects and Lab Books
Plugins: Tweaker (required).
PhD students offering advice on thesis writing are common (read as regret). I started asking them what they would have done differently or earlier.
“Deep stuff Leo,” one person said. So my main issue is basic organization, losing track of my tasks and the reasons for them.
As a result, I'd go on other experiments that didn't make sense, and have to reverse engineer my logic for thesis writing. - PhD student now wise Postdoc
Time management requires planning. Keeping track of multiple projects and lab books is difficult during a PhD. How I deal with it:
- One folder for all my projects
- One file for each project
I use a template to create each project
### [[Projects MOC]]
# <% tp.file.title %>
**Tags**::
**Links**::
**URL**::
**Project Description**::## Notes:
### <% tp.file.last_modified_date(“dddd Do MMMM YYYY”) %>
#### Done:
#### TODO:
#### Notes
You can insert a template into a new note with CMD + P and looking for the Templater option.
I then keep adding new days with another template:
### <% tp.file.last_modified_date("dddd Do MMMM YYYY") %>
#### Done:
#### TODO:
#### Notes:
This way you can keep adding days to your project and update with reasonings and things you still have to do and have done. An example below:
Example of project note with timestamped notes.
3.5 Private Encrypted Diary
This is one of my favorite Obsidian uses.
Mini Diary's interface has long frustrated me. After the author archived the project, I looked for a replacement. I had two demands:
- It had to be private, and nobody had to be able to read the entries.
- Cloud syncing was required for editing on multiple devices.
Then I learned about encrypting the Obsidian folder. Then decrypt and open the folder with Obsidian. Sync the folder as usual.
Use CryptoMator (https://cryptomator.org/). Create an encrypted folder in Cryptomator for your Obsidian vault, set a password, and let it do the rest.
If you need a step-by-step video guide, here it is:
Conclusion
So, I hope this was helpful!
In the first section of the article, we discussed notes and note-taking techniques. We discussed when to use tags and links over folders and when to break up larger notes.
Then we learned about Obsidian, its interface, and some useful plugins like Citations for citing papers and Templater for creating note templates.
Finally, we discussed workflows and how to use Zotero to take notes from scientific papers, as well as managing Lab Books and Private Encrypted Diaries.
Thanks for reading and commenting :)
Read original post here

Todd Lewandowski
3 years ago
DWTS: How to Organize Your To-Do List Quickly
Don't overcomplicate to-do lists. DWTS (Done, Waiting, Top 3, Soon) organizes your to-dos.

How Are You Going to Manage Everything?
Modern America is busy. Work involves meetings. Anytime, Slack communications arrive. Many software solutions offer a @-mention notification capability. Emails.
Work obligations continue. At home, there are friends, family, bills, chores, and fun things.
How are you going to keep track of it all? Enter the todo list. It’s been around forever. It’s likely to stay forever in some way, shape, or form.
Everybody has their own system. You probably modified something from middle school. Post-its? Maybe it’s an app? Maybe both, another system, or none.
I suggest a format that has worked for me in 15 years of professional and personal life.
Try it out and see if it works for you. If not, no worries. You do you! Hopefully though you can learn a thing or two, and I from you too.
It is merely a Google Doc, yes.
It's a giant list. One task per line. Indent subtasks on a new line. Add or move new tasks as needed.
I recommend using Google Docs. It's easy to use and flexible for structuring.
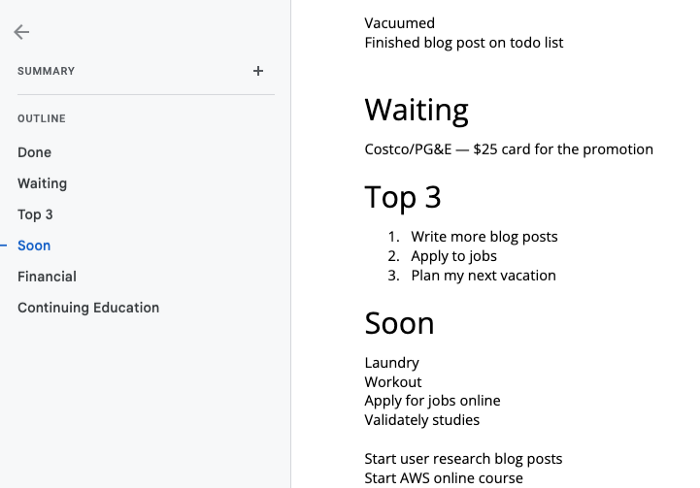
Prioritizing these tasks is key. I organize them using DWTS (Done, Waiting, Top 3, Soon). Chronologically is good because it implicitly provides both a priority (high, medium, low) and an ETA (now, soon, later).
Yes, I recognize the similarities to DWTS (Dancing With The Stars) TV Show. Although I'm not a fan, it's entertaining. The acronym is easy to remember and adds fun to something dull.

What each section contains
Done
All tasks' endpoint. Finish here. Don't worry about it again.
Waiting
You're blocked and can't continue. Blocked tasks usually need someone. Write Person Task so you know who's waiting.
Blocking tasks shouldn't last long. After a while, remind them kindly. If people don't help you out of kindness, they will if you're persistent.
Top 3
Mental focus areas. These can be short- to mid-term goals or recent accomplishments. 2 to 5 is a good number to stay focused.
Top 3 reminds us to prioritize. If they don't fit your Top 3 goals, delay them.
Every 1:1 at work is a project update. Another chance to list your top 3. You should know your Top 3 well and be able to discuss them confidently.
Soon
Here's your short-term to-do list. Rank them from highest to lowest.
I usually subdivide it with empty lines. First is what I have to do today, then week, then month. Subsections can be arranged however you like.
Inventories by Concept
Tasks that aren’t in your short or medium future go into the backlog.
Eventually you’ll complete these tasks, assign them to someone else, or mark them as “wont’ do” (like done but in another sense).
Backlog tasks don't need to be organized chronologically because their timing and priority may change. Theme-organize them. When planning/strategic, you can choose themes to focus on, so future top 3 topics.
More Tips on Todos
Decide Upon a Morning Goal
Morning routines are universal. Coffee and Wordle. My to-do list is next. Two things:
As needed, update the to-do list: based on the events of yesterday and any fresh priorities.
Pick a few jobs to complete today: Pick a few goals that you know you can complete today. Push the remainder below and move them to the top of the Soon section. I typically select a few tasks I am confident I can complete along with one stretch task that might extend into tomorrow.
Finally. By setting and achieving small goals every day, you feel accomplished and make steady progress on medium and long-term goals.
Tech companies call this a daily standup. Everyone shares what they did yesterday, what they're doing today, and any blockers. The name comes from a tradition of holding meetings while standing up to keep them short. Even though it's virtual, everyone still wants a quick meeting.
Your team may or may not need daily standups. Make a daily review a habit with your coffee.
Review Backwards & Forwards on a regular basis
While you're updating your to-do list daily, take time to review it.
Review your Done list. Remember things you're proud of and things that could have gone better. Your Done list can be long. Archive it so your main to-do list isn't overwhelming.
Future-gaze. What you considered important may no longer be. Reorder tasks. Backlog grooming is a workplace term.
Backwards-and-forwards reviews aren't required often. Every 3-6 months is fine. They help you see the forest as often as the trees.
Final Remarks
Keep your list simple. Done, Waiting, Top 3, Soon. These are the necessary sections. If you like, add more subsections; otherwise, keep it simple.
I recommend a morning review. By having clear goals and an action-oriented attitude, you'll be successful.

Simon Egersand
3 years ago
Working from home for more than two years has taught me a lot.
Since the pandemic, I've worked from home. It’s been +2 years (wow, time flies!) now, and during this time I’ve learned a lot. My 4 remote work lessons.
I work in a remote distributed team. This team setting shaped my experience and teachings.
Isolation ("I miss my coworkers")
The most obvious point. I miss going out with my coworkers for coffee, weekend chats, or just company while I work. I miss being able to go to someone's desk and ask for help. On a remote world, I must organize a meeting, share my screen, and avoid talking over each other in Zoom - sigh!
Social interaction is more vital for my health than I believed.
Online socializing stinks
My company used to come together every Friday to play Exploding Kittens, have food and beer, and bond over non-work things.
Different today. Every Friday afternoon is for fun, but it's not the same. People with screen weariness miss meetings, which makes sense. Sometimes you're too busy on Slack to enjoy yourself.
We laugh in meetings, but it's not the same as face-to-face.
Digital social activities can't replace real-world ones
Improved Work-Life Balance, if You Let It
At the outset of the pandemic, I recognized I needed to take better care of myself to survive. After not leaving my apartment for a few days and feeling miserable, I decided to walk before work every day. This turned into a passion for exercise, and today I run or go to the gym before work. I use my commute time for healthful activities.
Working from home makes it easier to keep working after hours. I sometimes forget the time and find myself writing coding at dinnertime. I said, "One more test." This is a disadvantage, therefore I keep my office schedule.
Spend your commute time properly and keep to your office schedule.
Remote Pair Programming Is Hard
As a software developer, I regularly write code. My team sometimes uses pair programming to write code collaboratively. One person writes code while another watches, comments, and asks questions. I won't list them all here.
Internet pairing is difficult. My team struggles with this. Even with Tuple, it's challenging. I lose attention when I get a notification or check my computer.
I miss a pen and paper to rapidly sketch down my thoughts for a colleague or a whiteboard for spirited talks with others. Best answers are found through experience.
Real-life pair programming beats the best remote pair programming tools.
Lessons Learned
Here are 4 lessons I've learned working remotely for 2 years.
-
Socializing is more vital to my health than I anticipated.
-
Digital social activities can't replace in-person ones.
-
Spend your commute time properly and keep your office schedule.
-
Real-life pair programming beats the best remote tools.
Conclusion
Our era is fascinating. Remote labor has existed for years, but software companies have just recently had to adapt. Companies who don't offer remote work will lose talent, in my opinion.
We're still figuring out the finest software development approaches, programming language features, and communication methods since the 1960s. I can't wait to see what advancements assist us go into remote work.
I'll certainly work remotely in the next years, so I'm interested to see what I've learnt from this post then.
This post is a summary of this one.
You might also like

Jim Clyde Monge
3 years ago
Can You Sell Images Created by AI?

Some AI-generated artworks sell for enormous sums of money.
But can you sell AI-Generated Artwork?
Simple answer: yes.
However, not all AI services enable allow usage and redistribution of images.
Let's check some of my favorite AI text-to-image generators:
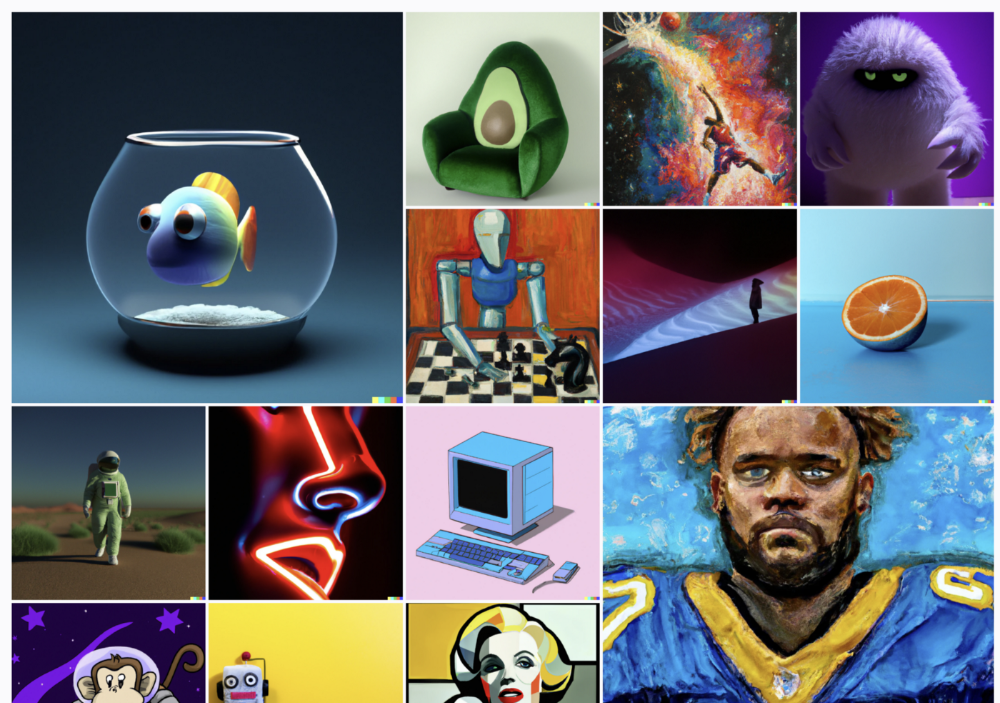
Dall-E2 by OpenAI
The AI art generator Dall-E2 is powerful. Since it’s still in beta, you can join the waitlist here.
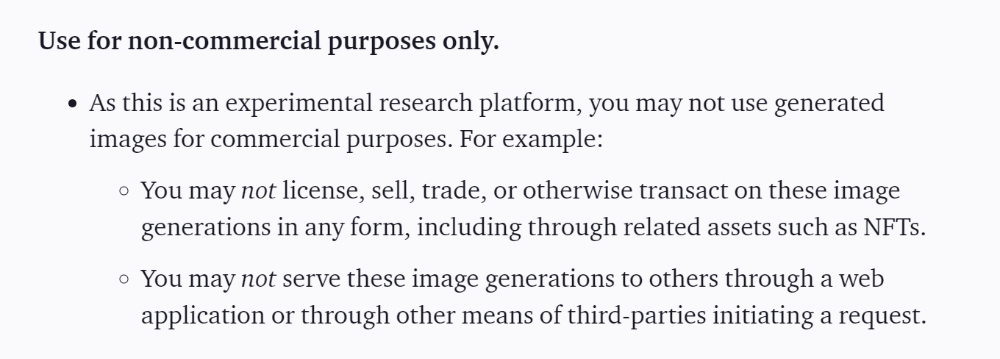
OpenAI DOES NOT allow the use and redistribution of any image for commercial purposes.
Here's the policy as of April 6, 2022.
Here are some images from Dall-E2’s webpage to show its art quality.
Several Reddit users reported receiving pricing surveys from OpenAI.
This suggests the company may bring out a subscription-based tier and a commercial license to sell images soon.
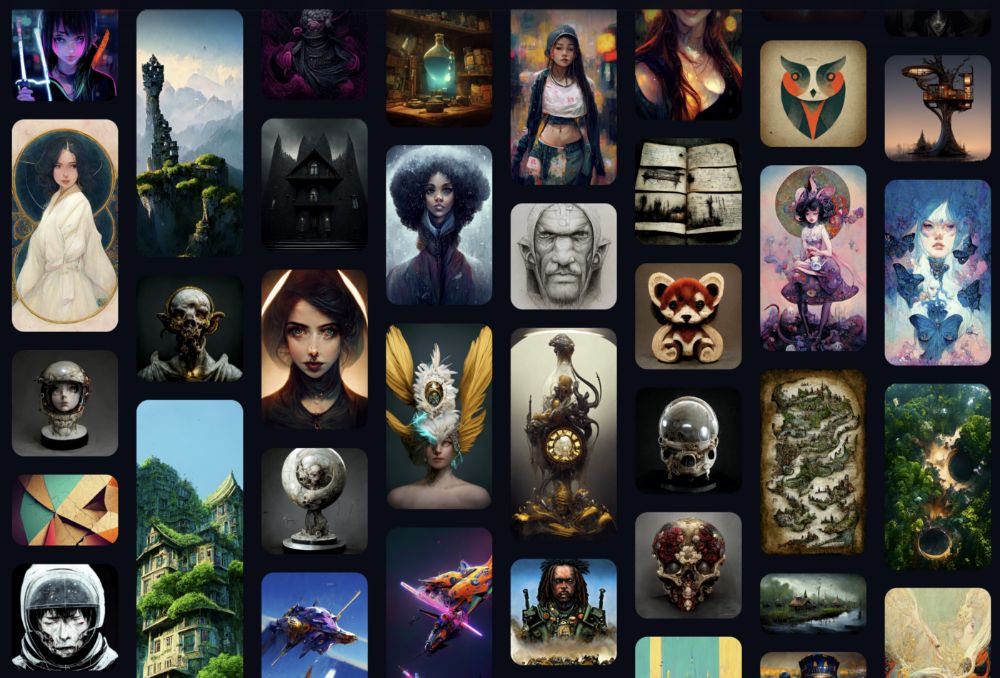
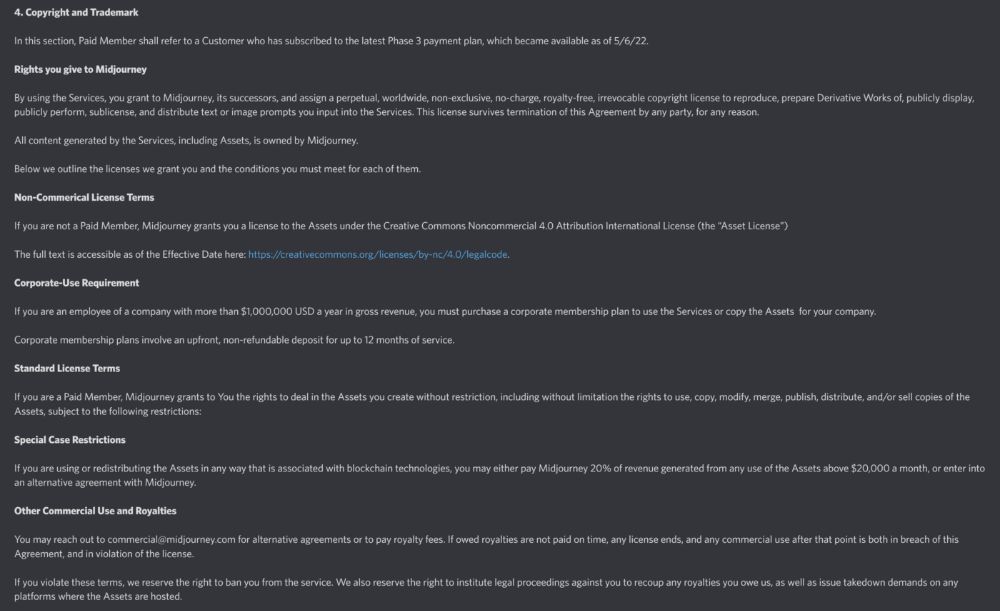
MidJourney
I like Midjourney's art generator. It makes great AI images. Here are some samples:
Standard Licenses are available for $10 per month.
Standard License allows you to use, copy, modify, merge, publish, distribute, and/or sell copies of the images, except for blockchain technologies.
If you utilize or distribute the Assets using blockchain technology, you must pay MidJourney 20% of revenue above $20,000 a month or engage in an alternative agreement.
Here's their copyright and trademark page.
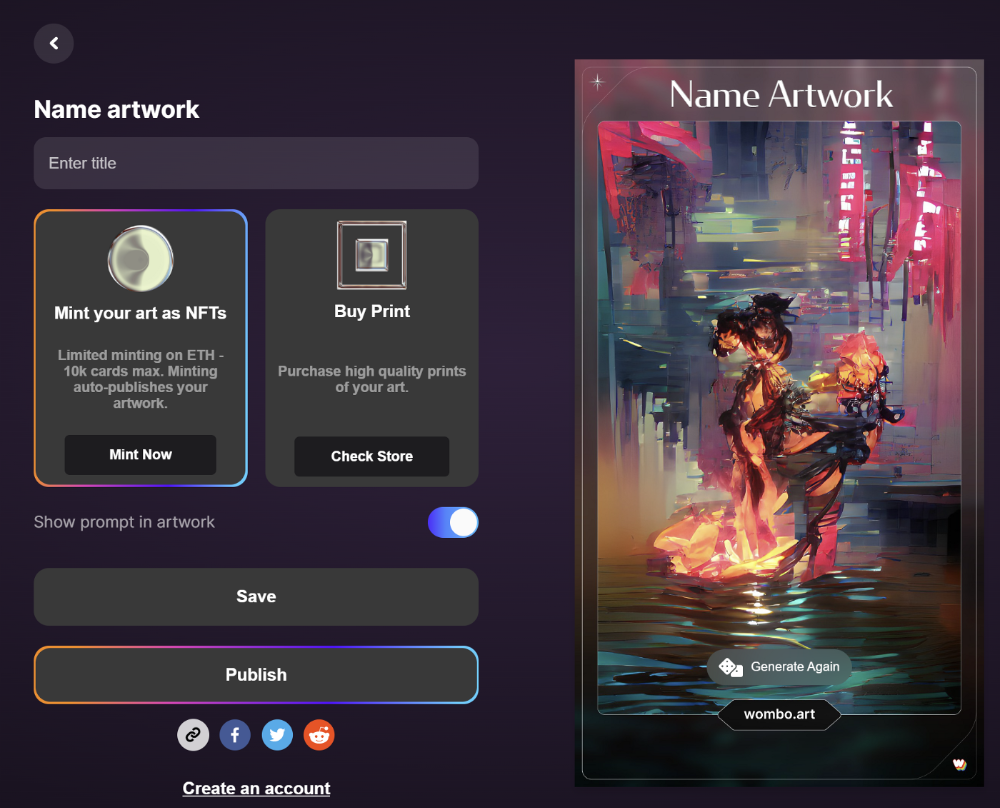
Dream by Wombo
Dream is one of the first public AI art generators.
This AI program is free, easy to use, and Wombo gives a royalty-free license to copy or share artworks.
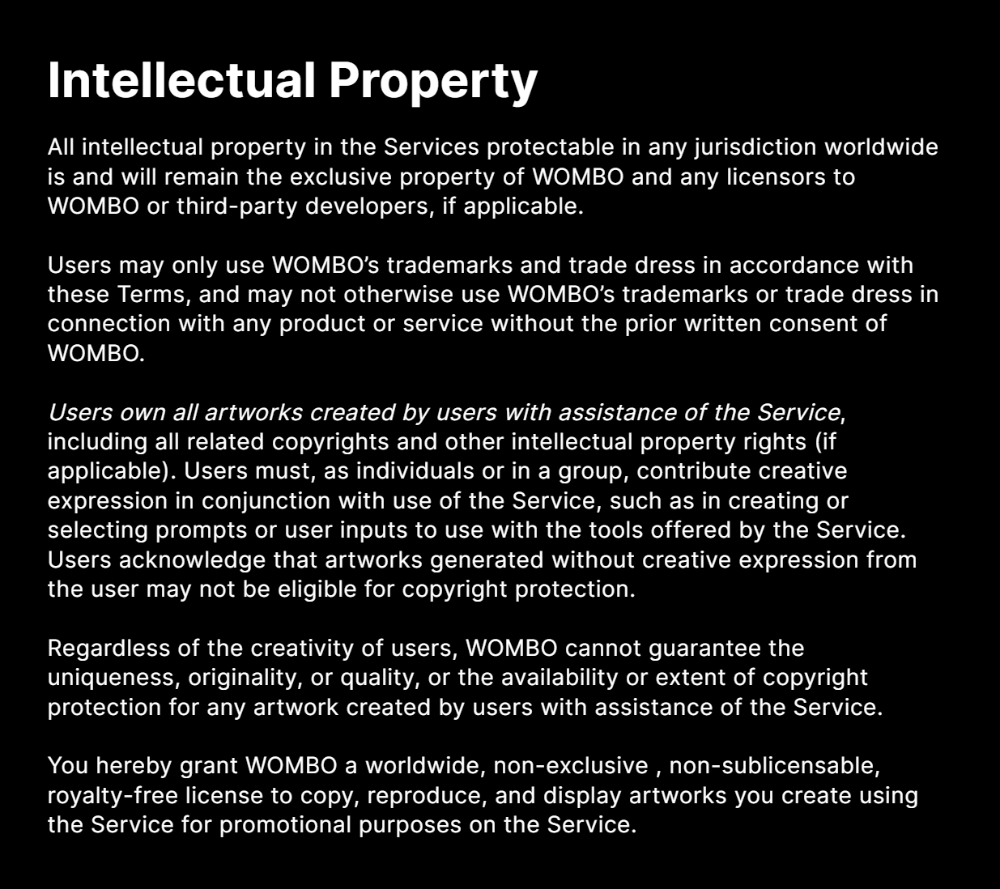
Users own all artworks generated by the tool. Including all related copyrights or intellectual property rights.
Here’s Wombos' intellectual property policy.
Final Reflections
AI is creating a new sort of art that's selling well. It’s becoming popular and valued, despite some skepticism.
Now that you know MidJourney and Wombo let you sell AI-generated art, you need to locate buyers. There are several ways to achieve this, but that’s for another story.

KonstantinDr
3 years ago
Early Adopters And the Fifth Reason WHY
Product management wizardry.

Early adopters buy a product even if it hasn't hit the market or has flaws.
Who are the early adopters?
Early adopters try a new technology or product first. Early adopters are interested in trying or buying new technologies and products before others. They're risk-tolerant and can provide initial cash flow and product reviews. They help a company's new product or technology gain social proof.
Early adopters are most common in the technology industry, but they're in every industry. They don't follow the crowd. They seek innovation and report product flaws before mass production. If the product works well, the first users become loyal customers, and colleagues value their opinion.
What to do with early adopters?
They can be used to collect feedback and initial product promotion, first sales, and product value validation.
How to find early followers?
Start with your immediate environment and target audience. Communicate with them to see if they're interested in your value proposition.
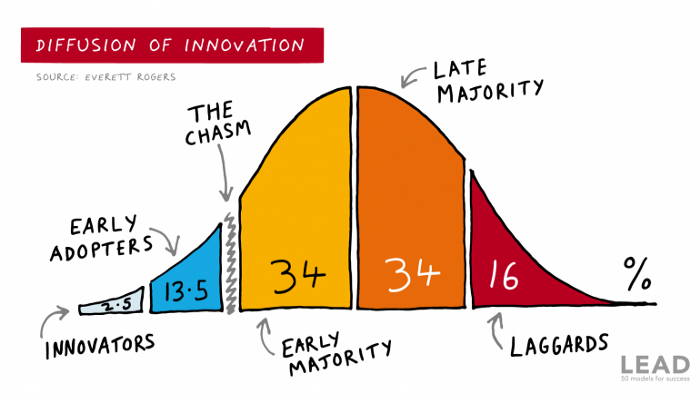
1) Innovators (2.5% of the population) are risk-takers seeking novelty. These people are the first to buy new and trendy items and drive social innovation. However, these people are usually elite;
Early adopters (13.5%) are inclined to accept innovations but are more cautious than innovators; they start using novelties when innovators or famous people do;
3) The early majority (34%) is conservative; they start using new products when many people have mastered them. When the early majority accepted the innovation, it became ingrained in people's minds.
4) Attracting 34% of the population later means the novelty has become a mass-market product. Innovators are using newer products;
5) Laggards (16%) are the most conservative, usually elderly people who use the same products.

Stages of new information acceptance
1. The information is strange and rejected by most. Accepted only by innovators;
2. When early adopters join, more people believe it's not so bad; when a critical mass is reached, the novelty becomes fashionable and most people use it.
3. Fascination with a novelty peaks, then declines; the majority and laggards start using it later; novelty becomes obsolete; innovators master something new.
Problems with early implementation
Early adopter sales have disadvantages.
Higher risk of defects
Selling to first-time users increases the risk of defects. Early adopters are often influential, so this can affect the brand's and its products' long-term perception.
Not what was expected
First-time buyers may be disappointed by the product. Marketing messages can mislead consumers, and if the first users believe the company misrepresented the product, this will affect future sales.
Compatibility issues
Some technological advances cause compatibility issues. Consumers may be disappointed if new technology is incompatible with their electronics.
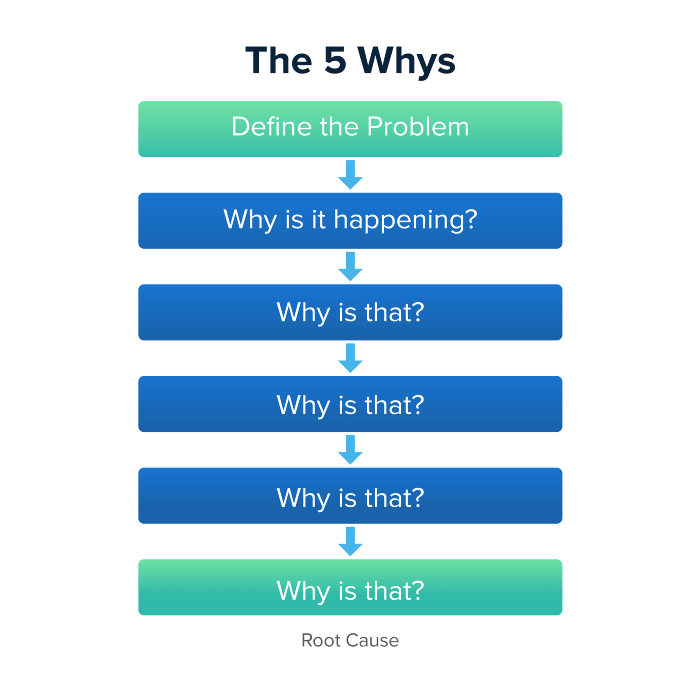
Method 5 WHY
Let's talk about 5 why, a good tool for finding project problems' root causes. This method is also known as the five why rule, method, or questions.
The 5 why technique came from Toyota's lean manufacturing and helps quickly determine a problem's root cause.
On one, two, and three, you simply do this:
We identify and frame the issue for which a solution is sought.
We frequently ponder this question. The first 2-3 responses are frequently very dull, making you want to give up on this pointless exercise. However, after that, things get interesting. And occasionally it's so fascinating that you question whether you really needed to know.
We consider the final response, ponder it, and choose a course of action.
Always do the 5 whys with the customer or team to have a reasonable discussion and better understand what's happening.
And the “five whys” is a wonderful and simplest tool for introspection. With the accumulated practice, it is used almost automatically in any situation like “I can’t force myself to work, the mood is bad in the morning” or “why did I decide that I have no life without this food processor for 20,000 rubles, which will take half of my rather big kitchen.”
An illustration of the five whys
A simple, but real example from my work practice that I think is very indicative, given the participants' low IT skills. Anonymized, of course.
Users spend too long looking for tender documents.
Why? Because they must search through many company tender documents.
Why? Because the system can't filter department-specific bids.
Why? Because our contract management system requirements didn't include a department-tender link. That's it, right? We'll add a filter and be happy. but still…
why? Because we based the system's requirements on regulations for working with paper tender documents (when they still had envelopes and autopsies), not electronic ones, and there was no search mechanism.
Why? We didn't consider how our work would change when switching from paper to electronic tenders when drafting the requirements.
Now I know what to do in the future. We add a filter, enter department data, and teach users to use it. This is tactical, but strategically we review the same forgotten requirements to make all the necessary changes in a package, plus we include it in the checklist for the acceptance of final requirements for the future.
Errors when using 5 why
Five whys seems simple, but it can be misused.
Popular ones:
The accusation of everyone and everything is then introduced. After all, the 5 why method focuses on identifying the underlying causes rather than criticizing others. As a result, at the third step, it is not a good idea to conclude that the system is ineffective because users are stupid and that we can therefore do nothing about it.
to fight with all my might so that the outcome would be exactly 5 reasons, neither more nor less. 5 questions is a typical number (it sounds nice, yes), but there could be 3 or 7 in actuality.
Do not capture in-between responses. It is difficult to overestimate the power of the written or printed word, so the result is so-so when the focus is lost. That's it, I suppose. Simple, quick, and brilliant, like other project management tools.
Conclusion
Today we analyzed important study elements:
Early adopters and 5 WHY We've analyzed cases and live examples of how these methods help with product research and growth point identification. Next, consider the HADI cycle.


Crypto Zen Monk
2 years ago
How to DYOR in the world of cryptocurrency
RESEARCH
We must create separate ideas and handle our own risks to be better investors. DYOR is crucial.
The only thing unsustainable is your cluelessness.
DYOR: Why
On social media, there is a lot of false information and divergent viewpoints. All of these facts might be accurate, but they might not be appropriate for your portfolio and investment preferences.
You become a more knowledgeable investor thanks to DYOR.
DYOR improves your portfolio's risk management.
My DYOR resources are below.
Messari: Major Blockchains' Activities
New York-based Messari provides cryptocurrency open data libraries.
Major blockchains offer 24-hour on-chain volume. https://messari.io/screener/most-active-chains-DB01F96B
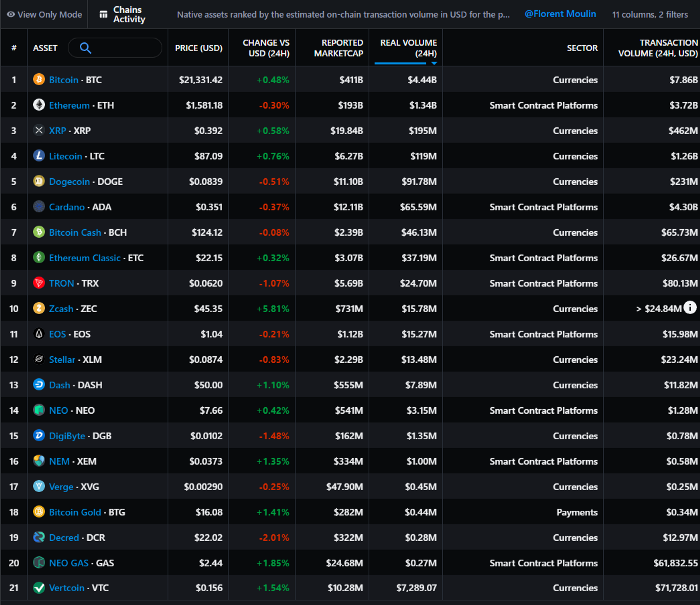
What to do
Invest in stable cryptocurrencies. Sort Messari by Real Volume (24H) or Reported Market Cap.
Coingecko: Research on Ecosystems
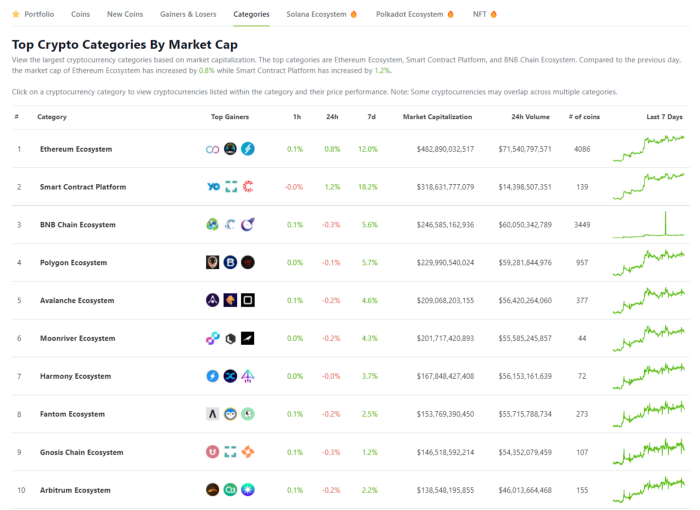
Top 10 Ecosystems by Coingecko are good.
What to do
Invest in quality.
Leading ten Ecosystems by Market Cap
There are a lot of coins in the ecosystem (second last column of above chart)
CoinGecko's Market Cap Crypto Categories Market capitalization-based cryptocurrency categories. Ethereum Ecosystem www.coingecko.com
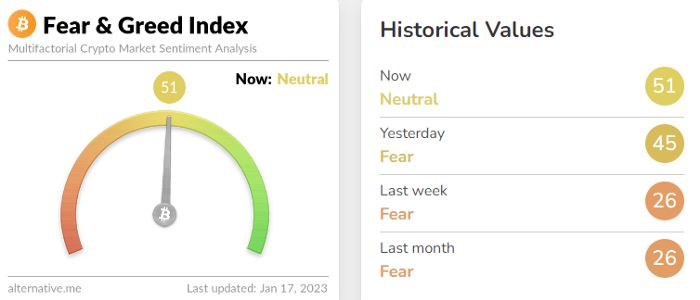
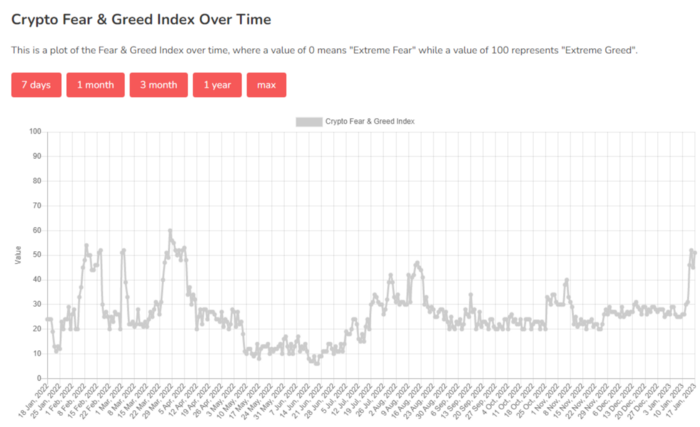
Fear & Greed Index for Bitcoin (FGI)
The Bitcoin market sentiment index ranges from 0 (extreme dread) to 100. (extreme greed).
How to Apply
See market sentiment:
Extreme fright = opportunity to buy
Extreme greed creates sales opportunity (market due for correction).
Glassnode
Glassnode gives facts, information, and confidence to make better Bitcoin, Ethereum, and cryptocurrency investments and trades.
Explore free and paid metrics.
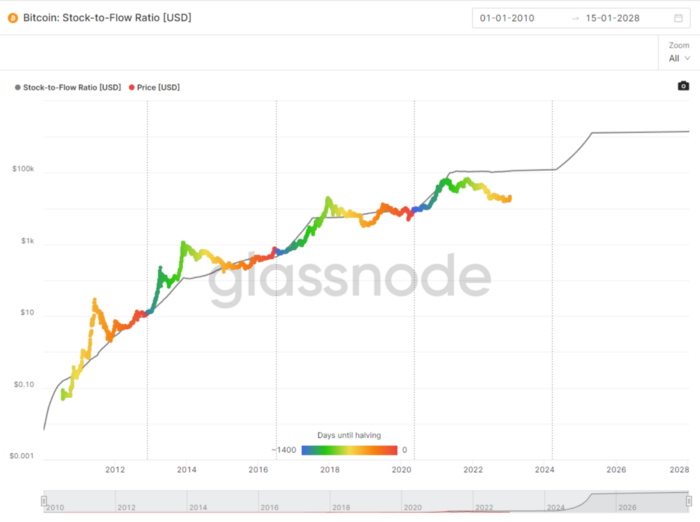
Stock to Flow Ratio: Application
The popular Stock to Flow Ratio concept believes scarcity drives value. Stock to flow is the ratio of circulating Bitcoin supply to fresh production (i.e. newly mined bitcoins). The S/F Ratio has historically predicted Bitcoin prices. PlanB invented this metric.
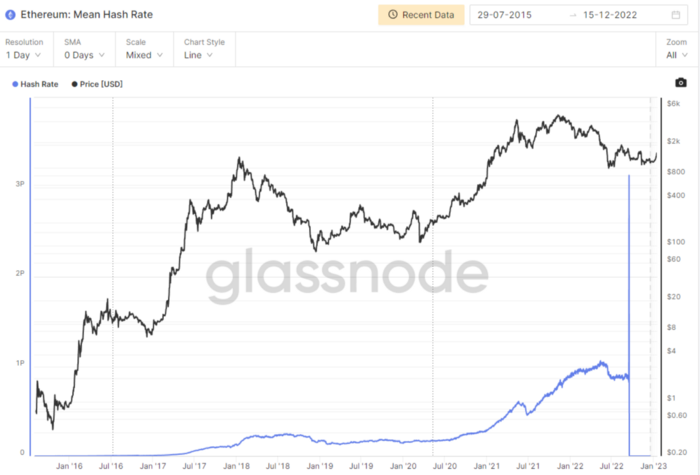
Utilization: Ethereum Hash Rate
Ethereum miners produce an estimated number of hashes per second.
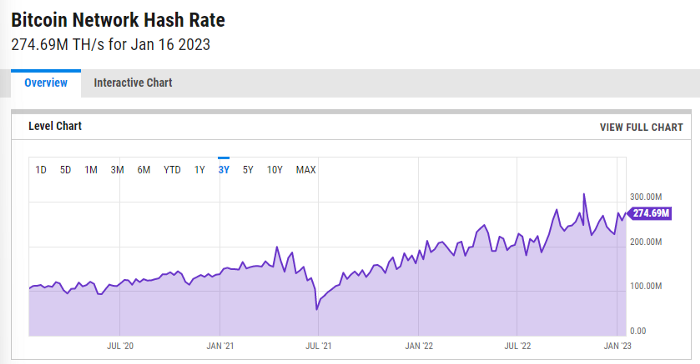
ycharts: Hash rate of the Bitcoin network
TradingView
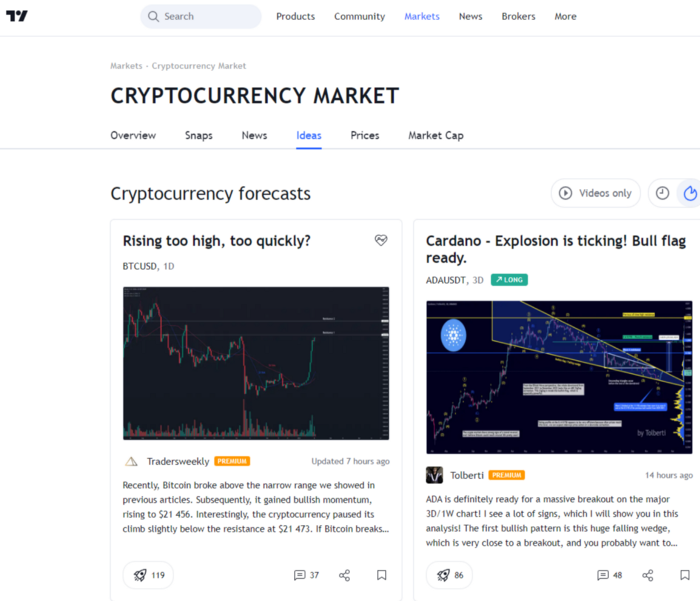
TradingView is your go-to tool for investment analysis, watch lists, technical analysis, and recommendations from other traders/investors.
Research for a cryptocurrency project
Two key questions every successful project must ask: Q1: What is this project trying to solve? Is it a big problem or minor? Q2: How does this project make money?
Each cryptocurrency:
Check out the white paper.
check out the project's internet presence on github, twitter, and medium.
the transparency of it
Verify the team structure and founders. Verify their LinkedIn profile, academic history, and other qualifications. Search for their names with scam.
Where to purchase and use cryptocurrencies Is it traded on trustworthy exchanges?
From CoinGecko and CoinMarketCap, we may learn about market cap, circulations, and other important data.
The project must solve a problem. Solving a problem is the goal of the founders.
Avoid projects that resemble multi-level marketing or ponzi schemes.
Your use of social media
Use social media carefully or ignore it: Twitter, TradingView, and YouTube
Someone said this before and there are some truth to it. Social media bullish => short.
Your Behavior
Investigate. Spend time. You decide. Worth it!
Only you have the best interest in your financial future.